Spiders Are Part of the Natural World

And THIS very interesting critter has been living on the outside screen of my back porch for the past three to four days. Her/his legs make this spider about 2 inches big.

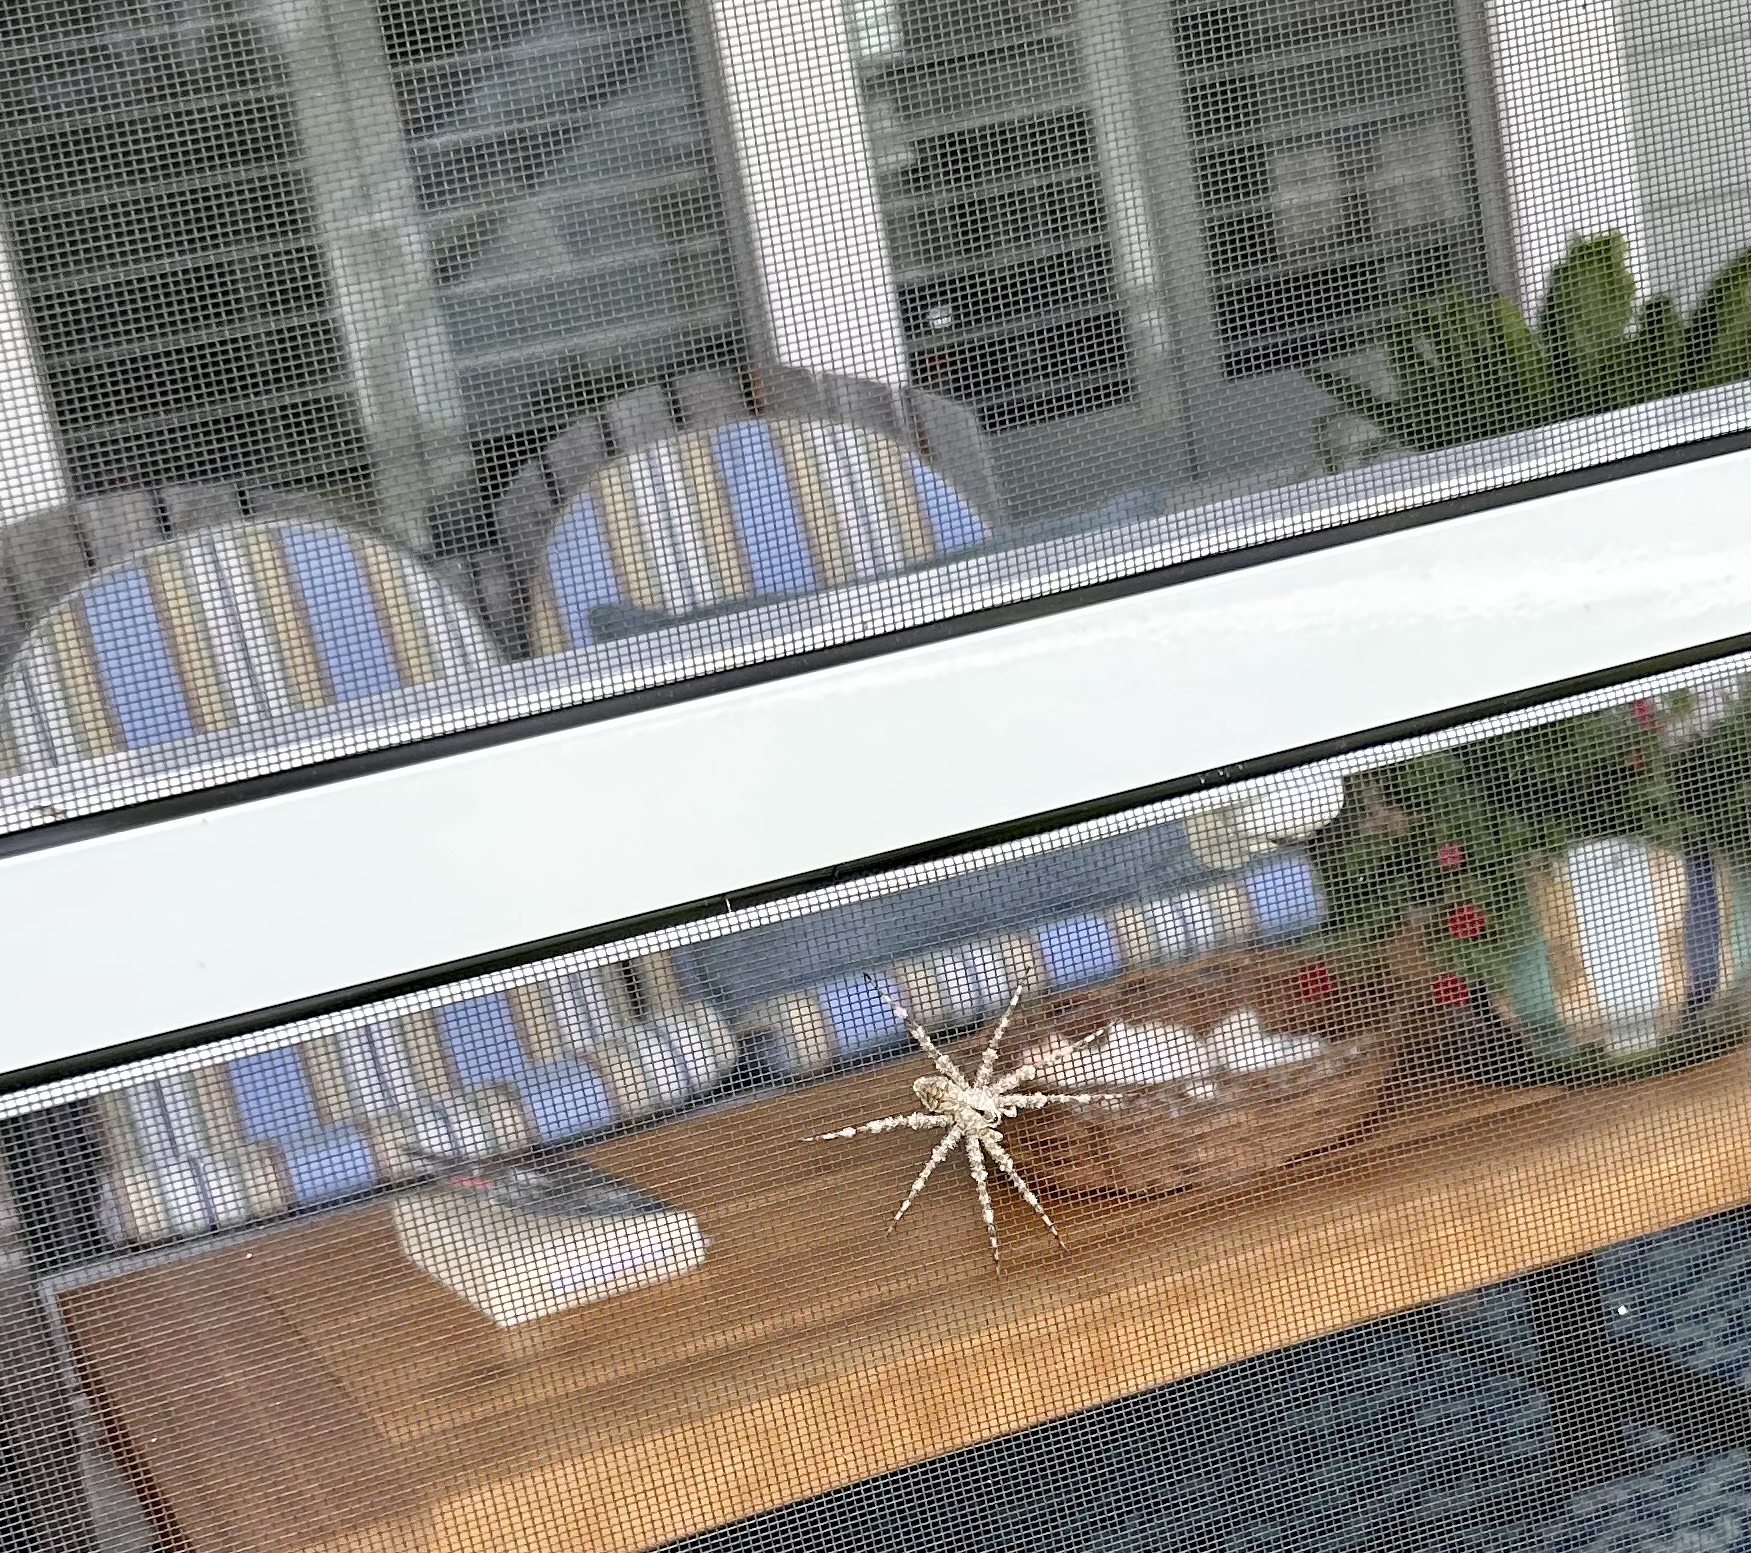
I posted this picture to our local neighborhood Facebook group, asking if anyone could identify what kind of spider this one is. I thought maybe a Wolf spider as it is one of four big spiders in South Carolina. But the coloring was…wrong.

In due time, a neighbor identified this spider, and it is NOT a Wolf spider. S/he is a White-Banded fishing spider (Dolomites albineus). Measurements for spiders are kind of confusing–in that some seem to use just the body length, while others use the whole length, including the legs. The inclusion of the legs can make a bigger profile, of course.

By this morning, another neighbor said she has had two around her house as well.

We have a lot of cache water basins here (low-country drainage methods)–and some have sprinkler/fountains in the middle (beauty, yes, but also mosquito control). But there is standing water in drainage ditches, too, and water plants grow there. Likely this area is a good habitat for this spider.

This spider literally can “walk on water” to hunt prey. They have hairs that can repel water, and they can capture an air bubble on their abdomen that allows them to swim and dive (Wikipedia).

This spider can build webs, but the webs are not used for catching prey since they hunt their prey. The webs are used by the female as a sac to protect her eggs, which she carries nestled beneath her head, held secure in her fangs. Thus, if female, she is part of the “nursery egg” grouping of spiders.

But, why is this critter NOT in or near the water right now? Is s/he a she, and is she working currently on laying eggs? In a typical year, this spider can create and carry multiple egg sacs in warm weather. She can and will try to eat her mate. Freezing temperatures kill them, but the eggs can overwinter and hatch in the spring.

Ah, these spiders can and do venture far from water. They can and do capture and eat other insects, including “flies, moths, beetles, mayflies, and other insects.” Thus, s/he is using my porch screen as a perch from which she can strike. And she is a help for control of insects in my garden, as she is when she kills insects on a tree that are harming it.

Here is a nice site that contains much more information about this spider.

https://mdc.mo.gov/discover-nature/field-guide/whitebanded-fishing-spider

By the way, the Wolf spider is the South Carolina state spider. Who knew? The Wolf spider is also a predator who does not rely on a web to capture its prey. And if carries a web sac on its back. Local information on the Wolf spider:

https://www.islandpacket.com/news/state/south-carolina/article265506996.html

Webbing A Block

Bonnie Hunter pioneered the “webbing” method for sewing units into a block.

Go Bonnie! I LOVE this method.

It took me a bit of time to understand this method because I was making it harder than it needed to be. It is pretty simple when you understand the concept, and it makes keeping units in a block in the right order and orientation so much simpler. I

am using Bonnie’s webbing method to make the blocks for the current half-square triangle quilt now on the design wall. OK, it has taken over the design wall and pushed aside the red quilt blocks–though I made a bunch of those yesterday. But, it would be SO EASY to get these individual units going in the wrong direction, which means unsewing activity. So I am grateful for Bonnie’s method.

First, lay out your units in the correct order. Then sew the top 2 units on the top row together, left to right of course, leaving aside for the moment the third unit. Chain down and sew the next two blocks (the second row) WITHOUT cutting the thread to the first row. Then do the next two blocs (the third row down). NOW you can cut the thread or chain piece something else so you can cut off your string of blocks that are “webbed” together.

Now, sew the third row down–the blocks that are waiting to be joined–BUT DON’T CUT the threads between the rows. See how the last block is just layed across it’s mate–which is just how you would sew it webbed or not.

Now you have your block all webbed together and ready to be sewn together.

Now I press the rows so the seams will but up nicely before I join the two rows. I am pressing the two outer rows one way and the inner row the other way.

Here’s a finished block, now sewn into its place in the quilt. It’s perfect, as you can see, after each unit was trimmed with the Bloc-Loc ruler.

Bonnie’s tutorial is for a 16-patch block. Do take a look as the 16-patch is just as easy as this 9-patch above is. And, it’s a fast method.

https://quiltville.blogspot.com/2022/12/two-over-one-is-how-its-done-block.html

The Bloc-Loc Rulers for Half-Square Triangles

Online friend Wendy Currie (Wendysquilting) blogged about the Bloc-Loc rulers some time ago–before I moved to South Carolina. These come in different sizes and I bought a 3-size package–so I have a range of choices of which size to use. Wendy, by the way, is an outstanding longarm quilter who lives in Thunder Bay, Canada.

I LOVE these rulers! For this project, I’m using the middle-sized ruler. My resulting blocks are so perfect I don’t really have to measure my bigger units when I sew them together.

But, first, here are the 3rd set of blocks for the Summer Camp Mystery from the Modern Quilt Studio. There will be 6 installments, and the next set comes next Friday. After the 4th set, I may pin all the blocks so far to the design wall to just…admire them? Yes, admire and pet, but also to see how my palette is working together and if I need to make any changes.

The unit for the solid scrappy quilt on the design wall–is a 3 1/2 inch half-square triangle made from TWO 4-inch light-dark squares cut from my solid scraps, layered together. Tara Faughnan uses this method. I also love Bonnie Hunter’s ruler for cutting triangles from strips of fabric layered together, but here I am cutting from scraps too small to use strips, for the most part. And I want more variety than the strip method affords, unless one uses shorter strips.

I layer the two squares and use a quarter-inch ruler strip (I love these rulers too) to mark the sewing lines on the light square. This method is more labor intensive, but also makes a clean unit that never needs resewing as the trick is in the sliver trimming with the Bloc-Loc ruler, not in the perfect sewing of two triangle units.

I put the dark fabric on the bottom and the Bloc-Loc ruler’s ridged edge fits along the seam to hold the unit perfectly in place. You want the ruler lines to be just ON THE FABRIC–not off of the fabric. Sliver trim. I trim ALL of the units I’ve sewn on the dark side first, and rotate each trimmed unit so the other side is facing up. It is satisfying to see the pile growing as I trim each unit.

Turn the pile of units so that the remaining notch is on the right, pointing up, and the light, untrimmed side is down.

The ruler now fits so the name is upside down. Remember to put the ruler’s lines ON YOUR UNIT or your unit will trim too small.

And, voila, you are DONE and have a whole pile of new units to use.

I’ve cut a TON of 4-inch squares to get color variety, so will use them up in making half-square triangle units via chain piecing. You can see I’ll need to keep cutting for the light units. If I don’t use all of these squares, I’ll save them for another project down the road. Meanwhile, my scrap pile is disappearing. And there is a long way to go on the scrap quilt, so, yes, many of these squares will get used.

I think piecing is my most favorite part of the quilting process.

Girlie car is coming home tomorrow as of right now. So I’m off to put gas in the rental, have lunch on the porch, and…SEW. There needs to be a walk in the day at some point. Maybe late afternoon, with music, when the day cools off a bit. Temps are now in the high 80s and low 90s. Summer has arrived.

Blue-Eyed Grass

I planted five little blue-eyed “grass” plants yesterday. Turns out this perennial is NOT a grass, but a form of iris.

I saw what I think is this plant in the rotary planting area of a Rifle Range road rotary near me. It’s low, and the little blue-violet blooms are so sweet. I’m pretty sure it is a variant of blue-eyed grass, but I am not dead sure. It turns out there ARE various forms of it. And if “they” are planting it in a rotary center, it’s hardy. Plus, it will spread. The “leaves” look like mondo grass–spiky and short. Turns out mondo grass is a lily relative, not a true grass either.

BUT, I couldn’t find any blue-eyed grass plants locally, so I ordered 5 little plants from Amazon to try them out–and planted them in the round curve of the bed border on the left side of the front of the house–where the bed turns to go along the long side of the house where I’ve planted so many plants now. (Those plants are blooming and filling in that bed beautifully now, and I may bore you with pics soon.)

Who knew Amazon sold plants? Son Michael says he’s been ordering plants from Amazon for some time. And I can tell you they came BEAUTIFULLY packed and were really healthy.

Here’s a description of blue-eyed “grass”–and there are pictures of this perennial at this site:

“Despite its common name, blue-eyed grass is not a grass. The genus Sisyrinchium is a large group of annuals and perennials in the iris family (Iridaceae). But many species are low growing with narrow leaves that appear grass-like and many grow in grasslands. All are native to North or South America. Most are not well known and only a few are used as ornamentals. The taxonomy of the group is quite confused, so the number of species varies from 50 to 150, depending on which classification system is used. Some species have many natural variants that were likely mis-named as species – so more research is needed to figure out the true relationships.” (From Wisconsin Horticulture web site: https://hort.extension.wisc.edu/articles/blue-eyed-grass-sisyrinchium/ )

And here are some images of various forms of this plant:

The plant I ordered is the “Lucerne” variant. The one in the rotary has flowers that are low to the ground and don’t seem to have the higher stem that Lucerne has. It is probably a variant.

Maybe someday I’ll get a better picture of the plants in the rotary–when there is no traffic.

Fat chance of that though!

It’s Chicken Salad Weather

So, yesterday I made some

And let me say, it is DELICIOUS.

I usually put a whole chicken in a big pot of water (sometimes I add the usual suspect savories if I want to save the broth). This time I couldn’t find the right size of a whole chicken–they were either too big or too small–so I used chicken parts. There was one part with the breast, but the other part was the drumstick and thigh. Basically I think chicken breasts–especially the boned and skinless versions– taste like dry paper, so I almost always lean towards the dark meats. But chicken salad needs SOME white meat, thus the use of the whole chicken when one can.

While the chicken parts were cooking, I set up the veggies: grated carrot, peeled and chopped cucumber, a bit of sweet raw onion diced, and celery diced. I had half of a yellow bell pepper, so I added it too. (Green pepper would be too strong for this salad I think.)

I was already hungry, so I set up a bed of lettuce, raddichio, and some of the roasted broccoli I made the other day on my plate. I have fallen in love with the baby red lettuce leaves in the stores now–the claim is that they have more iron than baby spinach, but that claim needs to be researched.

The chicken parts took about 30 minutes to cook, so I went outside to gather up fresh herbs for my mayo and then made it. LOOK at that beautiful color–due to beautiful egg yolks from local eggs.

Making homemade HEALTHY mayo is dead easy–and if you want to keep some for a few days, just add a bit of whey from your yogurt to preserve it. THIS mayo is super healthy, with its fresh eggs, good olive oil, the garlic, etc. Vitamin E, which makes beautiful skin abounds, and the egg yolks bring choline in to play.

Put two eggs, a tablespoon of good mustard, a tablespoon of something acid (lemon juice is lovely, but any vinegar will do too), and salt to taste into a blender. I added a garlic clove roughly chopped too. Have a bottle of a light olive oil ready to pour into the top of the bender. Turn the blender to a slow setting, start it, and start adding the olive oil in a thin stream. When the mixture has “made” and isn’t absorbing any more oil, stop. Your mayo is done.

If you want to add herbs, which I did, add them after the mayo is made and process it once more until the herbs are mixed in. I used fresh basil, thyme, a leaf or two of oregano (it is strong), and some Italian parsley with the leaves taken off the stems.

Ah, the chicken is done. After it has cooled enough to touch, take the meat off the bones and discard the bones and the skin. I use a pair of kitchen scissors to cut up the meat because that is what my Georgia grandmother taught me.

Pour the mayo over you chicken and veggies–using as much as you like. I like a lot, and the meat will absorb a lot of the mayo when the salad is stored.

Here’s my lunch. Chicken salad is super rich, so I wound up saving about a third of this salad to add to my supper portion–where I’d also have a big bowl of fresh berries (blueberries, blackberries, raspberries) drizzled with maple syrup.

The rest of my salad went into this bowl and is covered by this very nifty top. I love these tops and have written about them in an earlier post. NO PLASTIC here today.

I am only missing some of those tiny green peas I love and can buy frozen at Whole Foods. On the next trip that way, I’ll stock up with a few packages.

The Mimosas Are Blooming

I took this picture about two weeks ago–before I got distracted with having hurt Girlie car’s back hatch window. She will come home next Friday if all goes well.

Anyway, I had forgotten about Mimosa trees in the South. There was one near my Georgia grandparents’ home, and as children we climbed it often. It was a kind of fort. The fringed leaves became “grocery store” vegetables in the sandbox, where we staffed our play grocery store bins.

This tree has paler flowers–I’ve seen some here with flowers that are a much deeper pink. This tree is a pollinator’s heaven. And it is fragrant.

But, when I did a little research, I saw that this tree is terribly invasive here. Apparently it can take over a forest if left alone as it’s seeds really thrive and root easily.

Who knew?

Meanwhile, I am happily making half-square triangles out of my solid scraps.

These 4-inch squares will finish at 3 1/2 inches, and I’m using this method and sliver trimming them with a ruler so they are coming out perfectly. And with most of these half-square triangle methods, one can chain piece a lot in fairly quick order.

I also like Bonnie Hunter’s method of cutting the half-square pieces from two strips (dark/light) layered together. But often I don’t have strips with these scraps, and I want to vary the lighter pieces of the triangles.

And the third set of blocks in the Summer Camp mystery quilt will come today at noon. I’m looking forward to seeing and making what is next.

I Sewed Most of Yesterday

And today a painter is coming to paint the ceiling bases of these hanging lights over the kitchen bar. The bases are covering too-large holes in the ceiling. Painting them the color of the ceiling will help them recede and not stand out.

And after this fairly quick painting job is done, I’ll go pick up the raw milk and cream that I get every two weeks at Local Jo’s–and will deliver some to Mike’s family. I take a cooler with ice and frozen blocks in it to keep everything fresh and cold.

Then I’ll make my noonish dinner and will sew. It’s raining, so likely I’ll not be able to grill the two lamb chops I defrosted. Tomorrow: chicken salad with homemade mayo.

Alex is here mowing–between rain storms. The grass is now thick and happy–an apple green carpet that is soft and cushy underfoot. And it is growing like crazy. All the plants are also thriving.

Yesterday I got all the blocks I had set up on the half-square triangle quilt sewn together yesterday, and I’m loving what I’m seeing. I have not connected the 20-inch blocks themselves yet.

Now I’ll have to make a lot more of the units, and I have the sub-units (4-inch squares) set up to do that work via chain piecing. Plus I found a kind of pumpkin yellow orange for the sashing for the bottom left block. When all are done, I’ll have a top that is 60 by 60–and I’ll figure out what to do to take it out to the 70s range, width wise, and maybe 80s length wise.

I’m going to use Kona Thistle for the sashing between the big red blocks.

It is soft and does not compete with the outrageous Kaffe Fasset prints, but will separate, gently, them. I may use it as the binding too.

Of course I won’t position two green centers next to each other when the time comes to finalize the layout.

The next group of Summer Camp mystery blocks drops tomorrow–so there’s that work for the weekend.

Girlie will be done next Friday. How nice is that?

Very, I’d say. I miss her so much.

A Stupid Accident

On Saturday morning I was getting ready to make a Costco run, which involved an ice chest in Girlie car’s back hatch, and while backing out of the garage, I smashed the rear window as I had left the hatch door open, and it didn’t clear the low garage opening. In my Maine garage I would have gone right through with the hatch door open.

It is interesting that my RAV4, which warns me of all sorts of possible events while backing up, didn’t make a peep about the hatch door being open.

It was one of those totally stupid life moments. And it left me with tiny pieces of shattered glass all over the back of the garage, obvious damage to the back door, and a case of the shakes. And a loss of confidence. For sure.

So, let’s skip to today–Wednesday morning. Son Mike came right away with plastic and tape and soothing directions of what to do and what to expect. (Son Bryan was away with the family.)

USAA, on a Saturday, set the required insurance in place, organized the repair, and got me a rental car. Better Collision had an inspection spot ready for me on Monday, and I dropped off Girlie there and felt she was in good hands. There was additional drama as we got a really bad thunderstorm, which I tried to beat in getting Girlie to Better Collision, as we weren’t sure the plastic would be totally efficient, and I got caught in it just 5 minutes or less from finding the repair place. But Mike’s plastic seemed to hold until Better Collision could get her under cover.

Enterprise car rental picked me up at Better Collision, and I came home with a bright white Toyota Corolla, which I can drive until Girlie is fixed and which will stand out in parking lots. And the best news is that Better Collision called yesterday and, assuming parts are available, Girlie will be ready to go again some time Tuesday or Wednesday at the latest. And I can drop the rental car at Better Collision and Enterprise will pick it up there.

What has amazed me is that all these systems are so efficient and helpful. In all my years of driving, I’ve really never had an accident (knock on wood) that required this level of help. And I’d also like to say that there have been so many, many very nice people along the way who have helped me fix Girlie and to manage without her.

My nerves are another matter though! And my friends have been busy telling me of their car mishaps that they also classify as stupid moments that should not have happened. At least two friends have smashed hatch doors and the window backing out of a low garage. And, yes, that has made me feel much better. Accidents happen. And I think my own new rule will be NOT to open the back hatch door if I am leaving home unless it is OUTSIDE the garage.

To soothe my nerves and temporary loss of confidence in my sweet situation here, I’ve been sewing a lot since that Saturday morning. As always, quiet time in my studio restores me.

I’ve completed the second set of the Summer Camp mystery quilt (Modern Quilt Society) and am looking forward to the third round this Friday. These blocks are just so much fun. The blocks on the 3rd and 4th rows were made by cutting a set of blocks from the first set into two pieces and adding borders–a process I thought quite clever.

My backing/field fabric came yesterday, and I washed it last night. It’s a deep olive green and will be perfect. And the backing for the quilt from hell and its lighter batting came as well. The first of the 4 needed borders is almost done.

I’ve been sidetracked a bit with the half-square triangles made with solid scraps these past two days. OK, I’ve been side-tracked a lot. I am intrigued and engaged. Here’s where that project is as of this morning. I’m not going to use the dark green sashing I don’t think. I’ll put the aqua sashing in that spot. And there will be a third row. Then what? The blocks are 20 inches finished, and I’m loving how the secondary patterns are emerging. I’ll get the gold and light red sashing blocks sewn together today. But I also want this quilt to be more modern, so I may take the half-square units out on the top and sides in some way to be yet determined.

I took this picture of the design wall some time yesterday, so you can see the three projects I’m working on now. Then I stored the mystery quilt blocks. The red quilt blocks are stacked up together to make room on the design wall for the growing half-square triangle project–which is, by the way, eating up scraps like crazy.

I’m still wondering about the sashing color for the red quilt. I was thinking green, but I’m not sure. I don’t want it to remind of Christmas. I’ll try some other color choices later today. I don’t want pink. Maybe a soft lavender, like Kona thistle?

For now, before we get more rain, I need to take the rental car to the grocery store. I’m still not ready to make the Costco run though. But…soon.

Summer Camp: First Set of Blocks

Here’s the first set of blocks for the Modern Quilt Studio’s “Summer Camp Mystery Quilt”:

Each block has been measured and fiddled with if needed. The blocks in the 4th row, with the horizontal stripes, are used to make other blocks in the second set of block patterns, which I downloaded Friday. I did that work last night, and you’ll see them when I’ve finished the second set.

Each week we get a choice of eight blocks, divided into sets of two where each participant chooses one of the four pairs–so four blocks to make each week. But there are always multiple numbers of blocks to make for each choice–as you can see above.

So, now on to making the four blocks for this week.

Ten Common Food Myths

When I moved to Maine, I encountered a strong bias toward healthy, clean local foods and homeopathic help when needed. Living in Maine changed my life.

One of the first books given to me by a dear friend was Sally Fallon Morell’s Nourishing Traditions. It really changed my life. Morell is one of the founders of The Weston A. Price Foundation, an organization that sells no products beyond books and information based on research, often done by scientists who have specialized in how food works in the human body.

Price was a dentist who traveled the world to find groups of healthy local people in order to identify why they were healthy. He judged “health,” in part, by the condition of their teeth. What each healthy group was eating was a primary question for Price. He learned these groups of people ate healthy, clean, WHOLE foods present in their particular environments. AND, he noted that when they started eating “modern” foods, they became malnourished and sick. He left a most interesting archive of his discoveries.

The Weston A. Price Foundation has a terrific web site that anyone can use to research a food or health question.

Sally Fallon Morell is a nutritional researcher in her own right. In the formation of the Weston A. Price organization, Morell worked with Dr. Mary Enig, an internationally recognized expert on how various fats work in the human body. Enig had published work that said that trans fats were dangerous for humans–in the era when industry was seeking to substitute plant fats for the animal fats humans have eaten for thousands of years. The industry went after Enig, and she lost all research money and never got more. A few decades later, “science” had to acknowledge that trans fats were indeed dangerous for humans. But note that this story illustrates how powerful industries work to create room for their own products: they demonize what they want to replace.

Here’s an article that came into my internet feed the other day. It is based on an interview with Morell. You might find some surprises here that run counter to popular belief.

It should be no surprise to anyone these days that media bombards us with countless claims about what is healthy for humans, much of which is a departure from what has supported humans for thousands of years and much of which is based on “science” supported by industry to “prove” their claims are true.

Living in Maine, with all its farms and clean foods, transported me back in memory to how I grew up. My father was military, and we moved frequently, but lots of time was also spent with my mother’s people in rural Georgia, with access to local foods from the family farm and gardens. Family members gathered food daily, and much time was spent on food preparation and eating together.

After exposure to Morell’s Nourishing Traditions, I promptly reverted to eating the kind of traditional my grandparents ate. And I’ve never turned back from that practice. It is serving me well in so many ways as at 78 I am healthy and strong and have boundless energy and a zest for life. My food is my medicine, and I don’t need anything concocted by industries that do not have my best interests at heart.