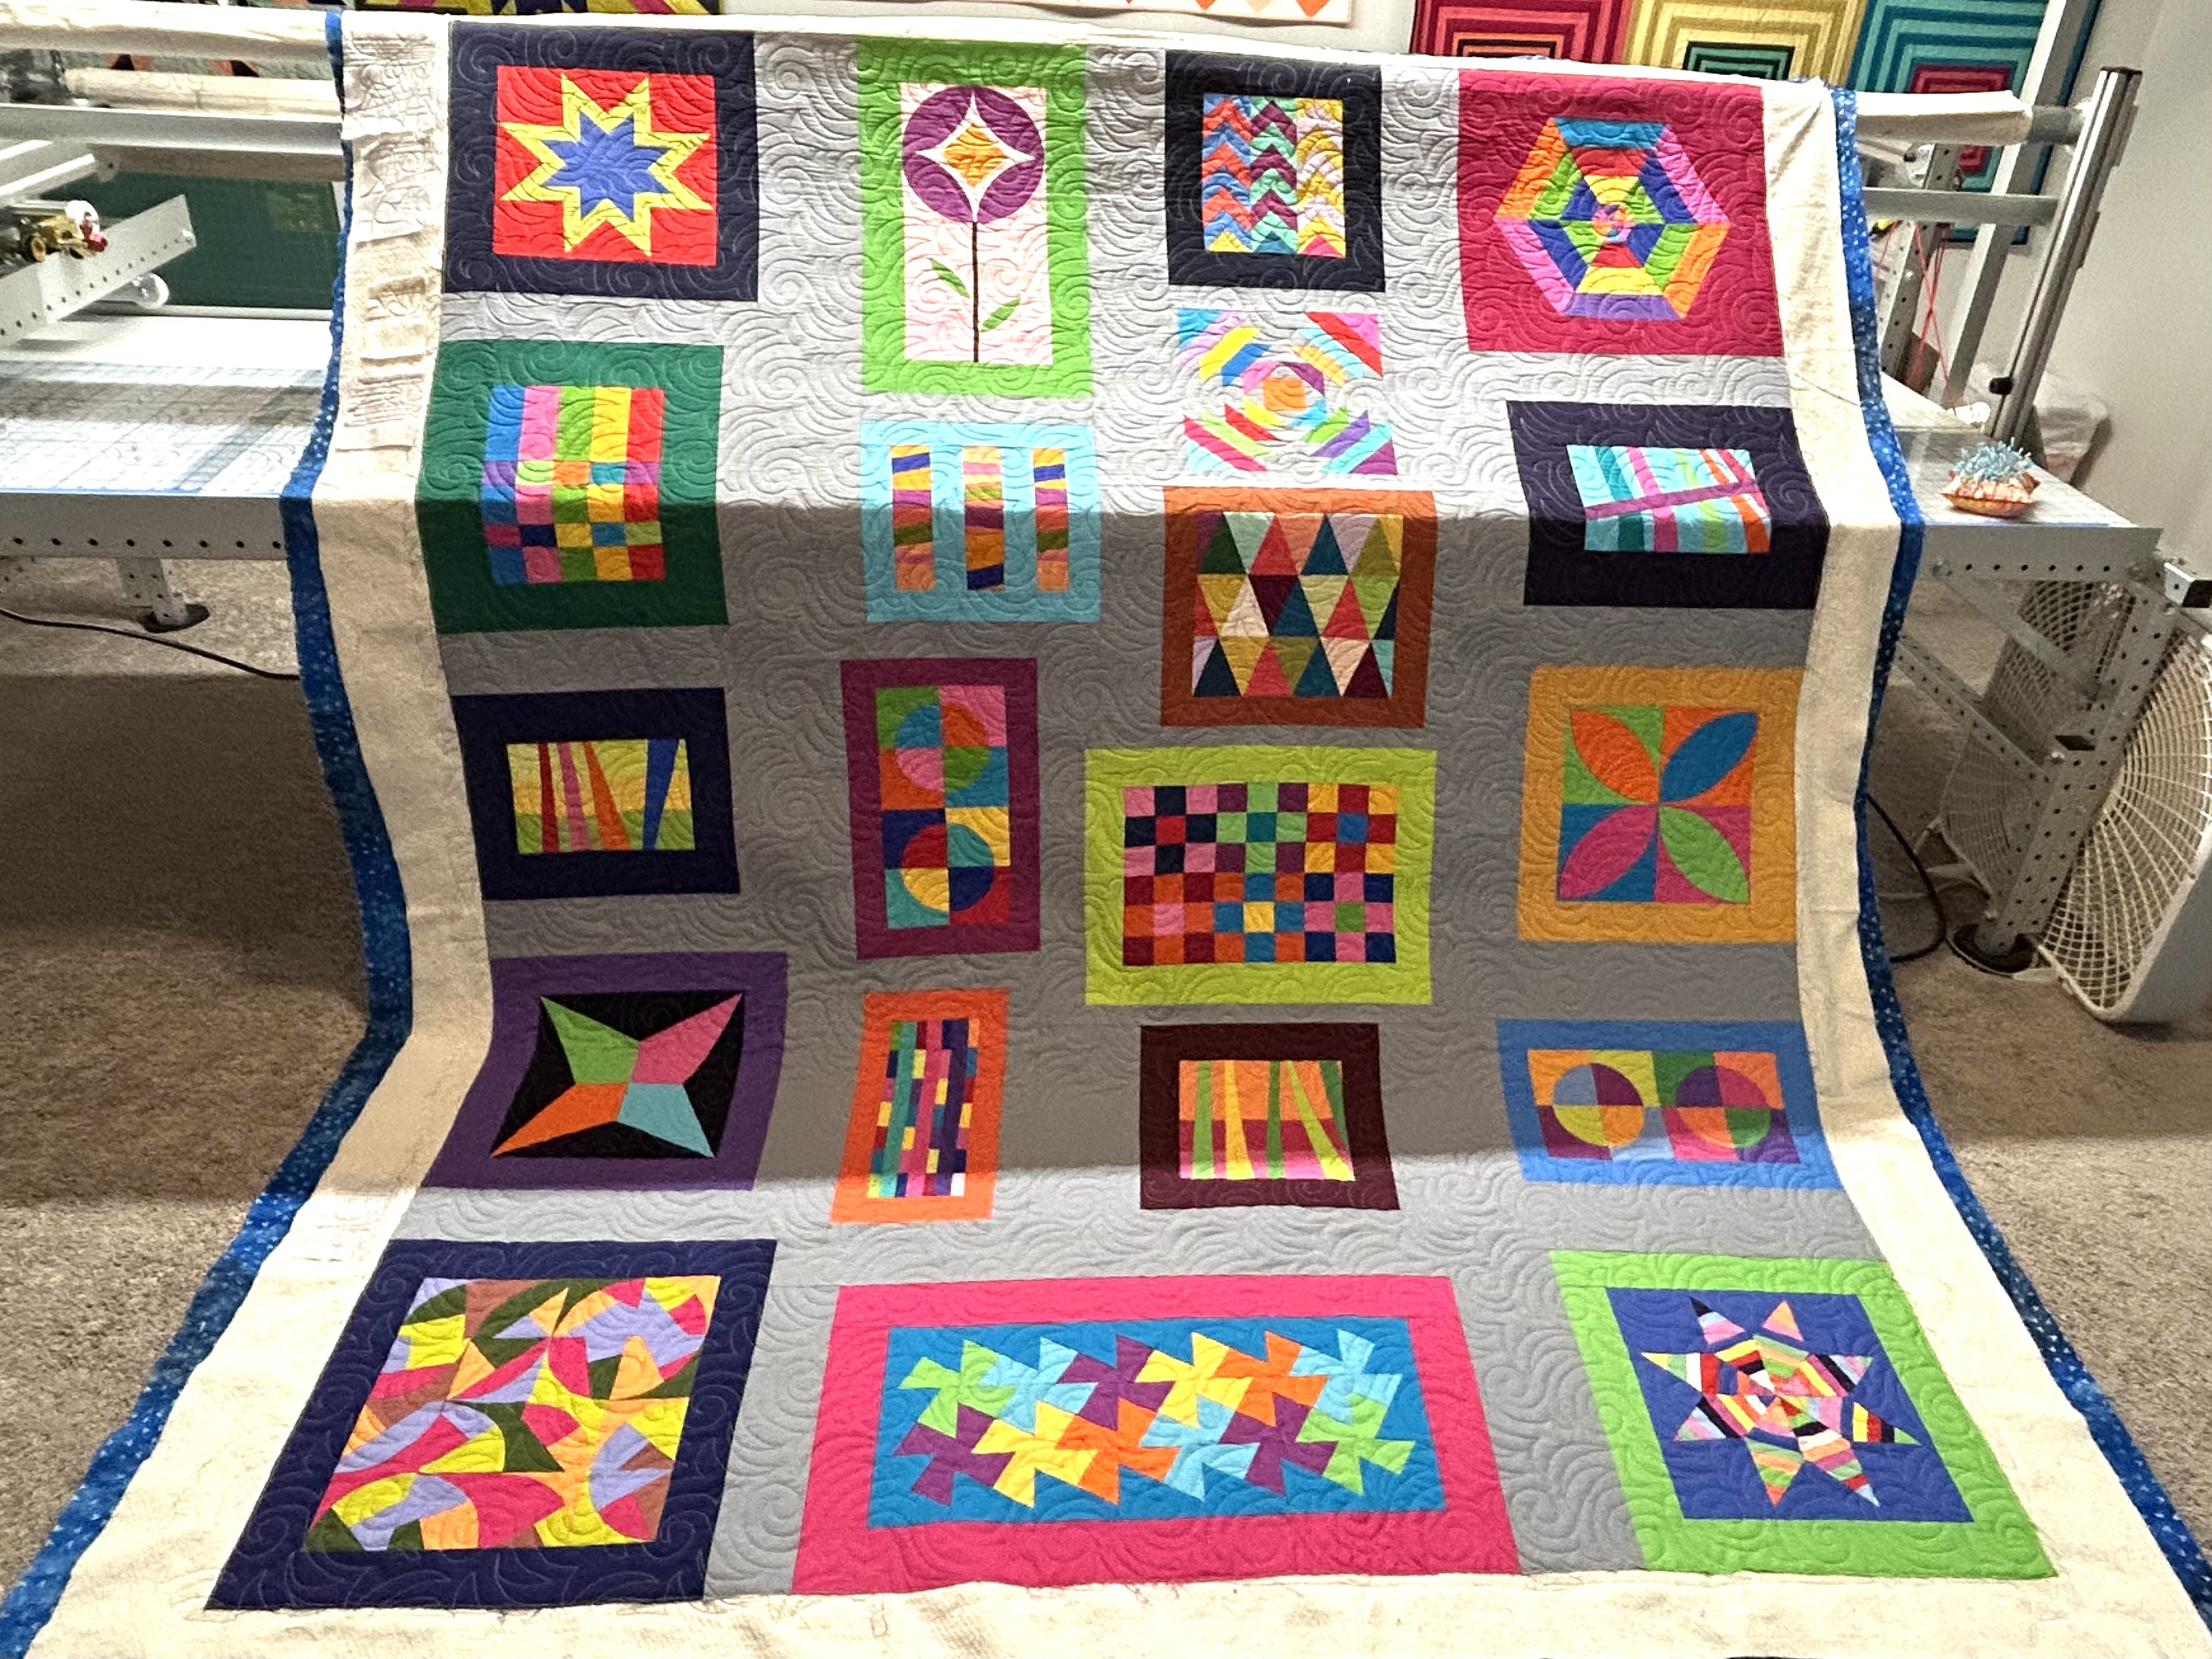
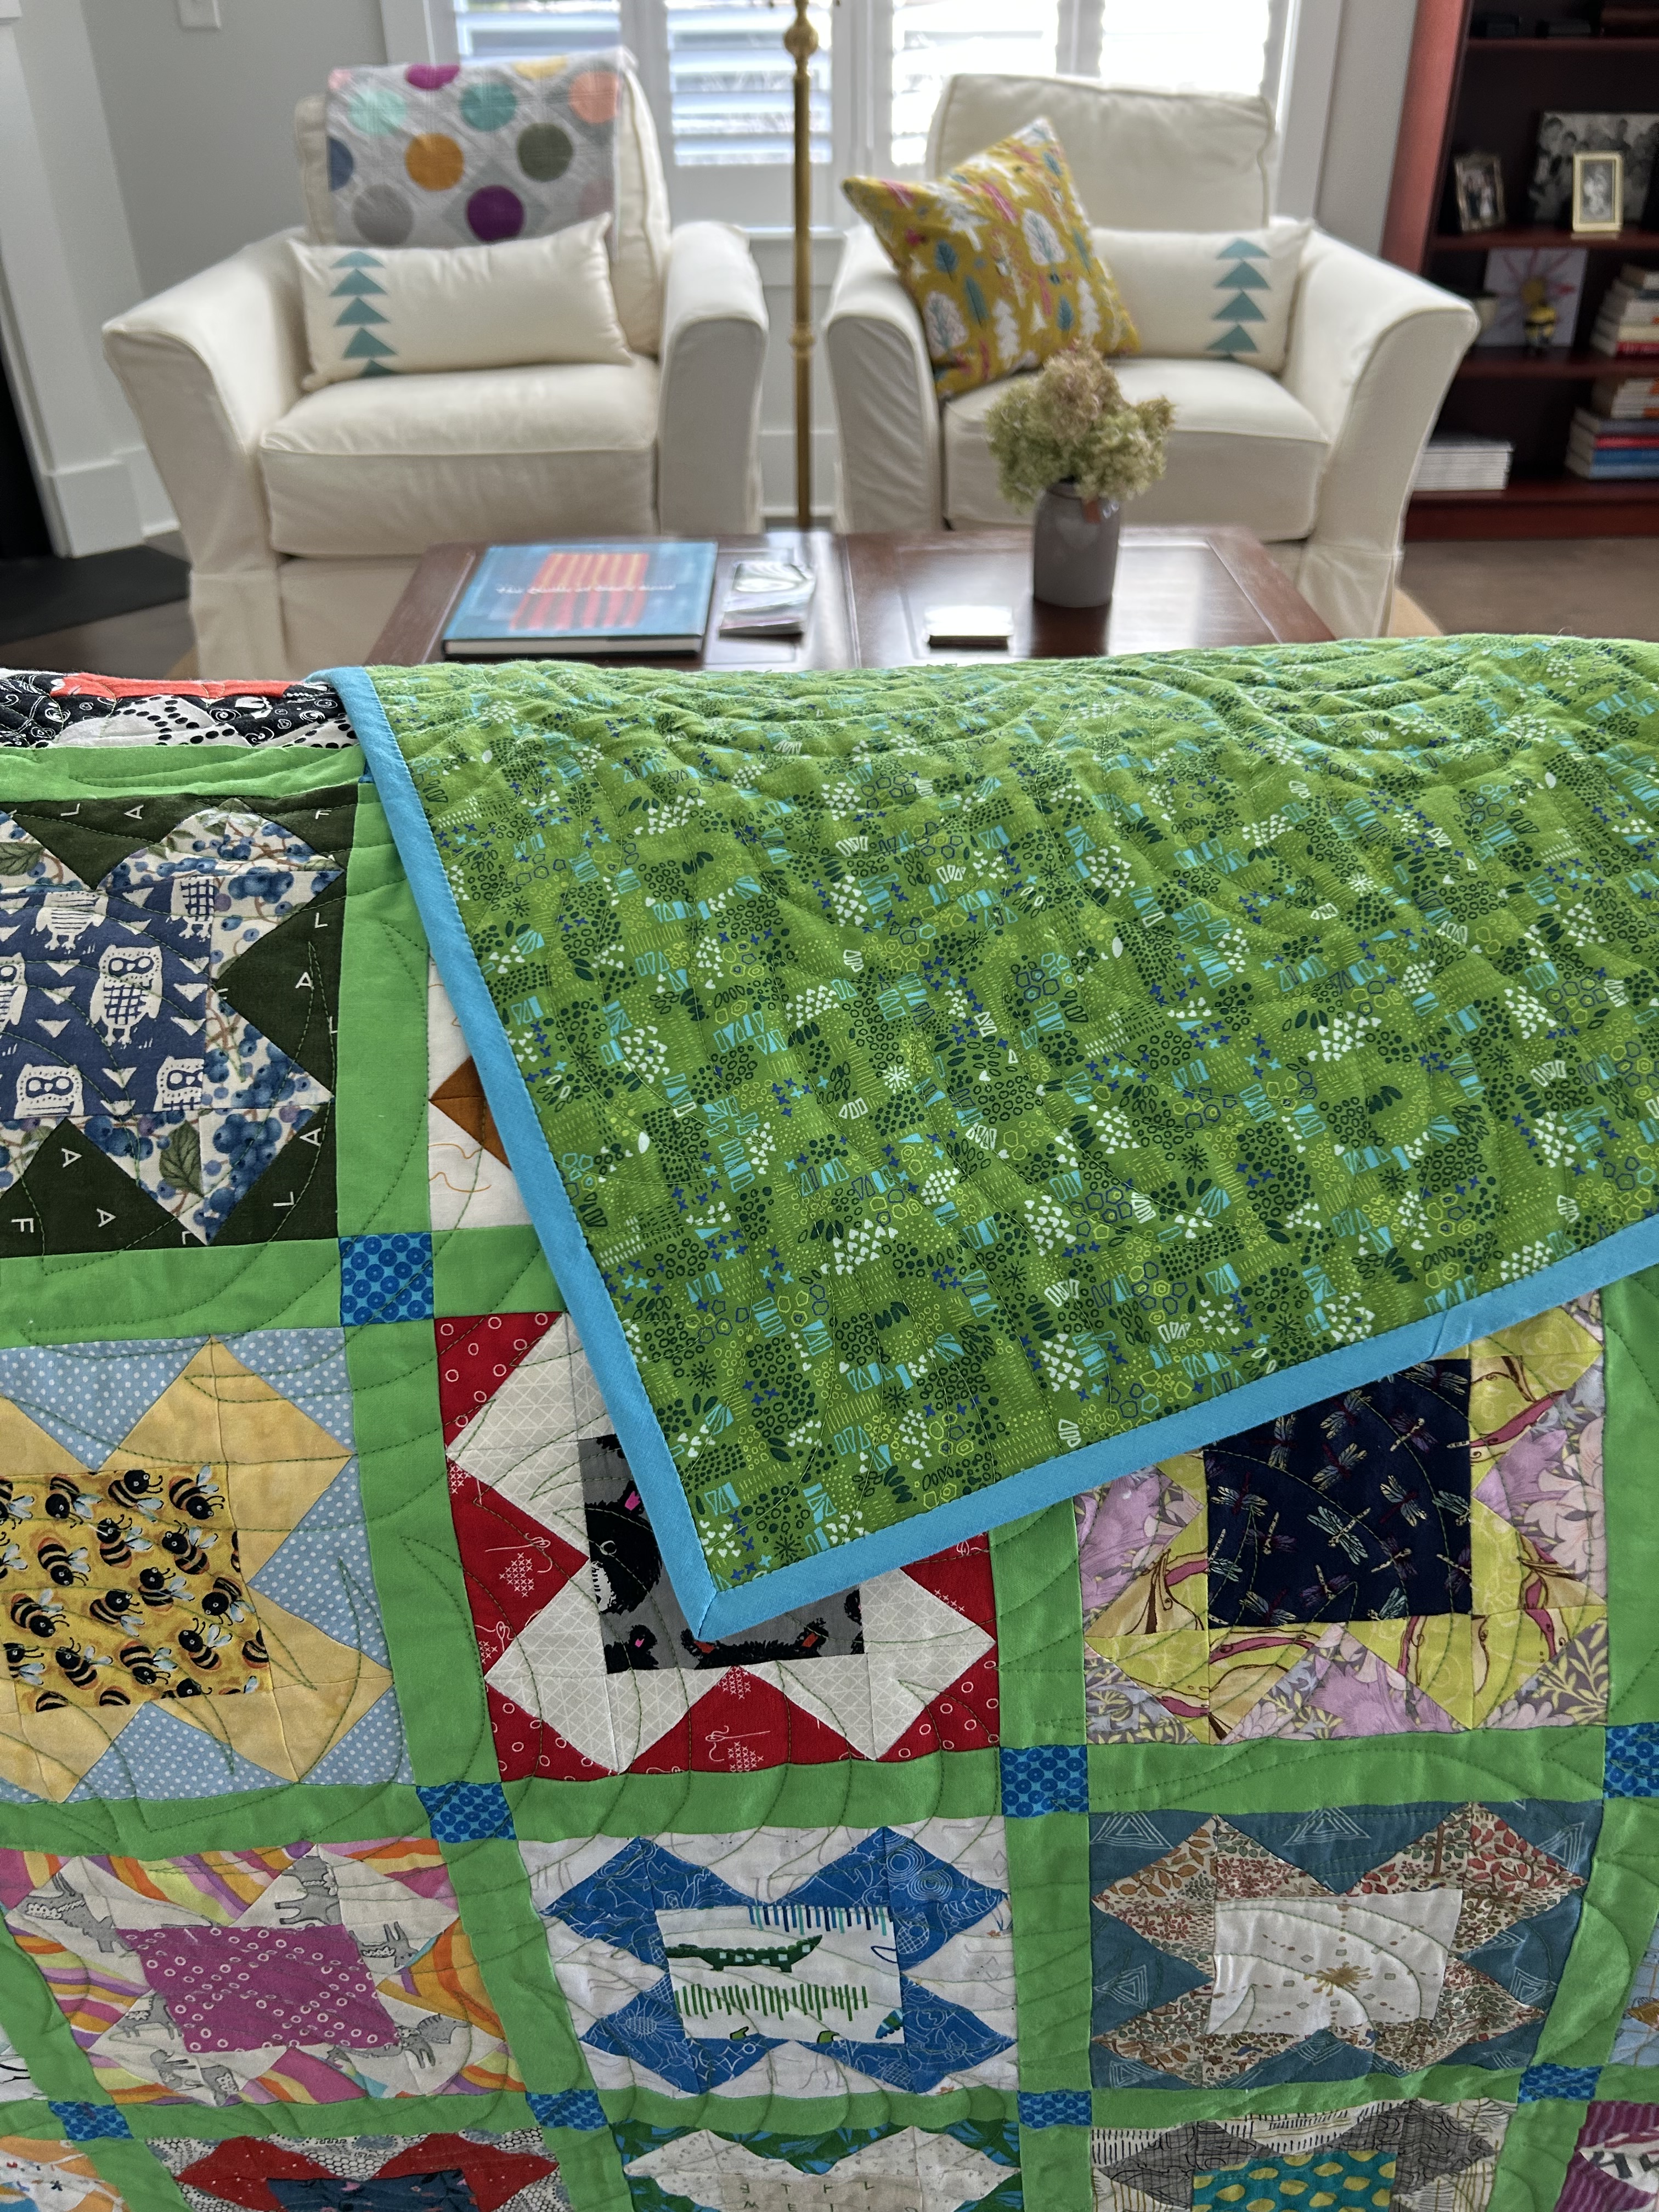
I don’t have a name yet. Something about…joyful…as I have had, for many months, so much fun playing with new blocks, orphan blocks, rulers, and Blocks3 (Tara Faughnan’s online class) ideas/methods.
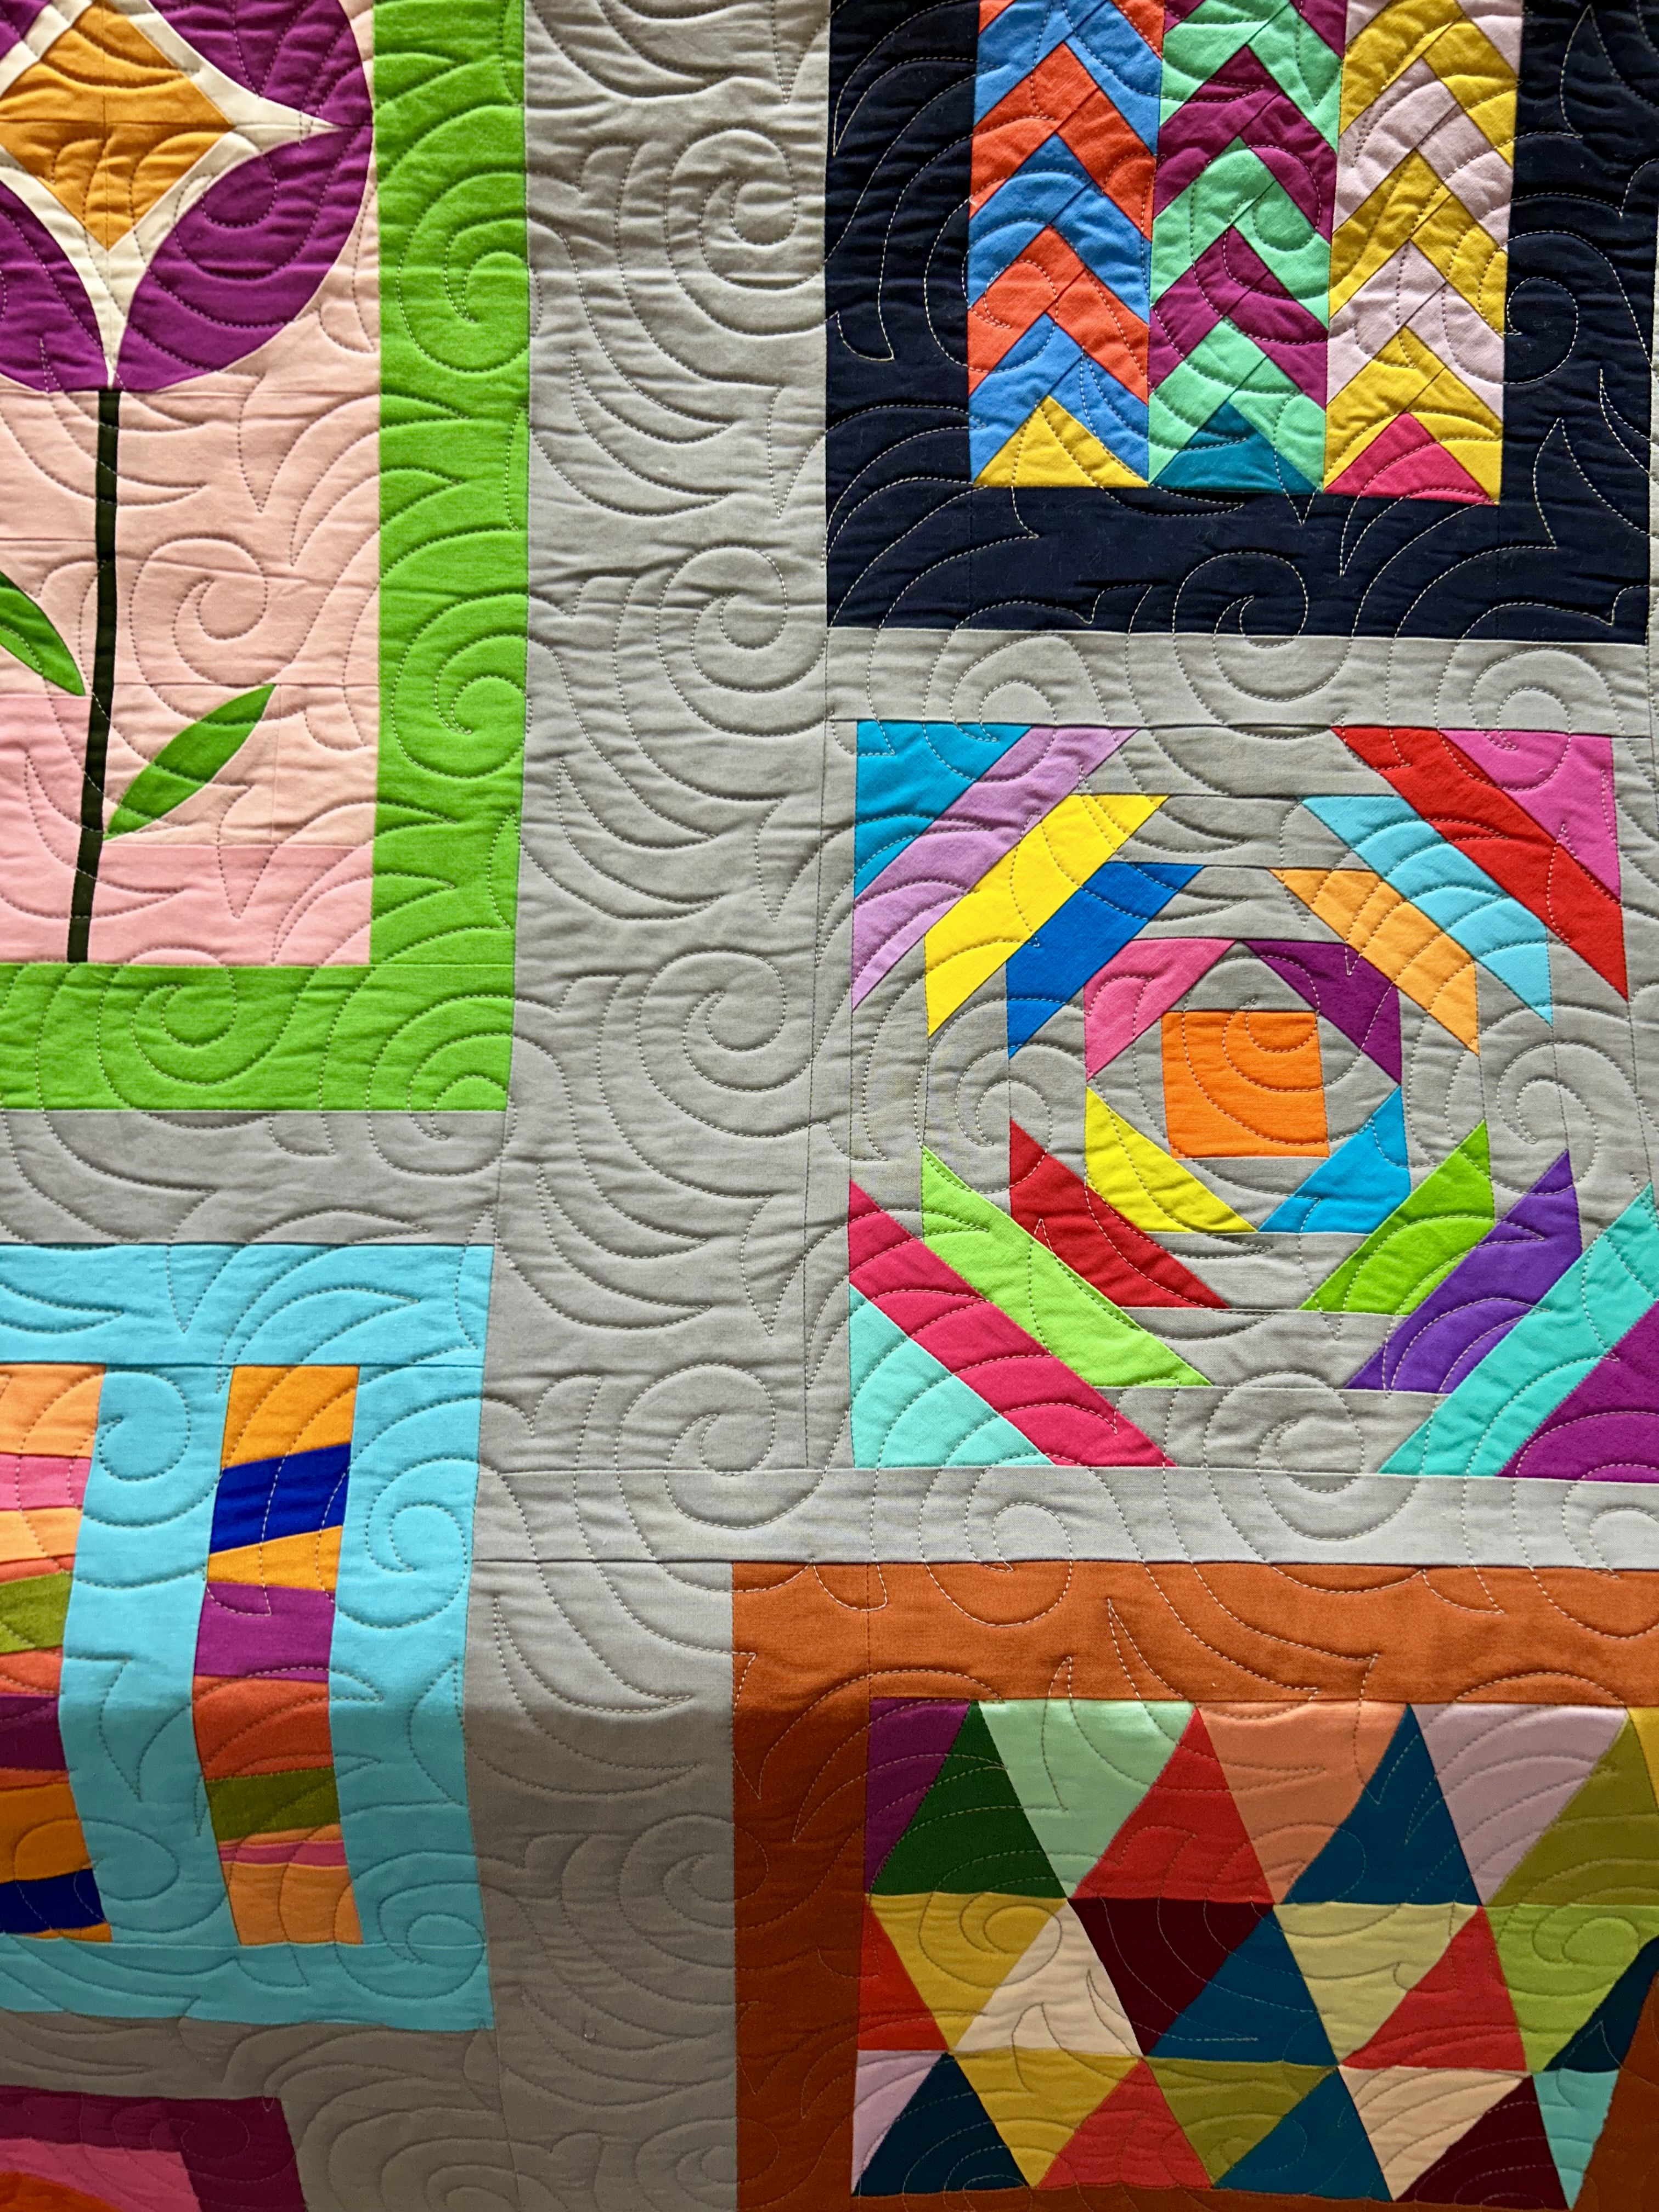
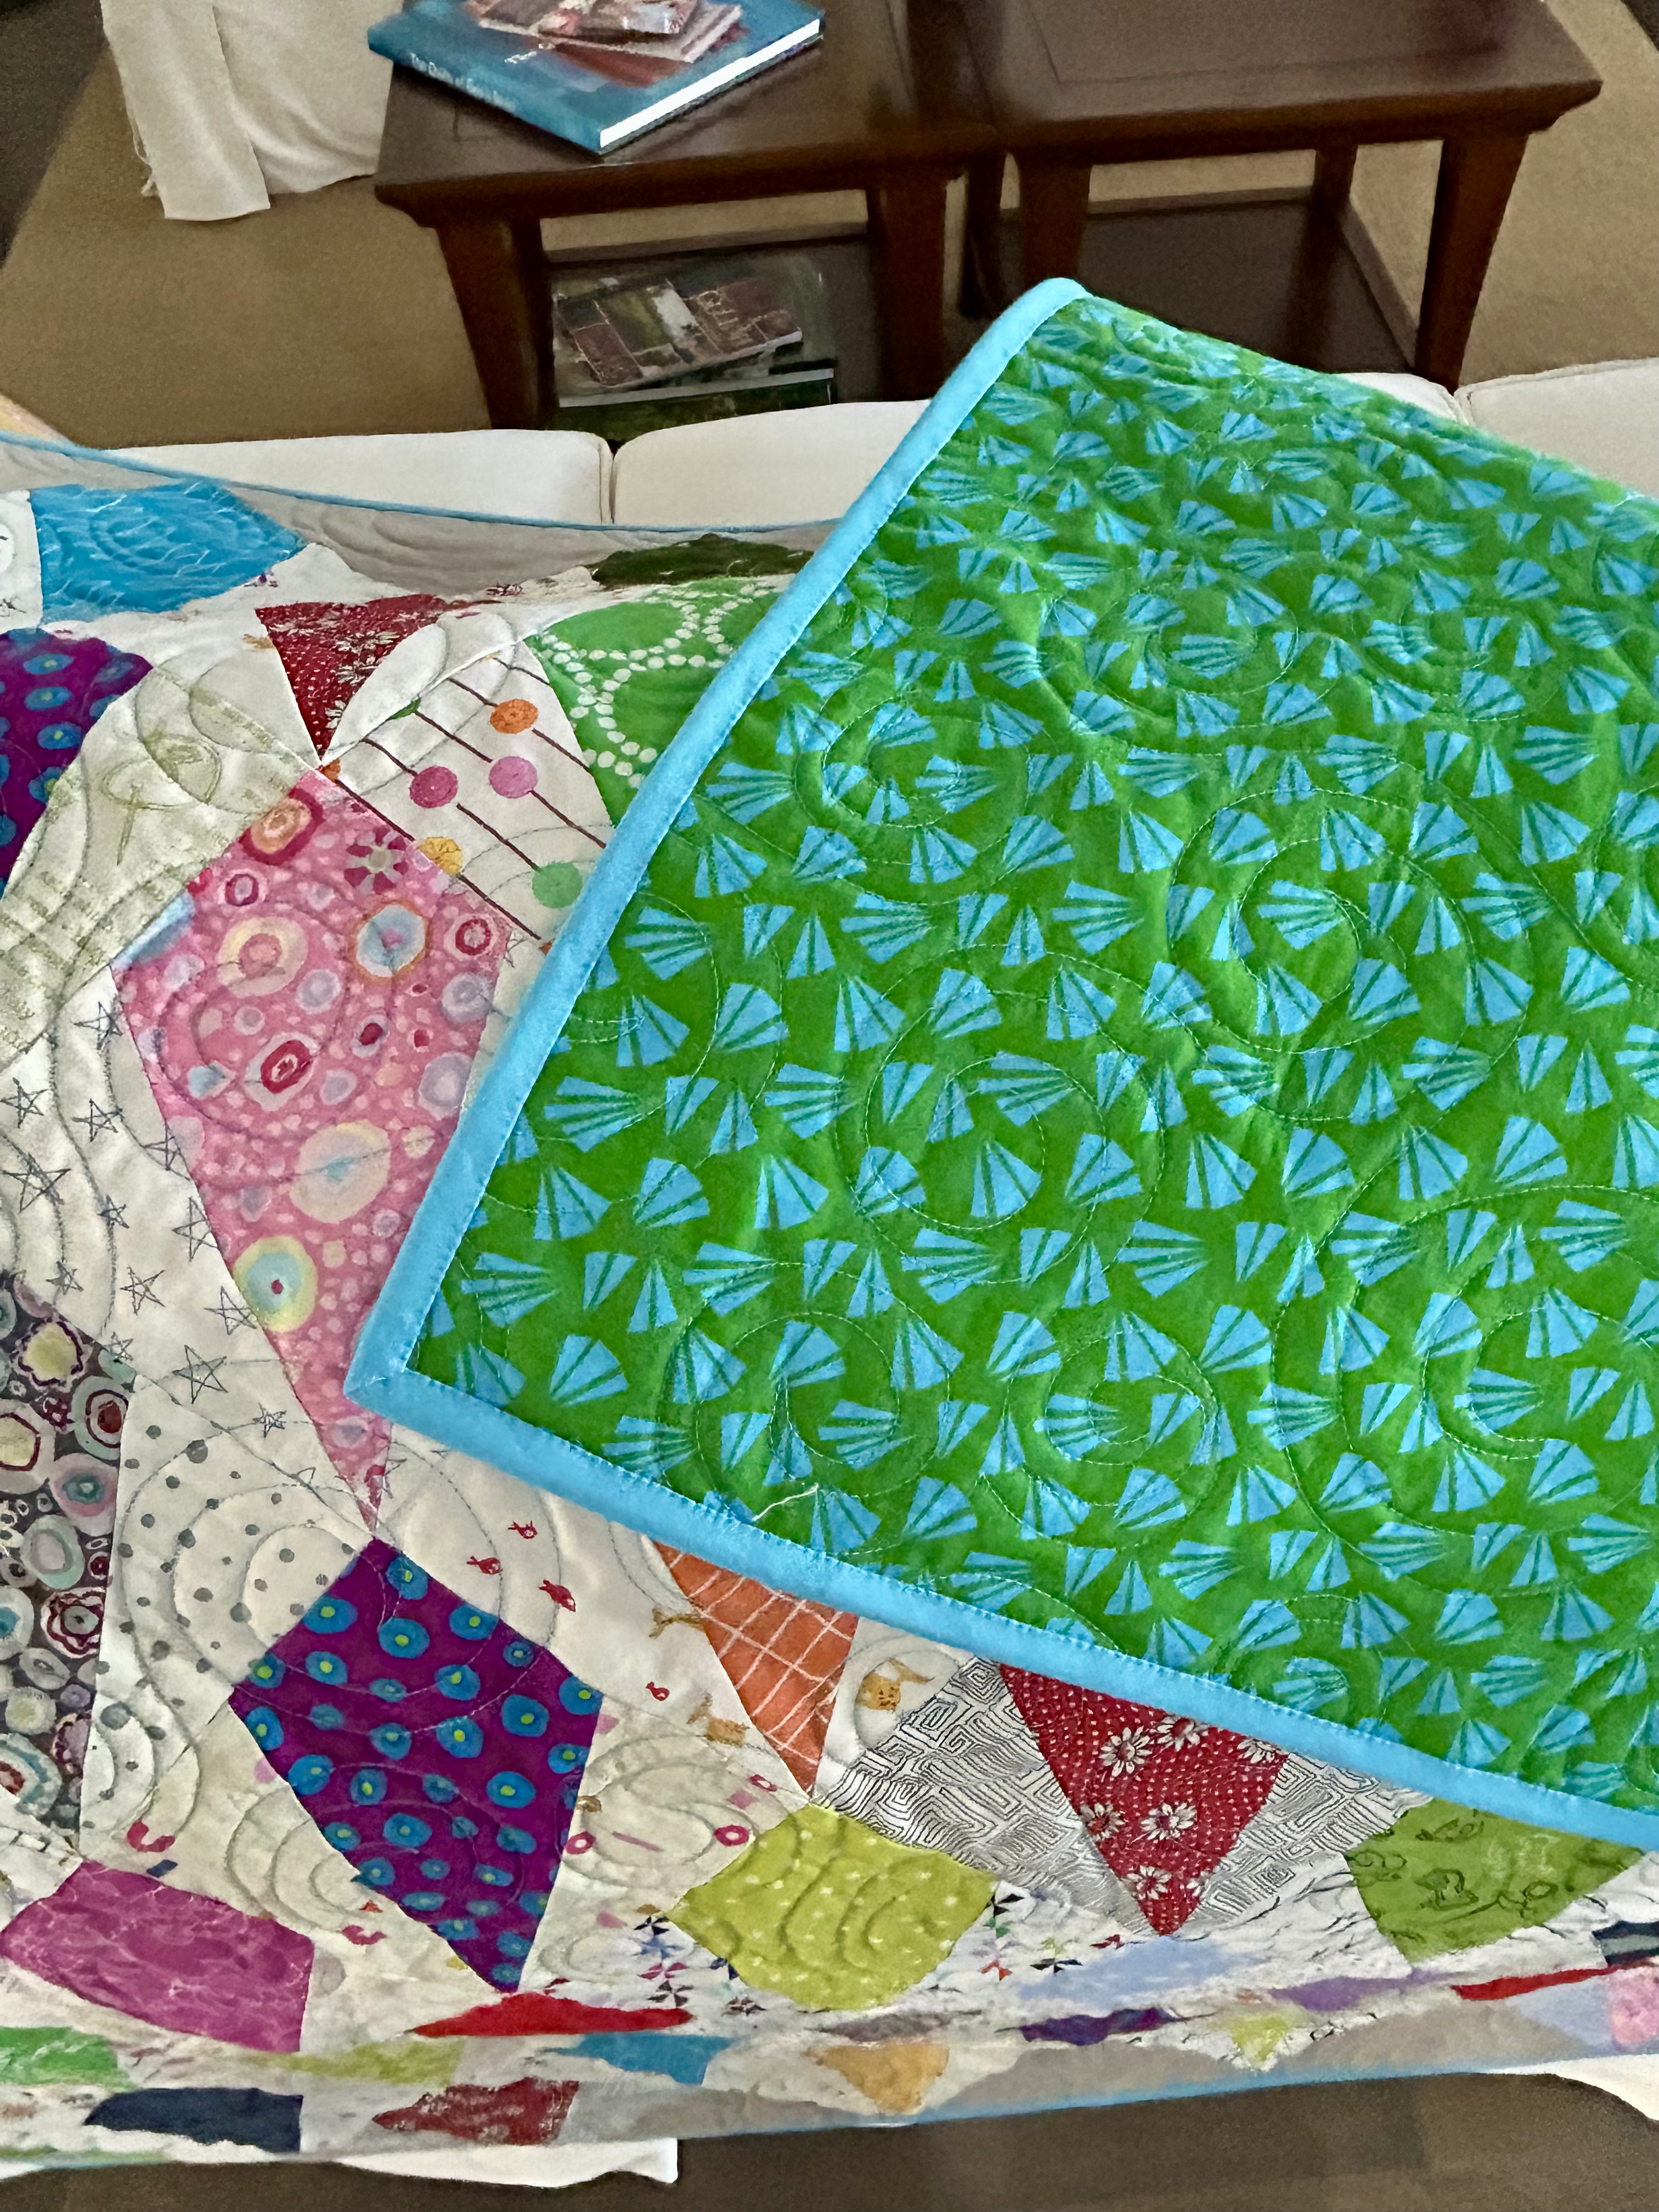
I’m so, so, so happy with the quilting, and I love how the pineapple block looks using the same field fabric in its construction. How fun is that!
Now I have some hand sewing for night tv watching–the binding will take a while.
We are hoping for rain today, but the storm passing through the south today went mostly west of us. Our temps are dropping into the 40s tonight. Oh well, spring is fickle, even in the coastal tropics.
Yesterday I noticed that the carpet of brown Centipede grass is starting to turn green–after our last few rainy days.
How fun is that?
So now I’ll have to take just a little bit of time to remove the few weeds that have gotten purchase in my carpet of grass–which means joyful and contemplative time in the sunshine and warmer weather.
I’ve been in enjoying a batch of GRITS I made the other day–something I have not made in about a year. I make mine with raw milk as the liquid, and I soak them in said milk overnight. And I add raw butter when they are done–and an extra pat on the top when fresh or reheated. Leftover grits are also great made into patties and pan fried in a good fat. Here, I have a leftover Mahi fish fillet and various veggies and freshly cooked spring sugar snap peas. So far, no weight gain either, but I have cut fruit consumption back to 2 cups a day, per the new food MAHA guide.
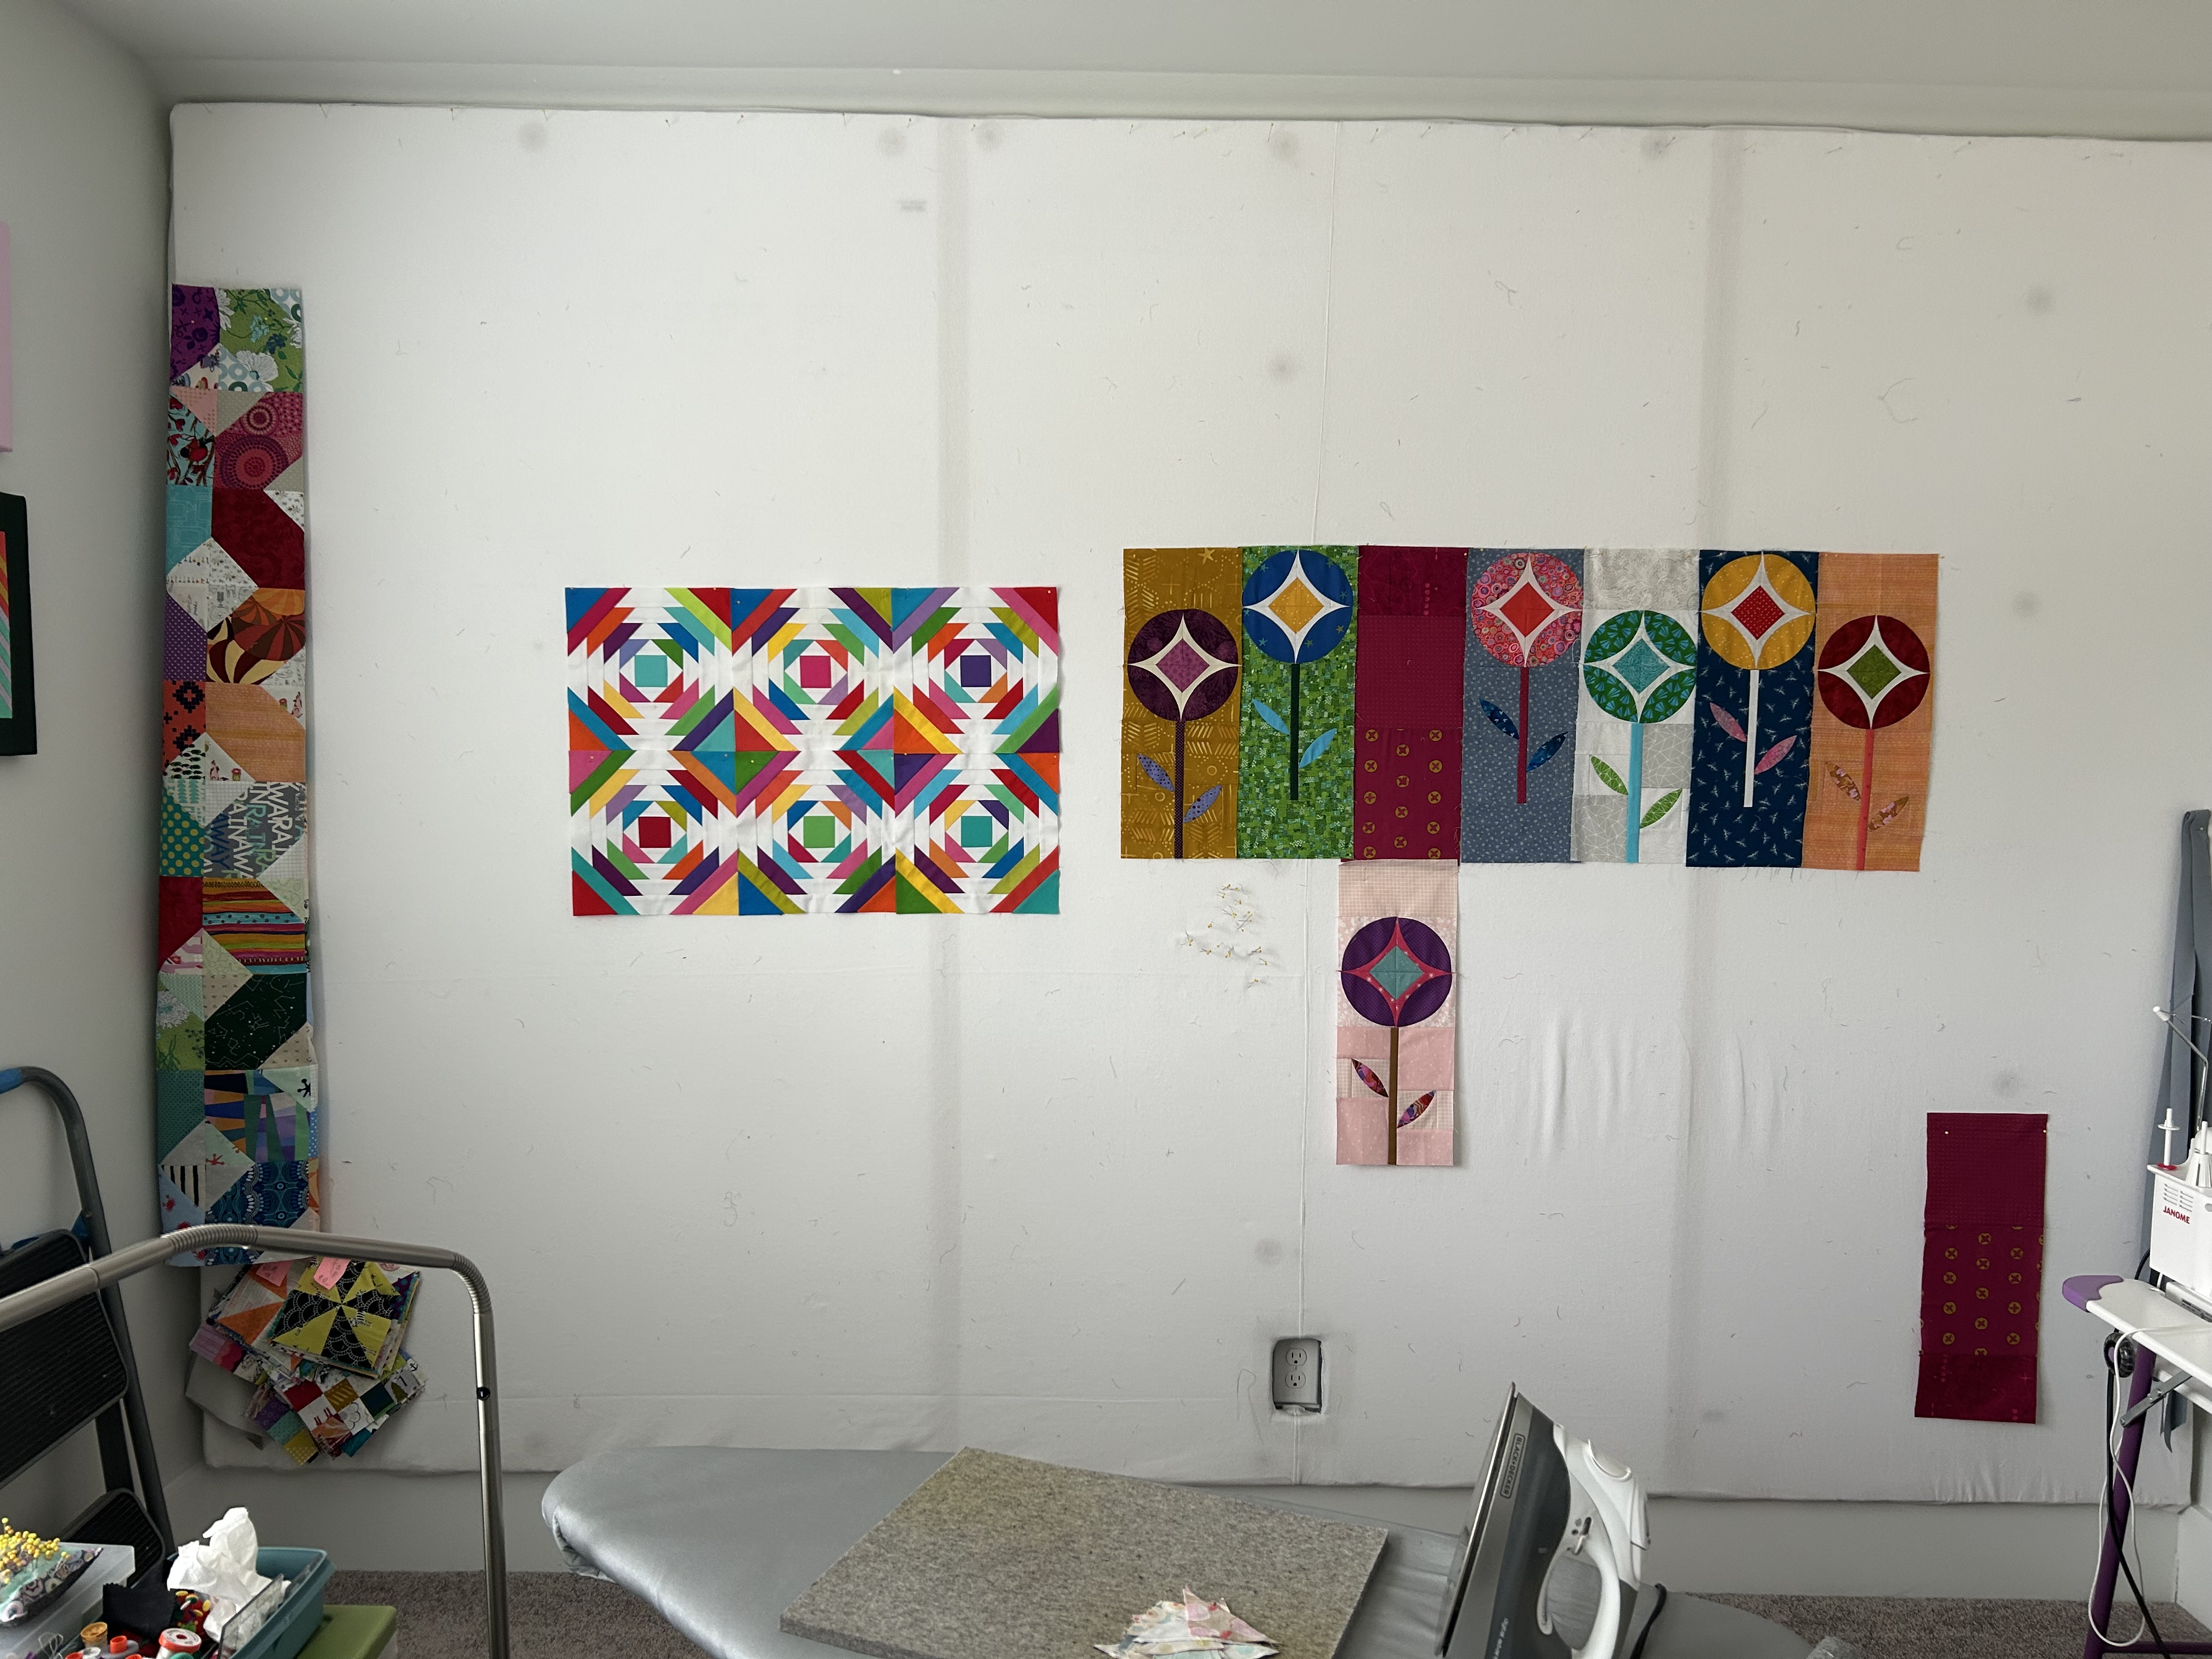
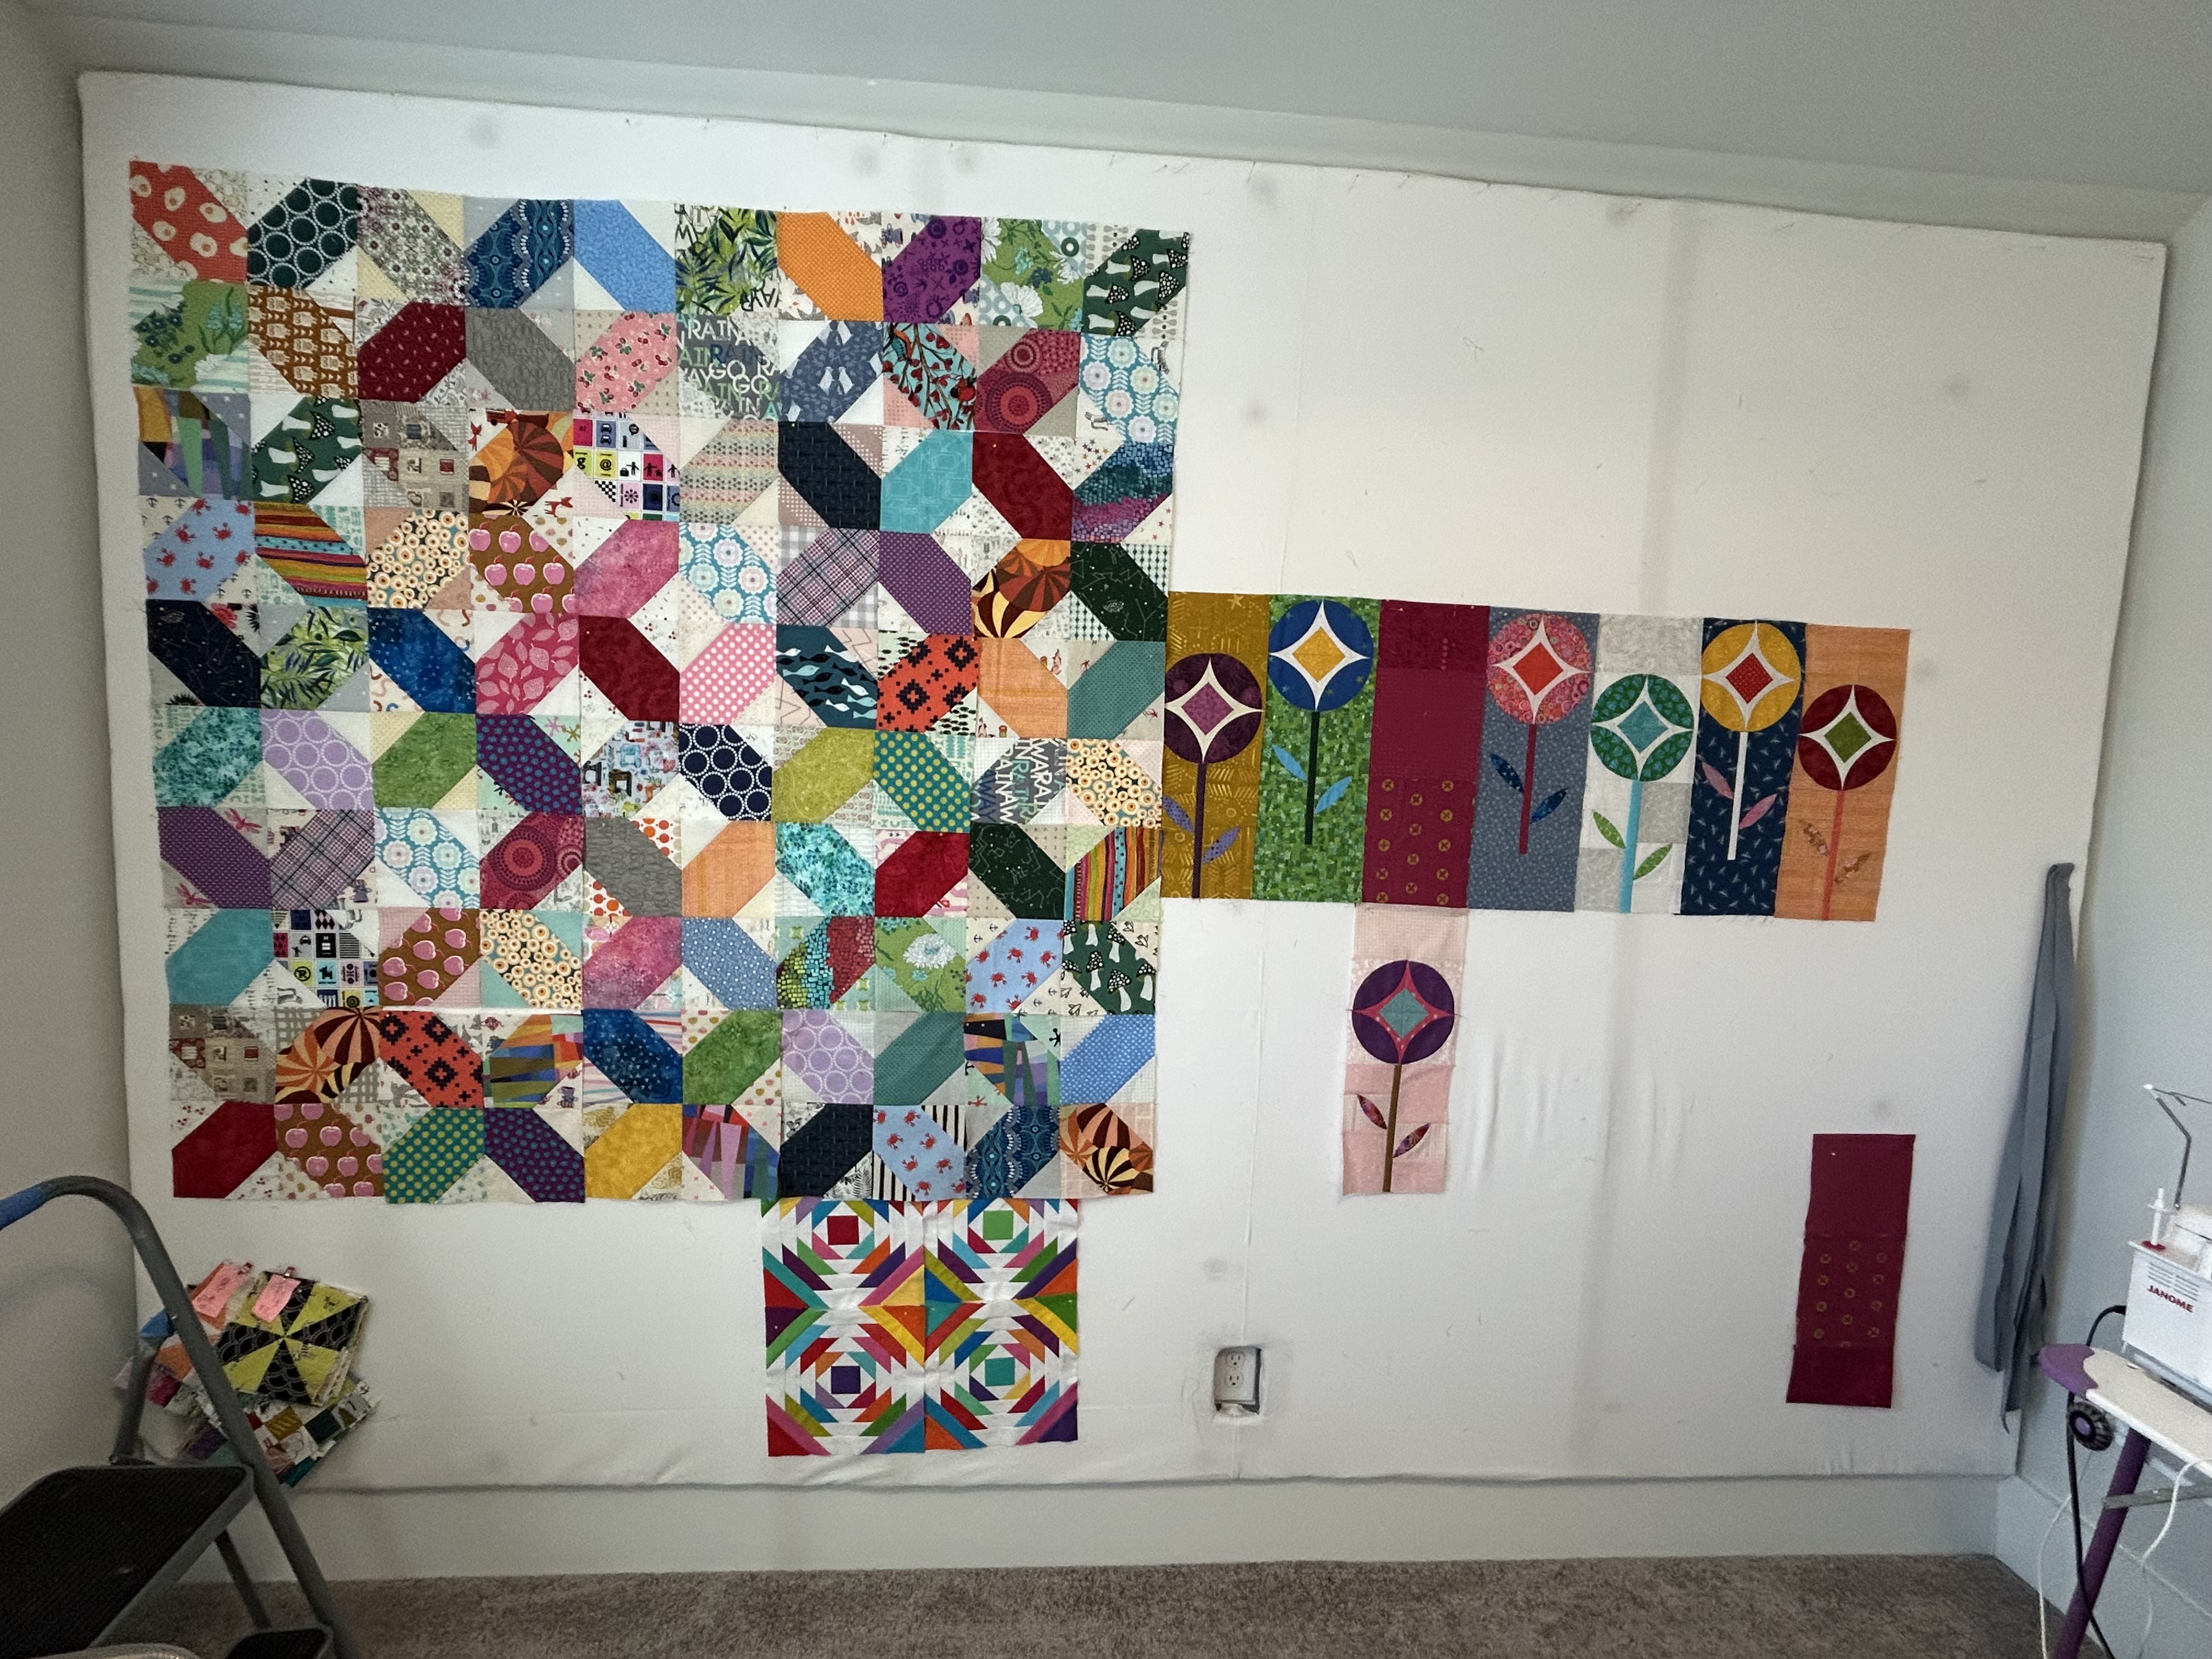
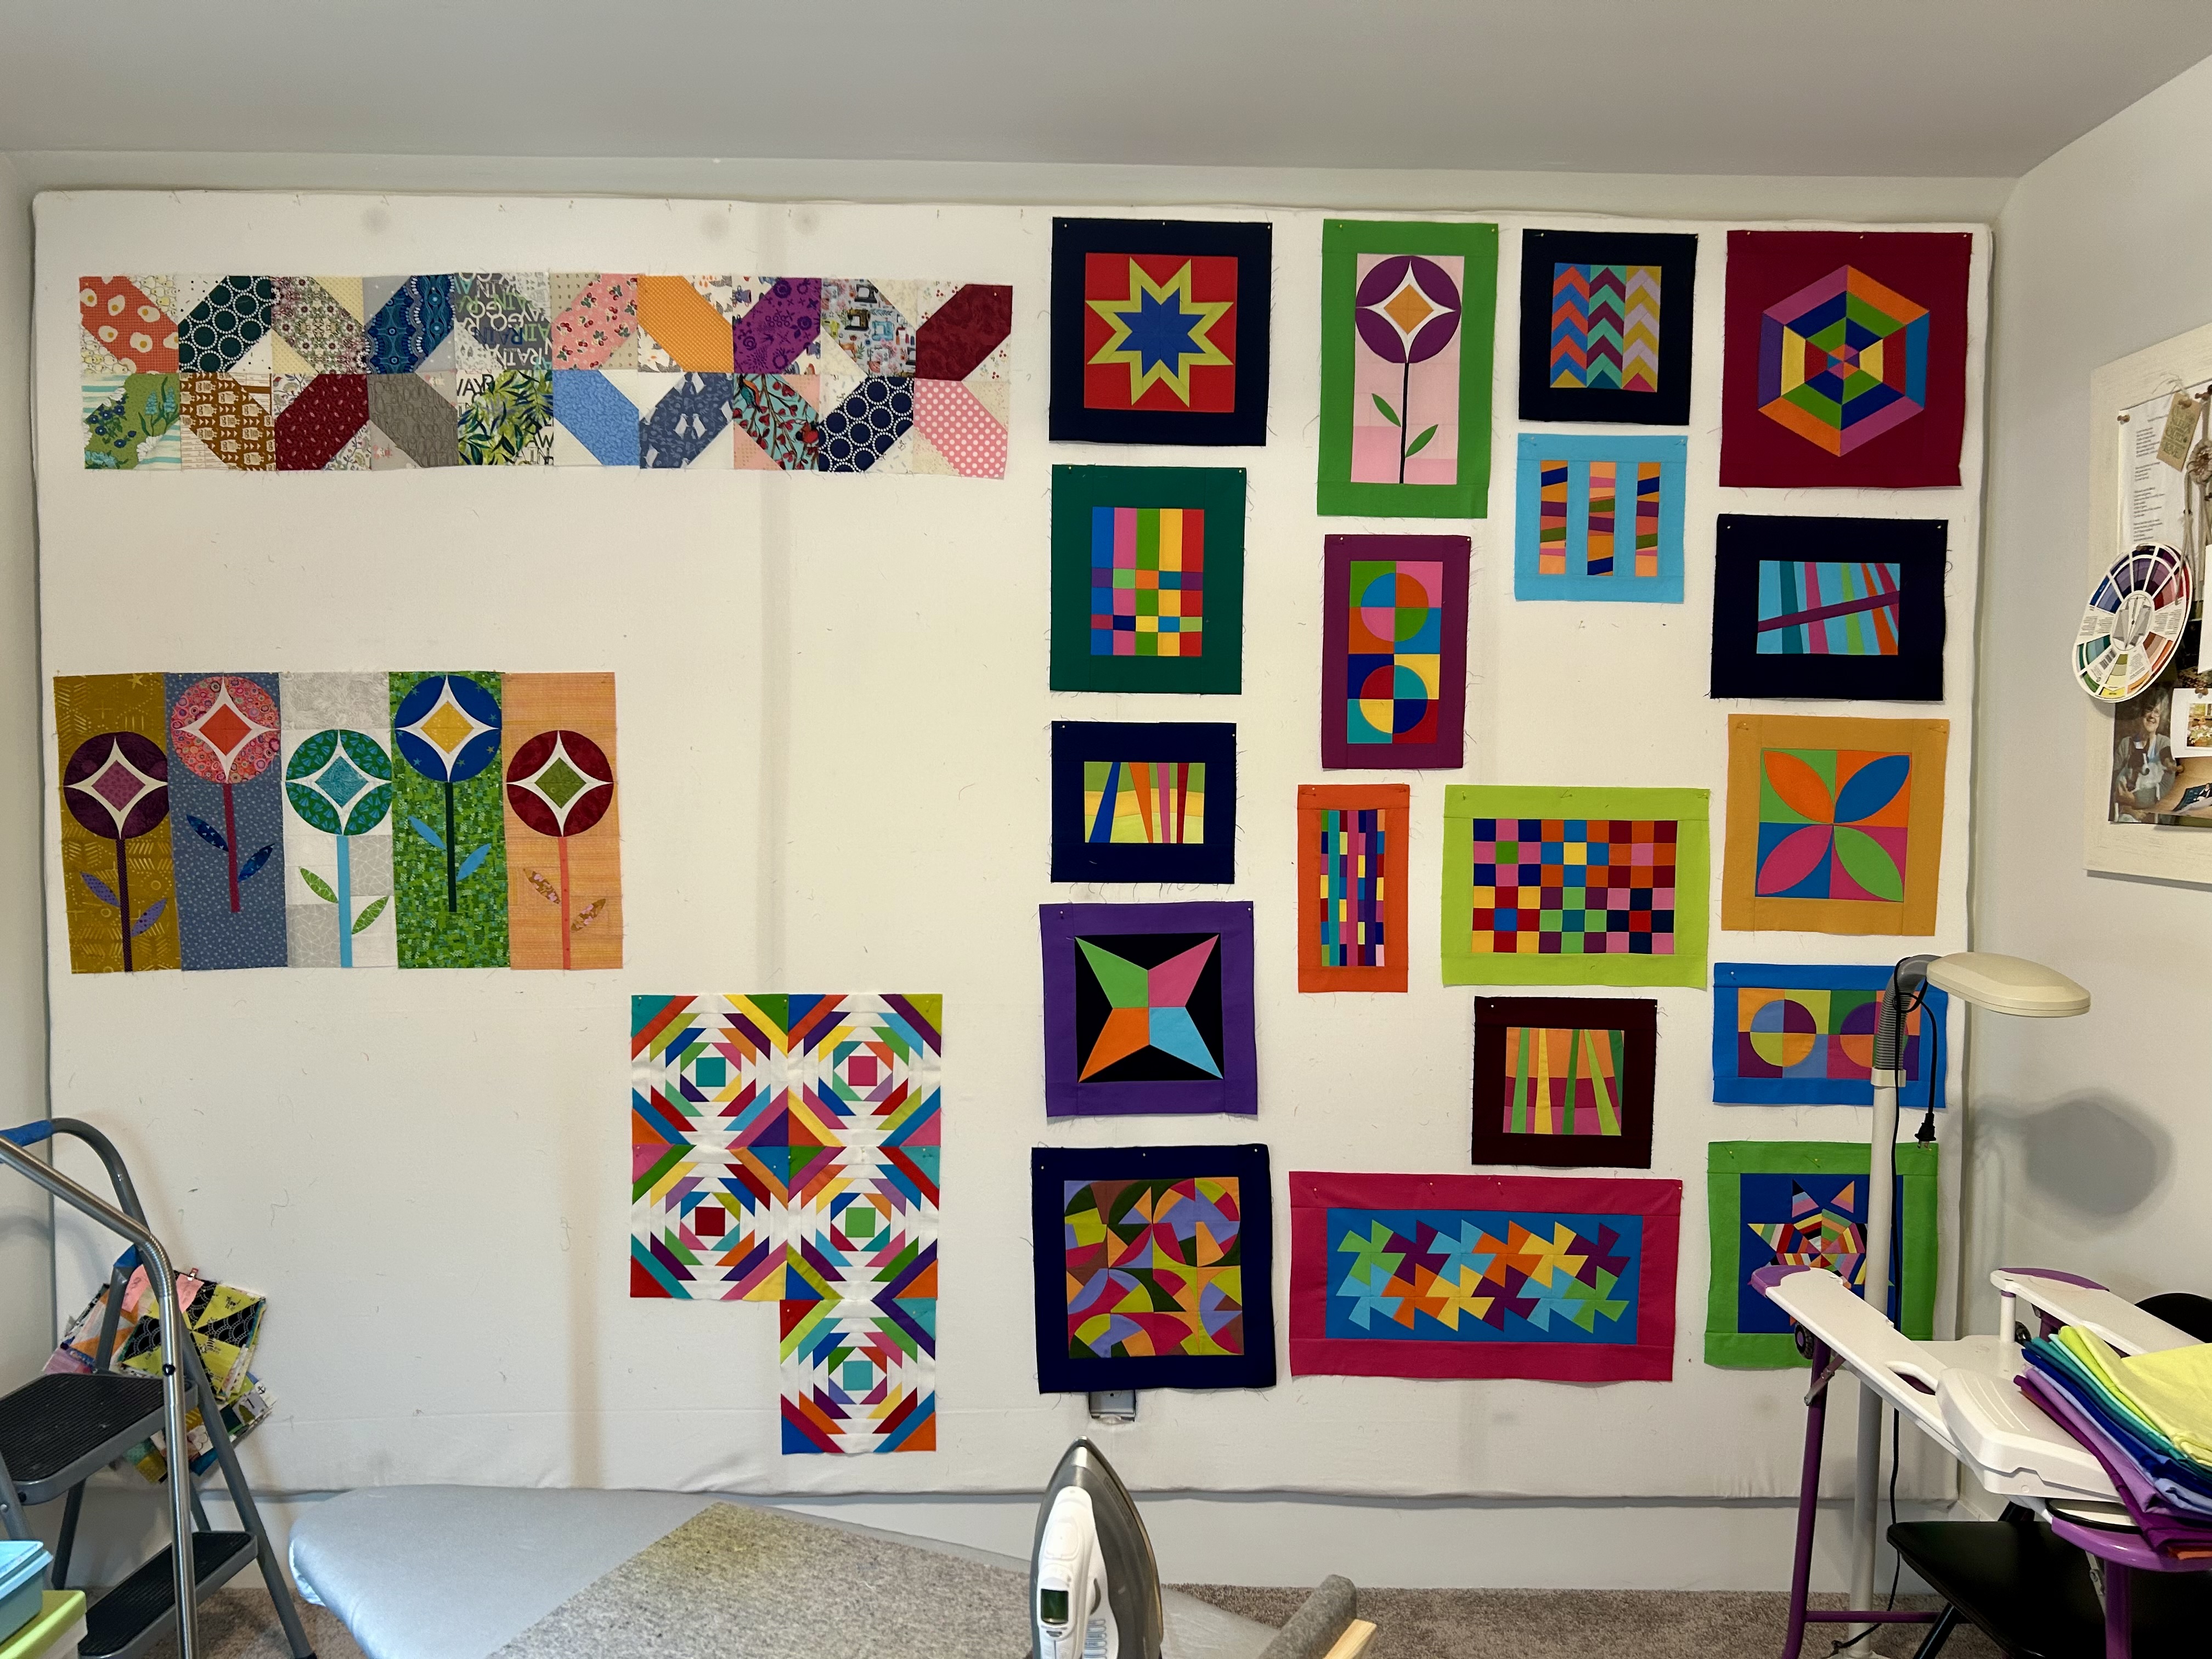
Here’s the design wall now–there is ROOM again.
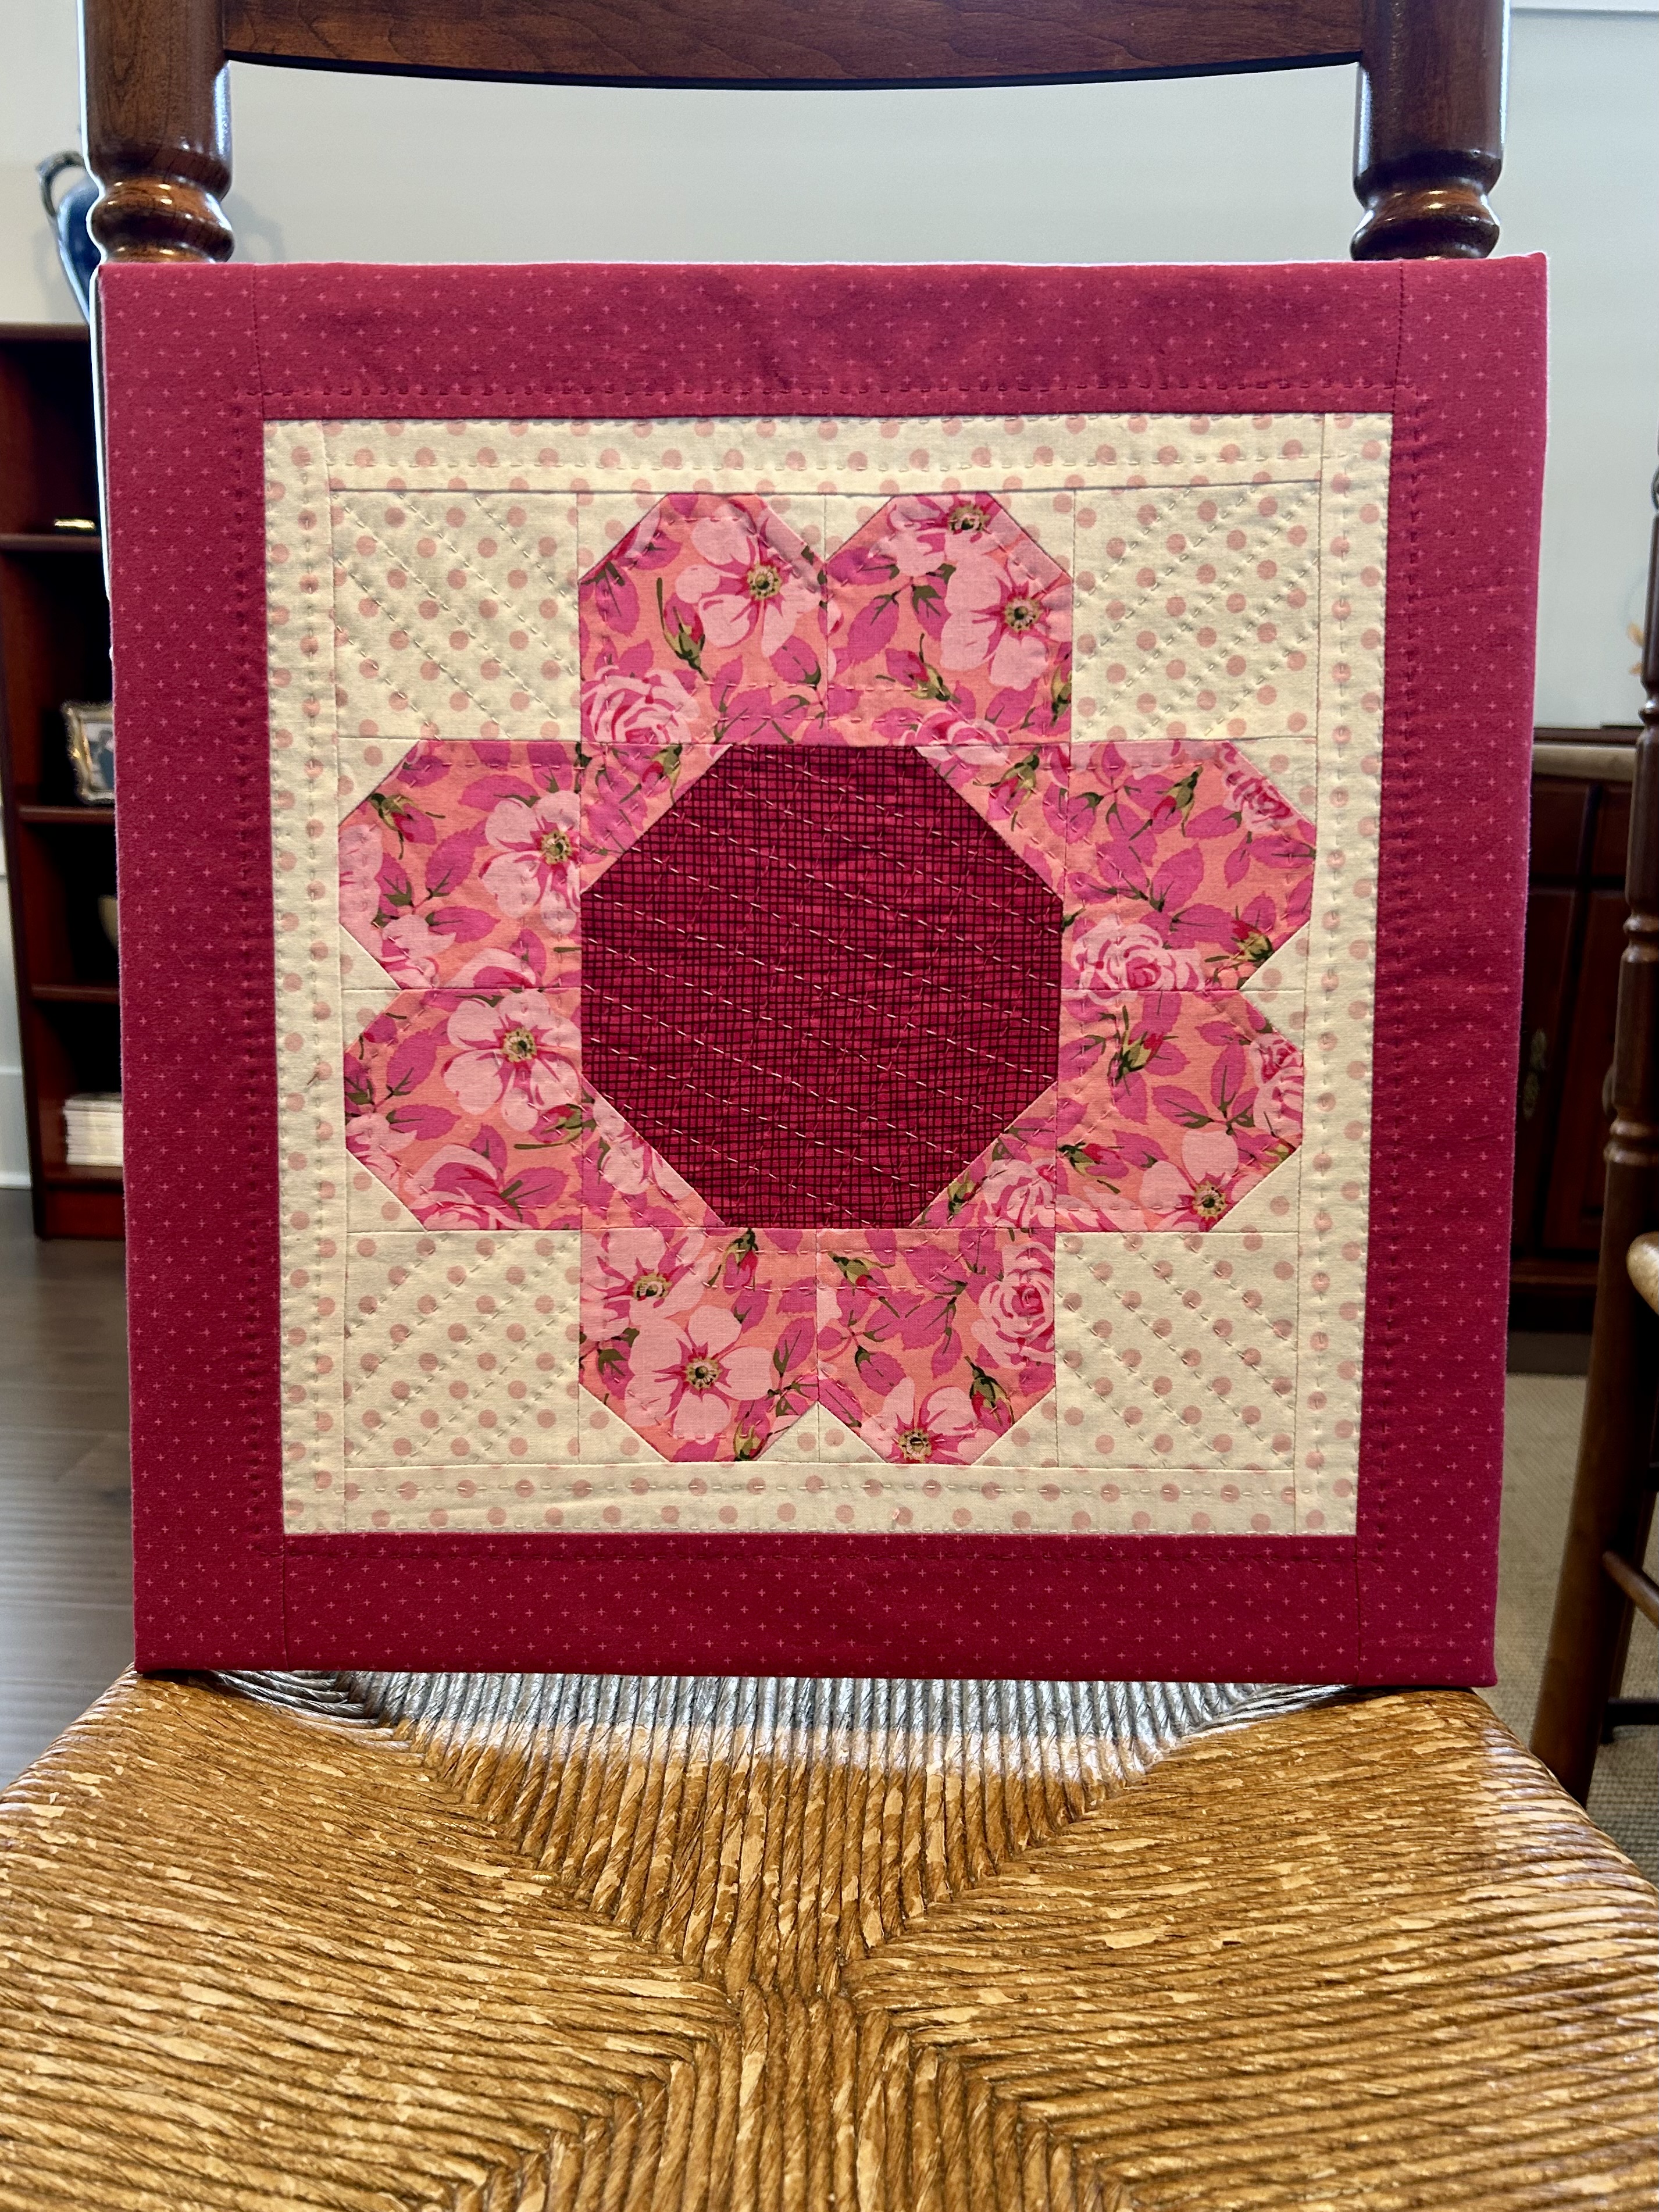
“Flower Pop” will have 9 blocks and 3 rows, which will make it 63 wide by 60 long. These blocks will likely move around as this quilt grows.
The colorful, bright solid fabric pineapple blocks are also growing. And that’s a whole “Pinwheel and Patches” Bonnie Hunter quilt on the bottom left ready to put on the design wall when I, again, have space. “XO” is ironed and ready for the longarm as soon as my nameless improv quilt is finished.
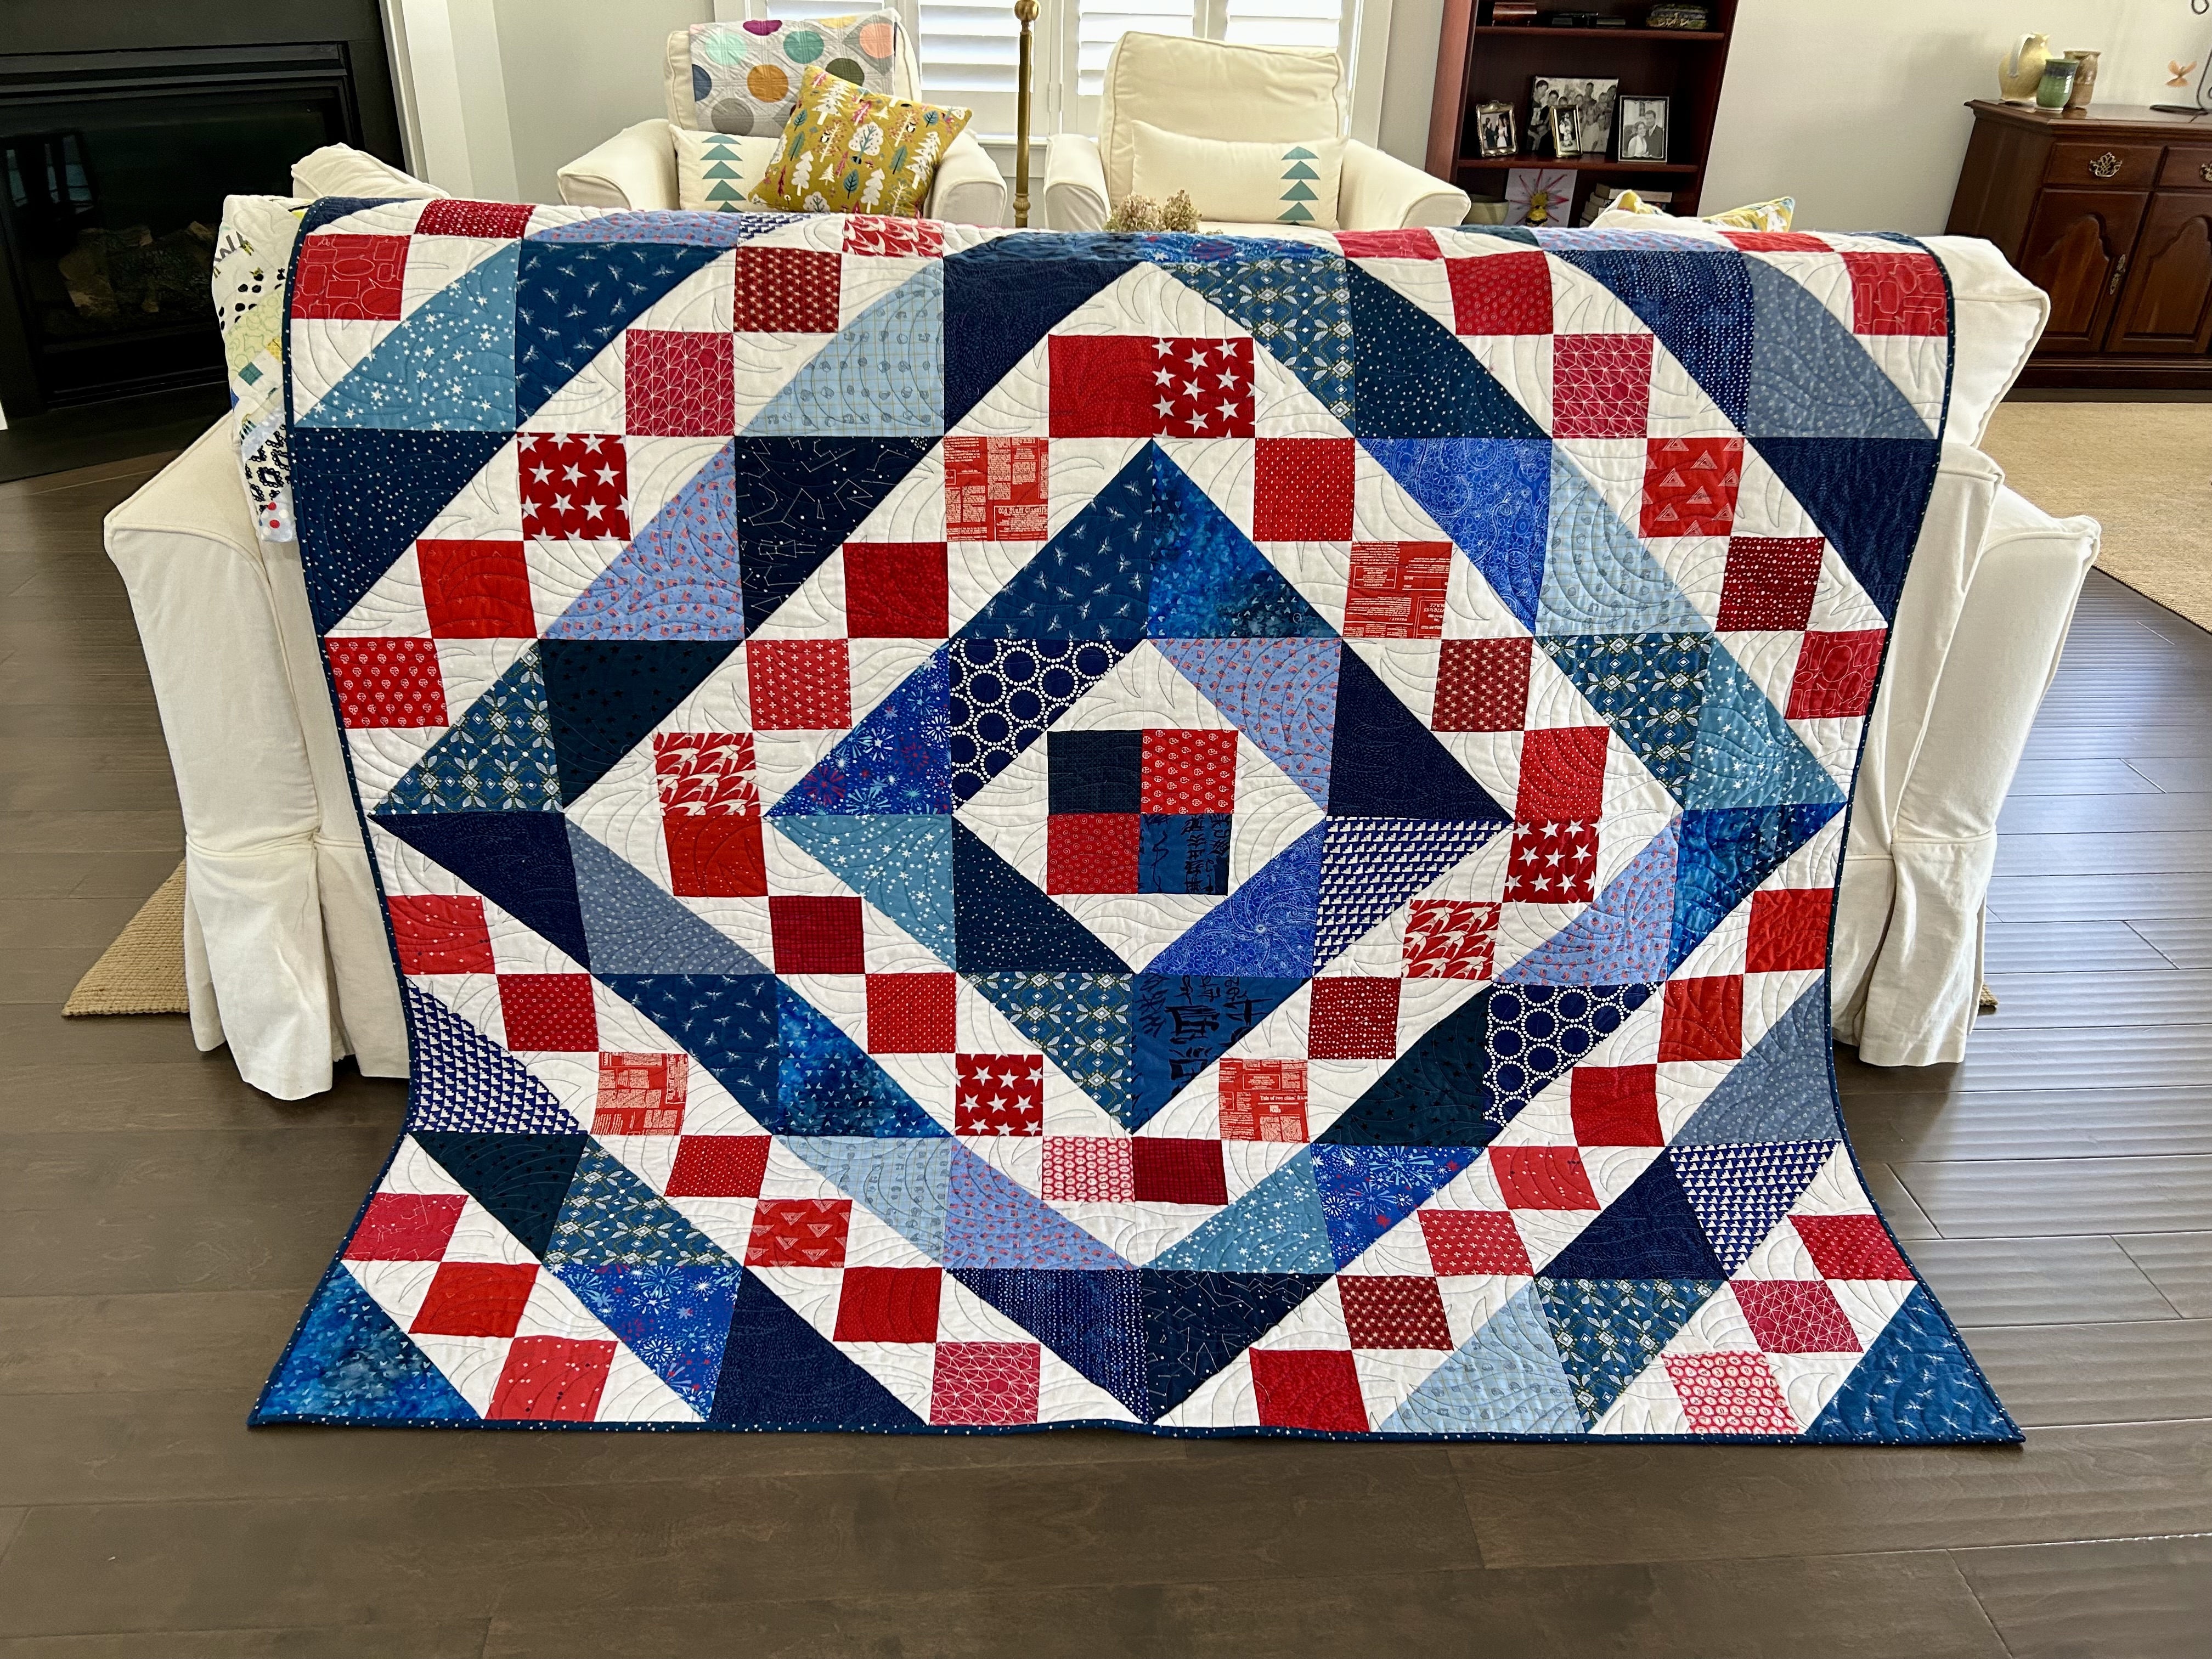
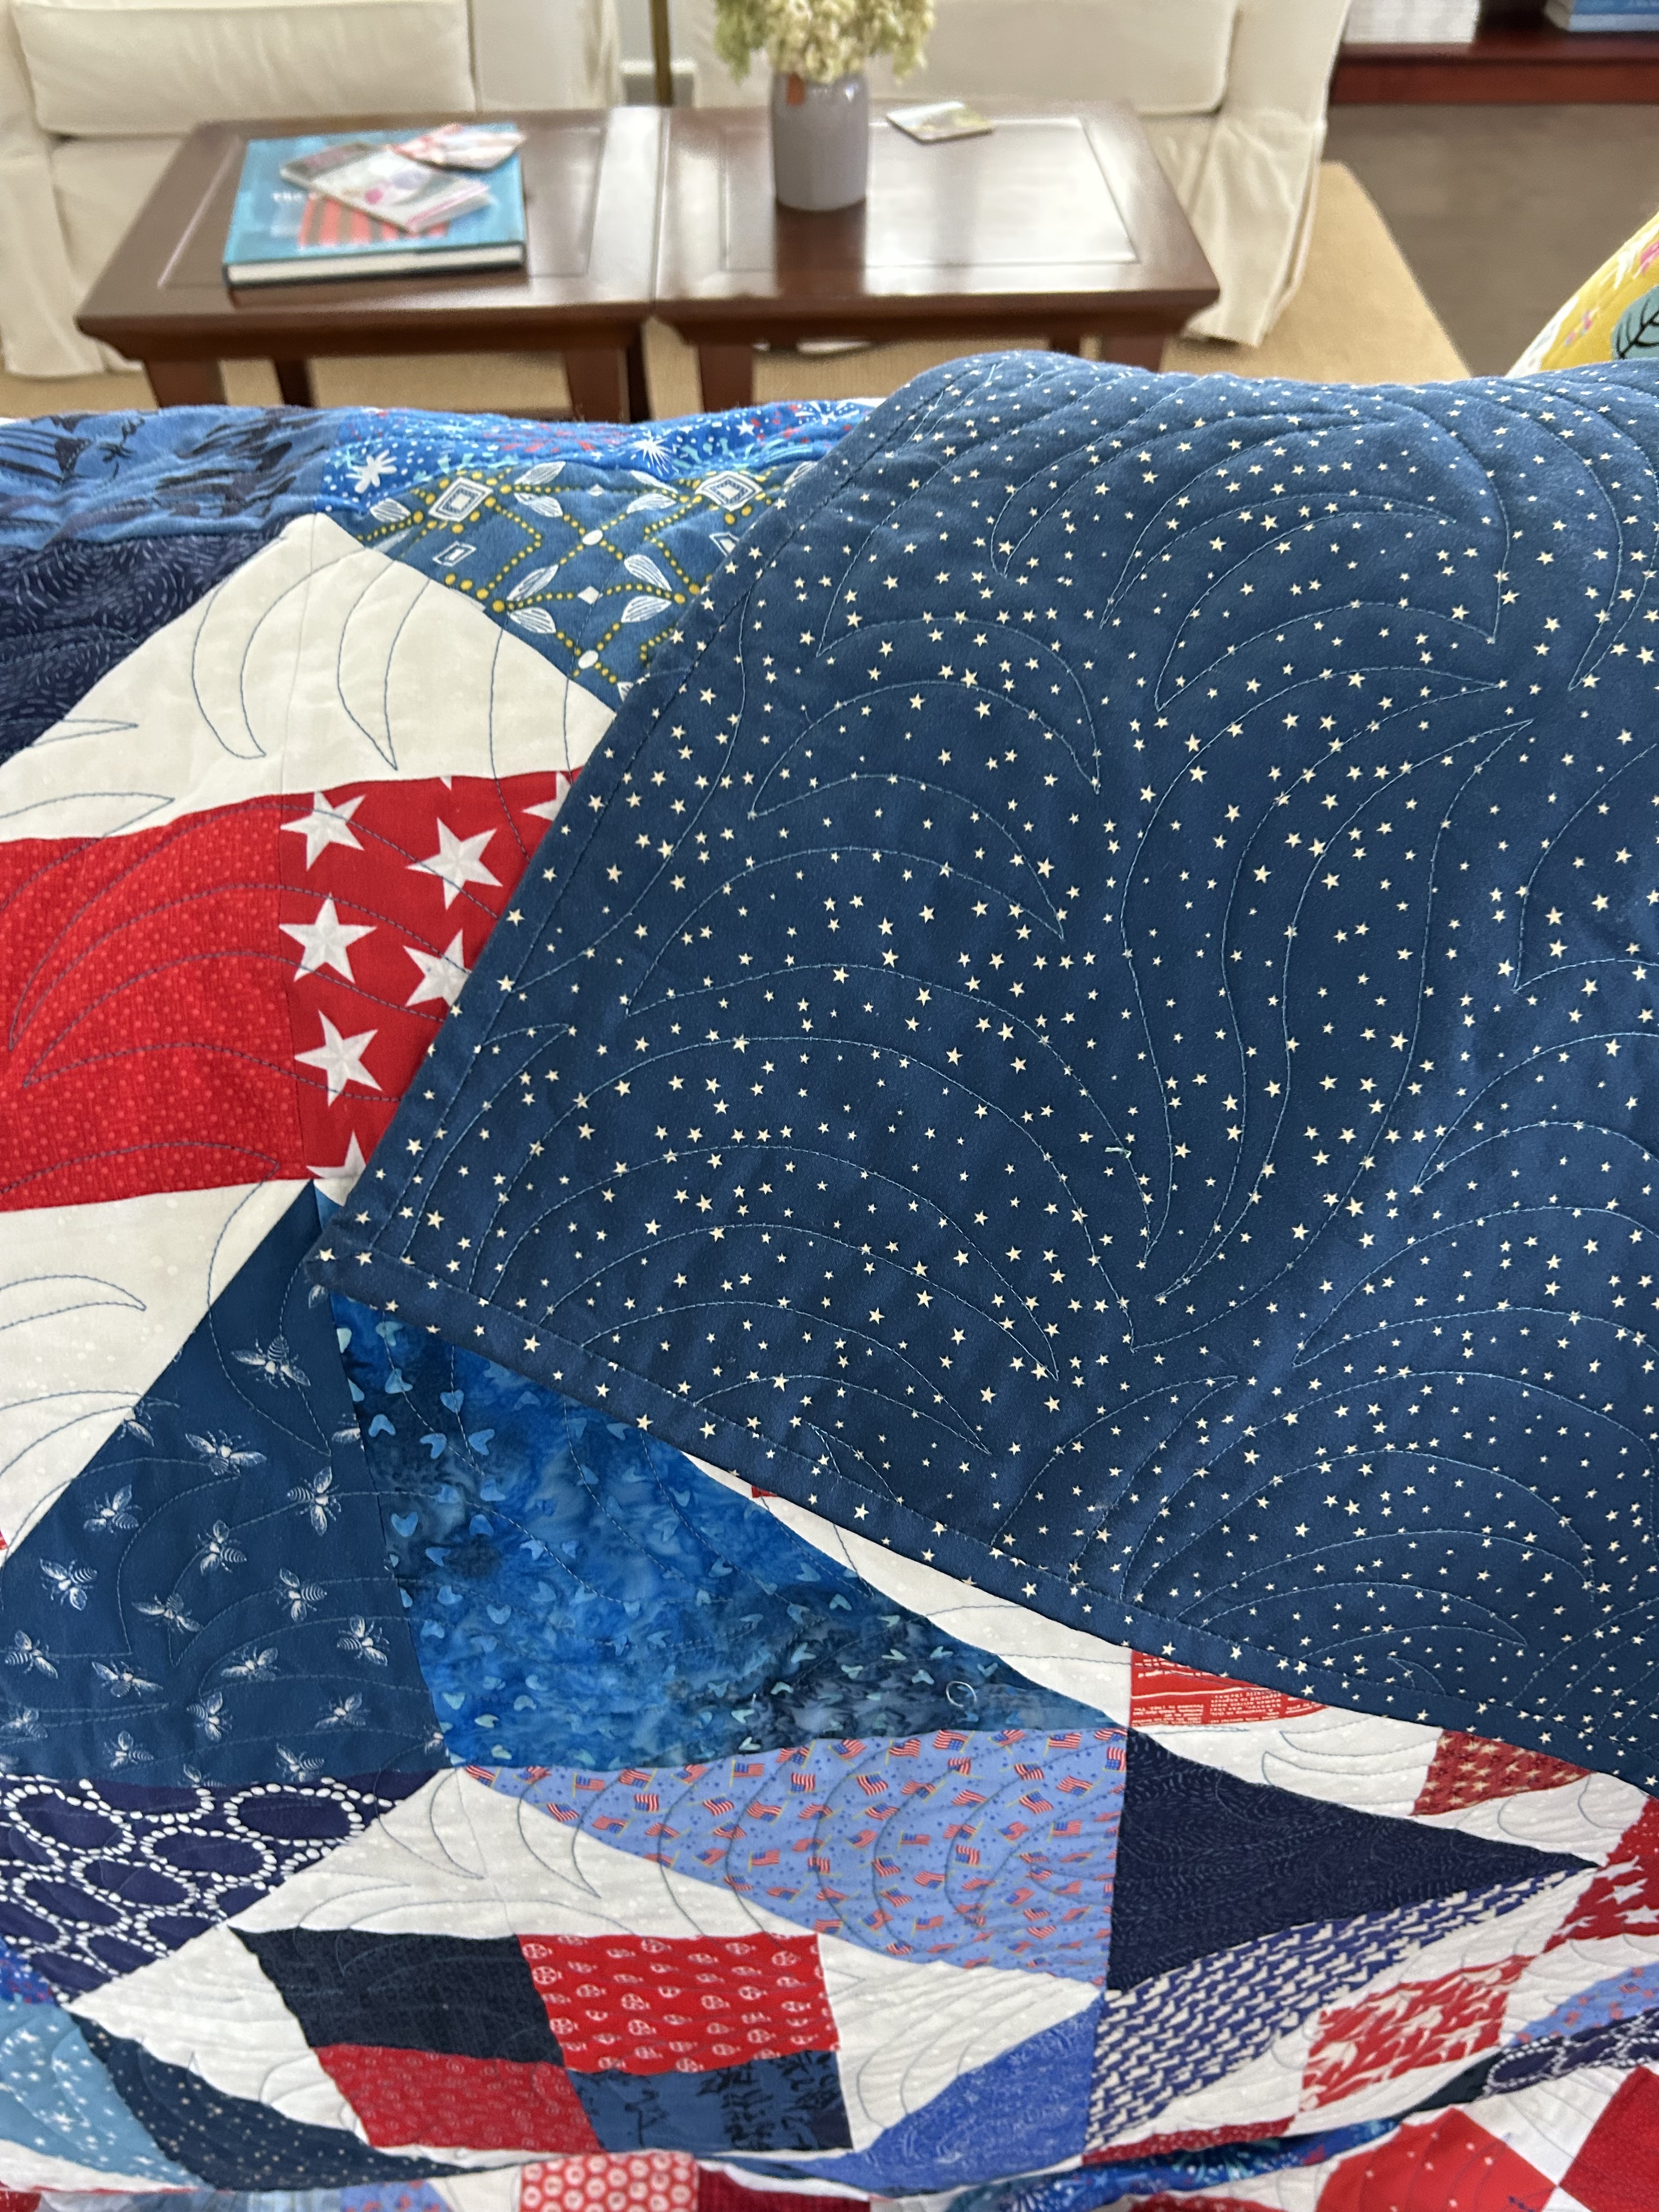
The quilt of valor is finished. Here’s a final picture so you can see the relative size of it at 64 inches square. Those are Cat’s Cradle ruler blocks.
I bound with the backing fabric, Marcus Fabrics “Liberty Island,” R261661D. I had enough to cut binding on the straight of grain, unlike the bias binding I usually make. And I discovered a whole new reason why I like bias binding–the raw binding edges don’t come undone in long strings until I encase the binding edges.
I won’t buy this maker again–Marcus Fabrics. There is something stiff about this fabric that did not wash out when washed–and this brittleness caused little white runs here and there with my longarm needle (a sharp, newly installed needle), my domestic machine needle while installing binding, and my very thin needle used to hand quilt the binding down.
Add in that I also had a similar problem with a stiff feeling Moda crimson wide back that would not stop shedding its dye. I washed it FOUR times (an hour each, but with soap only the first time), and it still shed its dye in a volume that made it impossible to use it in a quilt. I use color catchers when washing new fabrics, so I can easily see if there is a problem. So now I’m wondering if some fabric makers are using some new technology to make thin cottons stiffer? And if something about that stiffness can cause the little runs in the fabric or the shedding of some dyes????
From now on, if a fabric is stiff, I’m not buying it. I returned the Moda wideback to the shop owner, who was horrified and immediately refunded my money. She is investigating now.
I also finished hand quilting this 14-inch stretched canvas block and gifted it.
This pattern is “Best Buds” by Pen and Paper Patterns–and we talked about it some months ago. It is a cute block, and I think it would make a handsome quilt. Maybe that will happen…??? BUT, note that there are some errors in the cutting directions, so if you go this direction, make a trial block first. It isn’t hard to sew otherwise.
It is cold here with freezing temps at night and high wind. But after Tuesday night, I think we will head into early spring here in coastal South Carolina.
My Quilt of Valor is off the longarm, trimmed, and ready for me to check how to organize the binding so I don’t play binding roulette.
And now almost two binding sides are done.
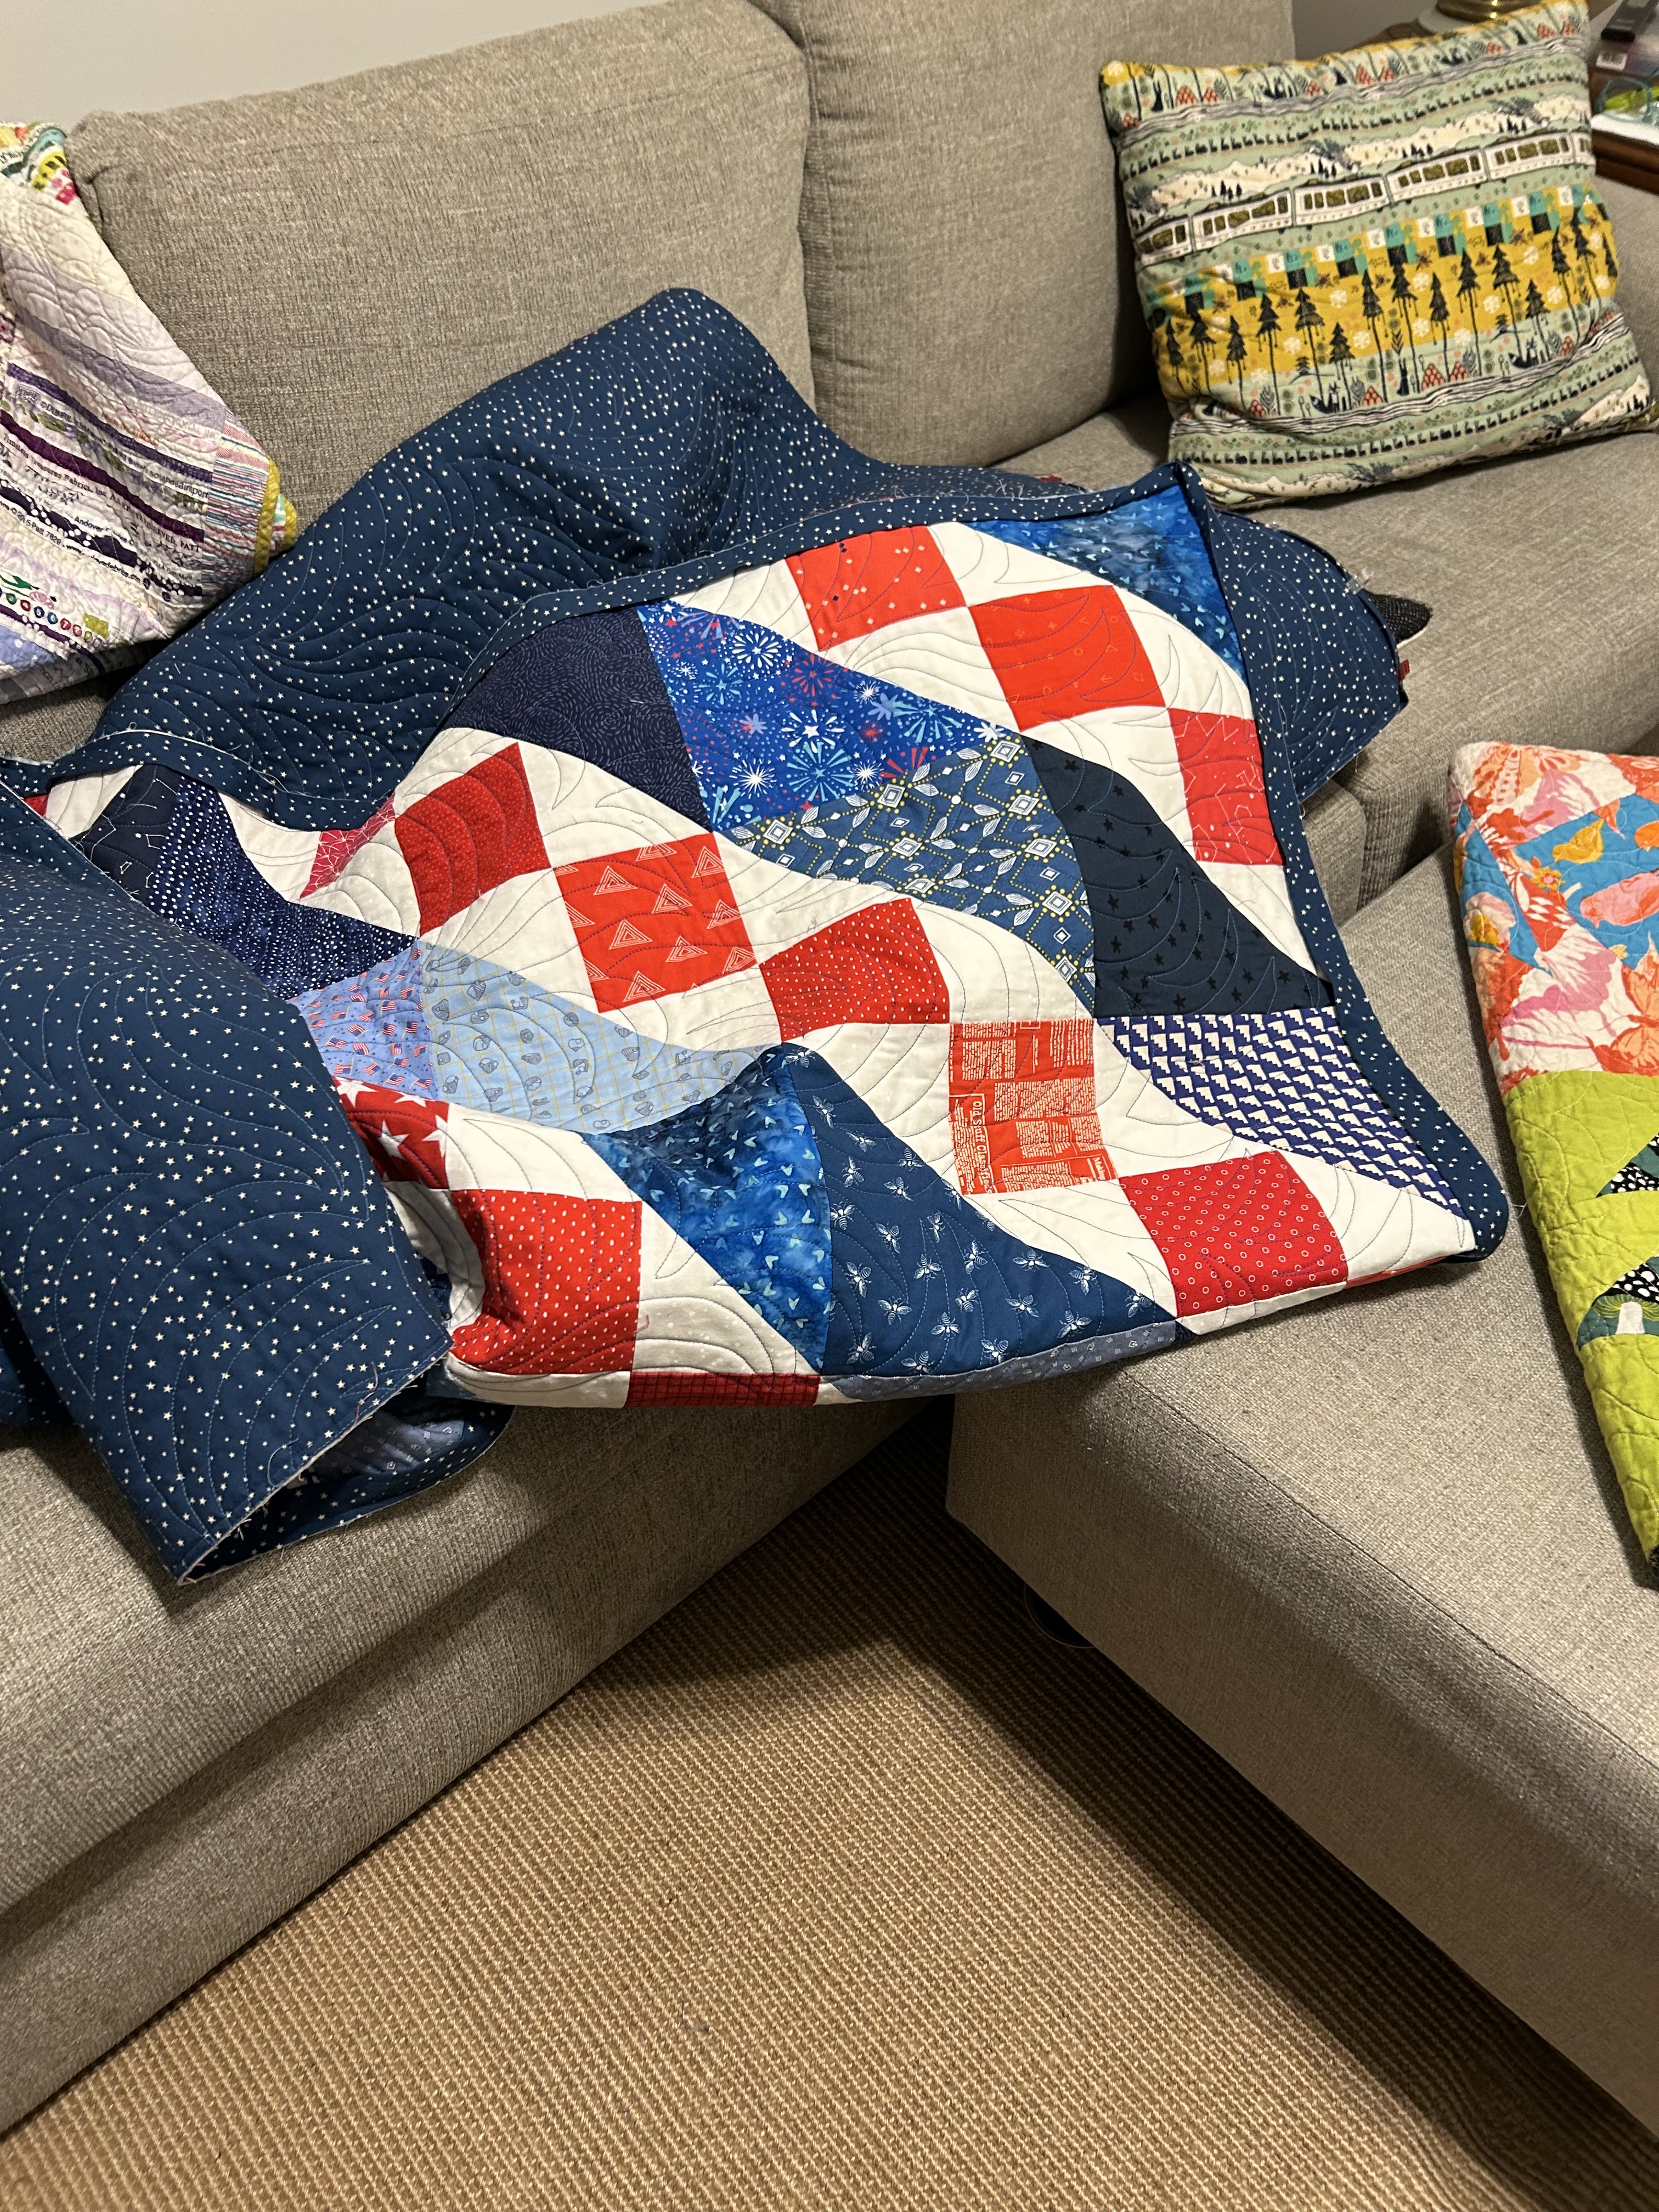
The improv quilt if ready to go on the longarm, and I got a backing last week. I’m thinking about what pantograph to use–something with some curves I think. I really would like matchstick stitching for this graphic quilt, but it’s a bit too long for me to manage with my domestic machine–and I’d still baste it on the longarm anyway. Doing straight line stitching on the longarm is very time consuming and hard to do accurately.
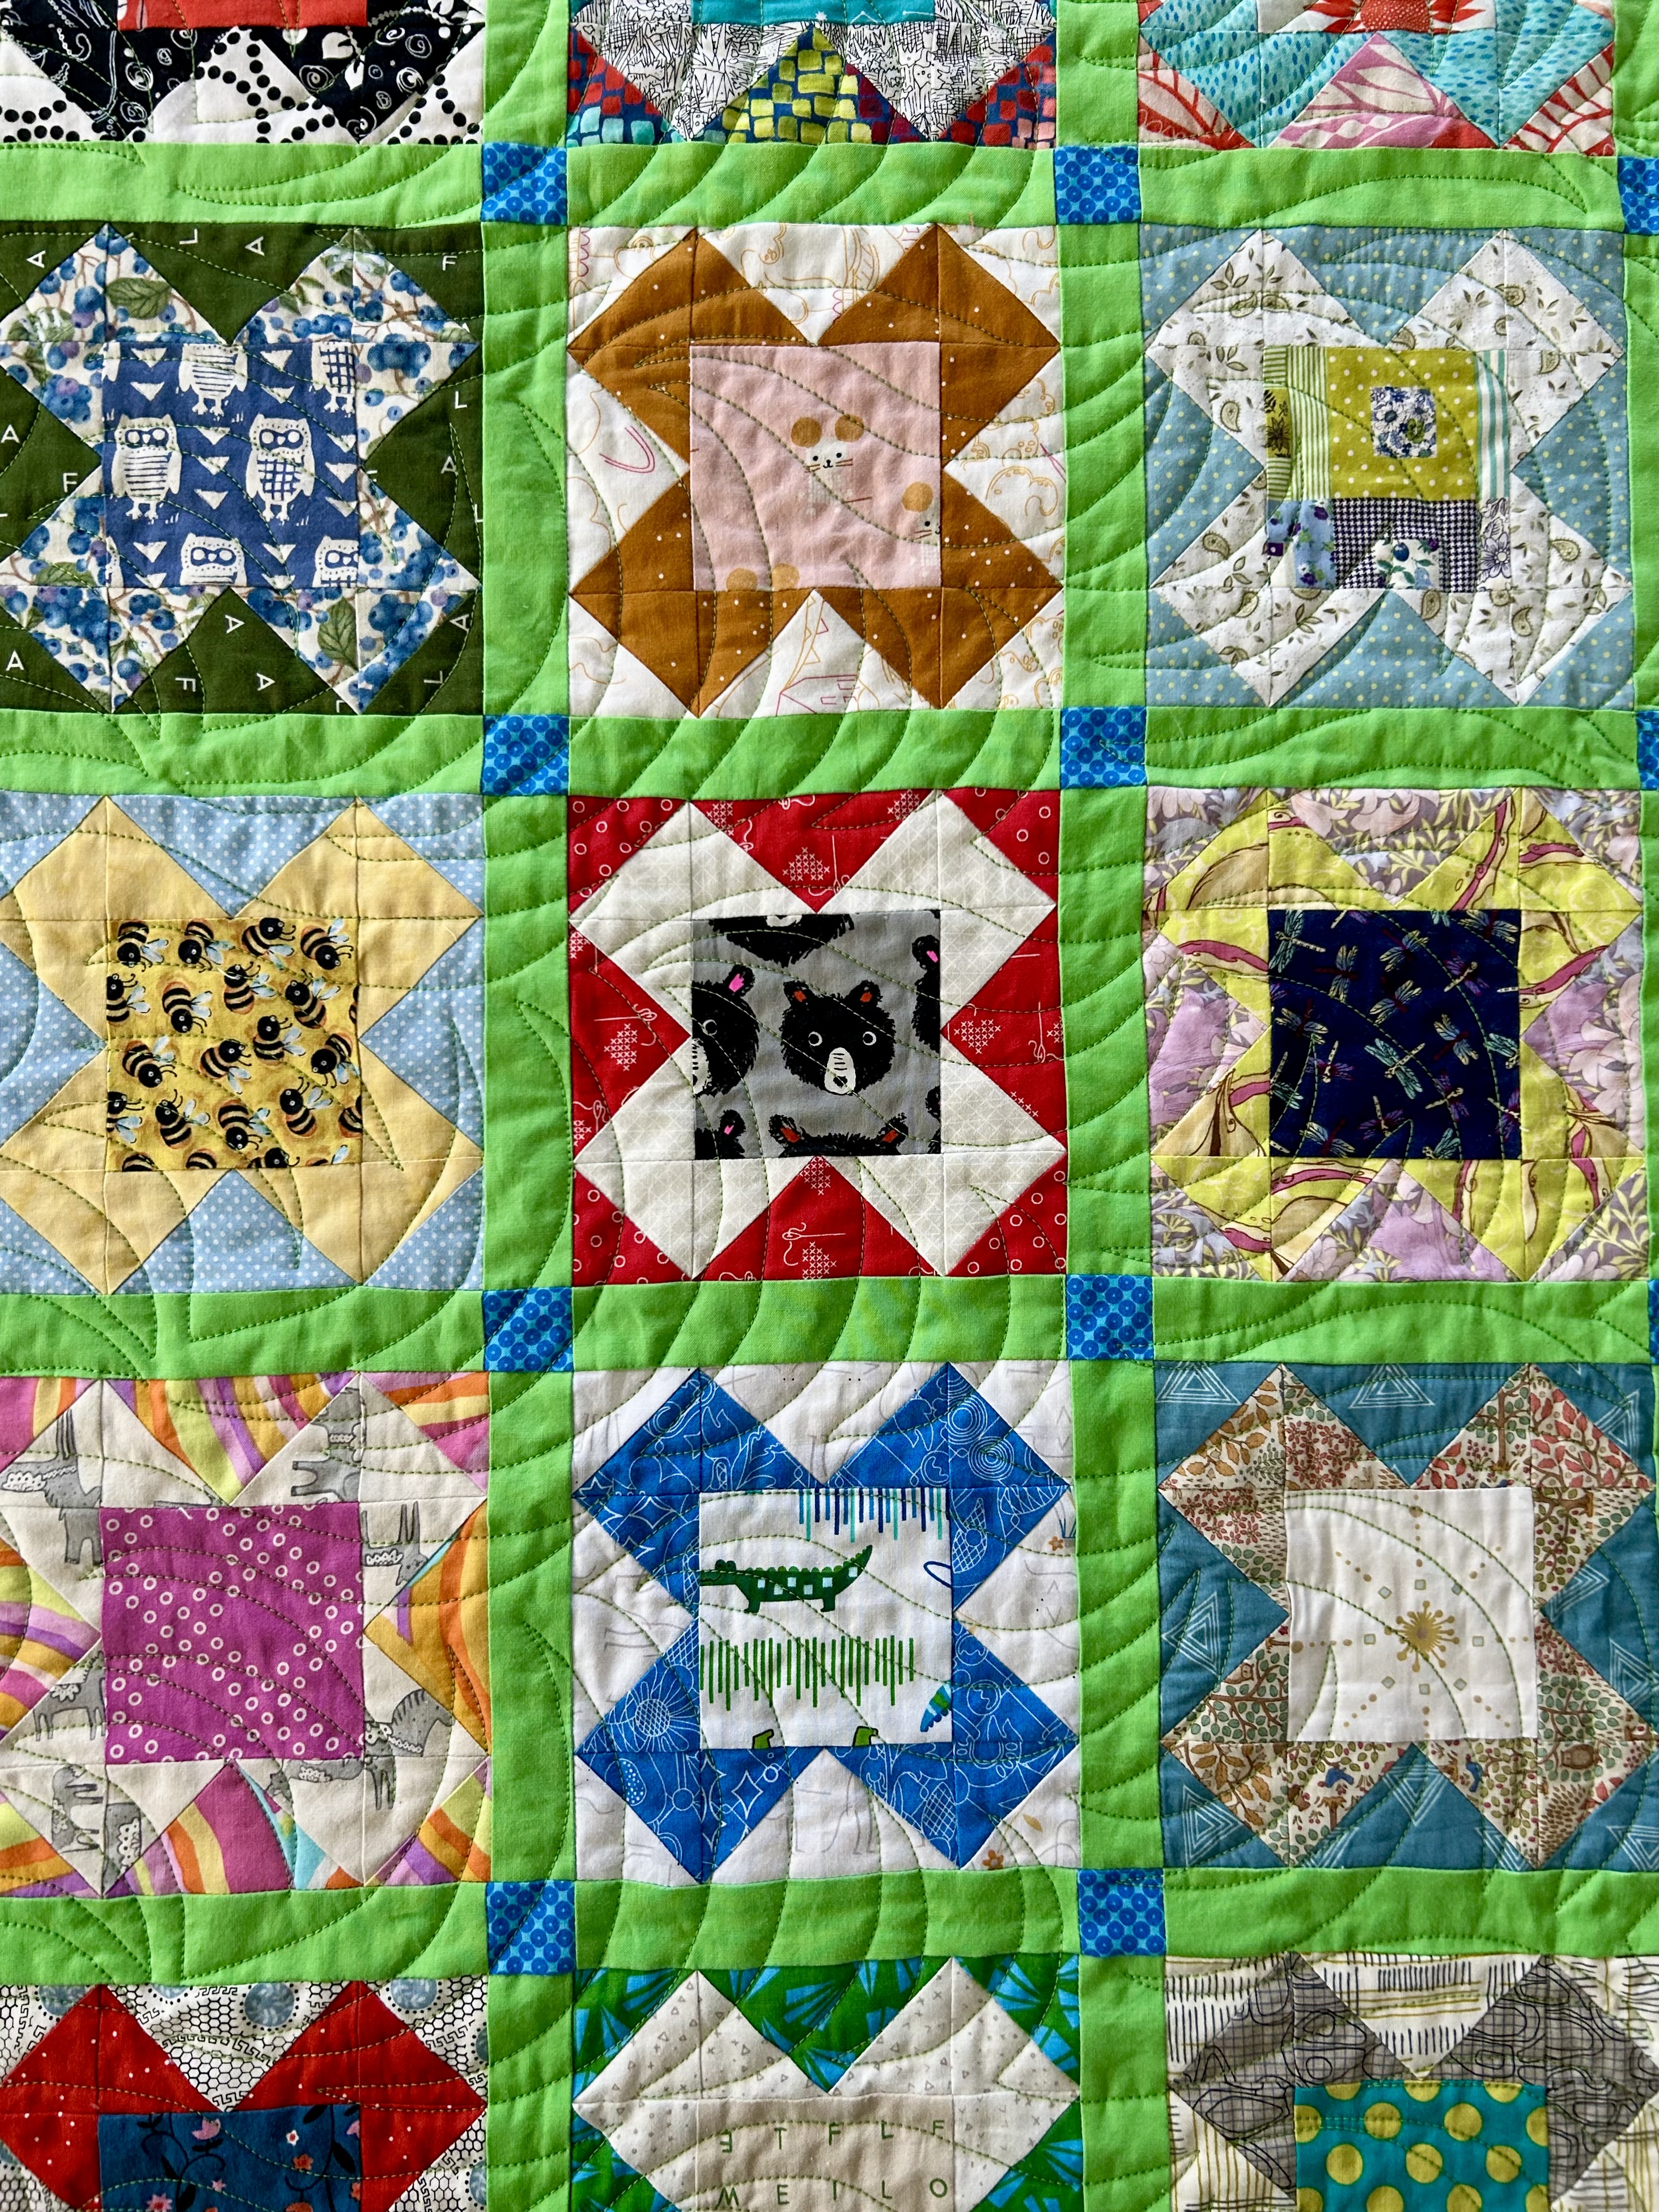
Now the XO scrappy quilt blocks are hogging the design wall, but I’ll start sewing them together today. This quilt block is a joke on me as when they passed out conceptual genes, I didn’t get any–which is why I love to work on a design wall. This block is NOT just an “X” block or an “O” block. When you make either block and put it next to another of its same blocks, it makes an “XO” block–which drives your eyes kind of crazy as they try to focus on either the “X” or the “O” form. How fun is that?
“Flower Pop” needs 2 more blocks for its first row–of a planned three rows, which will make a nice lap-size quilt. The 8th block has fabric ready to cut and sew.
The pineapple blocks are hiding under the “XO” top, but will soon have room to grow.
And then, on the lower left, leader/ender blocks are all ready to lay out for a small quilt. Maybe I’ll make it bigger.
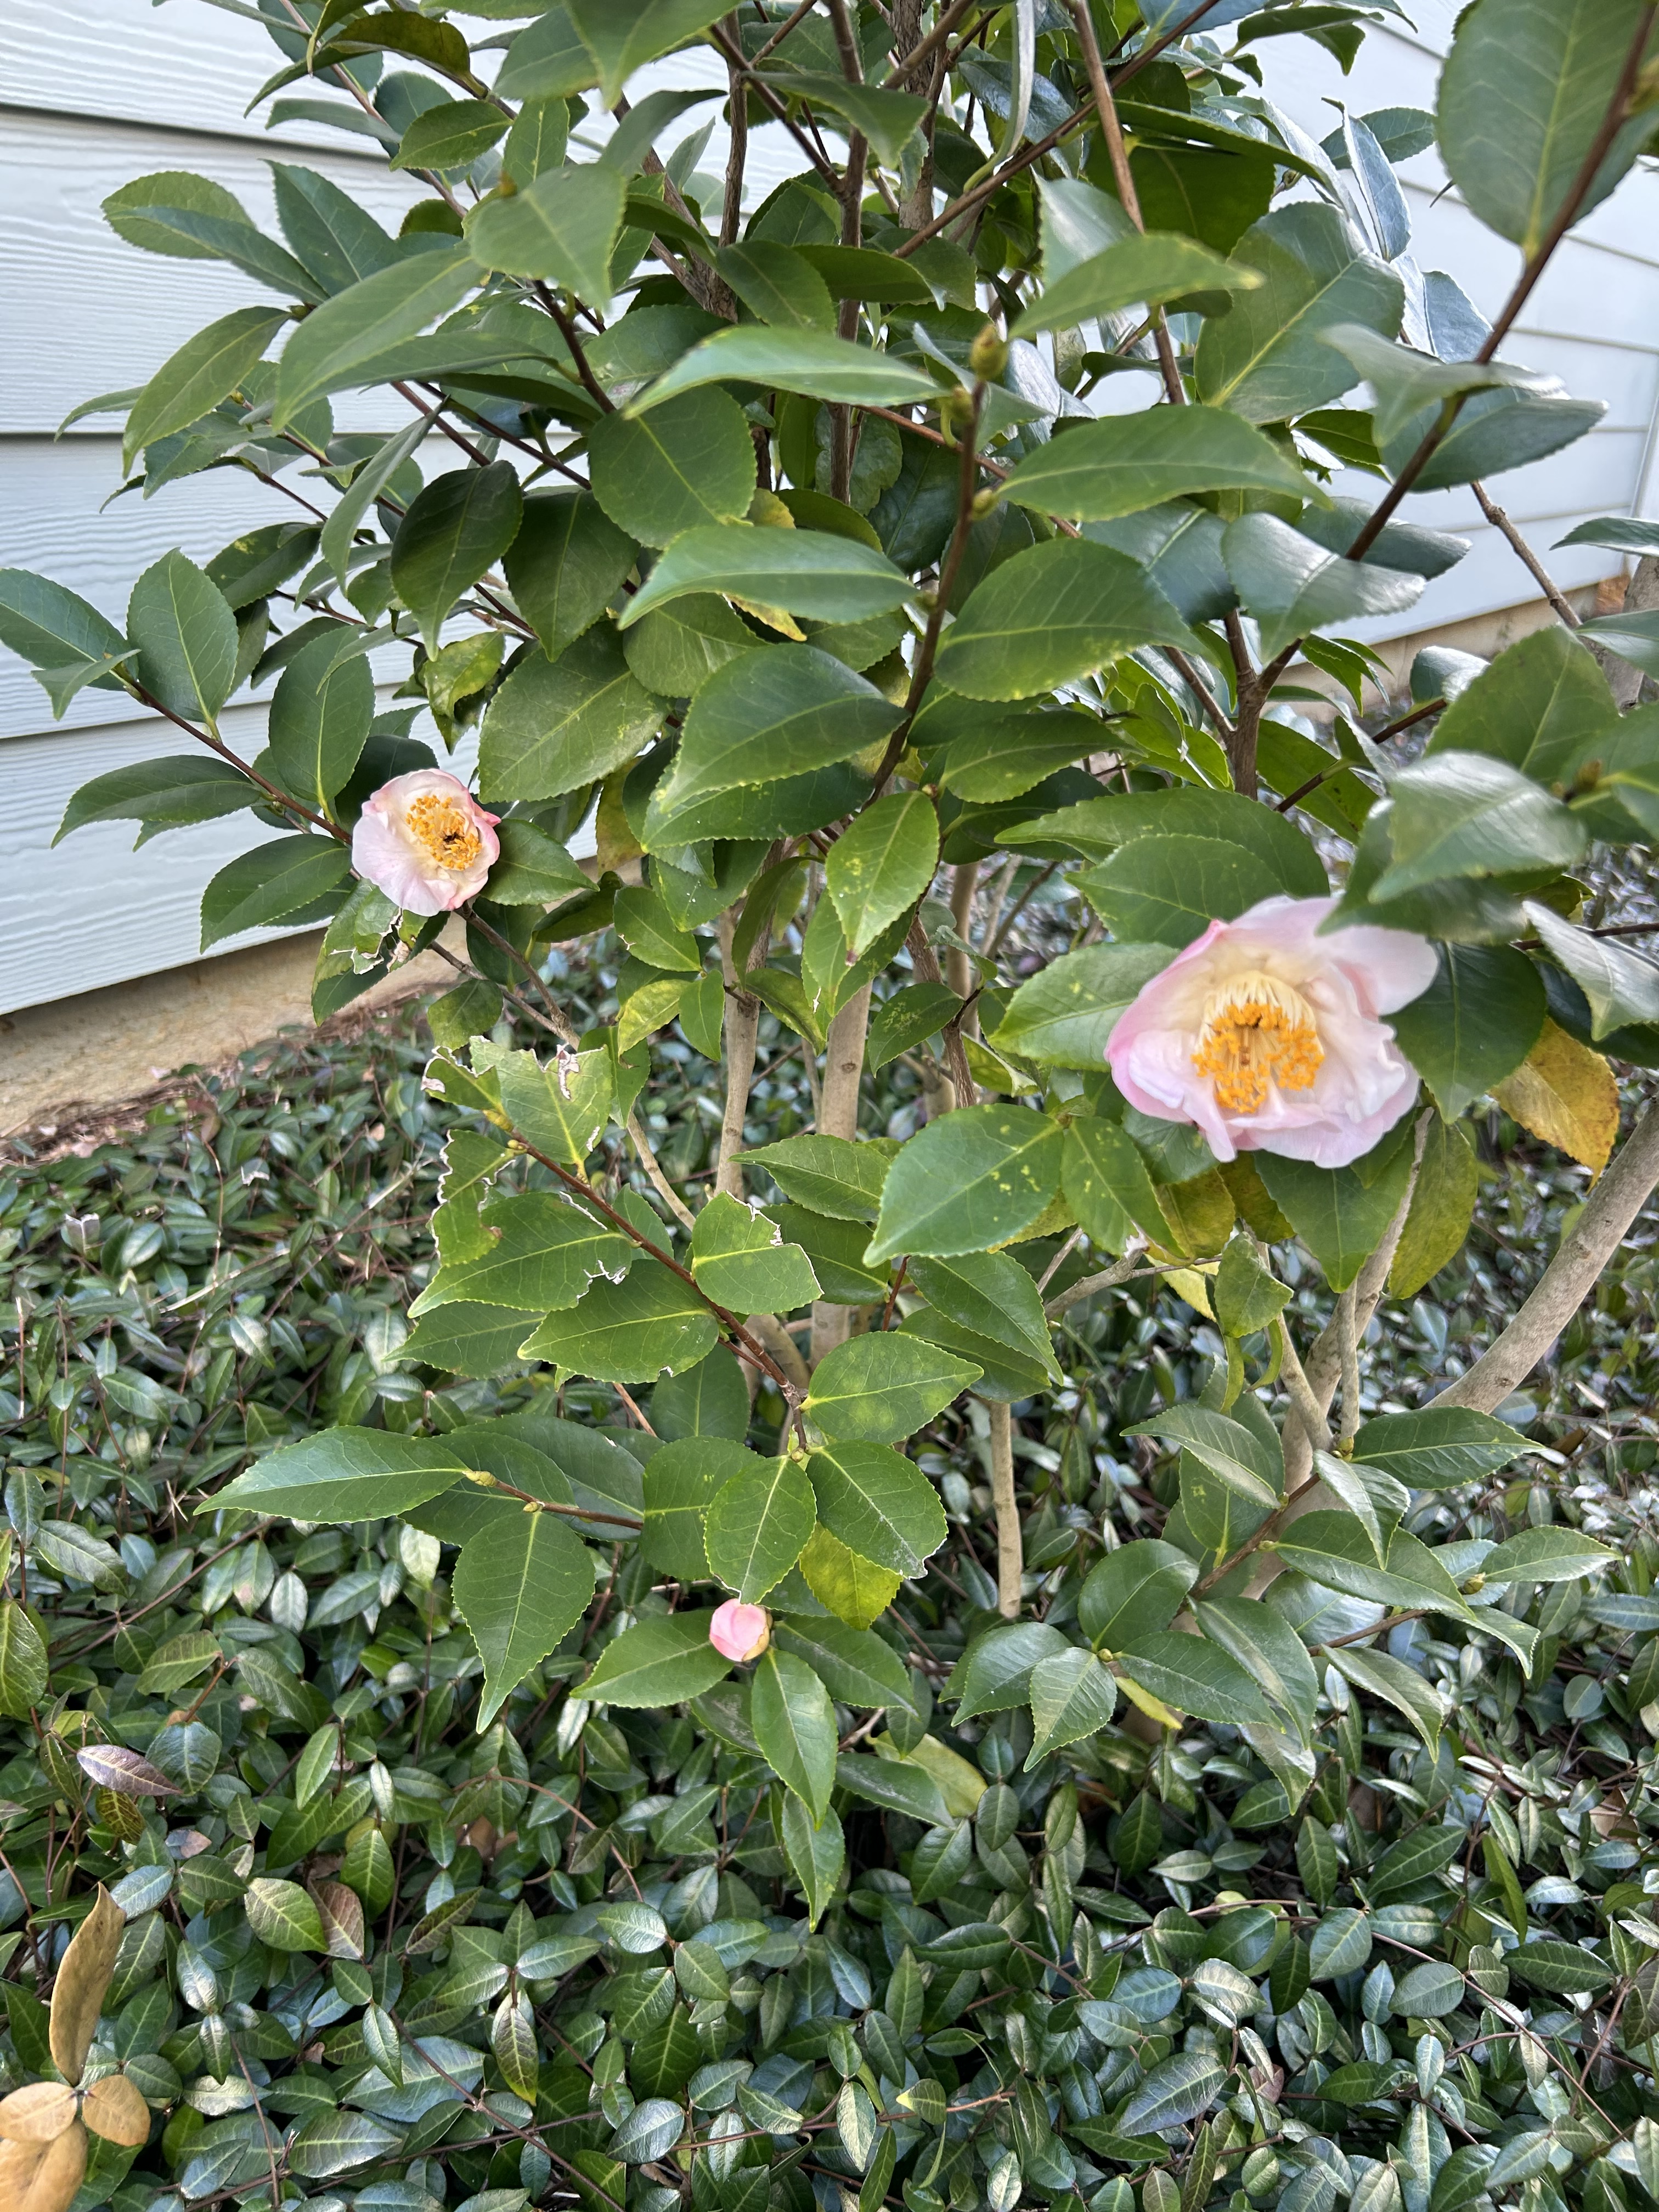
But first, a camellia saga. Last winter the buds on this plant did not survive the cold weather, though I wrapped the plant to protect it. This year, it was loaded with buds, and one day a month ago I went out to check it, and they were all gone but three at the bottom. Deer!!! (And now I’m wondering about the buds from last winter. Deer LOVE flower buds.) But after almost three years, the remaining three blooms opened up. Can you imagine how pretty if the bush were covered with these pretty blooms? Nevertheless, I’ll take what I can get. Joy in the moment, you know.
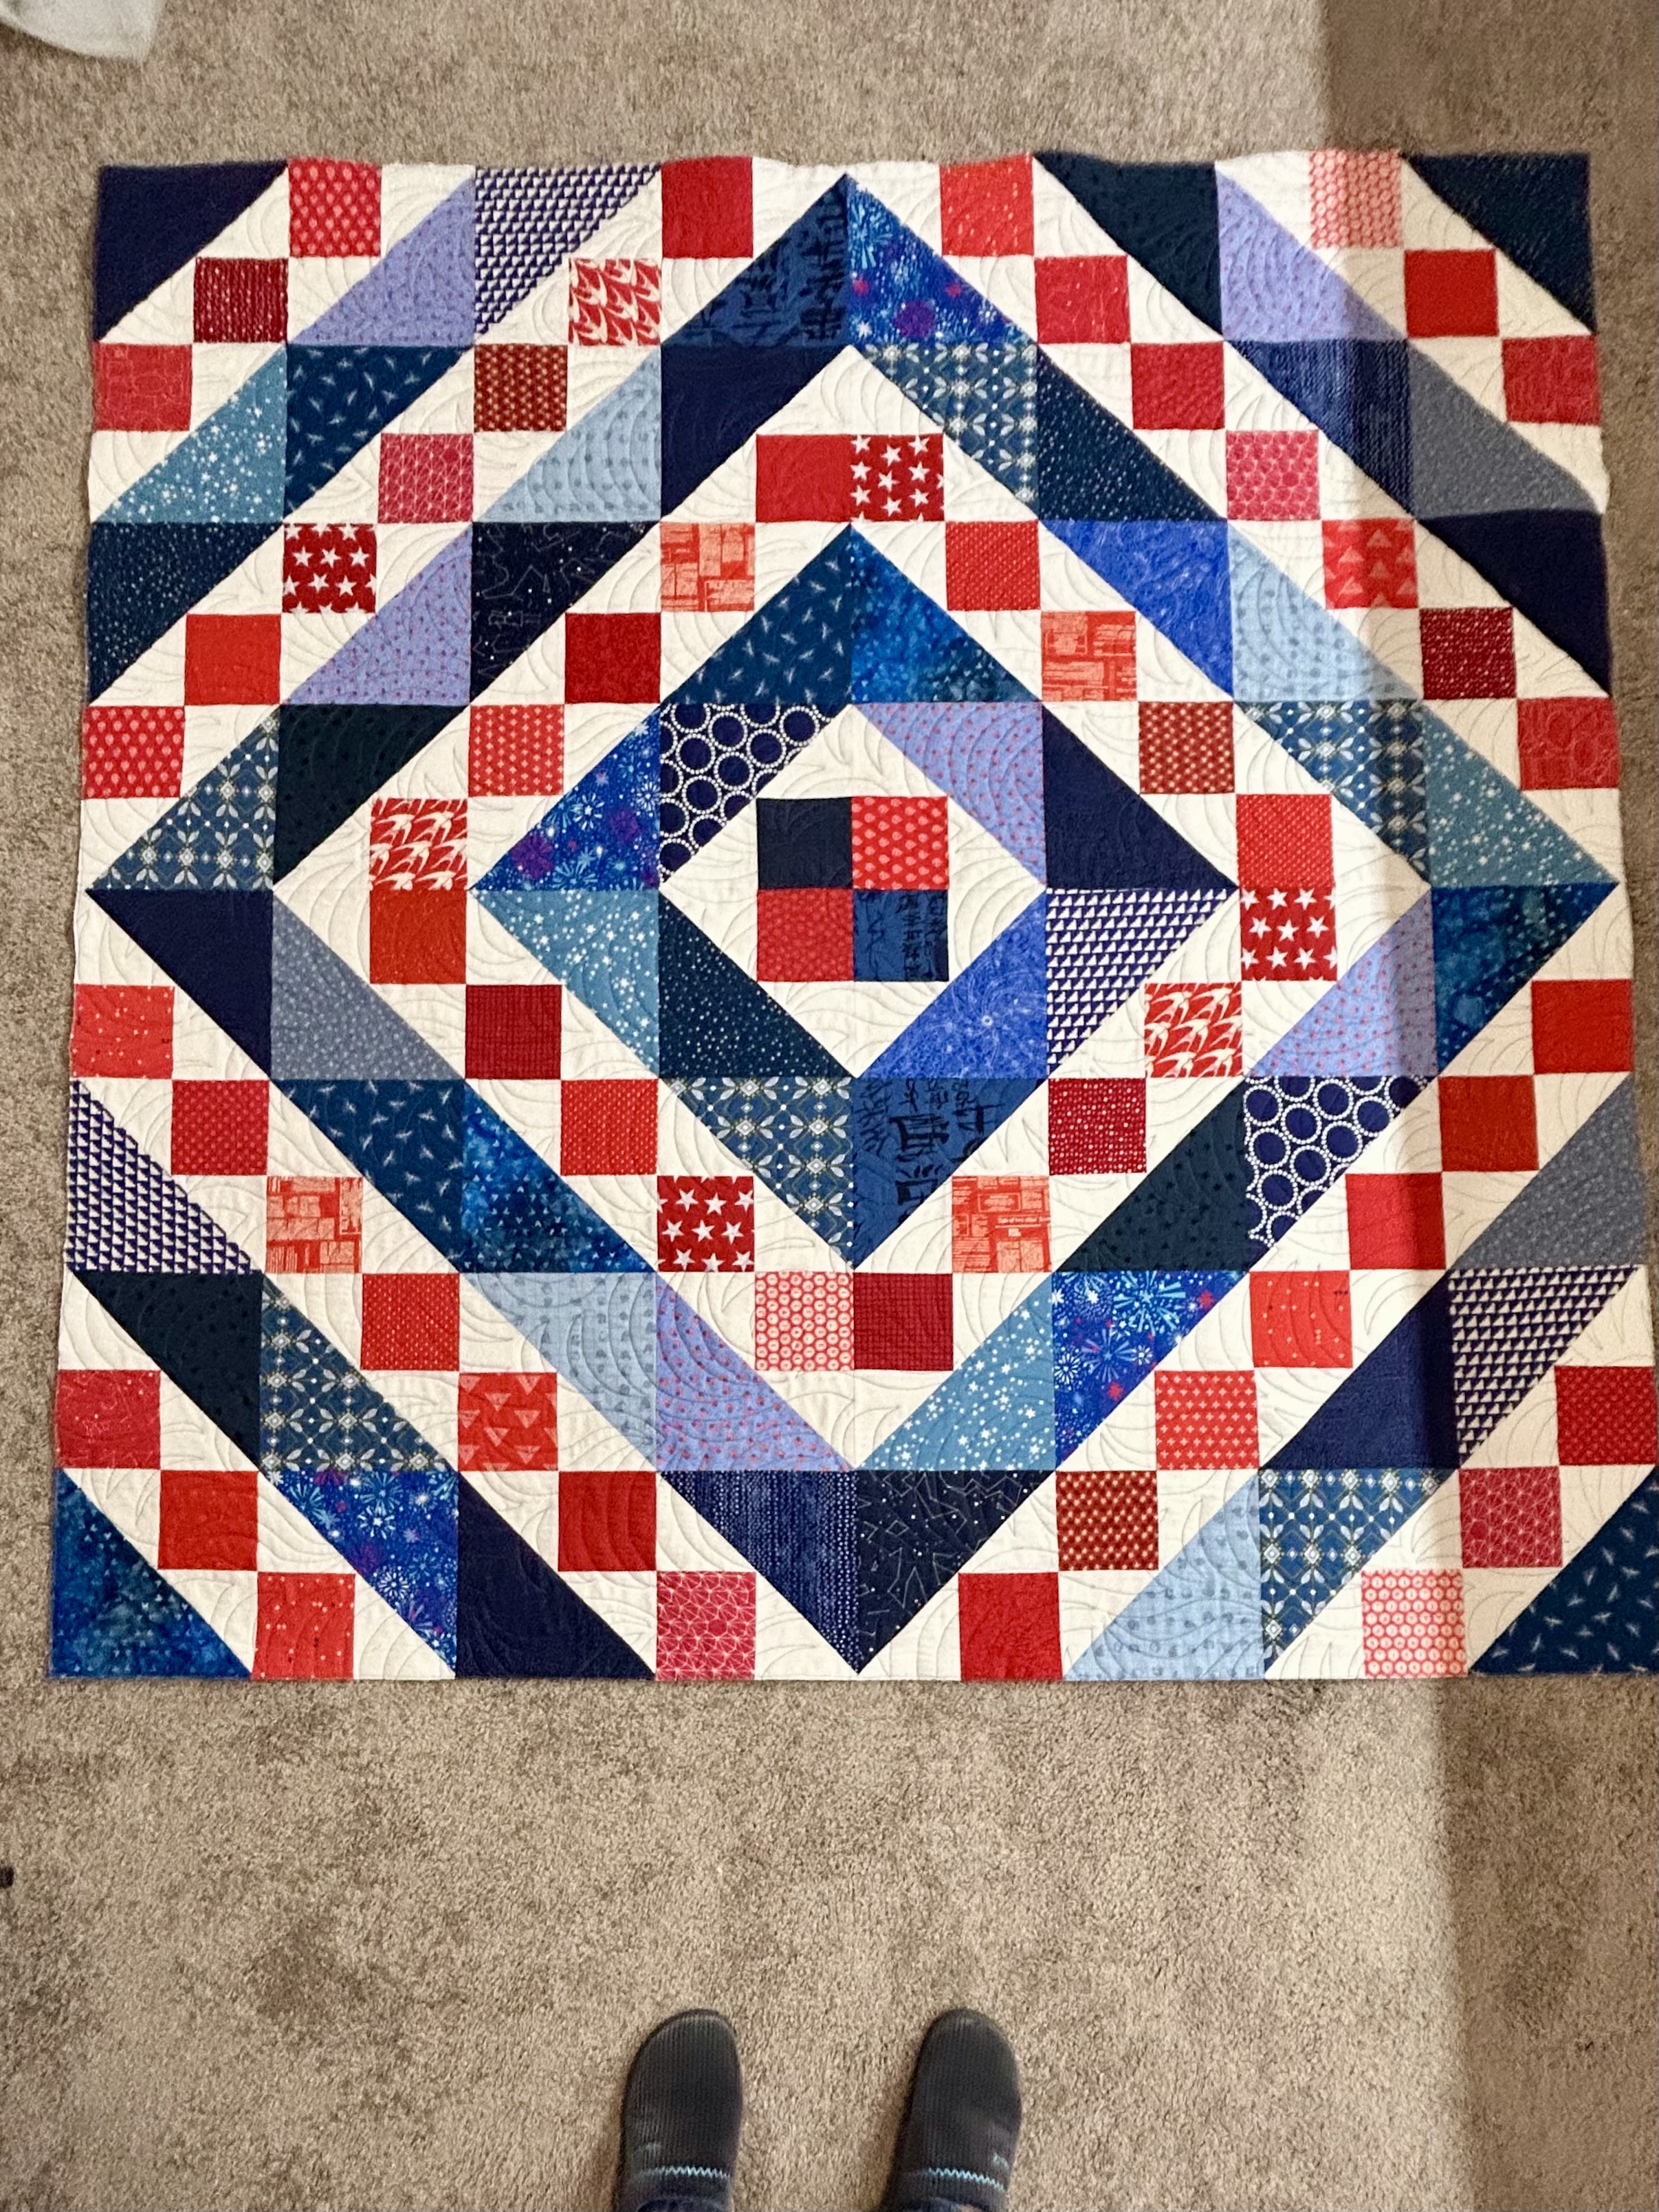
I hope you can see where the quilt is and where the rug is in this picture. It’s the best I can do for the moment. I put it down to measure it to make sure it is square. It is a half-inch off on the bottom right, but the corners are all square, and the bottom line is true, so I’m going to call it a day. The longarm quilting process can gather up fabric during the quilting, so I think I’m good on this one.
I had such fun making these blocks. Many were the trial blocks for my online Tara Faughnan class, Blocks 3. Many were just playing with scraps. And many were made while playing with rulers I haven’t used in a while. I am especially intrigued by how a pineapple block looks with the neutral part of the block the same color as the quilt field fabric. I love how the colors float as a result!!!
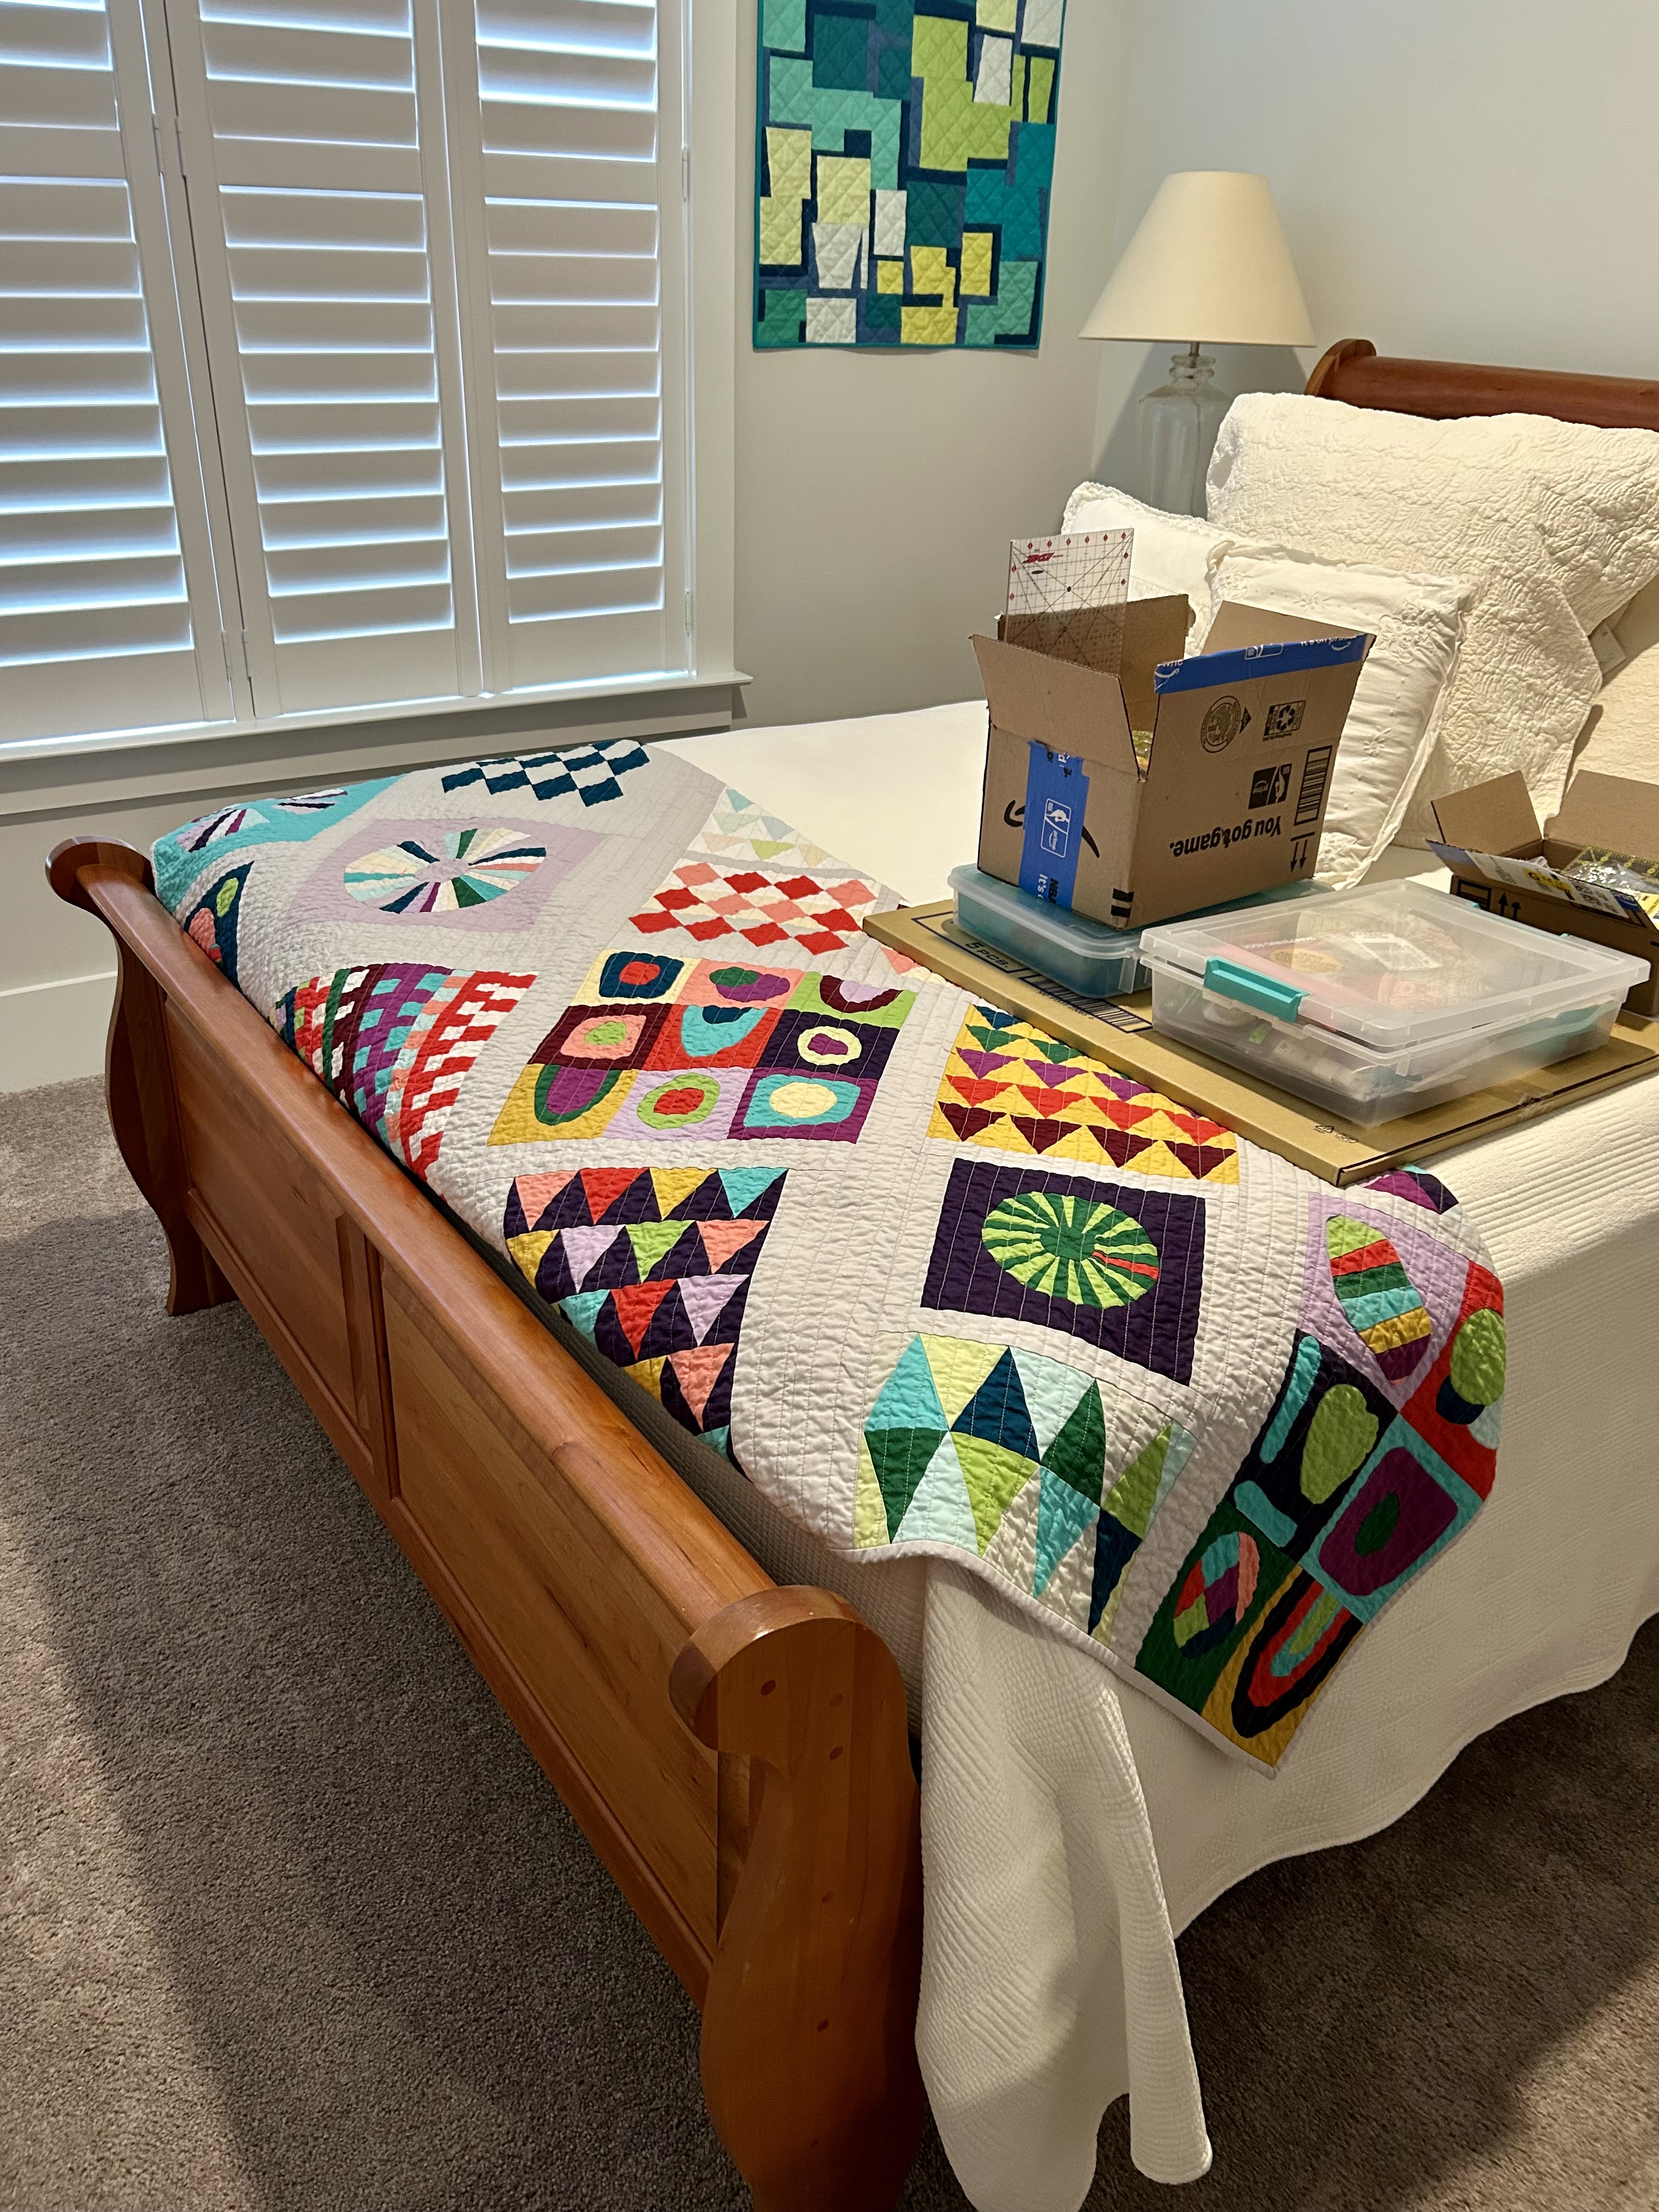
You may remember the improv quilt I made a few years ago with the blocks from the Blocks 1 class. It now lives on the end of the guest bedroom bed, right now alongside the sewing supplies I’m collecting for the college granddaughter and the three younger granddaughters. Two sewing machines are coming for them in late March.
How did it get to be Wednesday already?
It is getting warmer here, and I put away my warm knit pants, though we will have another bit of cold weather at night early next week. Or so the weather says…
Good morning to all. I’m not sure where the time has flown to, but I’ve been steadily working on my quilt projects all along.
Here’s “Pistachio,” all finished. She is 50-inches square. She is very green, but so cheerful as spring is on the horizon here in coastal South Carolina. I made these blocks as leader/enders and was in no hurry to make enough to create a quilt, and that is how leader/enders can work out.
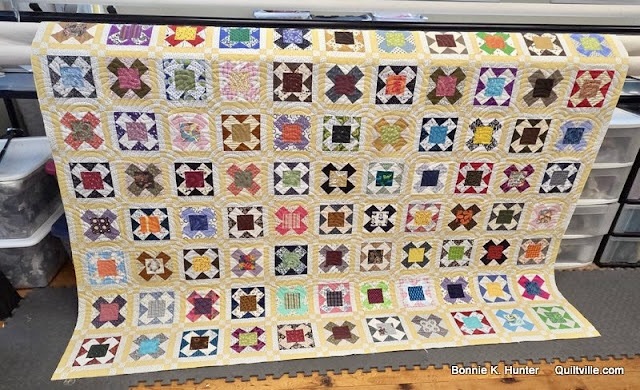
Bonnie Hunter designed the block some years back as part of her regular column for Quiltmaker magazine, a column which she no longer does. She called the block something like “X-Plus.” I tried to find links to this block at the magazine to give credit where credit is due, but the archive seems to be gone. Sometime last year Bonnie started making these blocks herself, off and on, and recently she, too, finished a quilt with this block and called it “Sunnyside.” (Bonnie Hunter’s blog is quiltville.blogspot.com and it is a treasure trove of free patterns.)
The very green backing is La Dolce Vita! by Stacey Peterson (Free Spirit, PWSTO 36 seeds). The white dots are little hearts.
The 6.5-inch block is just a 9-patch with a 3-inch center, and I pulled the centers from my bins of 3.5-inch squares and for the most part alternated light and dark centers in the quilt. The other pieces of the block were cut from my strip bins.
I quilted with a green thread, and the pantograph is “Sumptuous” by Hermione Agee.
And here’s a kind of blurry picture of Bonnie Hunter’s “Sunnyside.”
Bonnie’s post is titled “I’m Calling it Sunnyside!,” and she posted this entry on January 19, 2026.
Over the years Bonnie has made quilts from the blocks she created for Quiltmaker, but I have no idea of when her work on blocks reverts to her. In any case, this sunny yellow quilt is lovely.
Have a great weekend. I’m having a lot of fun sewing together the improv quilt I’ve been making for months and months. How fun is that!
We’ve had some days and nights with temps in the 20’s.
We don’t do freezing temps very well here in Charleston, SC, let alone temps in the 20s.
I had a frozen pipe at the OUTSIDE water heater, as did both sons on Isle of Palms, but all are fixed now. A neighbor here rescued me and put on new and better insulation outside. We have all been dripping hot water at night. The hot shower I took last night was beyond delightful. And this morning I have clean sheets and am washing the dirty clothes in warm water!
So….of course I spent this very cold time, after dealing with hot water and cooking, SEWING.
My longarm needed a spring replaced, and that job was above my pay grade, but it is all fixed now and “Pistachio” is off the longarm, trimmed, bound, and is getting its binding sewn down at night.
It is so darn cute!
All that intense green…glows.
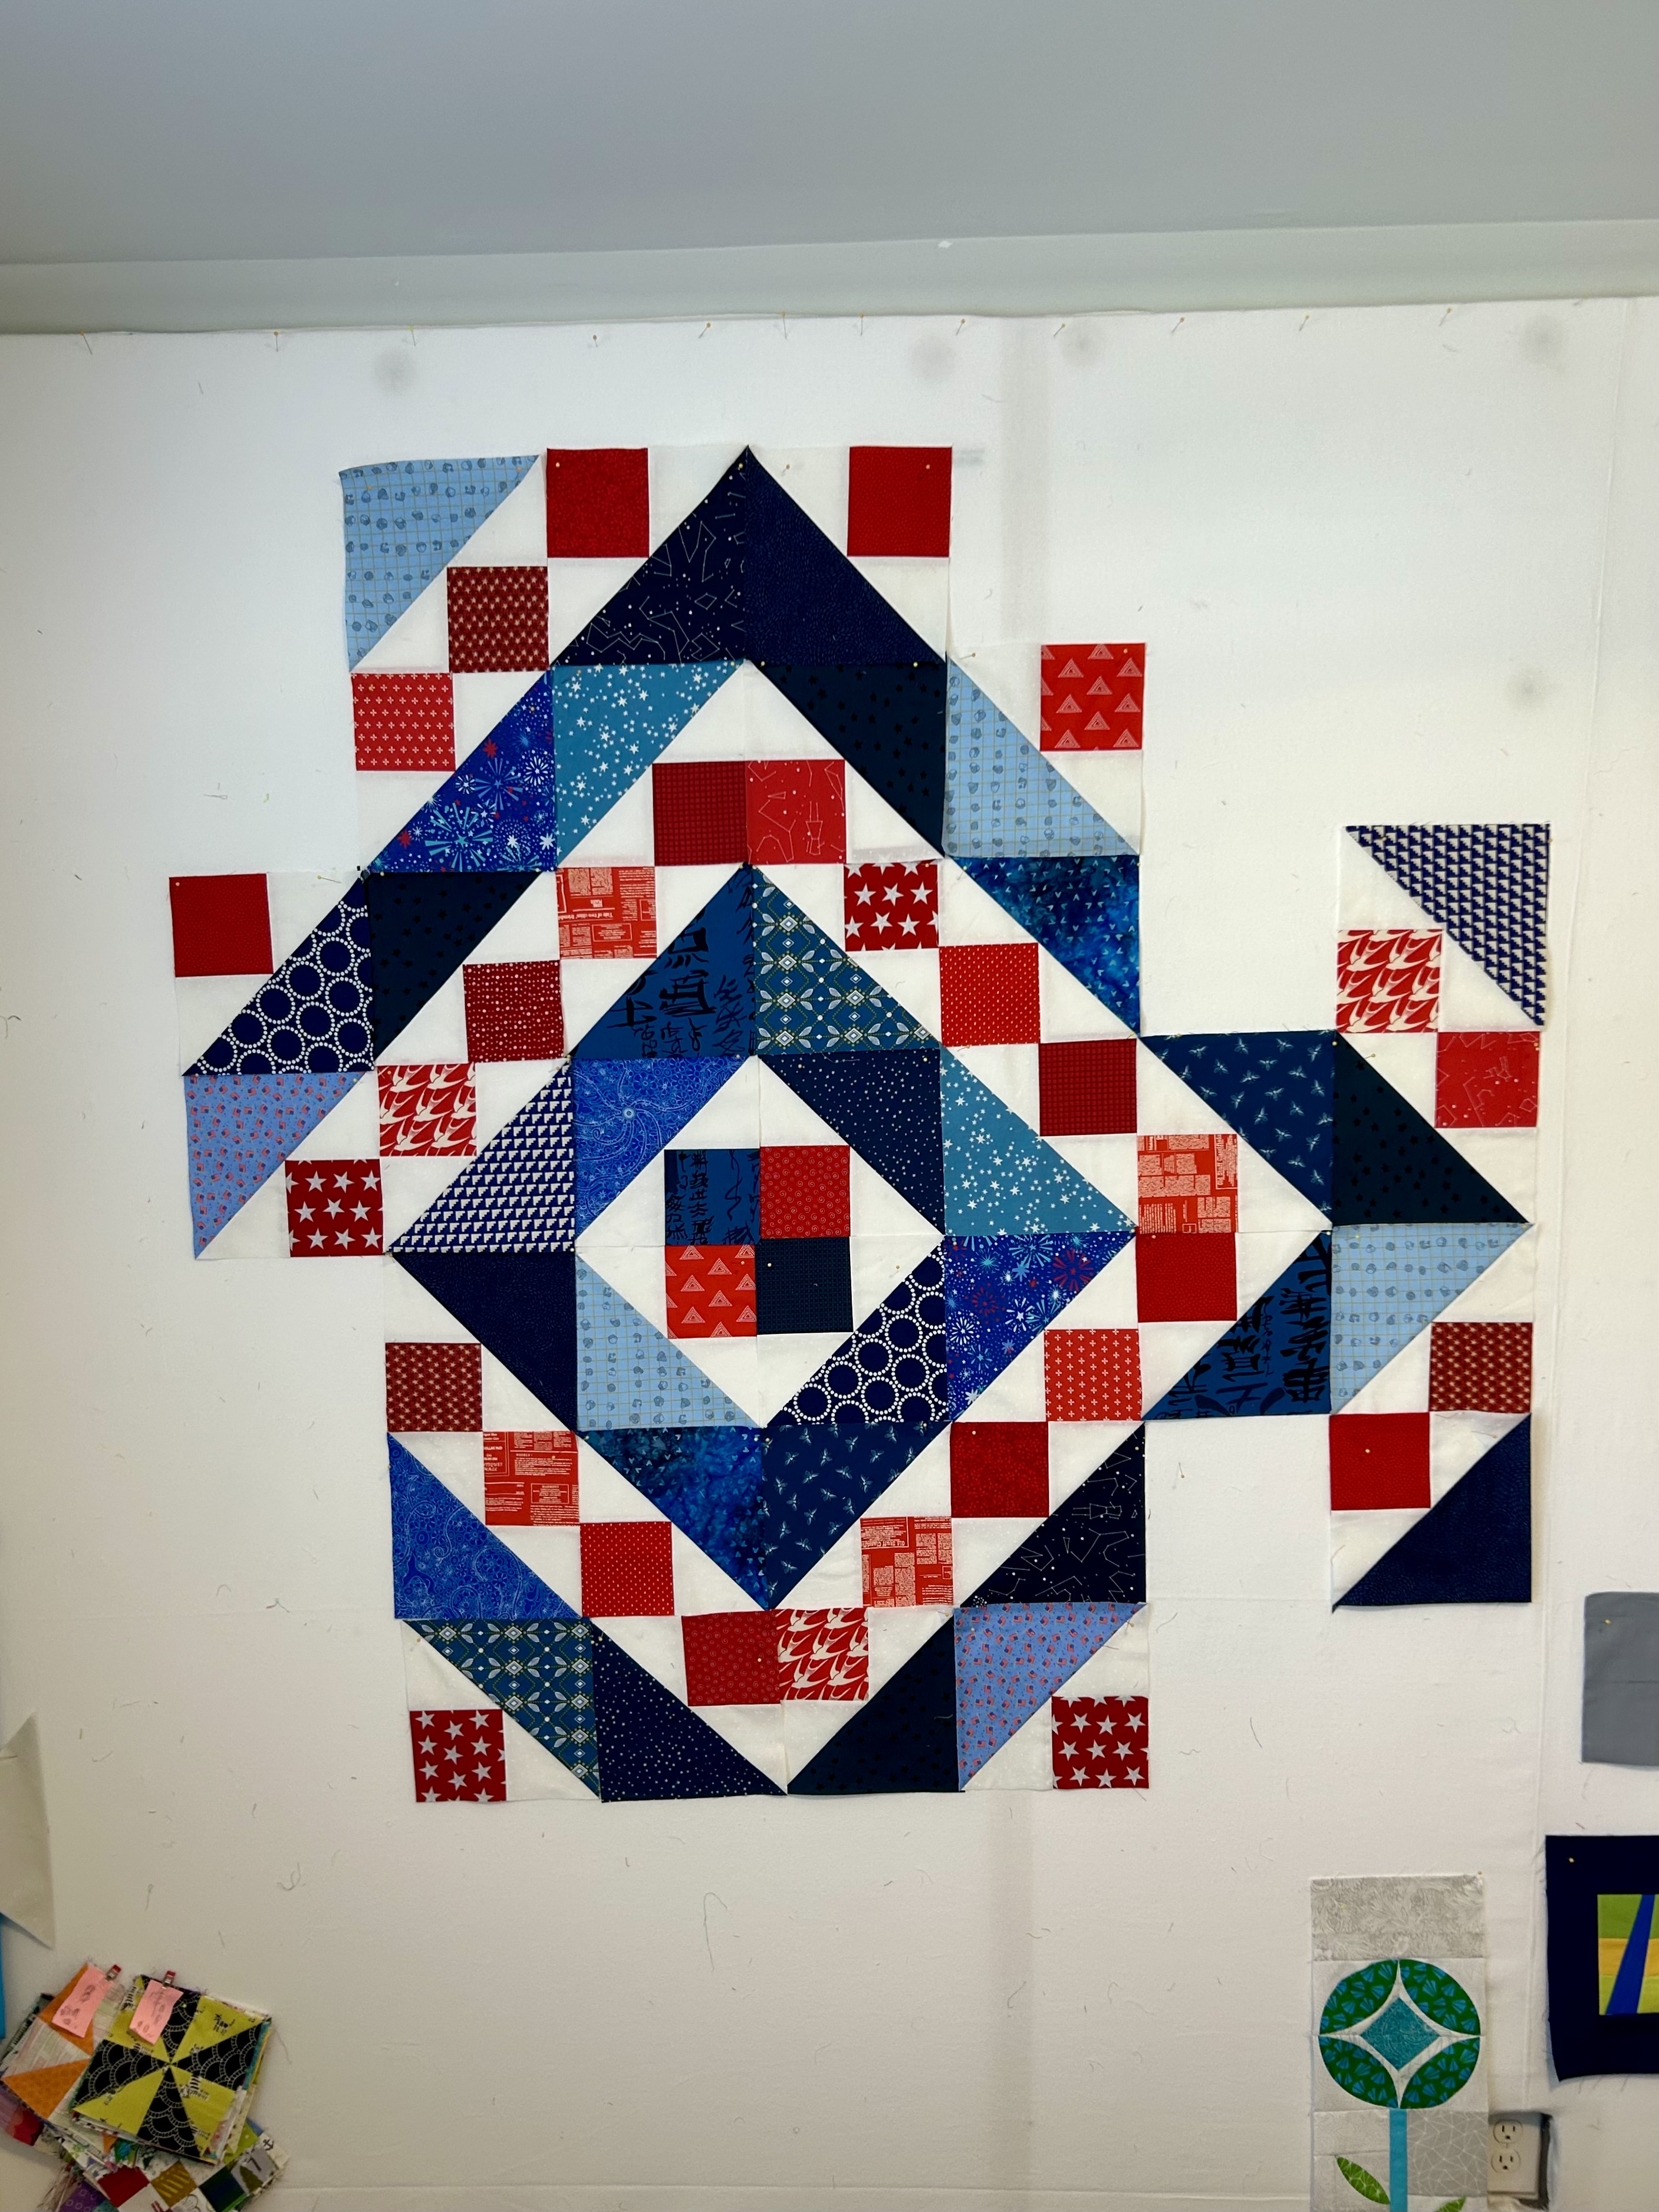
My Quilt of Valor donation quilt is ready to go on the longarm, and I’ve got a beautiful backing for it. The blocks are made with an 8-inch Cat’s Cradle ruler.
Here’s the design wall right now. The improv quilt needs two more blocks before I start sewing it together. It’s time. I need that space free again. I’m working on one of the needed blocks.
LOL, I didn’t see that the “X” block actually makes an “X/O” pattern when joined. That’s because I didn’t get any conceptual genes in my makeup, and it’s why I really need my design wall to “see” what’s going on. (Those blocks will move around as I go along, for sure.)
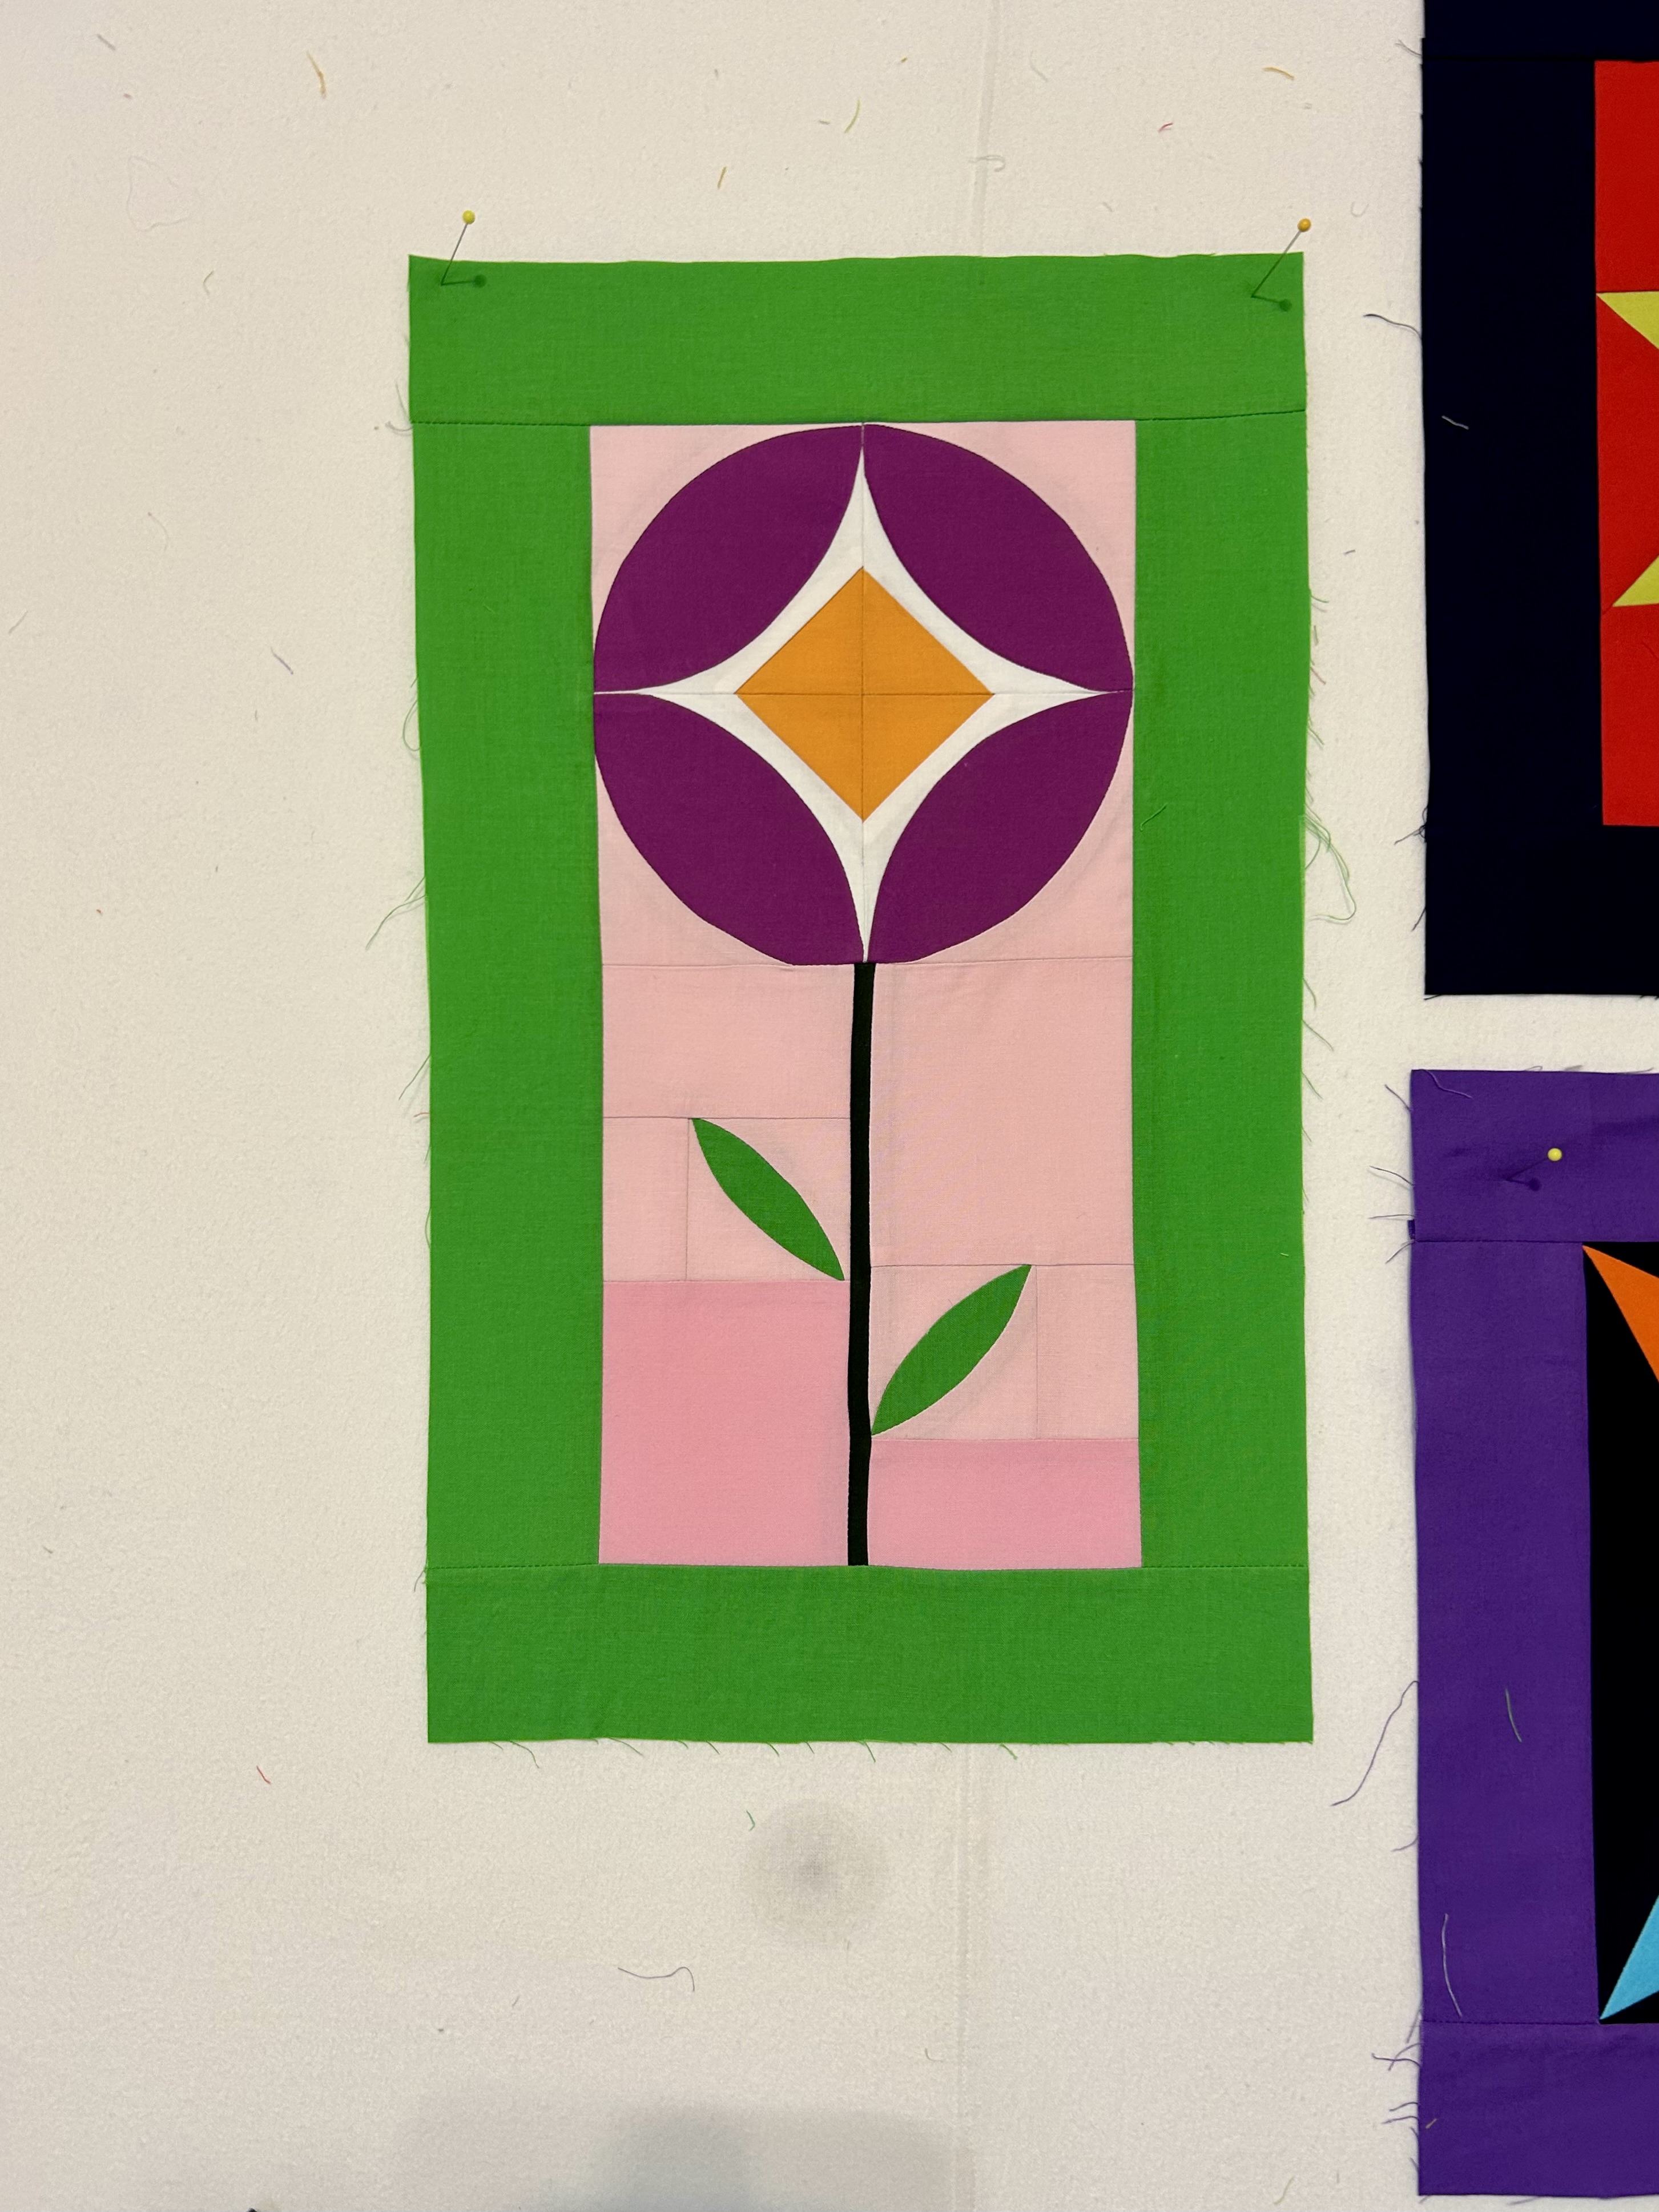
Isn’t that “Flower Pop” flower adorable! It’s fiddly though, and there was a very big learning curve for me, but these blocks are going faster now. (The pattern and the needed ruler come from Sew Kind of Wonderful.)
The pineapple blocks are from a ruler–and they are so cheerful. The goal is to use up a lot of solids and to have fun making these very fun and very graphic blocks.
The new palette for Tara Faughnan’s “Blocks3” came and is washed and ready to go. The month 5 block came in yesterday as it was February 1st.
I’m not sure I understand that rusty color in this palette, but I’m reserving judgment.
Rachel LaBour of the “Stitched in Color” blog recently shared this idea for scrappy quilts. The block parts are 6 inches finished (cut at 6.5 inch squared), so this block will make a big 12-inch block. I think it may be perfect to use up several piles of bigger scraps I have (smaller than a fat quarter) and need to use. That’s a “yeah” for me! I don’t really want to cut these pieces into smaller squares as I already have BINS of squares.
This block idea can be made into either an “x” or a “circle” format. But these blocks don’t link up so need to be made in separate projects. I suppose you could use sashing to separate them, but the secondary patterns would be lost.
The block is easy and quick–from cutting to sewing. So I’ve been playing with the “x” one as a leader/ender project and with the goal of making a donation quilt.
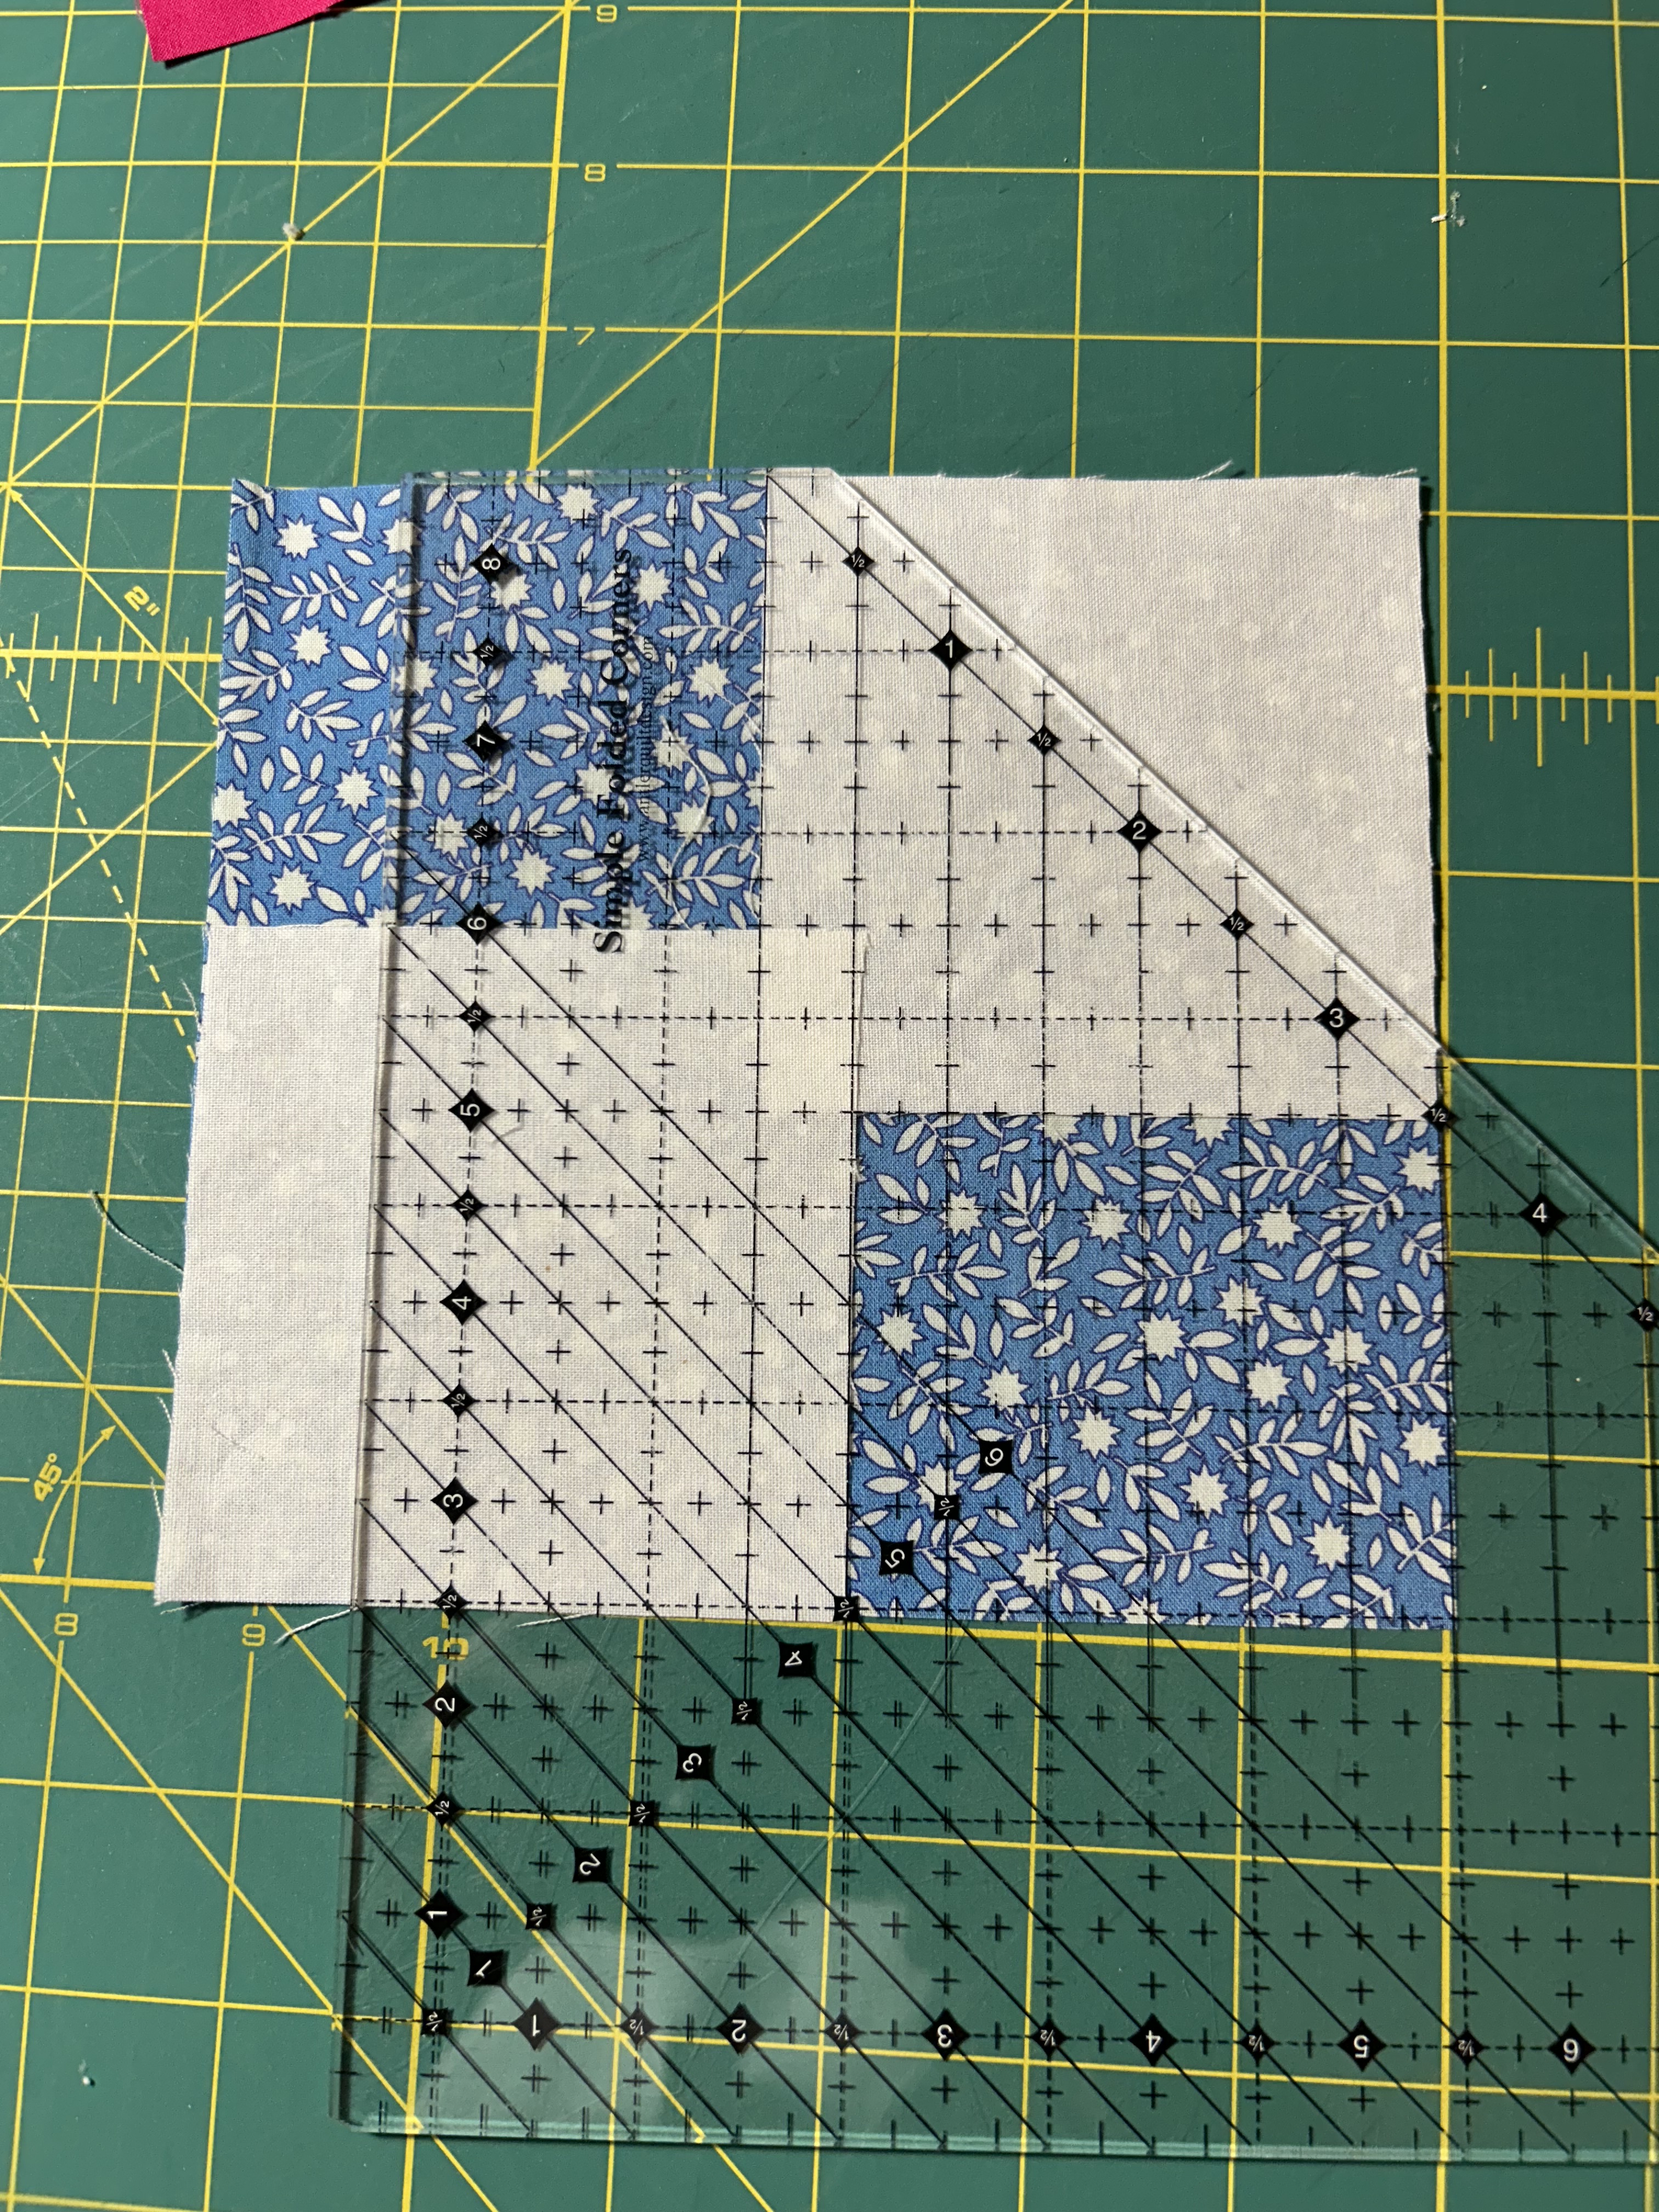
I’ve been using a Simple Folded Ruler to cut the corners from 3.5-inch squares placed at diagonal corners–which means I do not have to draw a sewing line on these squares, sew, then trim. (As I said above, I have a whole bin of 3.5-inch squares including this one in neutrals.)
I turned my blocks to the back to figure out how best to press them so the 4 sides would go together with seams butted. The “x” and “circle” blocks would have different pressing. The “x” block works to press in a circle, but the “o” block works to press 2 blocks out and 2 blocks in. Here’s a picture to help you. I think one could move these blocks around when sewing blocks together to line up the seams so they butt–which might change any placement orientation you wanted to have in terms of fabric pattern.
And then there were TWO:
Blocks are not likely to stay in this position, of course. Thinking 5 across (60) by 6 down (72). But…
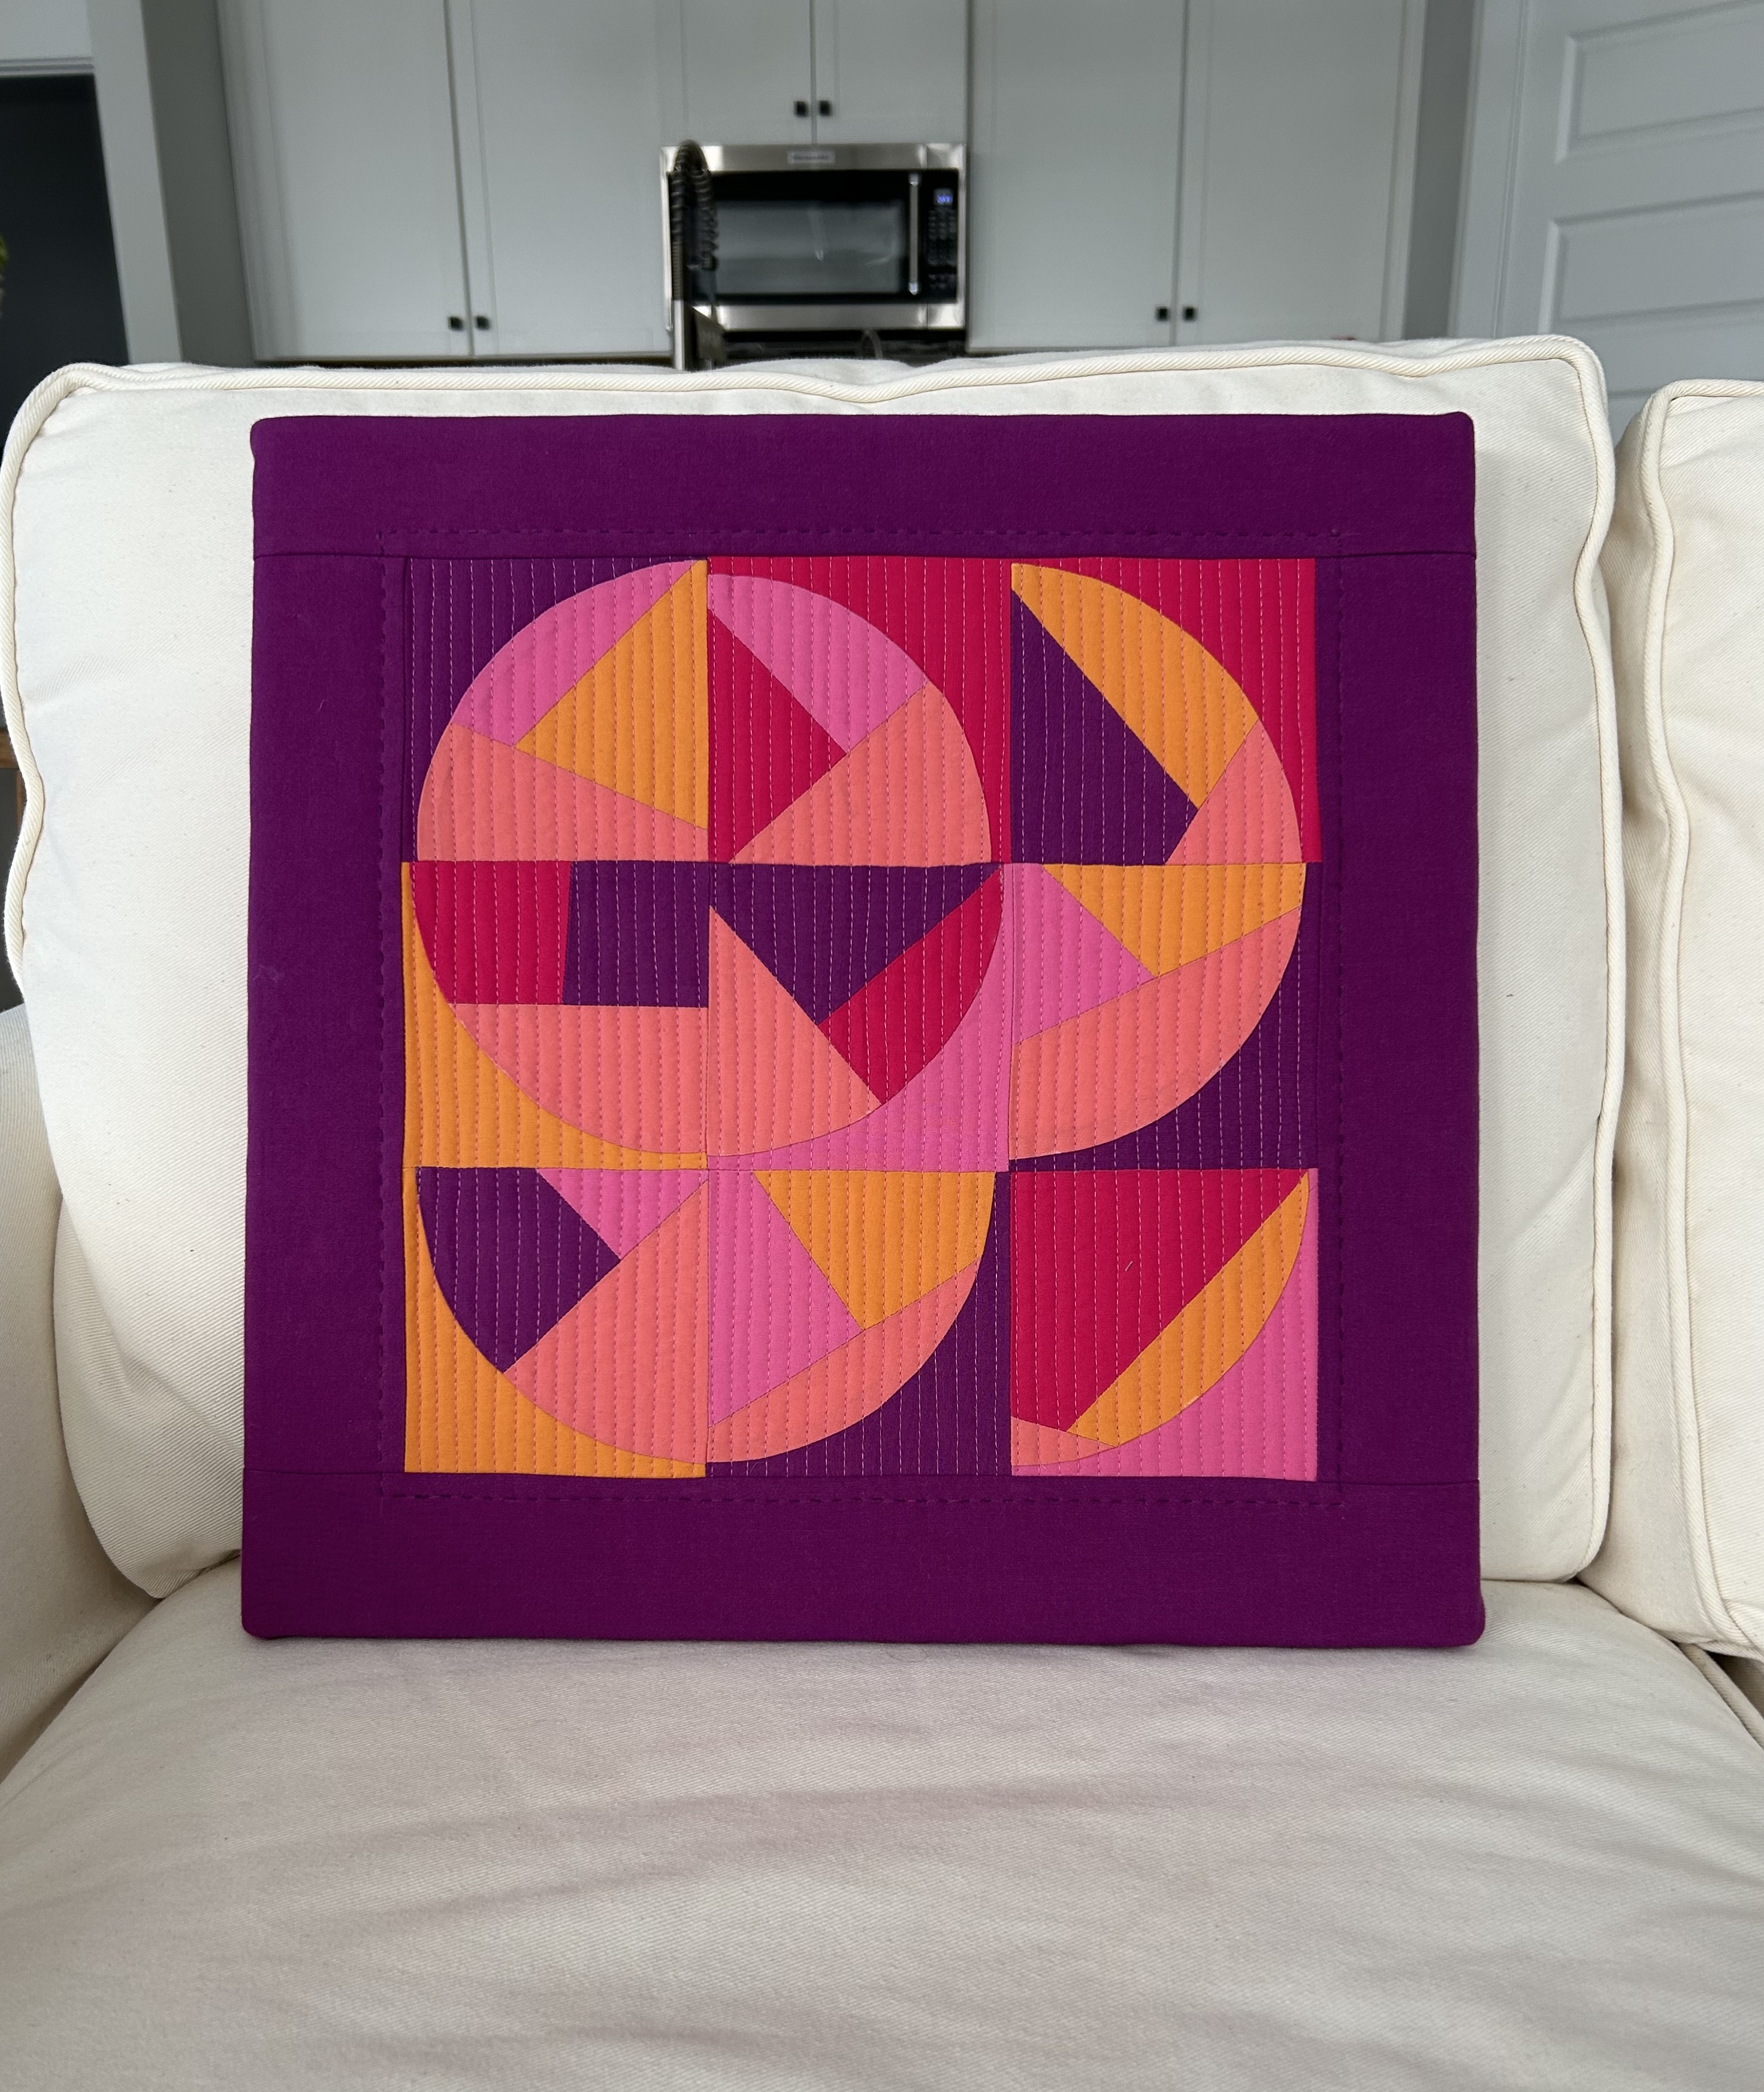
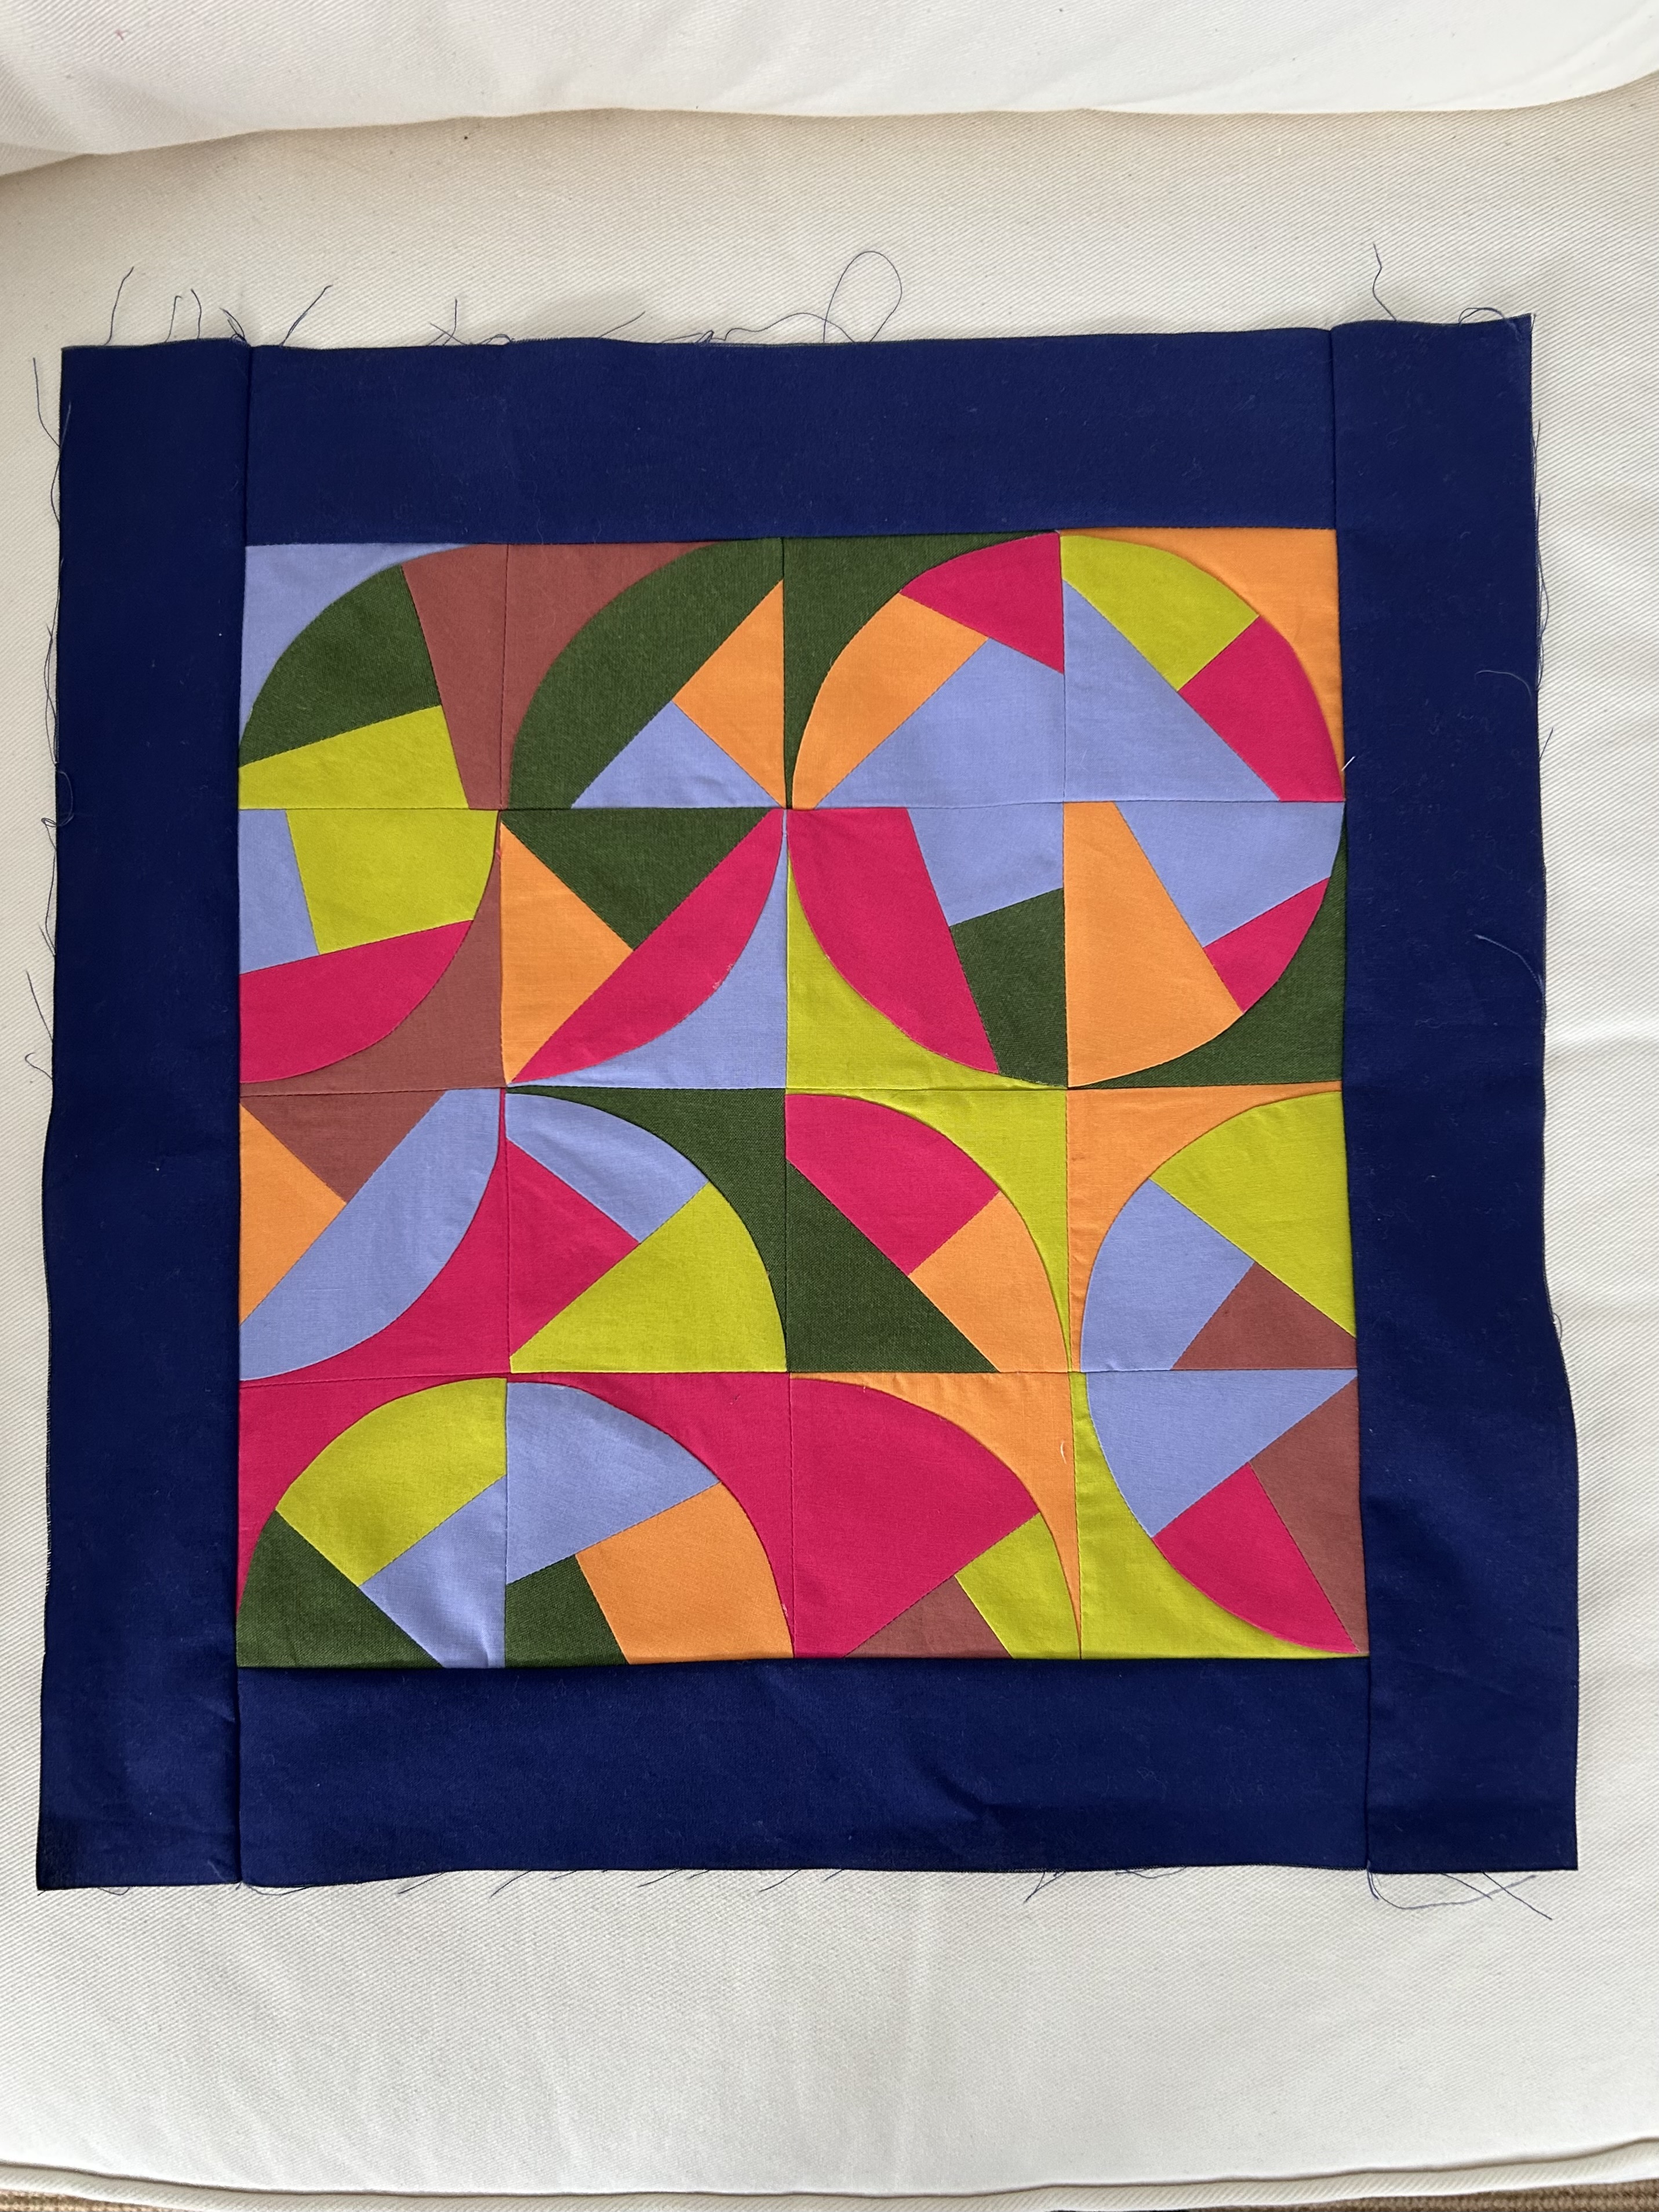
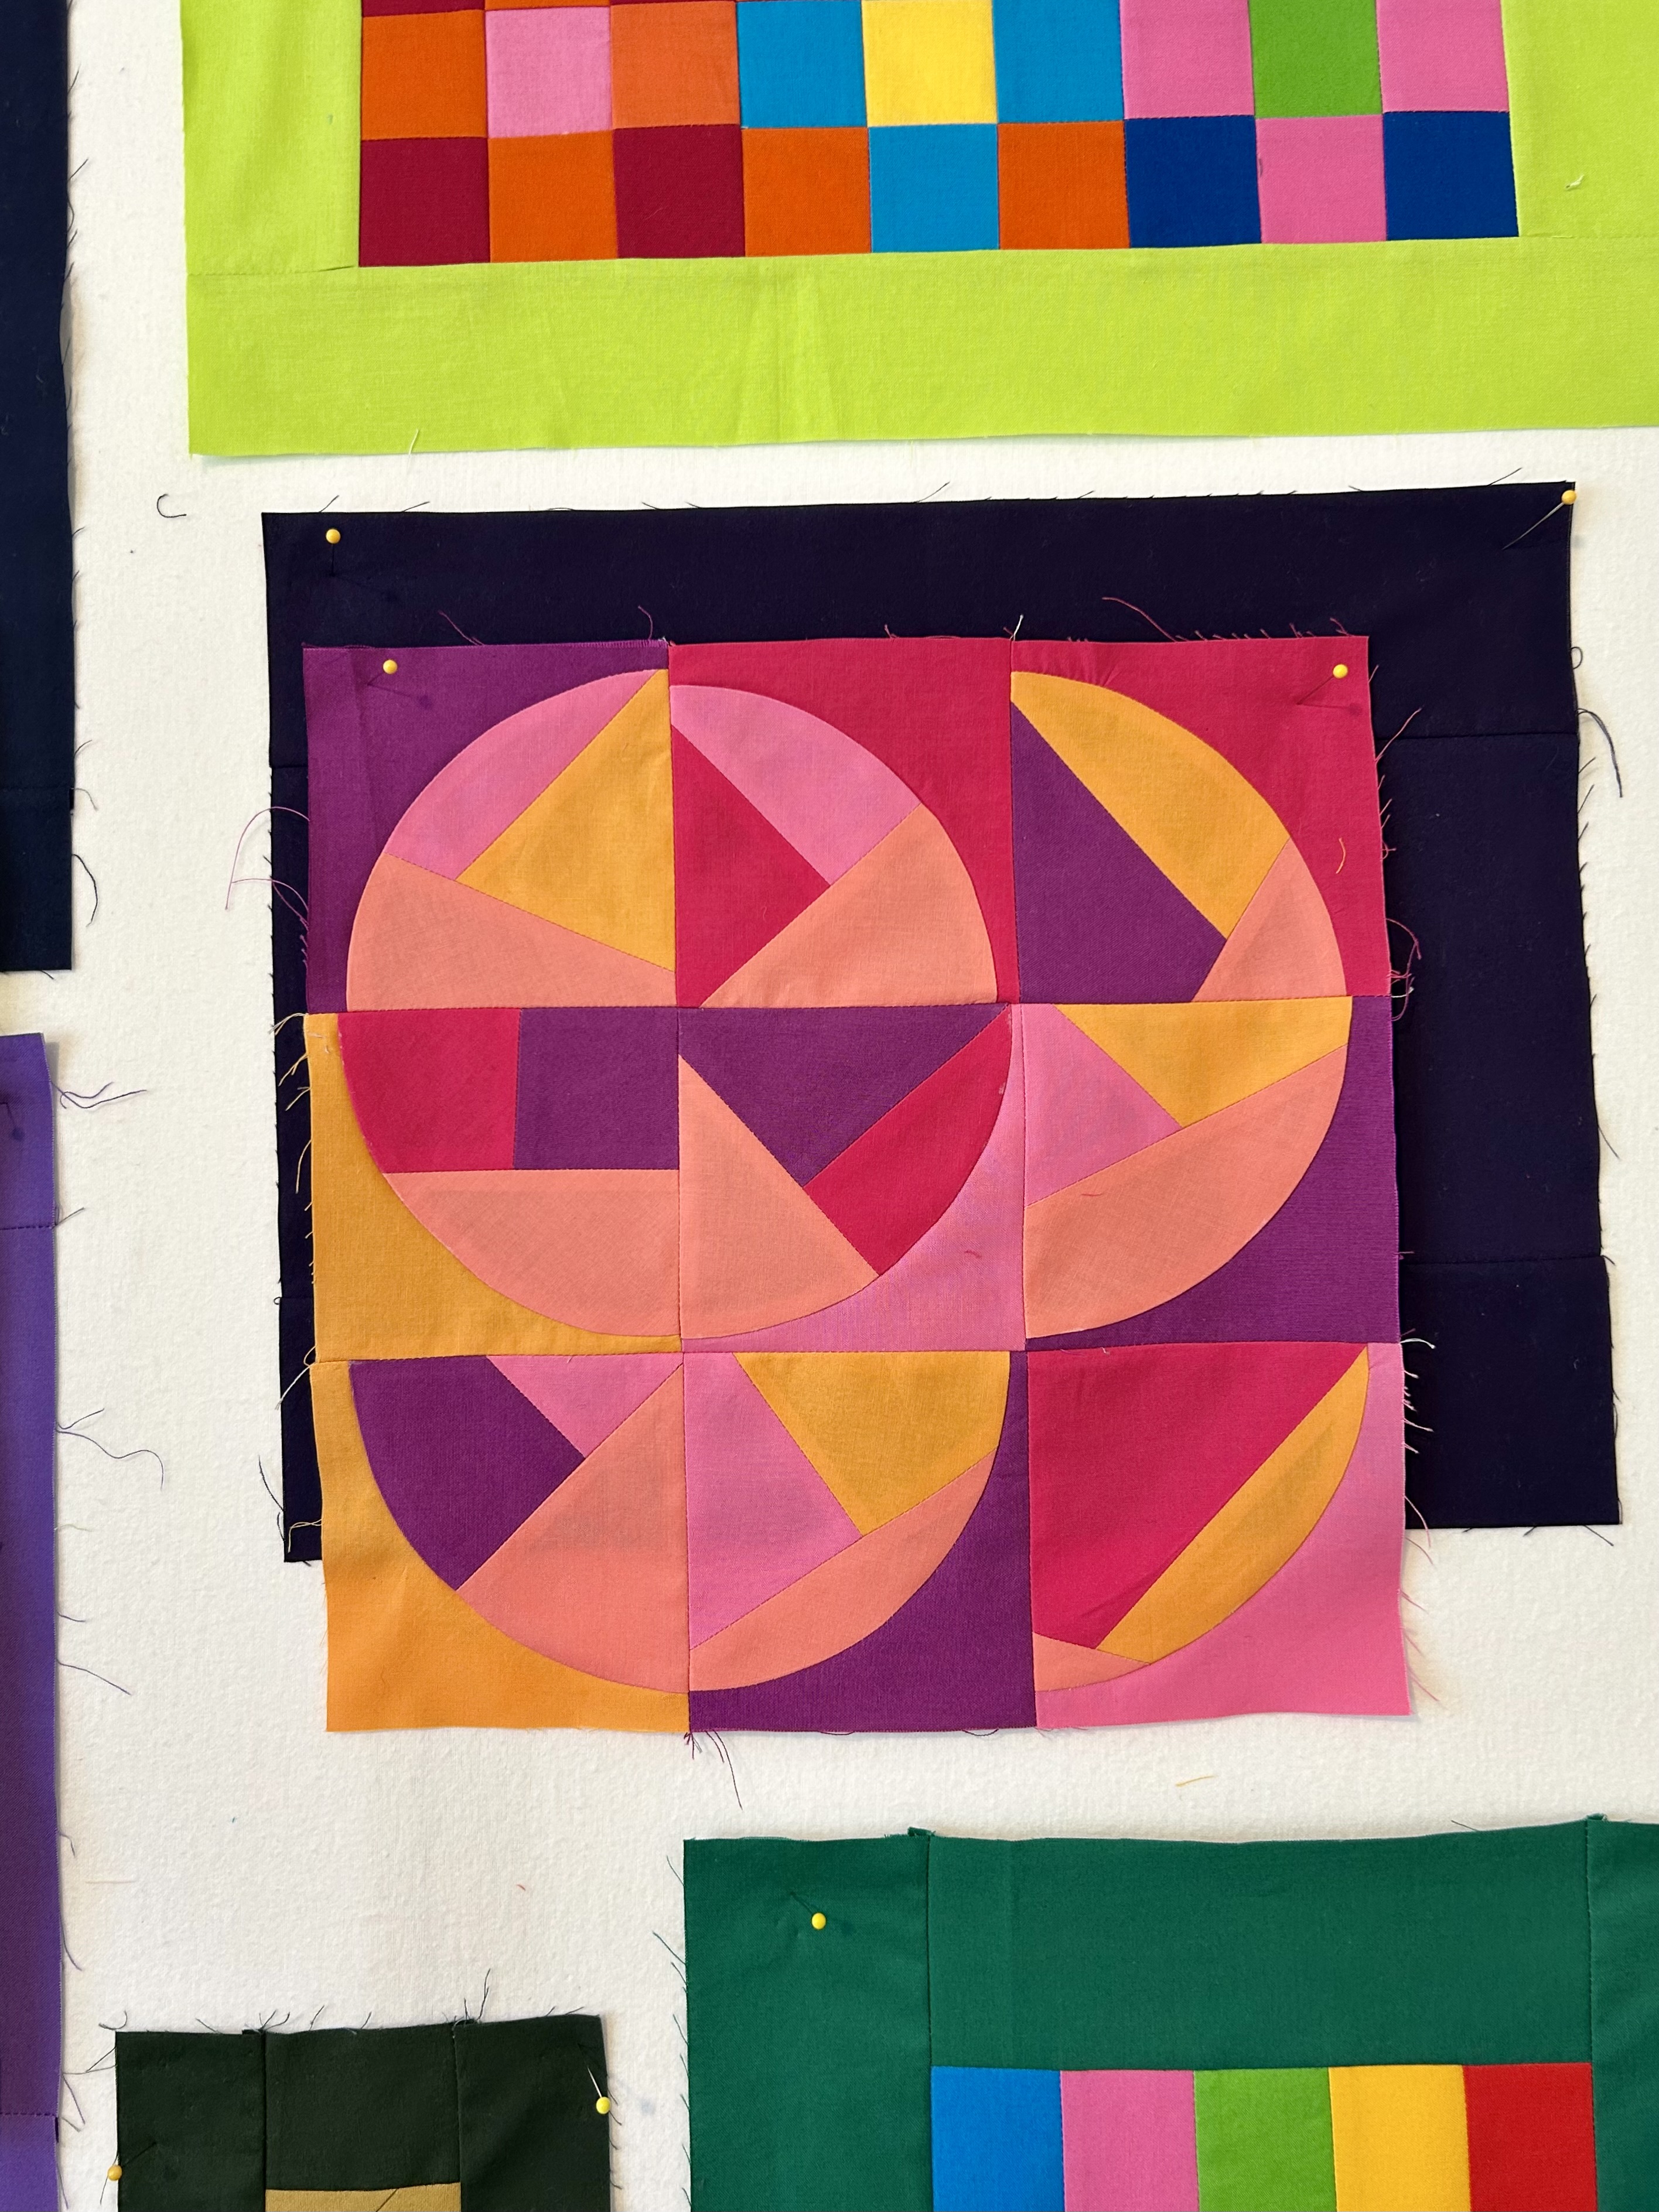
Month 4 of my Tara Faughnan online class, Blocks3, introduced the work of Jen Carlton Bailly’s “Make It Curvy” (bettycrockerass.com) block method, which involve her curvy templates in many sizes. These templates have a much narrower outside piece than, say, the Drunkard Path’s templates–which means one can make a bigger visual circle.
This block plays as well with COLOR–with what happens when you put a color with other colors. And this month’s palette choices allowed us to play with color and shape to our heart’s content. Jen’s method insures that no two blocks will be the same, given how one lays in color in the process she teaches.
Here’s my first effort–using a 4.5-inch template. I wanted warm colors to play together. When laying out one’s blocks, one might look for what colors might group to please the eye, and/or what kinds of shapes can be found. I quilted with a soft orchid thread in matchstick lines, and hand quilted an outside line with a more or less matching thread as I didn’t want it to stand out and pull the eye away from the center. Matchstick lines don’t take away from a very graphic piece. Then I installed the piece on stretched canvas.
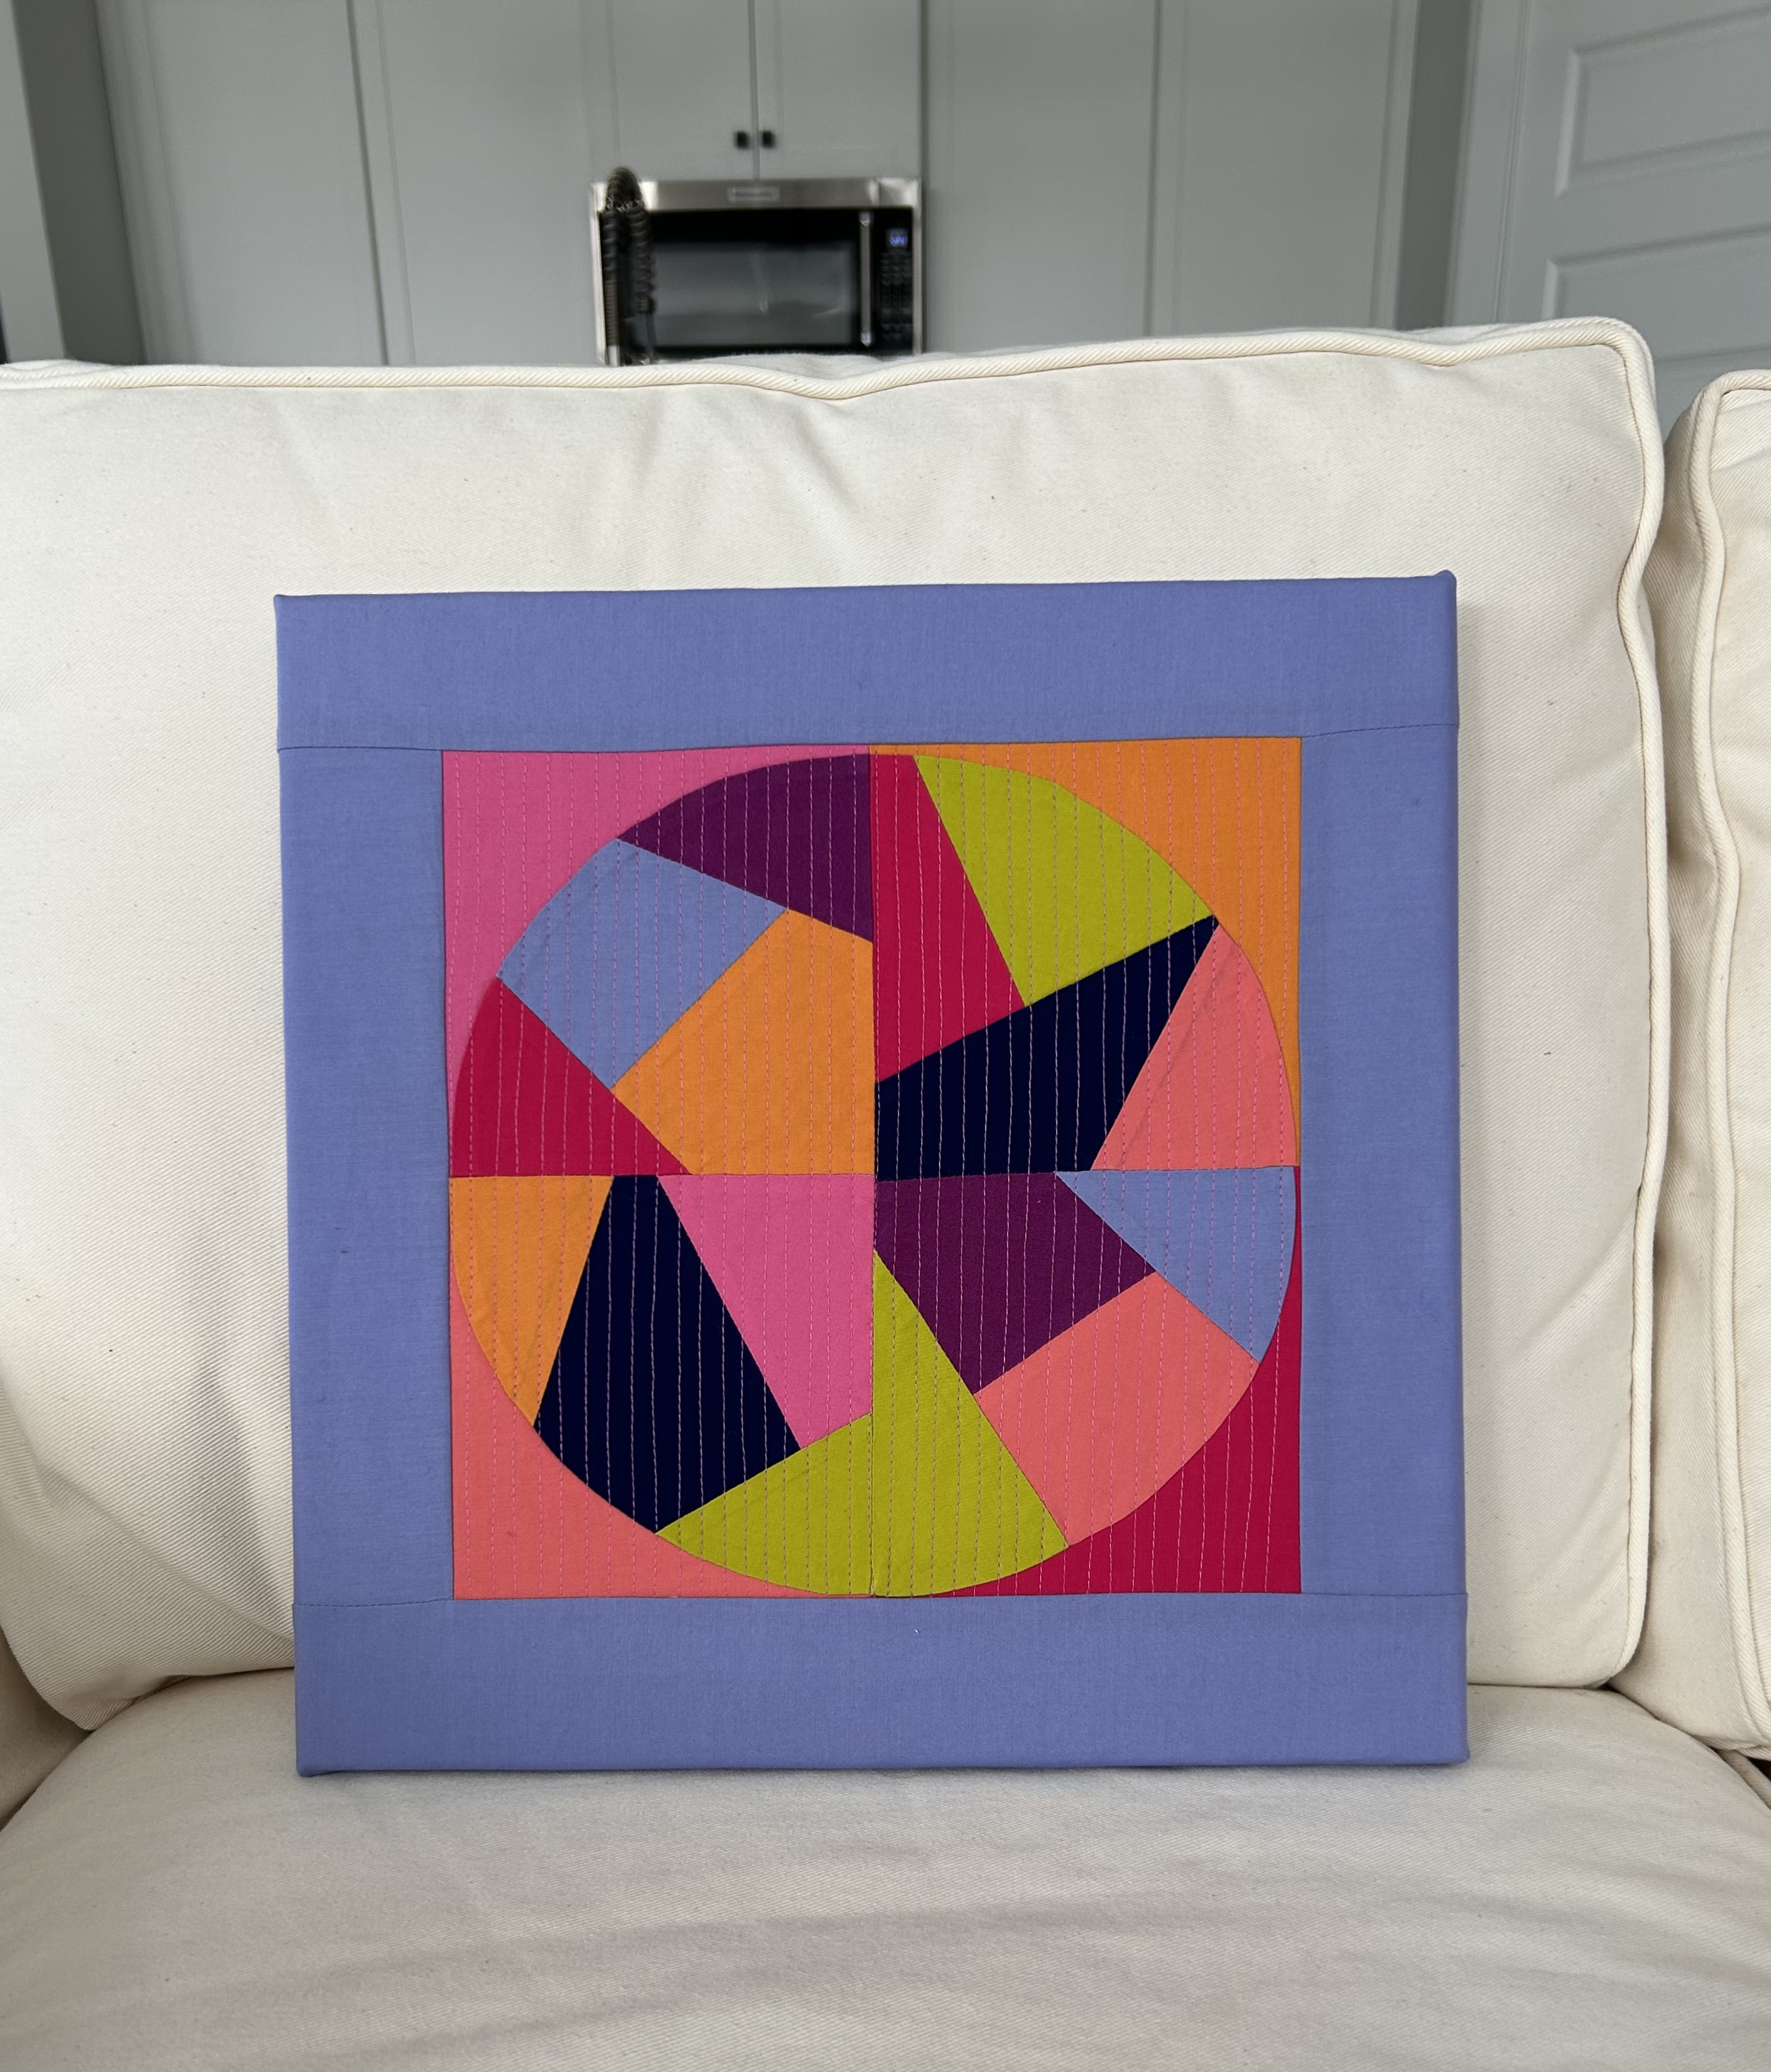
Below is my last effort, using a 5.5-inch template. Here I wanted add in some cooler colors AND to make a big circle. Note here how the light blue looks like a lavender color.
Here’s my second piece, made with a 3.5-inch template and using more colors. Note how the blue looks blue in this piece. Note how I played with blocking together the light blues and, in places, the dark and light greens and the rose colors. Finding what is pleasing to one’s eye is a fun process. This piece is going into my almost-finished improv quilt.
I am now thinking that it would be fun to make large blocks using this method and then set them into wider sashing that allows each block to shine. Hmmm…might be a good way to use up pieces in my solid stash. I would pull a palette first, though, at least in color families.
So, now, on to Month 5, and the palette is in the mail.
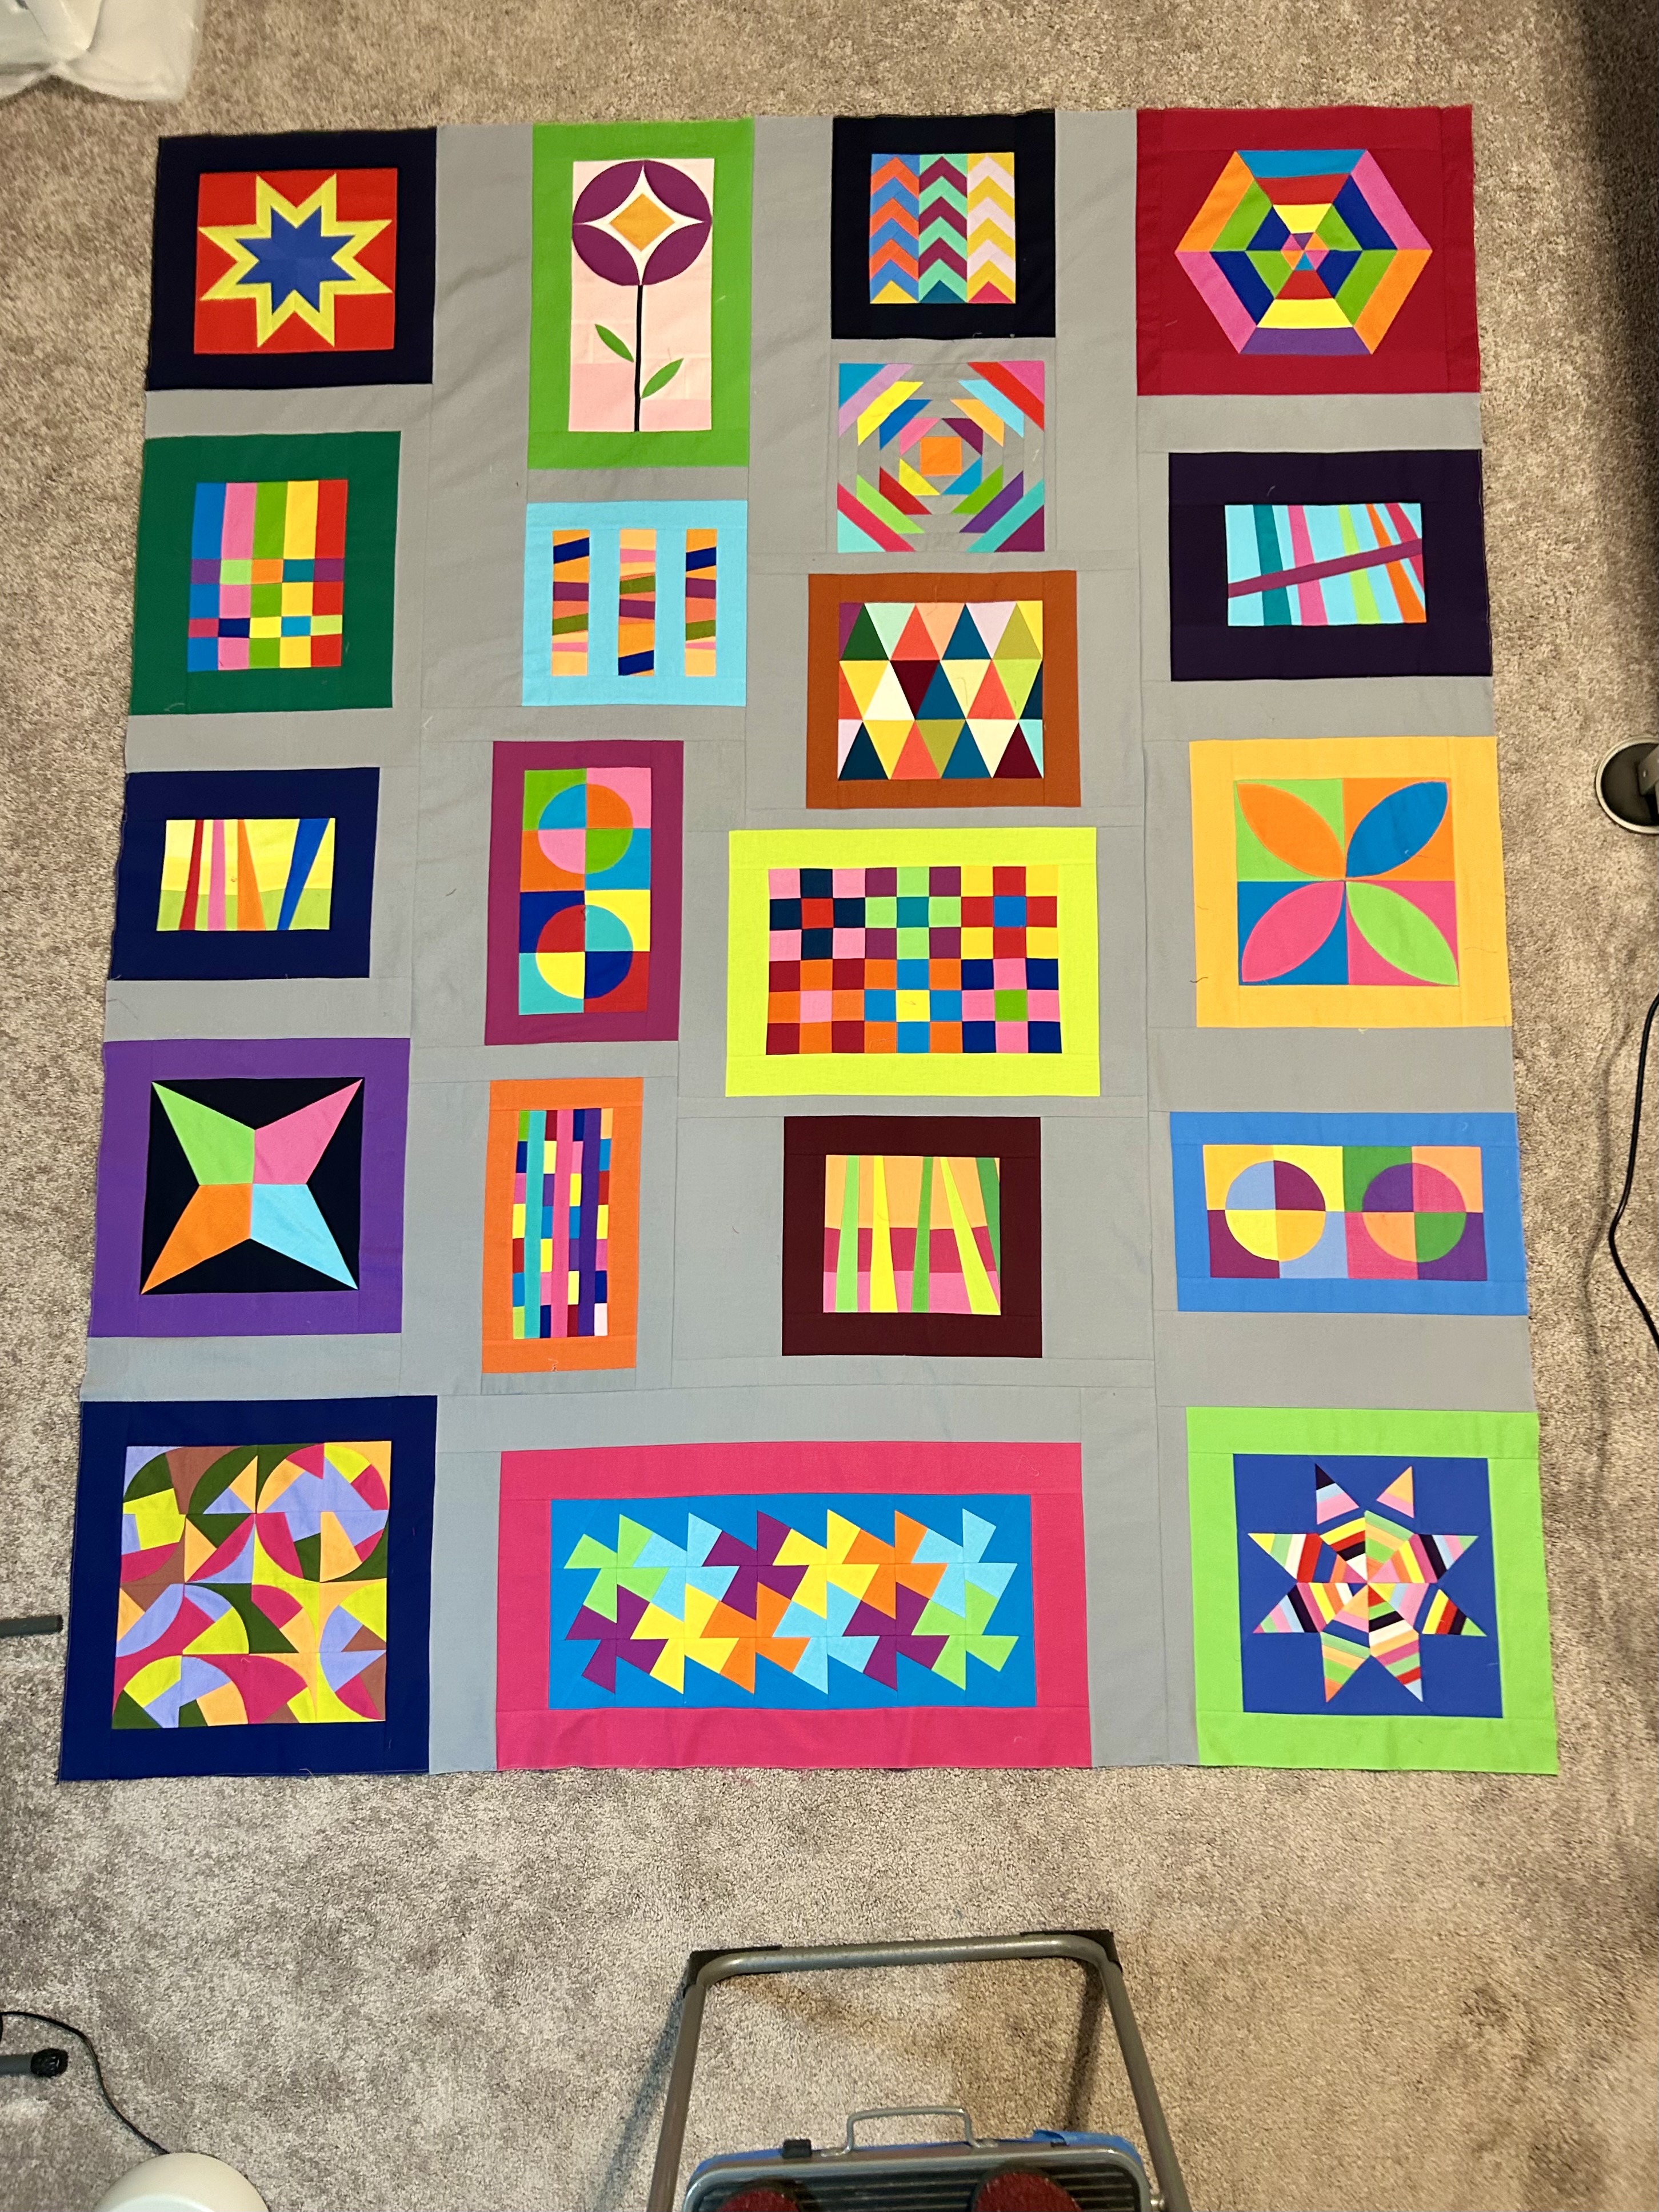
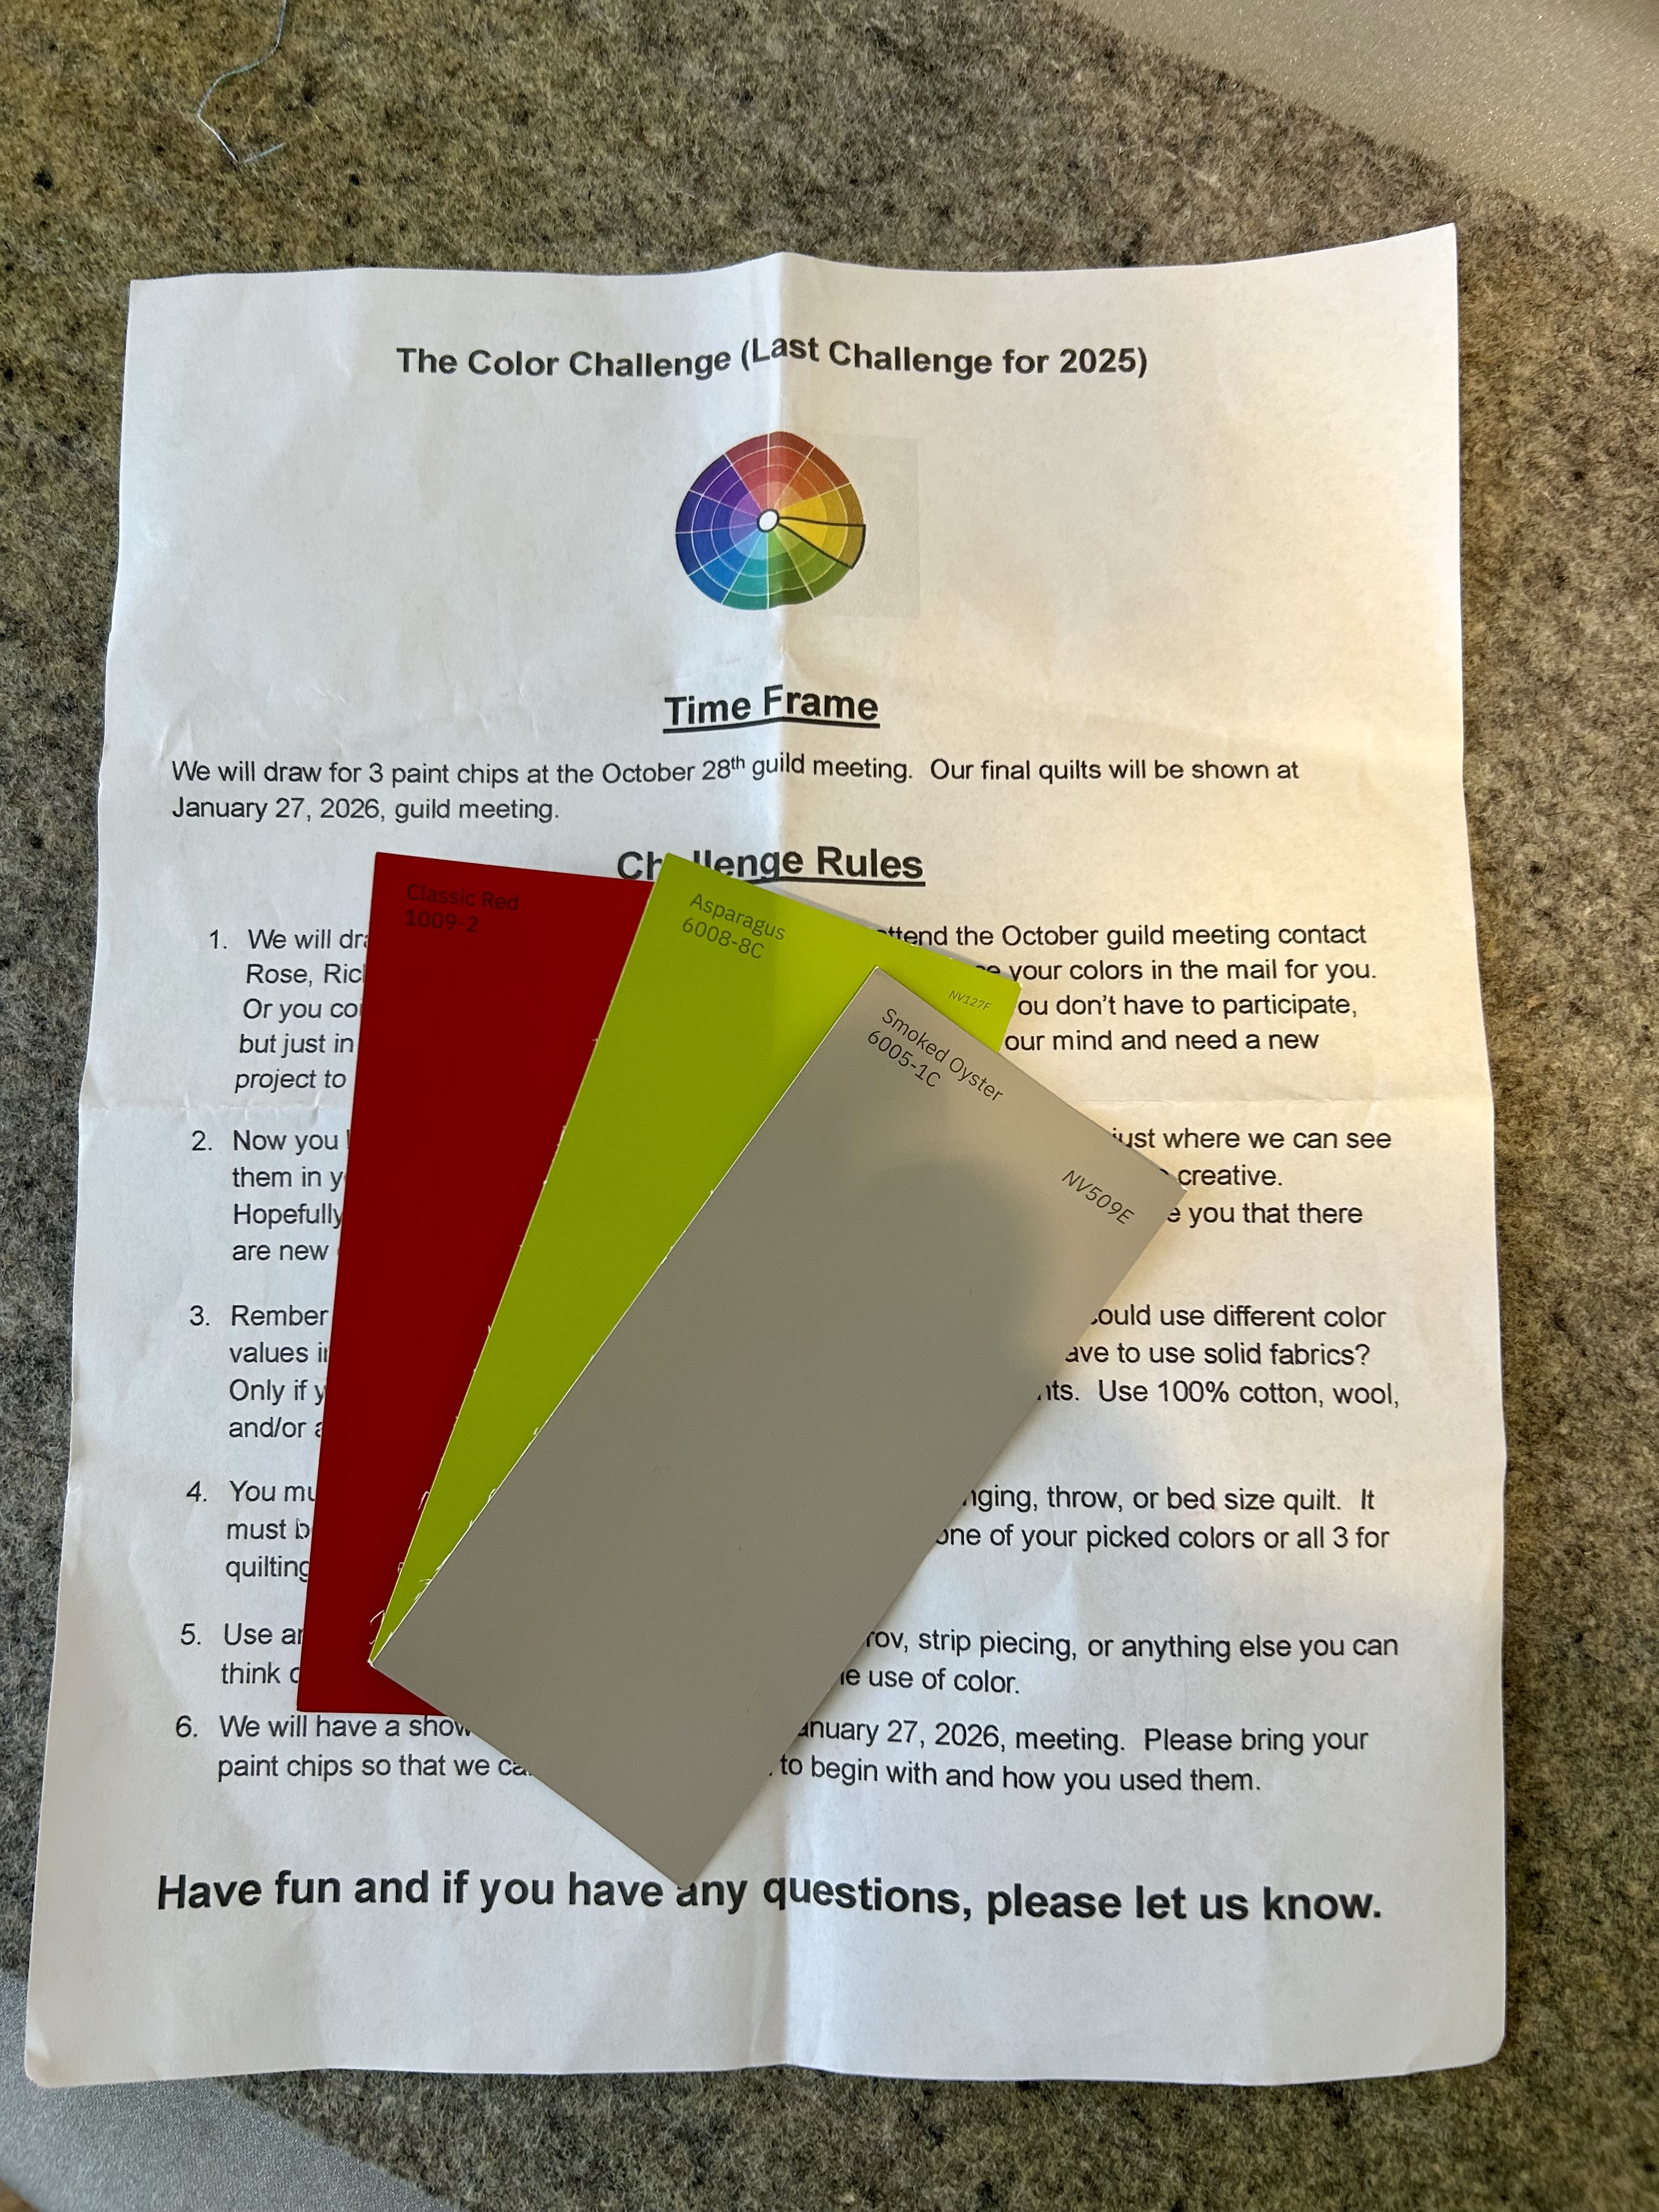
The Charleston Modern Quilt Guild issued a challenge that will be due in our January 2026 meeting.
We each drew an envelope with 3 colors in it. We had to make a quilt using ALL those colors at least once in said quilt.
Here are my colors–and it turns out that everyone got the “Smoked Oyster” color.
I didn’t want to make a Christmas quilt with the red and green colors as I knew I would make this quilt a donation gift for this group’s foster children outreach project.
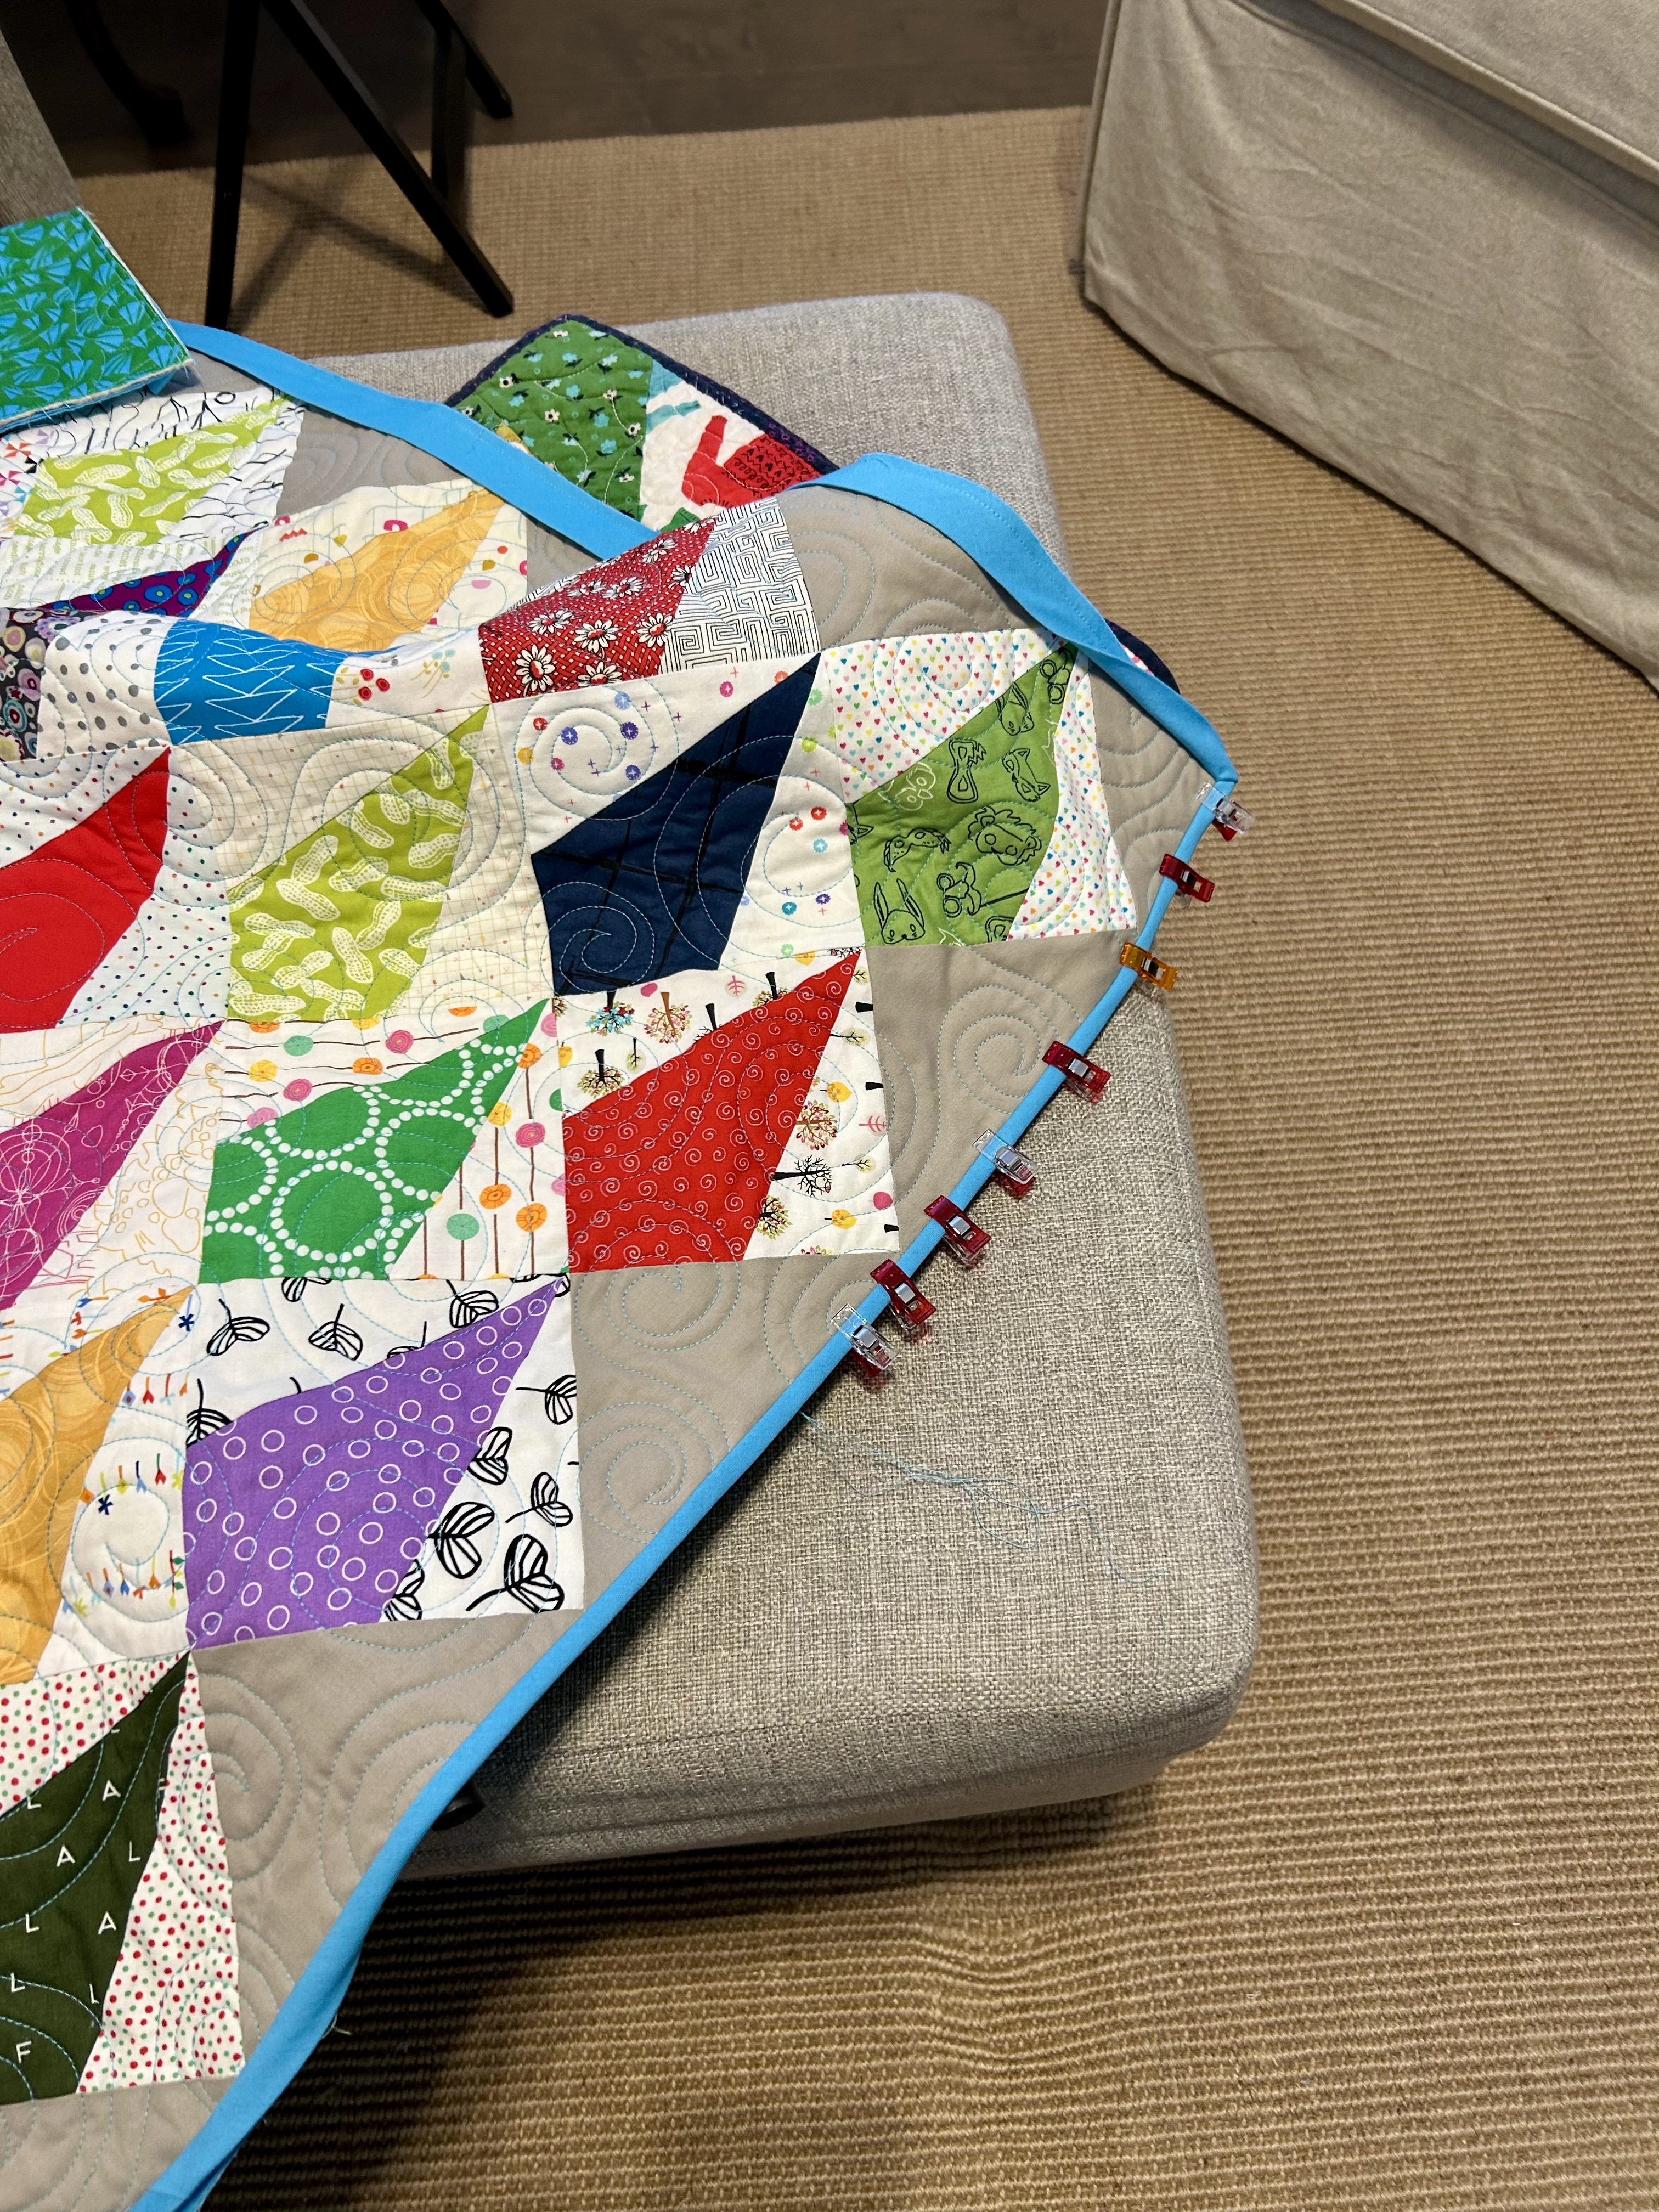
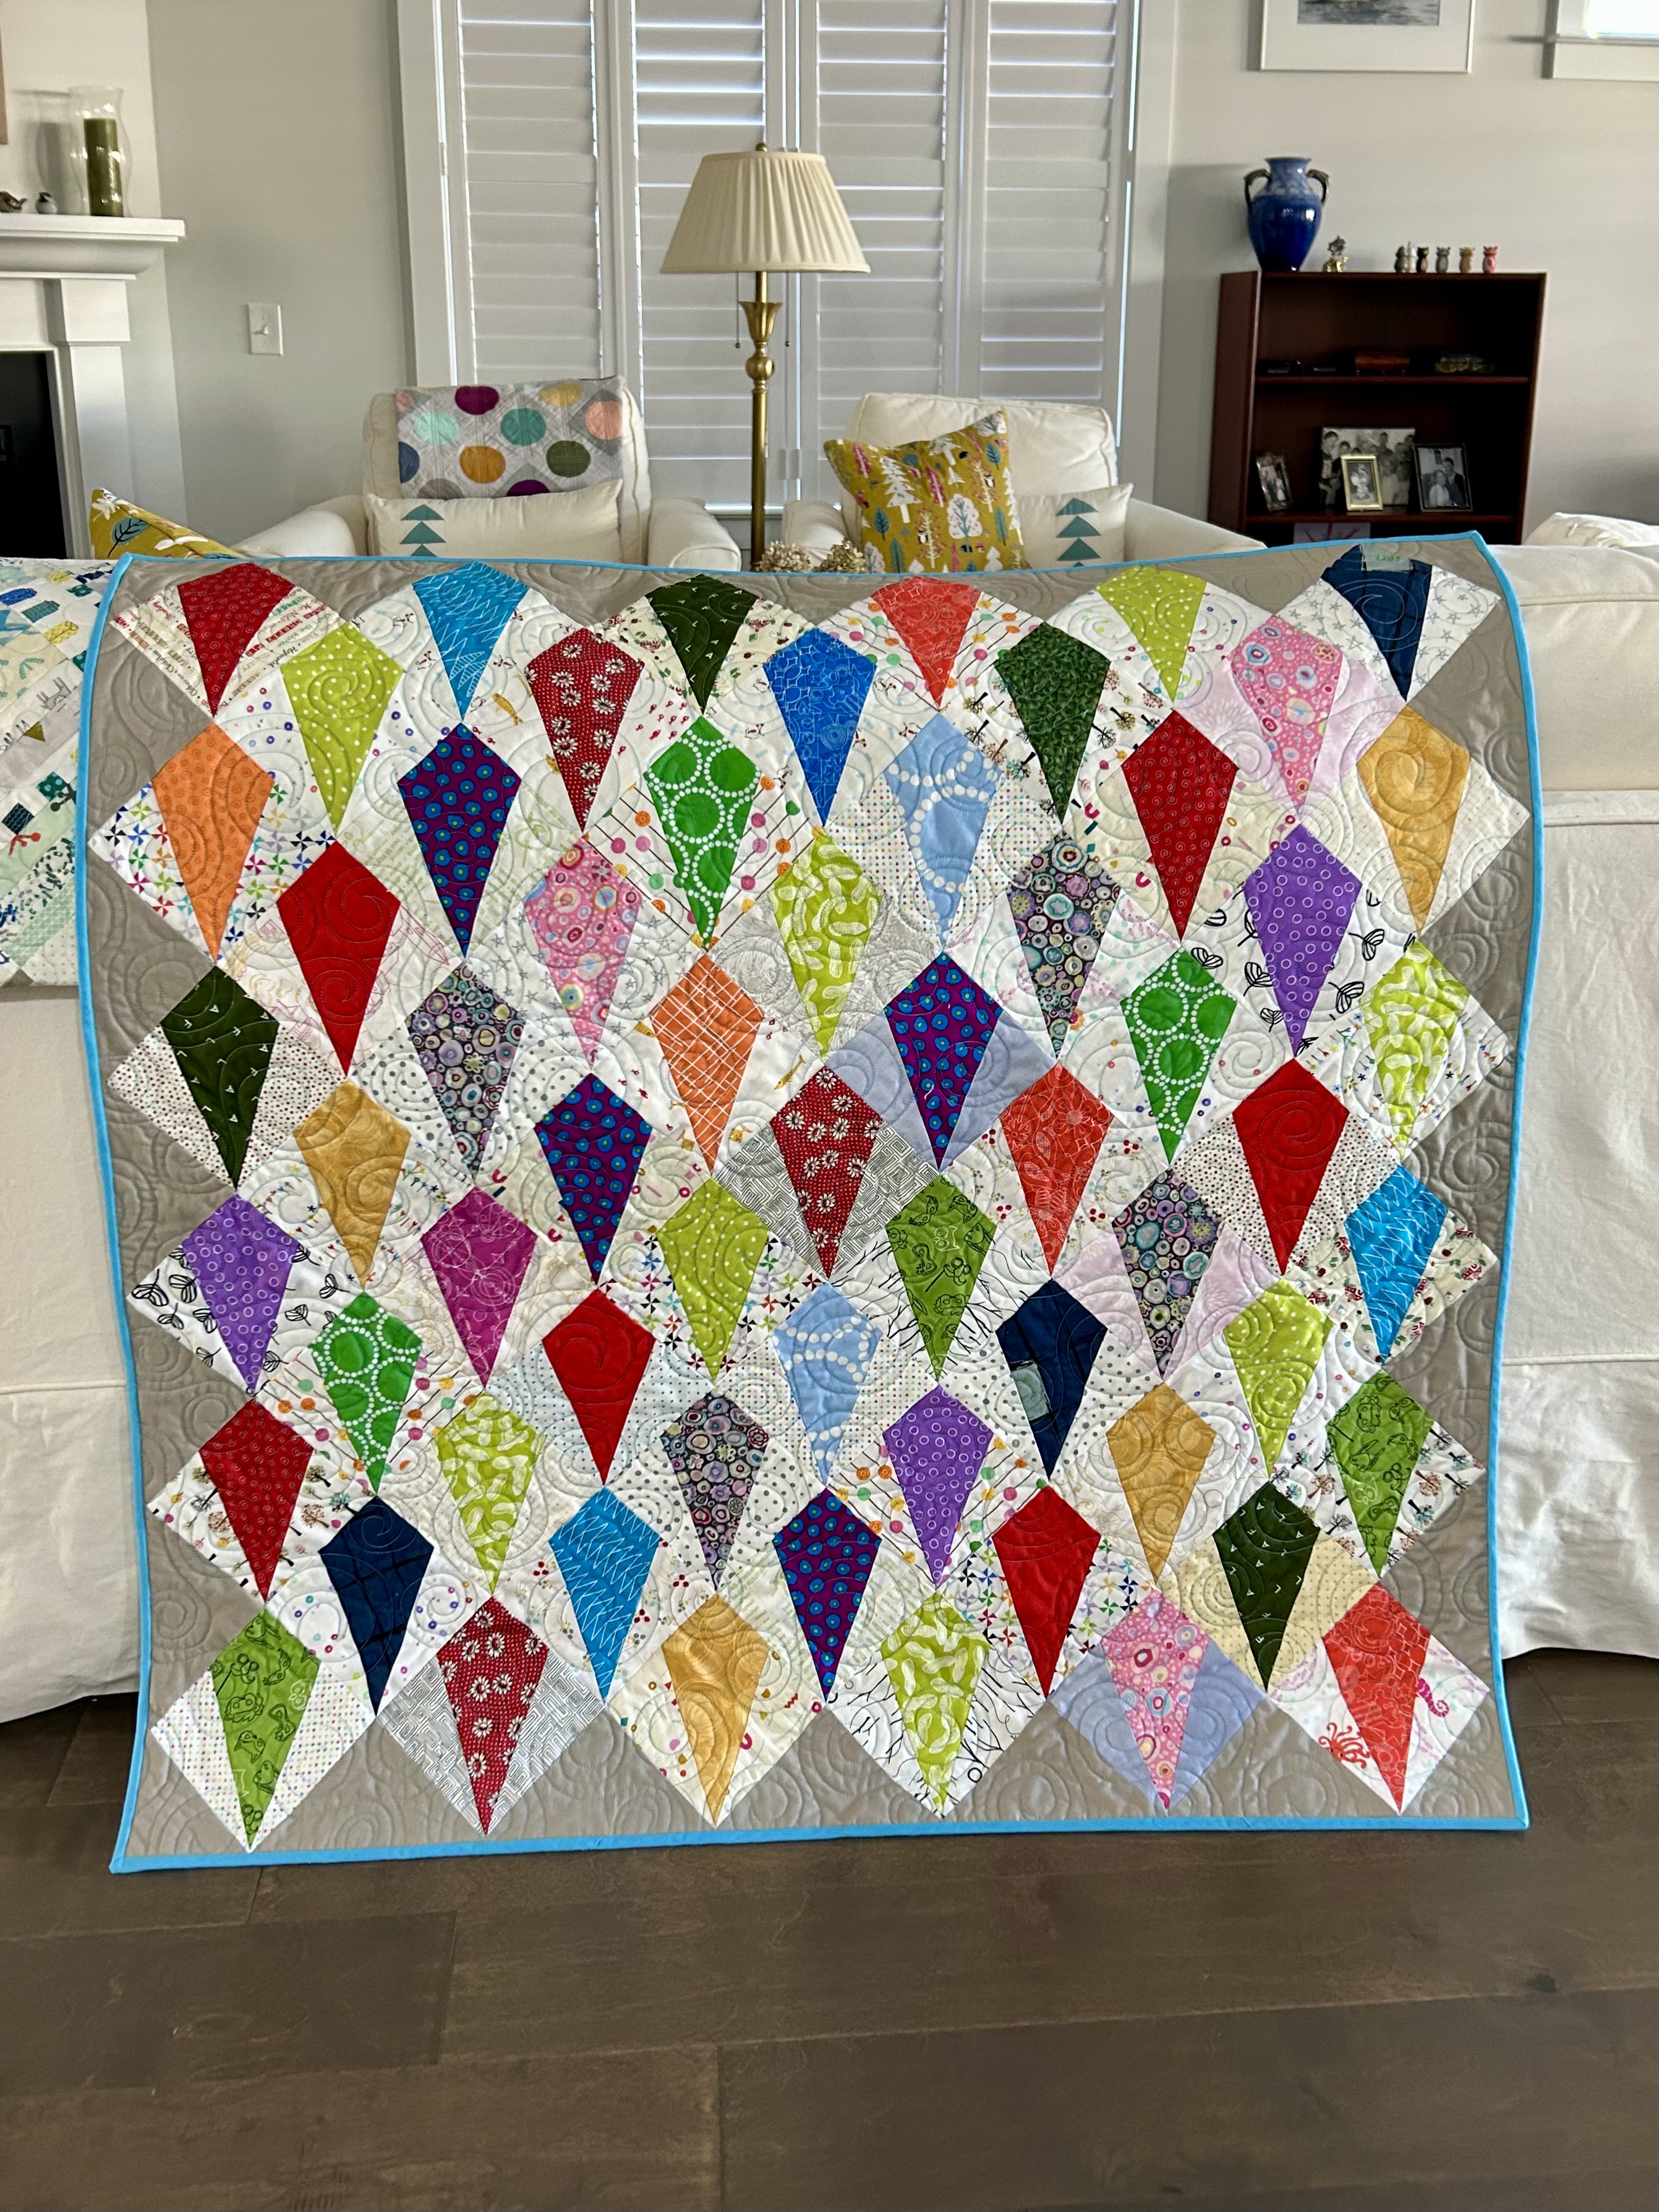
I found the “Smoked Oyster” color to be a real challenge with the clear red and spring green colors. Here’s my solution, which is scrappy, of course. To hide a color that is a problem child, just isolate it somehow. And, knock it back by surrounding it with lots of other colors. The block is a 5-inch kite block cut using a template for that block.
I played with turning some blocks like kites blowing and turning in the end, but I could not make it work. So I settled for putting the blocks on point and figuring out the outer border size. The formulas online for that process are excellent.
I chose a solid bright blue binding as it furter toned down the Smoked Oyster color:
I tried this orientation of this kite block at first, and I really like it. But not with the “Smoked Oyster” color for a whole quilt’s setting background. I turned that block into a hot pad for the counter, and it has two layers of batting and one of Insul-Brite–which makes it very chunky to make. The other hot pad is one I made 3 years ago, and I use it all the time for a hot dish on my kitchen counter.
Here’s the finished quilt:
The backing is “Glade Fans,” designed by Faye Guanipa for Dear Stella, DFG2998. I quilted with a blue the color of the binding (Signature, Soft Cyan) that melted into the backing and looked, actually, green (which was fascinating). (I always quilt with cotton thread.) The panto felt like swirling wind; Denise’s Spirals.
I’ve been “playing” with two new projects and making a Quilt of Valor donation quilt using the 8-inch Cat’s Cradle ruler.
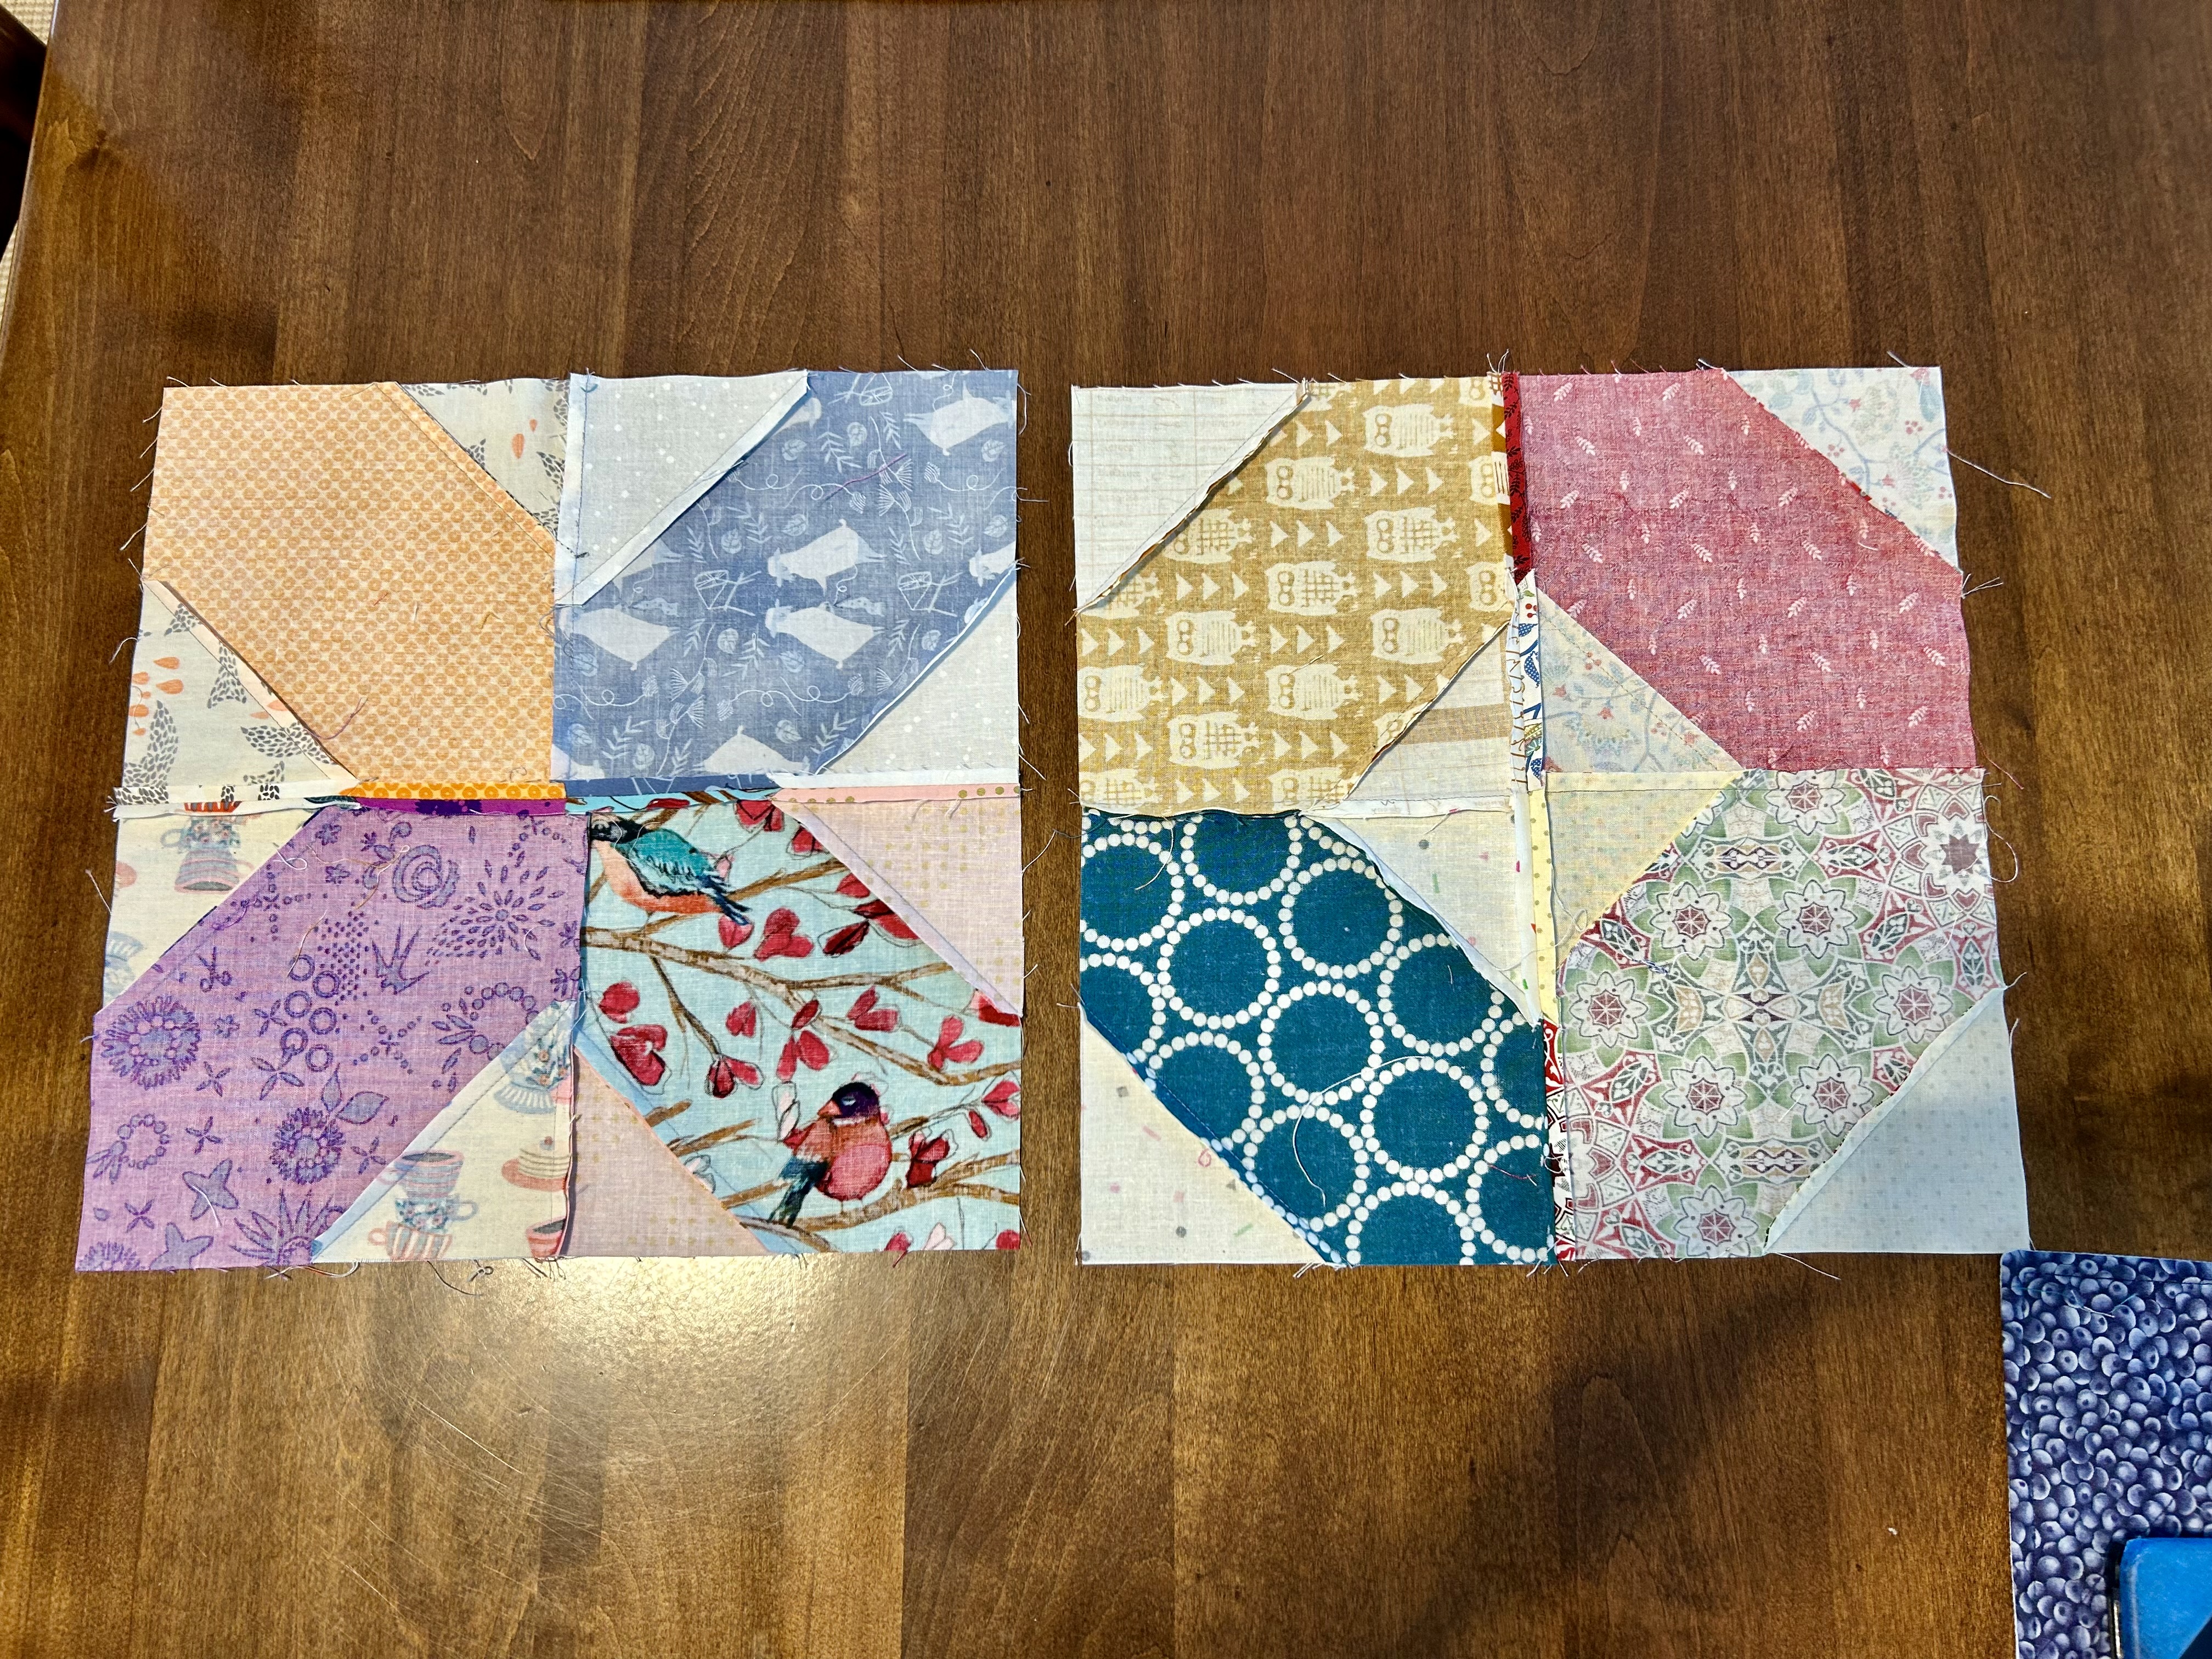
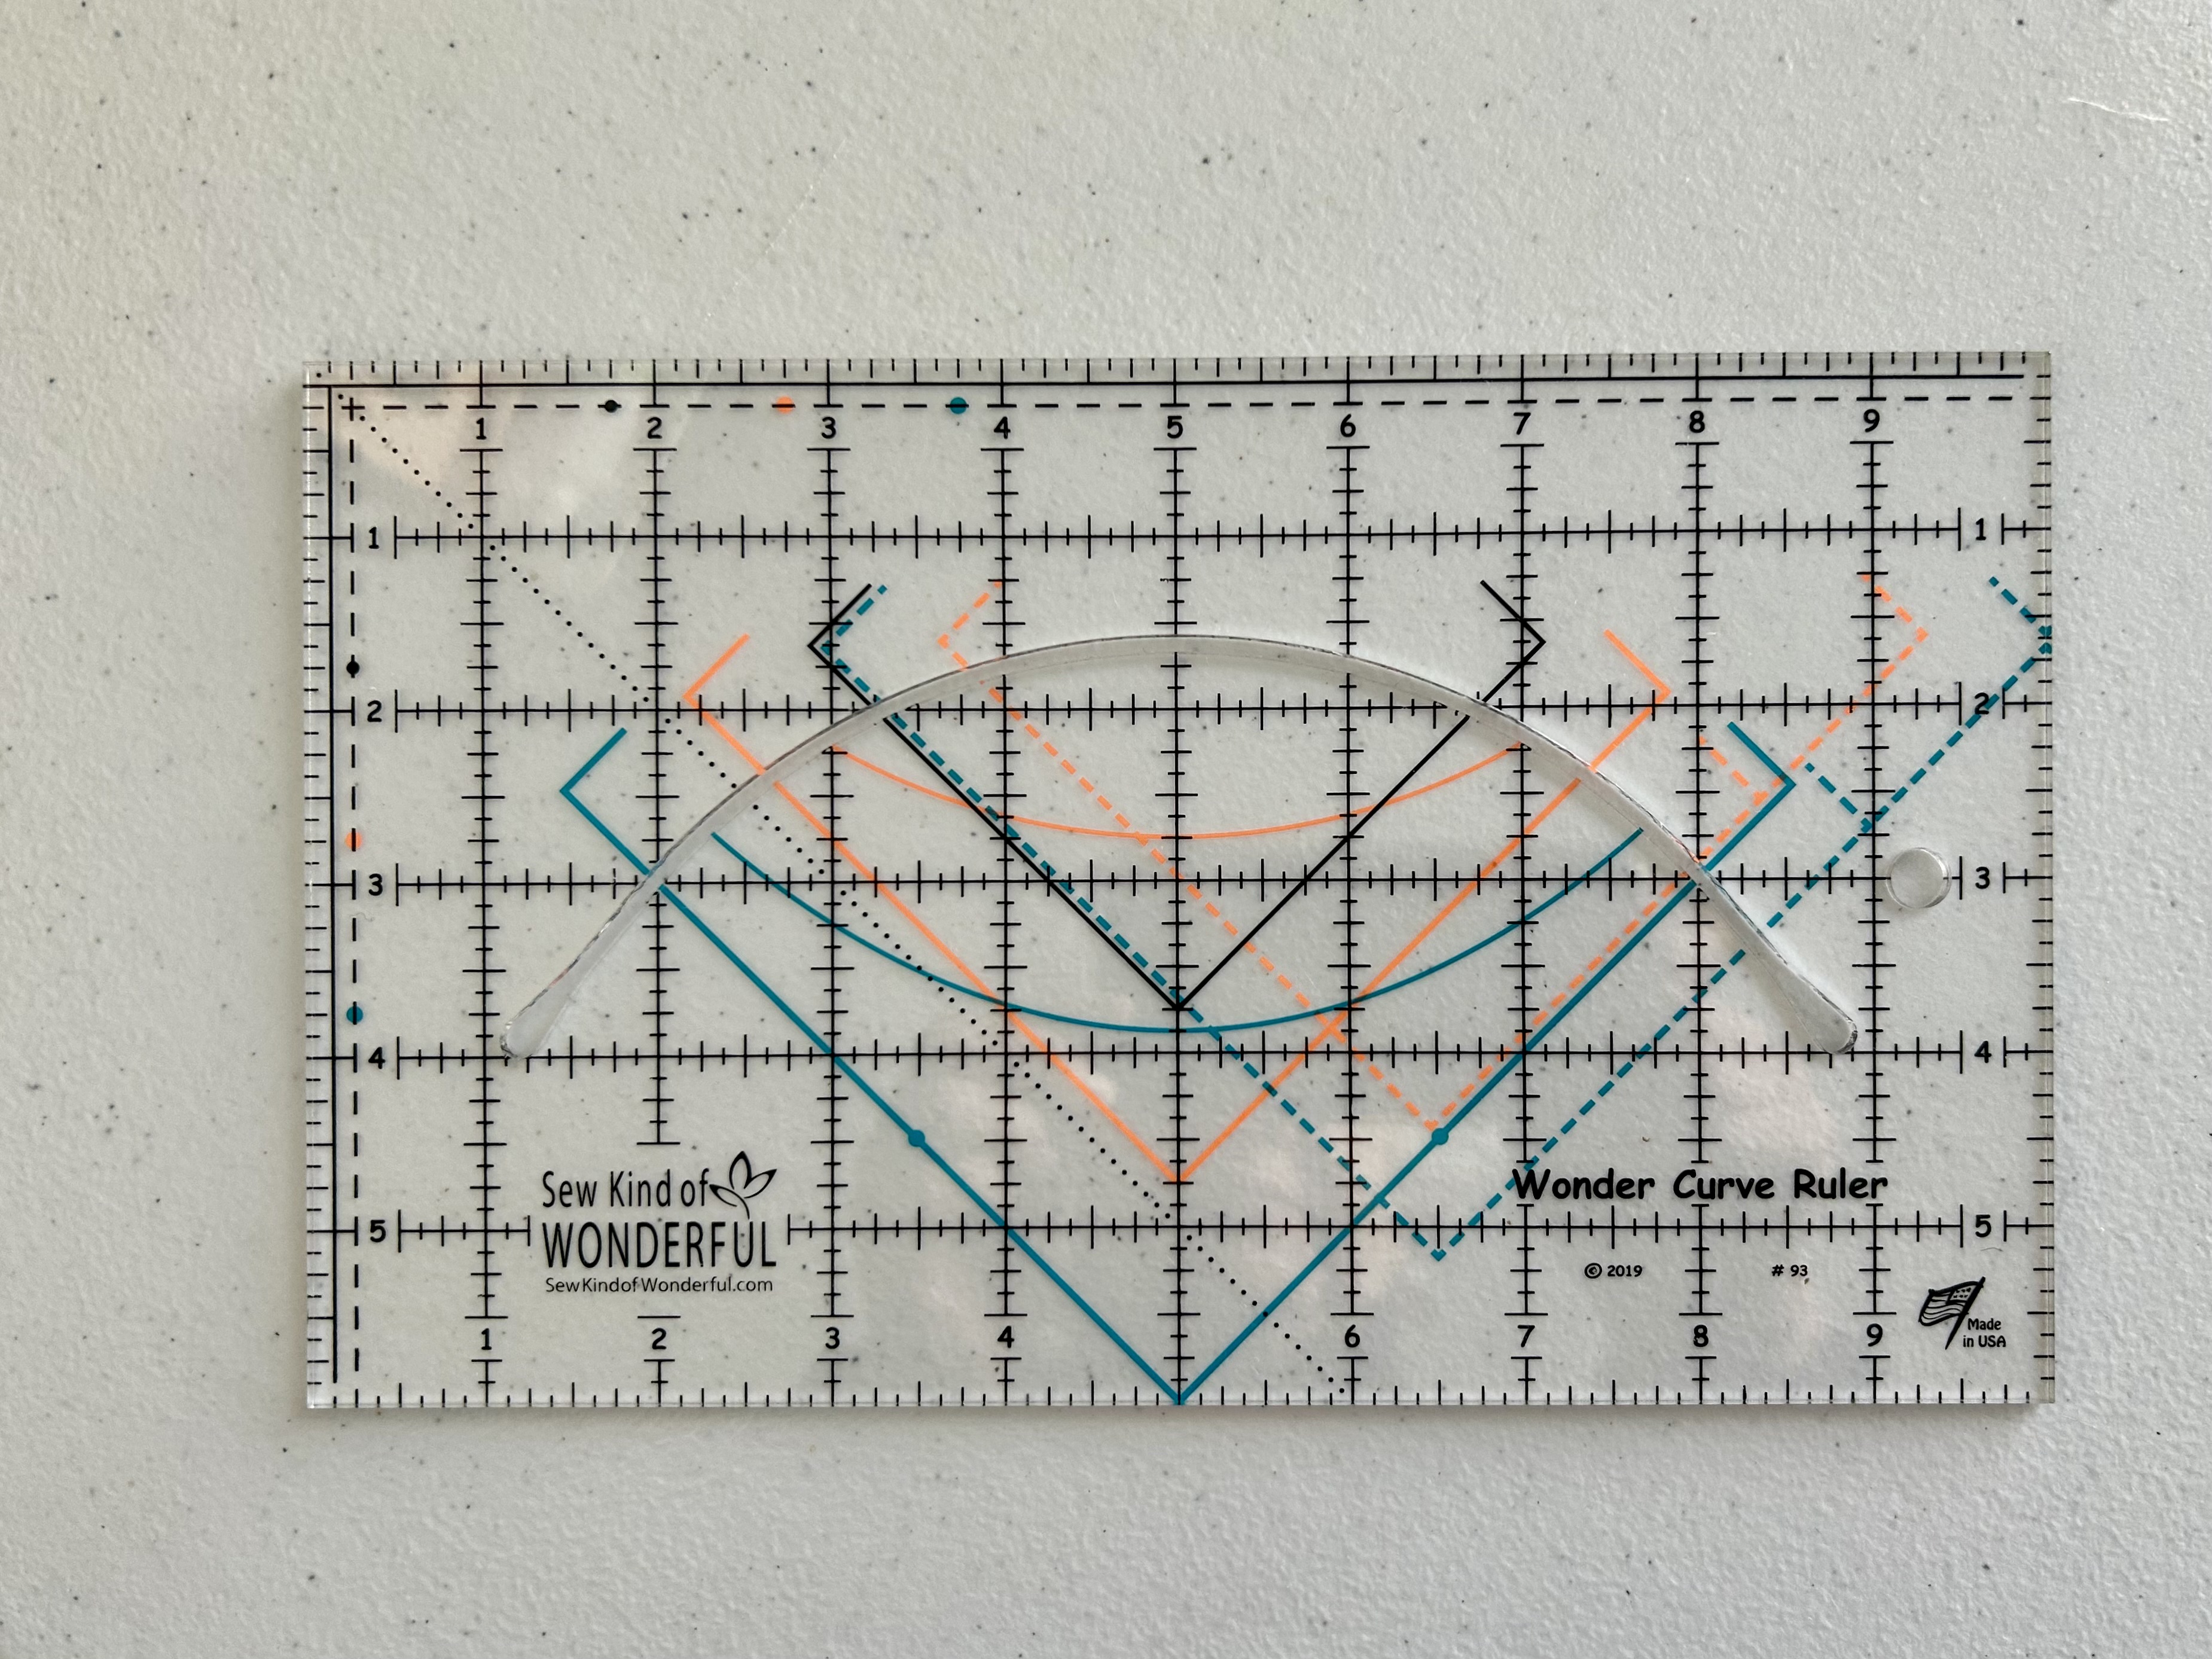
Years ago, I saw a pattern that intrigued me called “Flower Pop”designed by the talented women at Sew Kind of Wonderful. The pattern was in Simply Modern magazine, which is now defunct. The pattern uses a special ruler that cuts the curves used in the pattern, and back then, curves were just getting popular in the quilty world.
I ordered the ruler, but until a few weeks ago, it and the pattern waited for me as I moved from Maine to South Carolina and got reorganized here. Now I’ve been on a mission to use the rulers I have not yet trialed. The other day I pulled out this ruler and the pattern information as I still have that magazine. Here’s the ruler one uses to cut all the curves–and it does make that process easier, but there is a learning curve on how to use the ruler AND how to angle the cutter blade within the cutting strip.
My trial block was a steep learning curve for me as well, though I’m good at sewing curves. But I was still intrigued despite the problems I encountered while getting to know this block. Pressing is, of course, precise at various points.
I ordered the pattern itself from the Sew Kind of Wonderful web site as my magazine pattern was missing information that I needed. And I watched a really good video made by Sew Kind of Wonderful, available on YouTube. I am happy to say I’ve learned how to sew mild curves without using glue or pins.
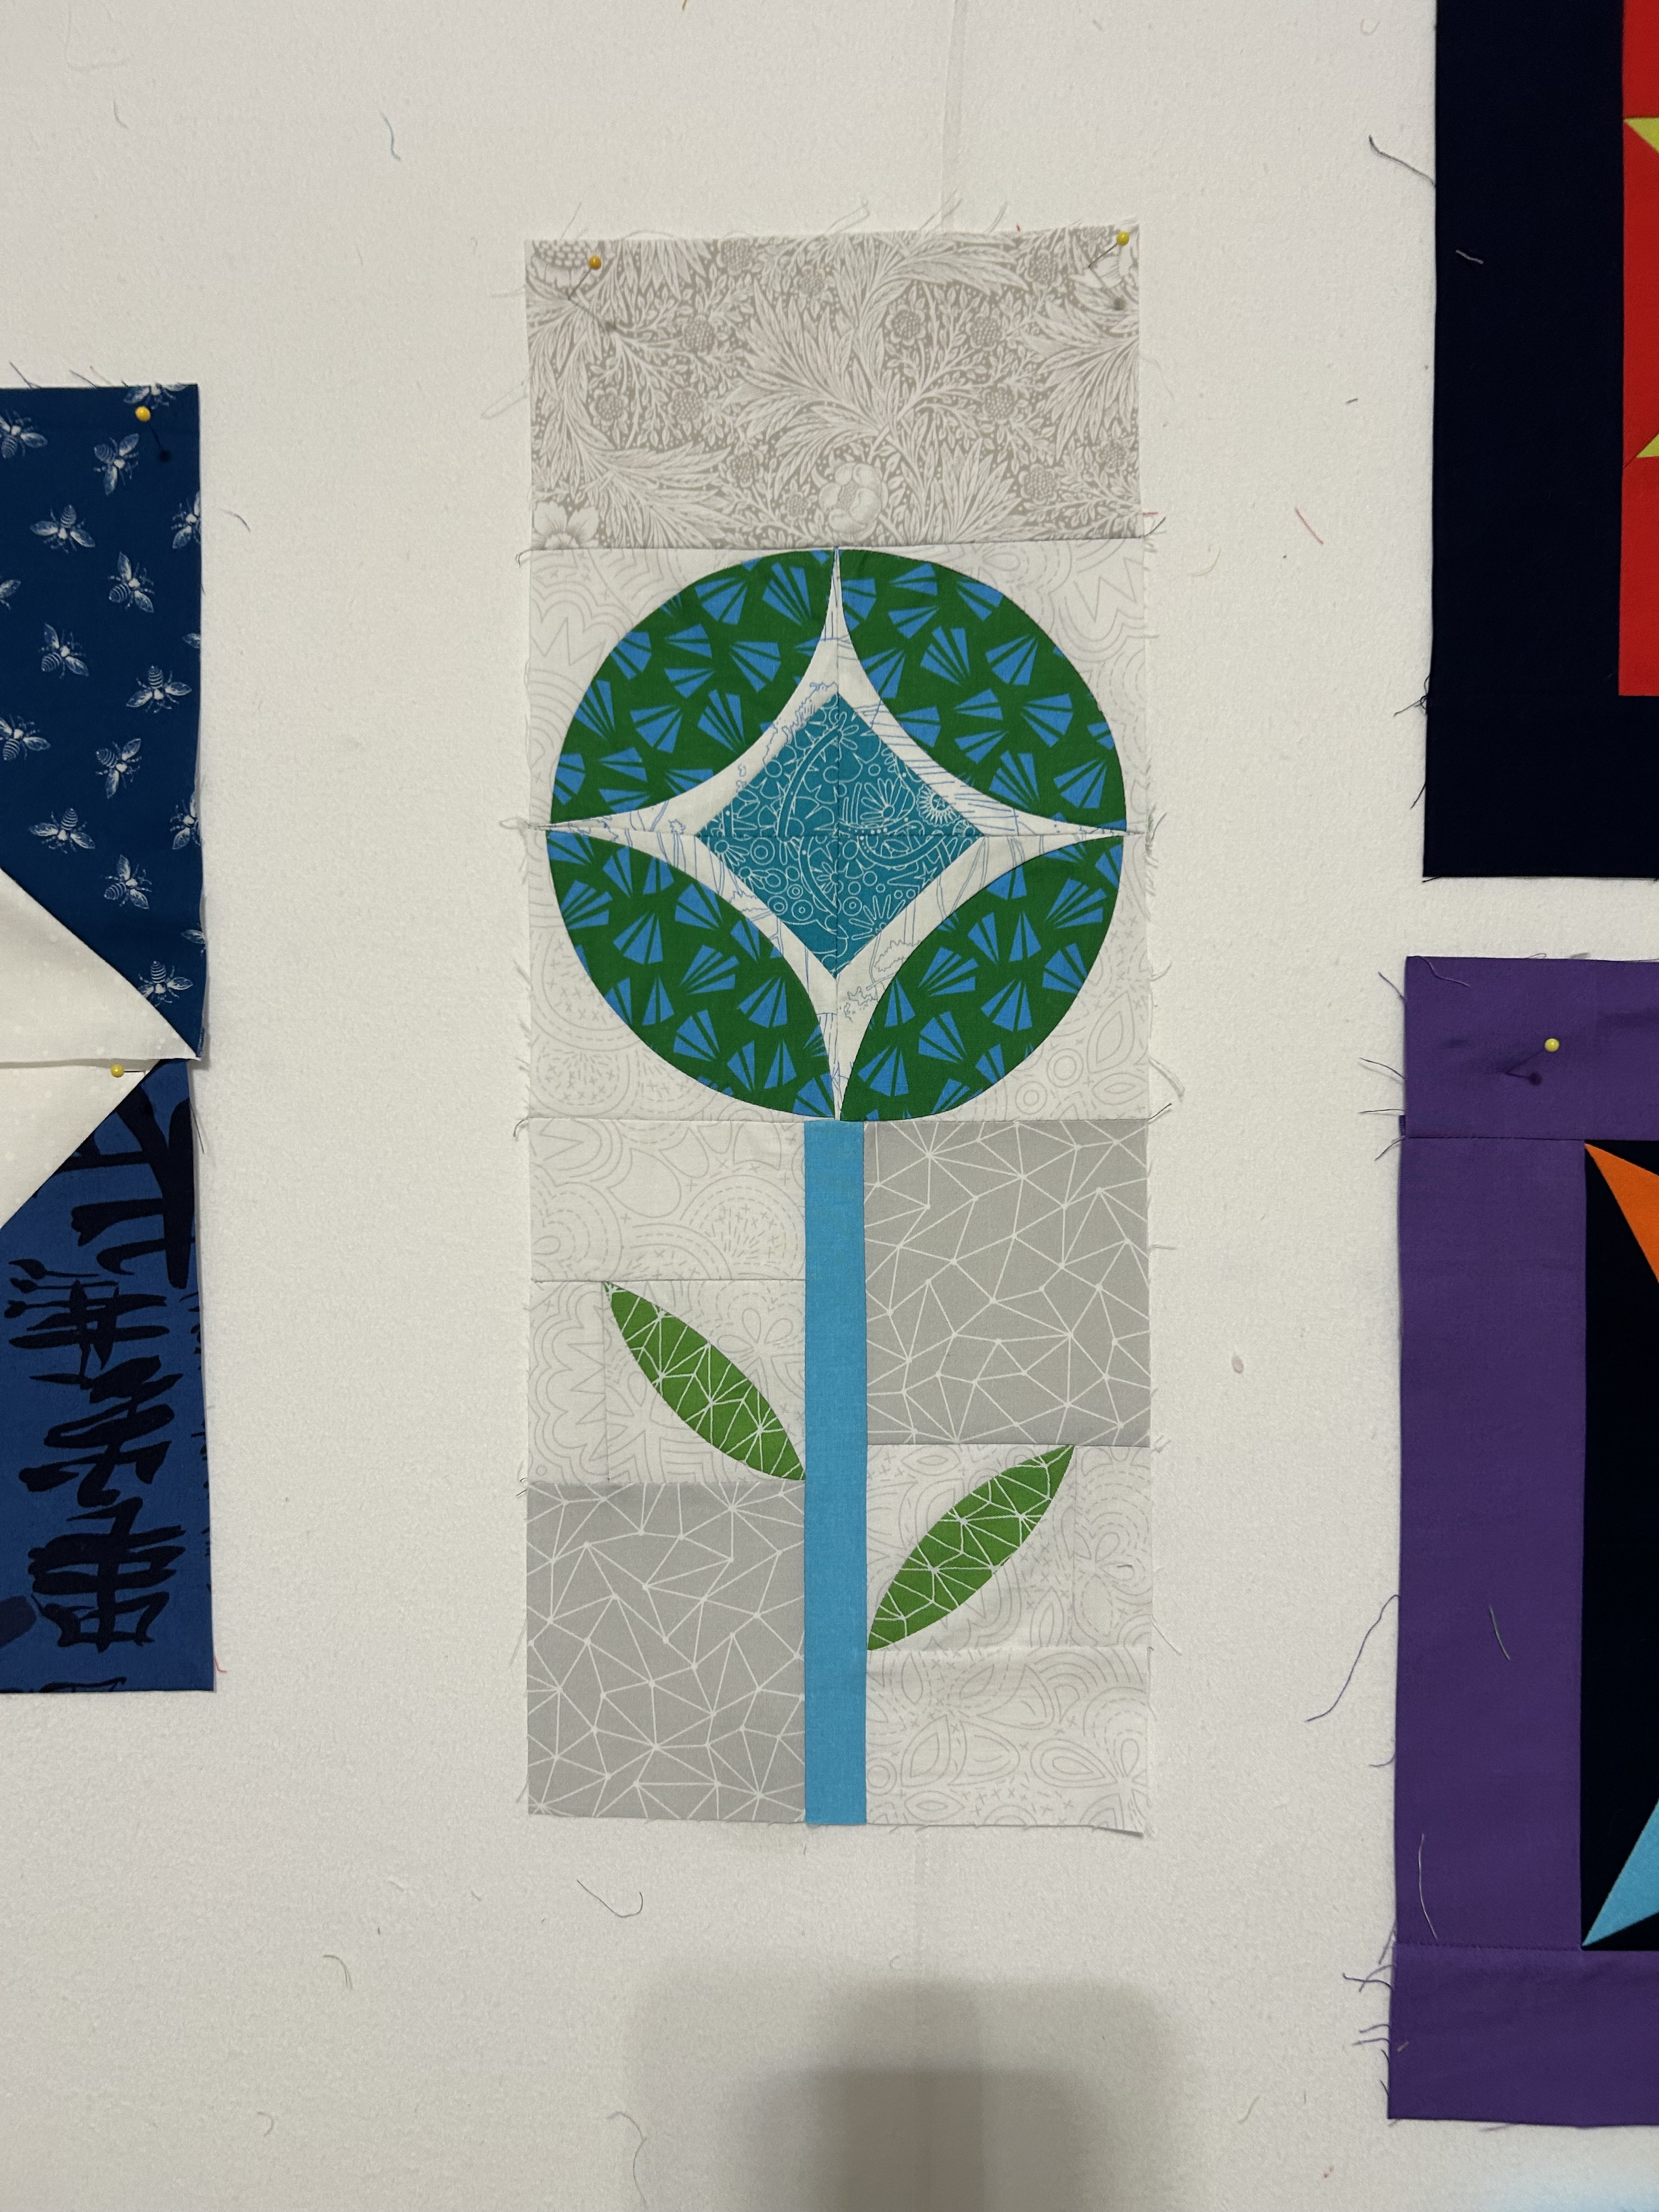
Here’s my second effort, using print fabrics. And I’m much happier with it.
The current pattern now shows all neutral backgrounds, but I very much liked one version shown in the magazine that has some darker backgrounds. OK, a lot of darker backgrounds.
So, I’ve cut parts for the next block with a medium blue print for the background. I have no idea where this effort will go. I am using stash fabrics for this project–assuming it becomes a project.
Meanwhile, the templates I ordered (a splurge) for the 4th block for my ongoing Tara Faughnan Blocks3 class arrived, and yesterday I made a trial block using the 4.5-inch templates. (I love the templates with their thinner outside piece.) The block idea, designed by guest designer Jen Carlton Bailly (bettycrockerass.com), is named “Shattered.” I used less colors than the designer used in her demonstration videos (we have 12 colors in a month’s palette) as this 4.5 inch block would make a bigger piece. It still felt incoherent to me, so I used circles that would calm my eye movement.
I discovered that using ONE color (light orange) for half of the block that gets cut limits the block. I can sort of see making a big block like this one and using very wide neutral sashing to make a quilt.
Later today I’ll try the 3.5 inch templates and will use more colors. When combining blocks, one is meant to look for what kind of interesting shapes and color blocks emerge. It’s “improv,” of course.
I’ve wanted to make a donation Quilt of Valor for my Patchwork Gals group. So that is now happening.
Bold. Graphic. What’s not to like?
I had to buy a few light blue fabrics, but all other fabrics are from my stash.