My DIL Tami has been looking for a hand sewing project for some time, and in past months, she and her daughter Talula have discovered needlepoint.
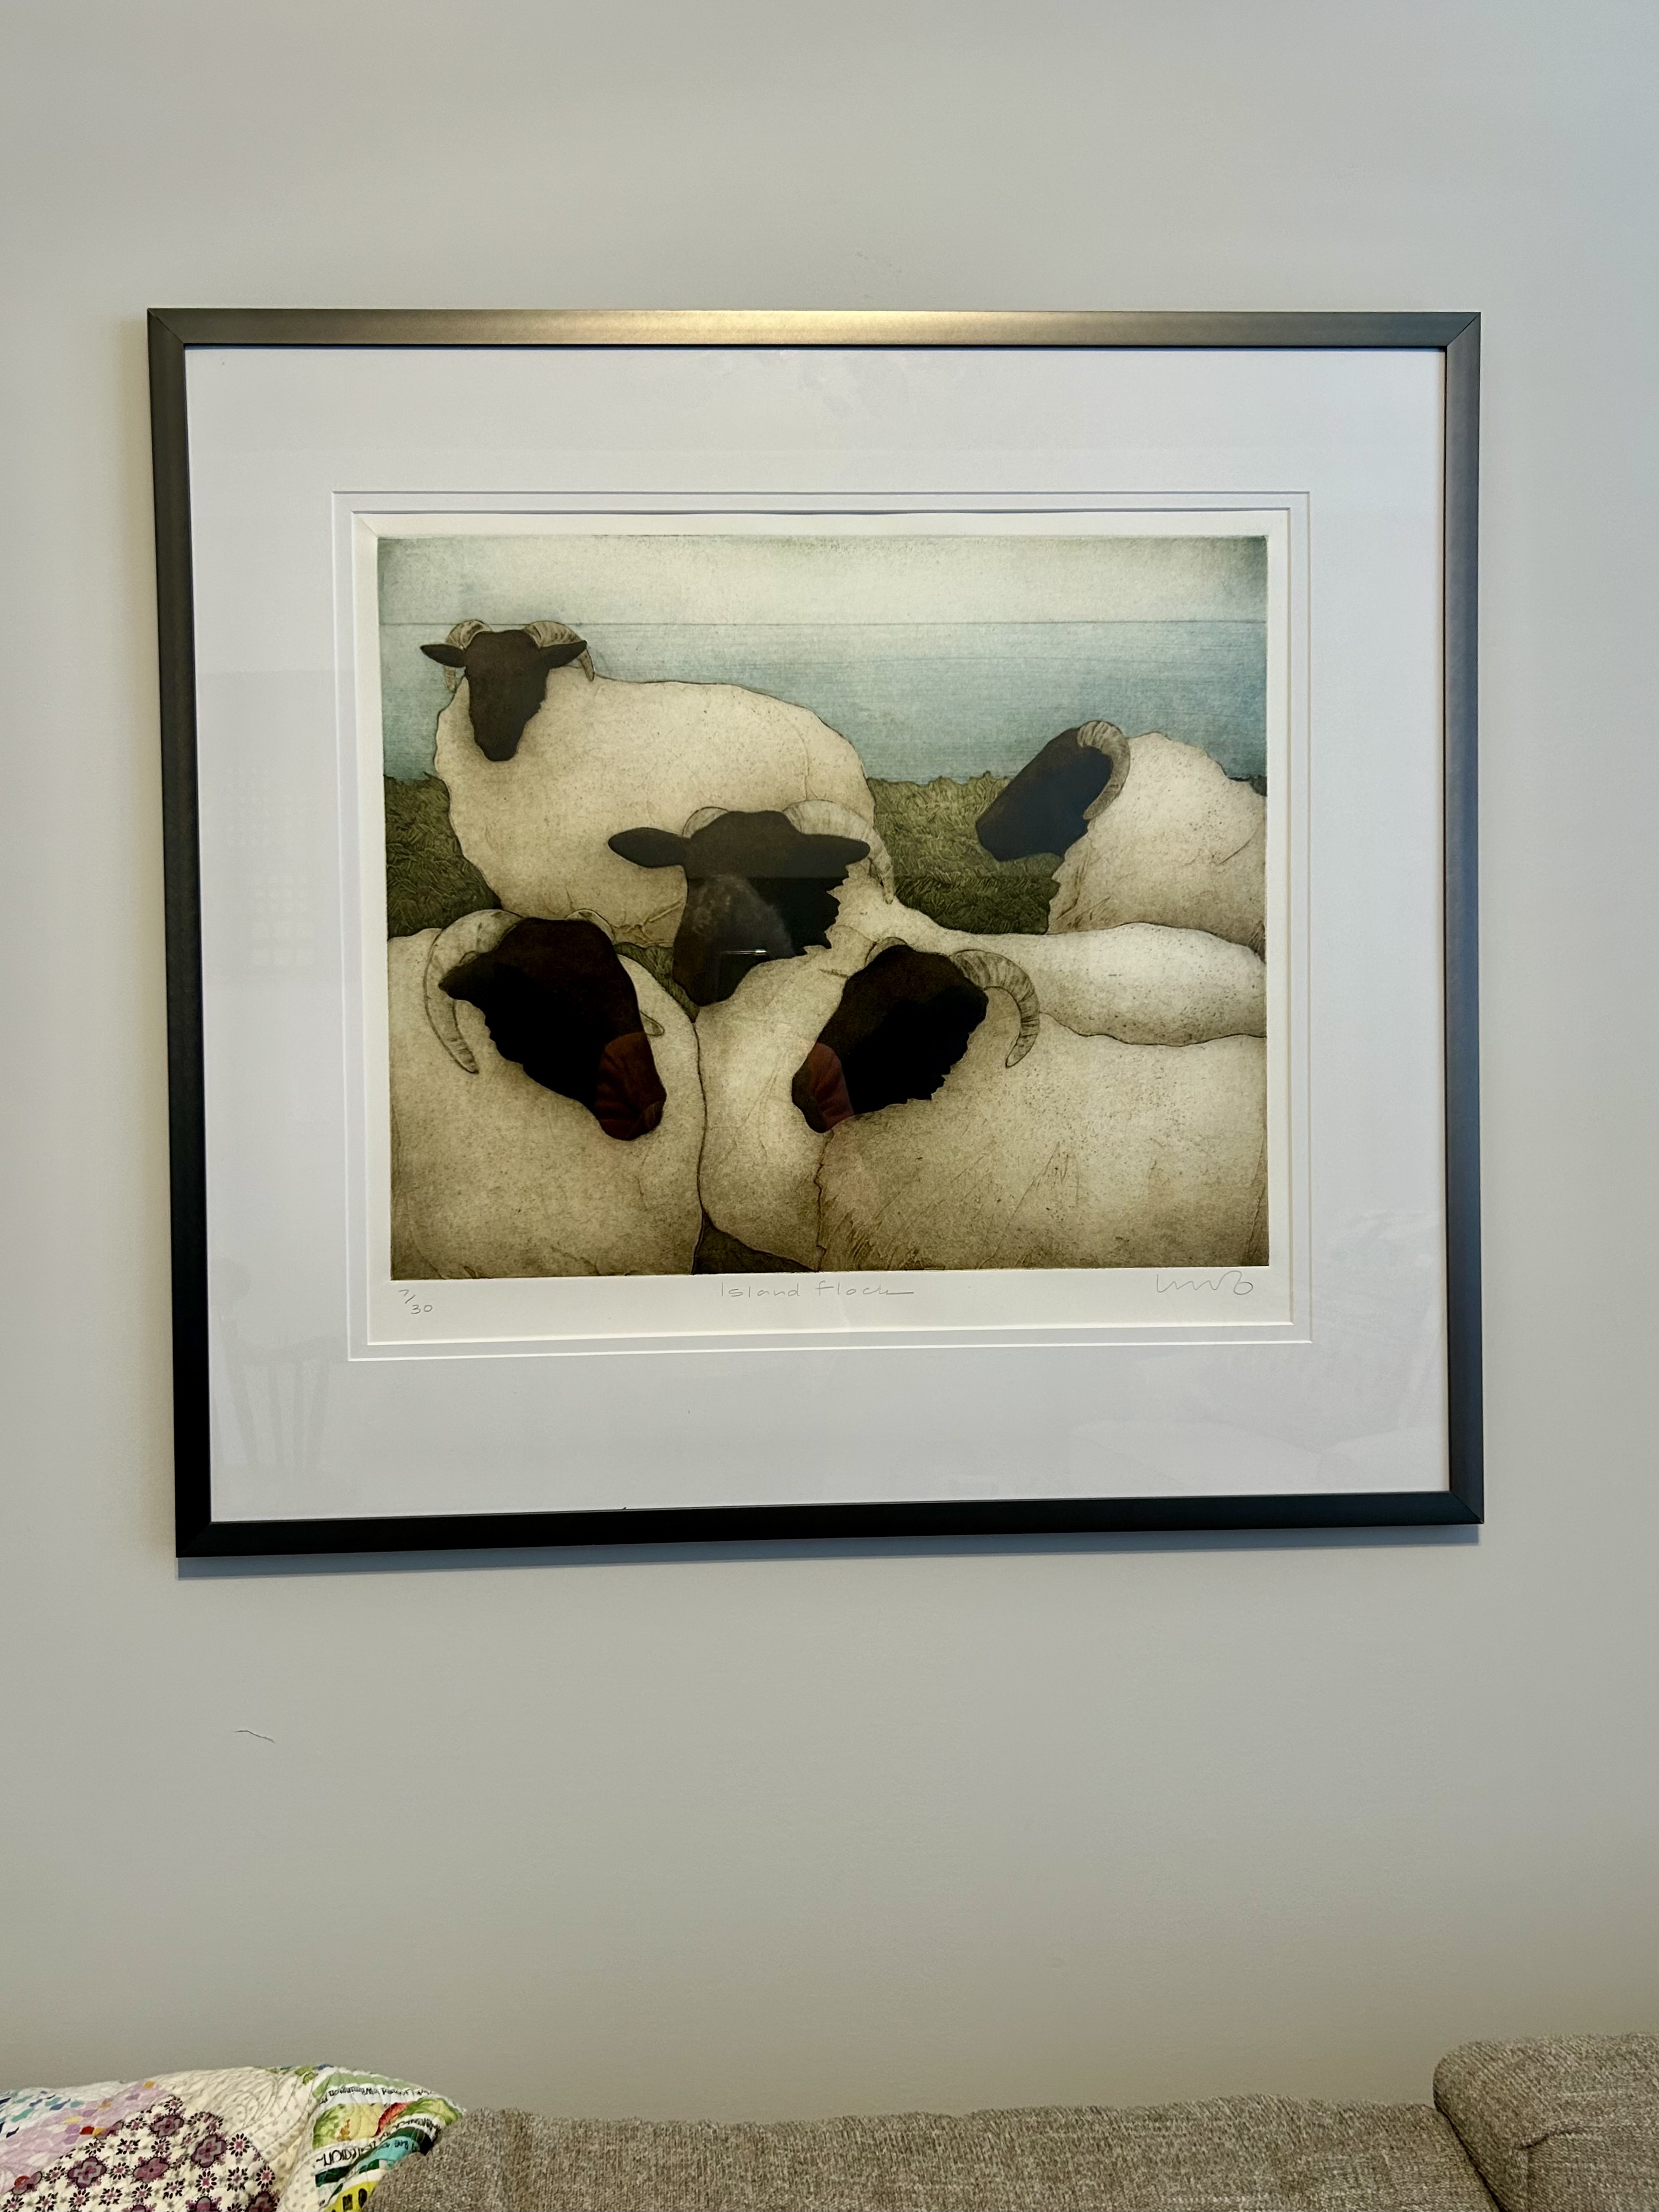
Tami brought me this needlepoint gift on Friday.
The sheep icon has a rich history in my family’s life. My husband’s father was an immigrant from Ireland back in the day (mid to late 1930s I think). My FIL was the second son, so would not inherit the family land. Growing up, he was in charge of the farm’s sheep.
When we moved to Maine, we were fascinated with how some farms put their sheep flocks out on the many, many offshore islands for the summer. There are iconic photos of the sheep flocks in boats being taken to the islands. Sheep wool forms the backbone of many of the woven wool Maine products. The Swan Island Company wool products and weaving are an example.
One summer after John died, I saw this framed art piece at a summer fair and bought it as I knew John would have had he still been alive. Of course it came with me to South Carolina.
I have not yet seen granddaughter Talula’s needlepoint projects as she is away at college. But her mother says Talula is working on a big one. In addition, she has now opened an Etsy store where she sells her own needlepoint designs and patterns.
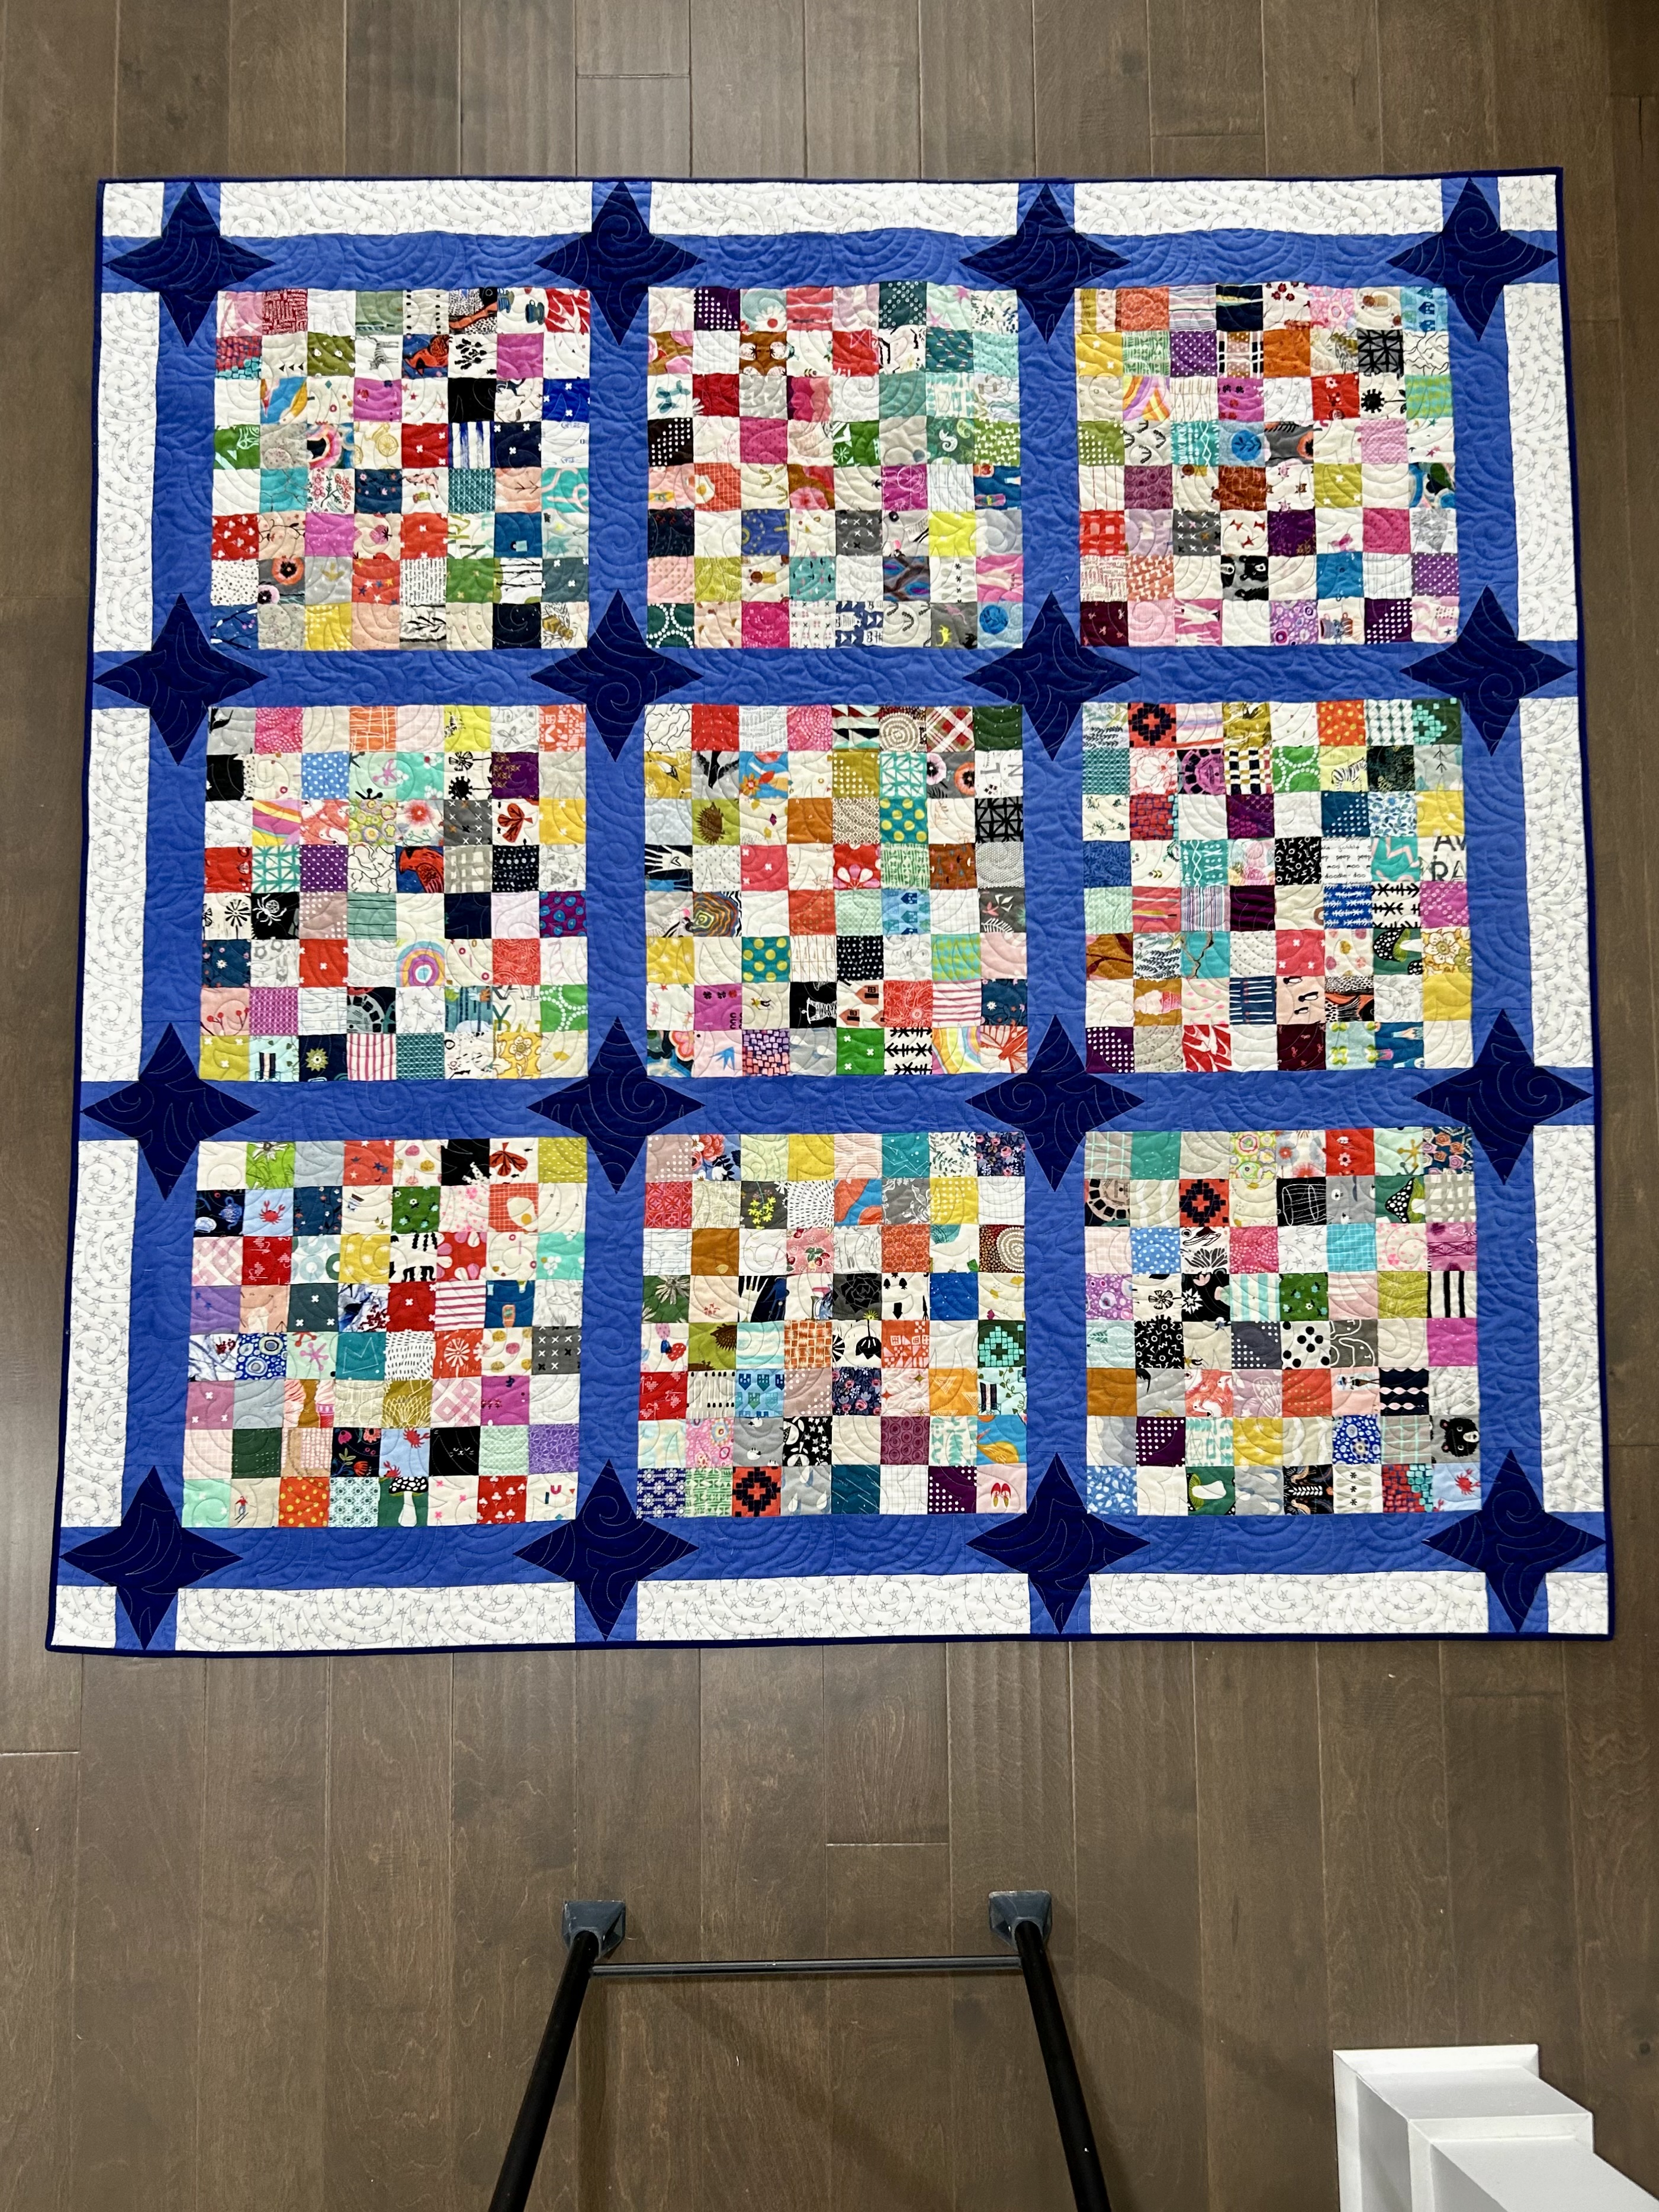
Rachel LaBour of the blog Stitched in Color used her “Parsnips” design as a sewalong some months ago. Rachel has now made two “Parsnips” quilts and you can see those and her pattern on her beautiful blog.
When I cut fabrics I cut leftovers into sizes that I can use later, so I have two separate bins for 2 and 2.5-inch squares that really needed to be used, so I used the 2.5 inch squares for this quilt. Rachel used rectangles and her block is smaller than mine, so she has more blocks. Note that I added the lighter outside border so I could take the stars out to the edge of the quilt. I suppose I could have, also, just made that blue border wider, now that I think about it.
The backing is WILD! It’s a wideback print that I used on its side so I had to buy less fabric to cover the back–and I have the leftover fabric from the edge in my stash now. To compare, that would be 5 or 6 yards of 44-wide fabric (depending on the print drop both long and wide) versus 2 or 25 yards of a wideback. Using a wideback this way if the print allows is…cheaper.
And…now my fingers are itching to try some blocks like these in the wideback with my solid leftover strips. Maybe a stretched canvas piece…
“Fall’s Splendor” is off the longarm, trimmed and bound, and getting its binding sewn down at night. I’m really happy with the quilting texture and the thread color (a mustard yellow/gold).
Up next on the longarm, “Spring’s Song,” which is ready to be loaded.
My design wall is hopping and full of color. I will take pics of it in a few days.
As for the bin of 2-inch squares, there are placemats happening.
This six-month online class taught by Tara Faughnan started in October and ended in March. Each month Tara encouraged us to take time to “play” with that month’s block idea.
I thought it might be fun to review my own “play” time and to show you one of my favorite pieces from each month.
“Hourglass” was the first month’s project. I was drawn to the half-rectangle triangle version–and here’s where I learned to diagonally cut a half-rectangle triangle block and recombine it to make a whole new block–which eventually wound up in my half-rectangle triangle series made with Latifah Saafir’s Hurty ruler. But more on that series later as the final and 4th quilt is now getting its binding sewn down.
Here are some small pieces I made with that half-rectangle “hourglass” block. I had fun with playing with hand-stitching and with trying a facing on one.
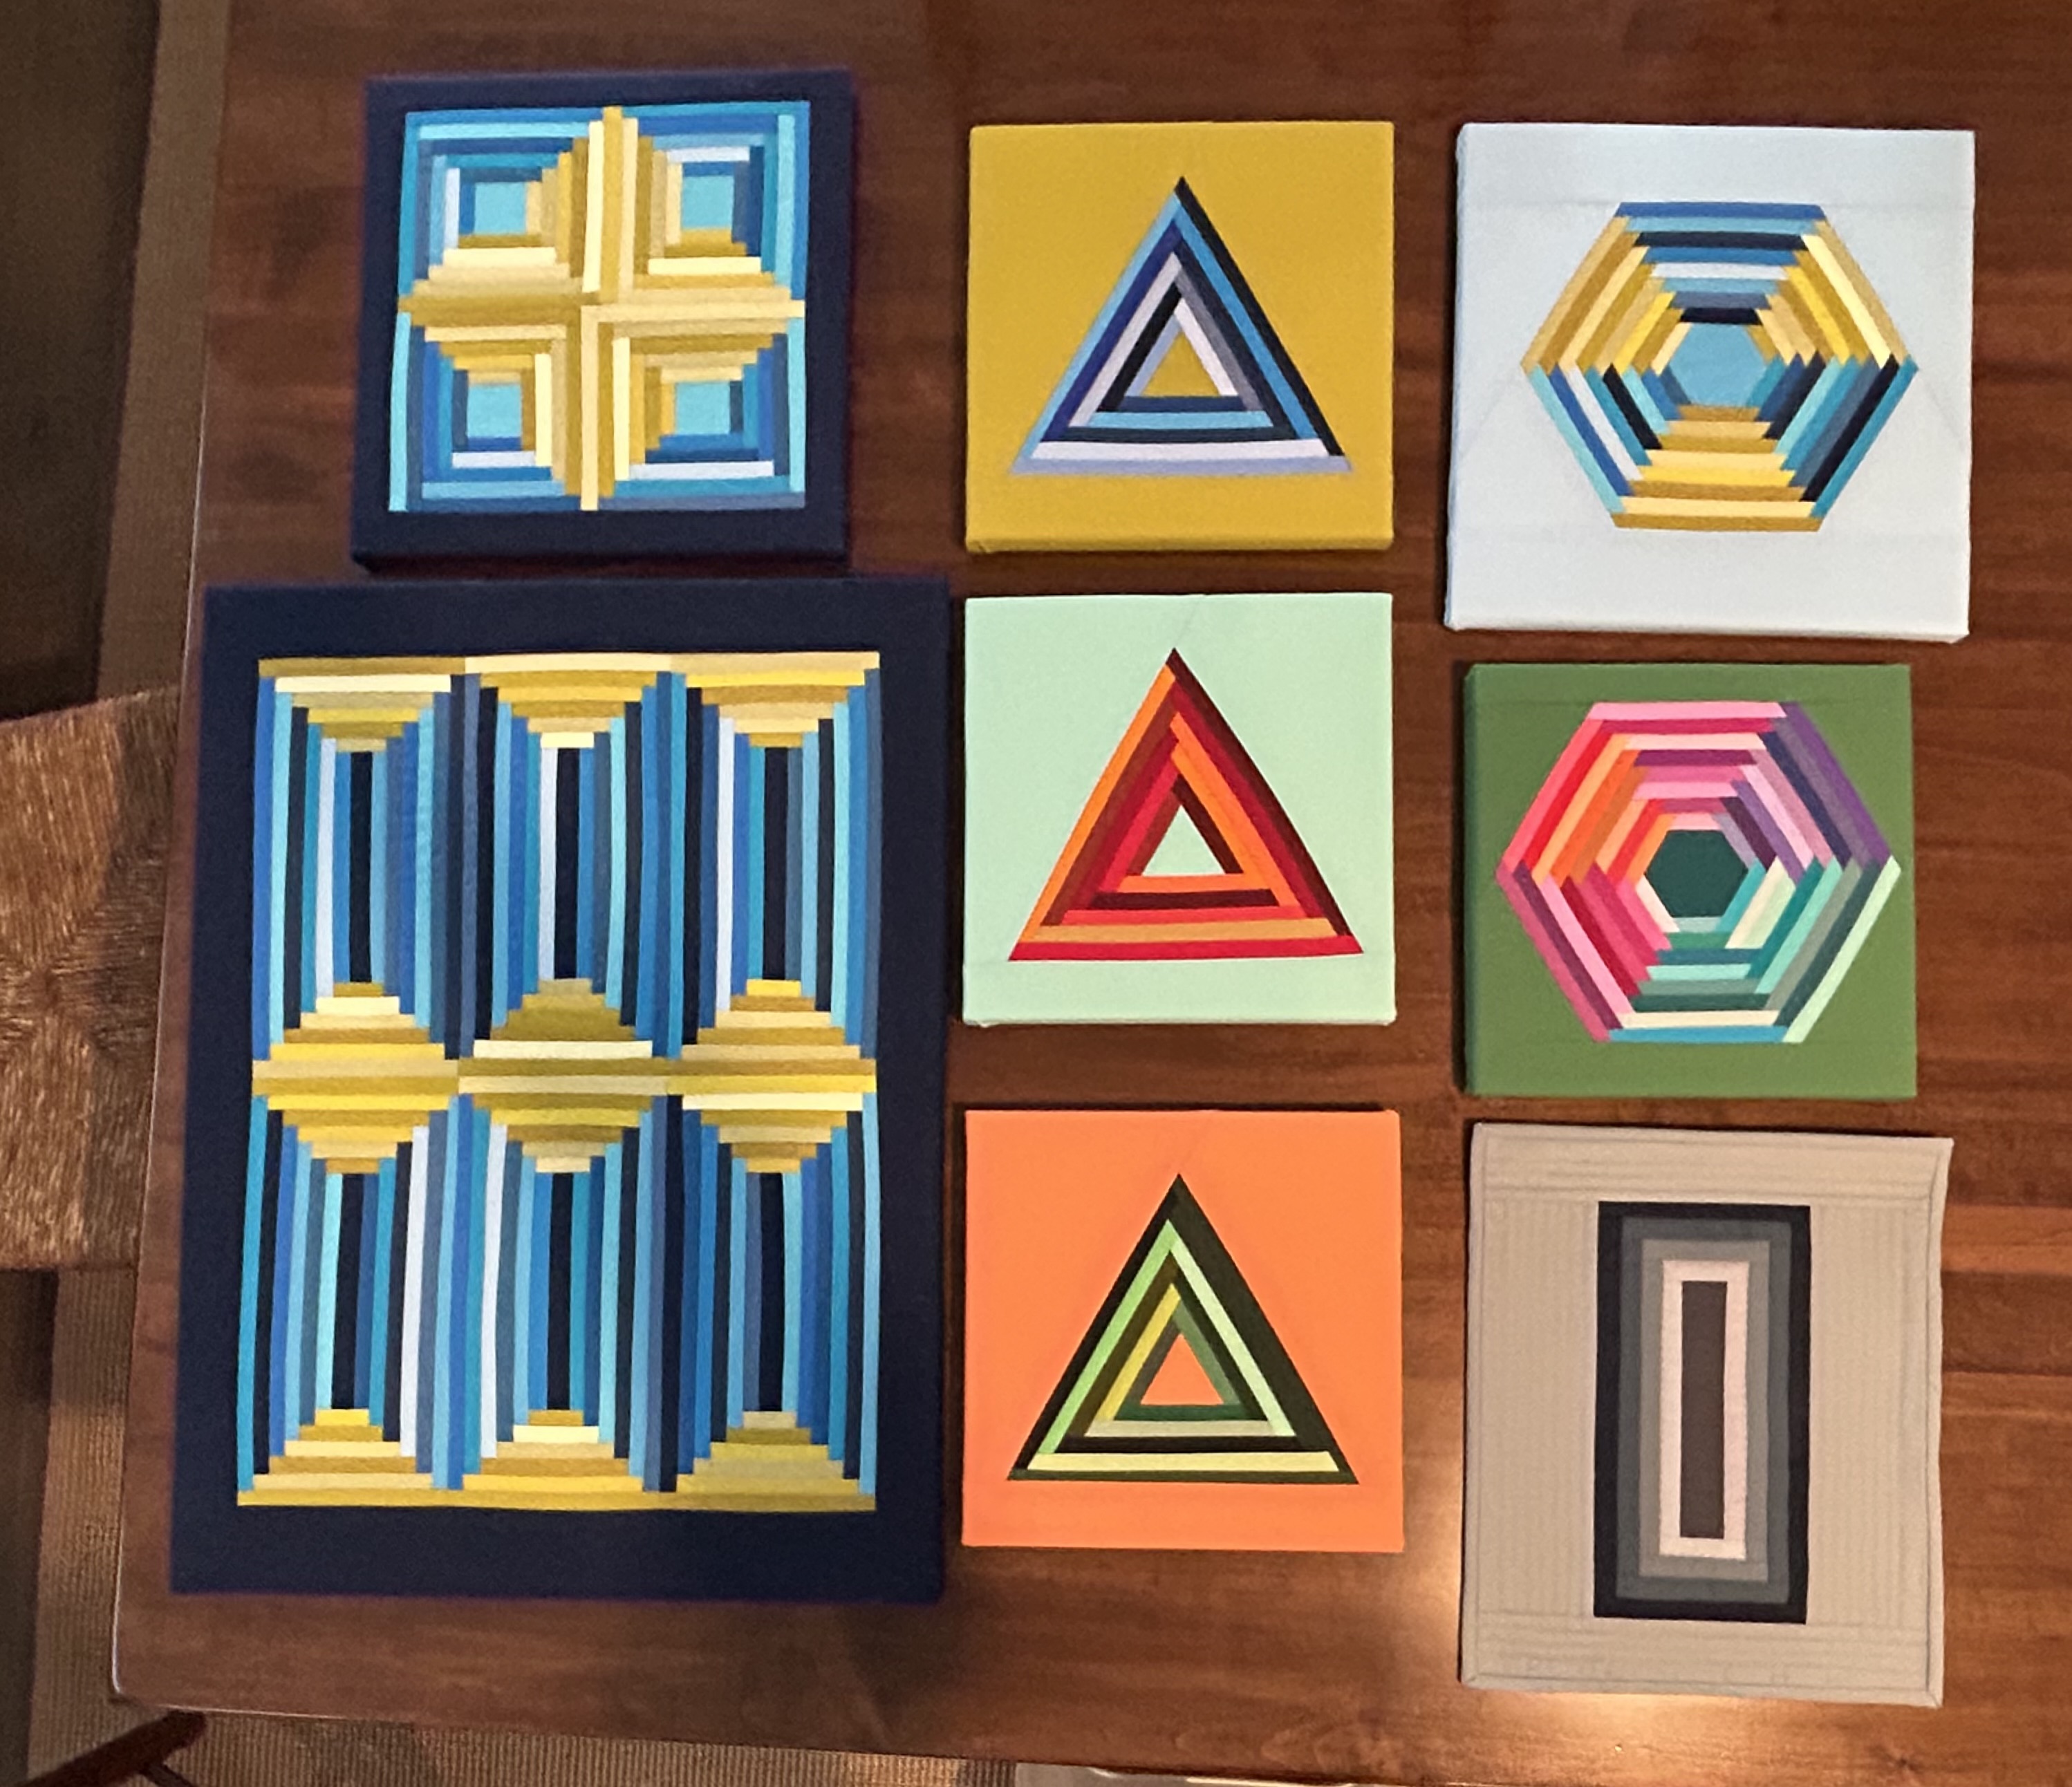
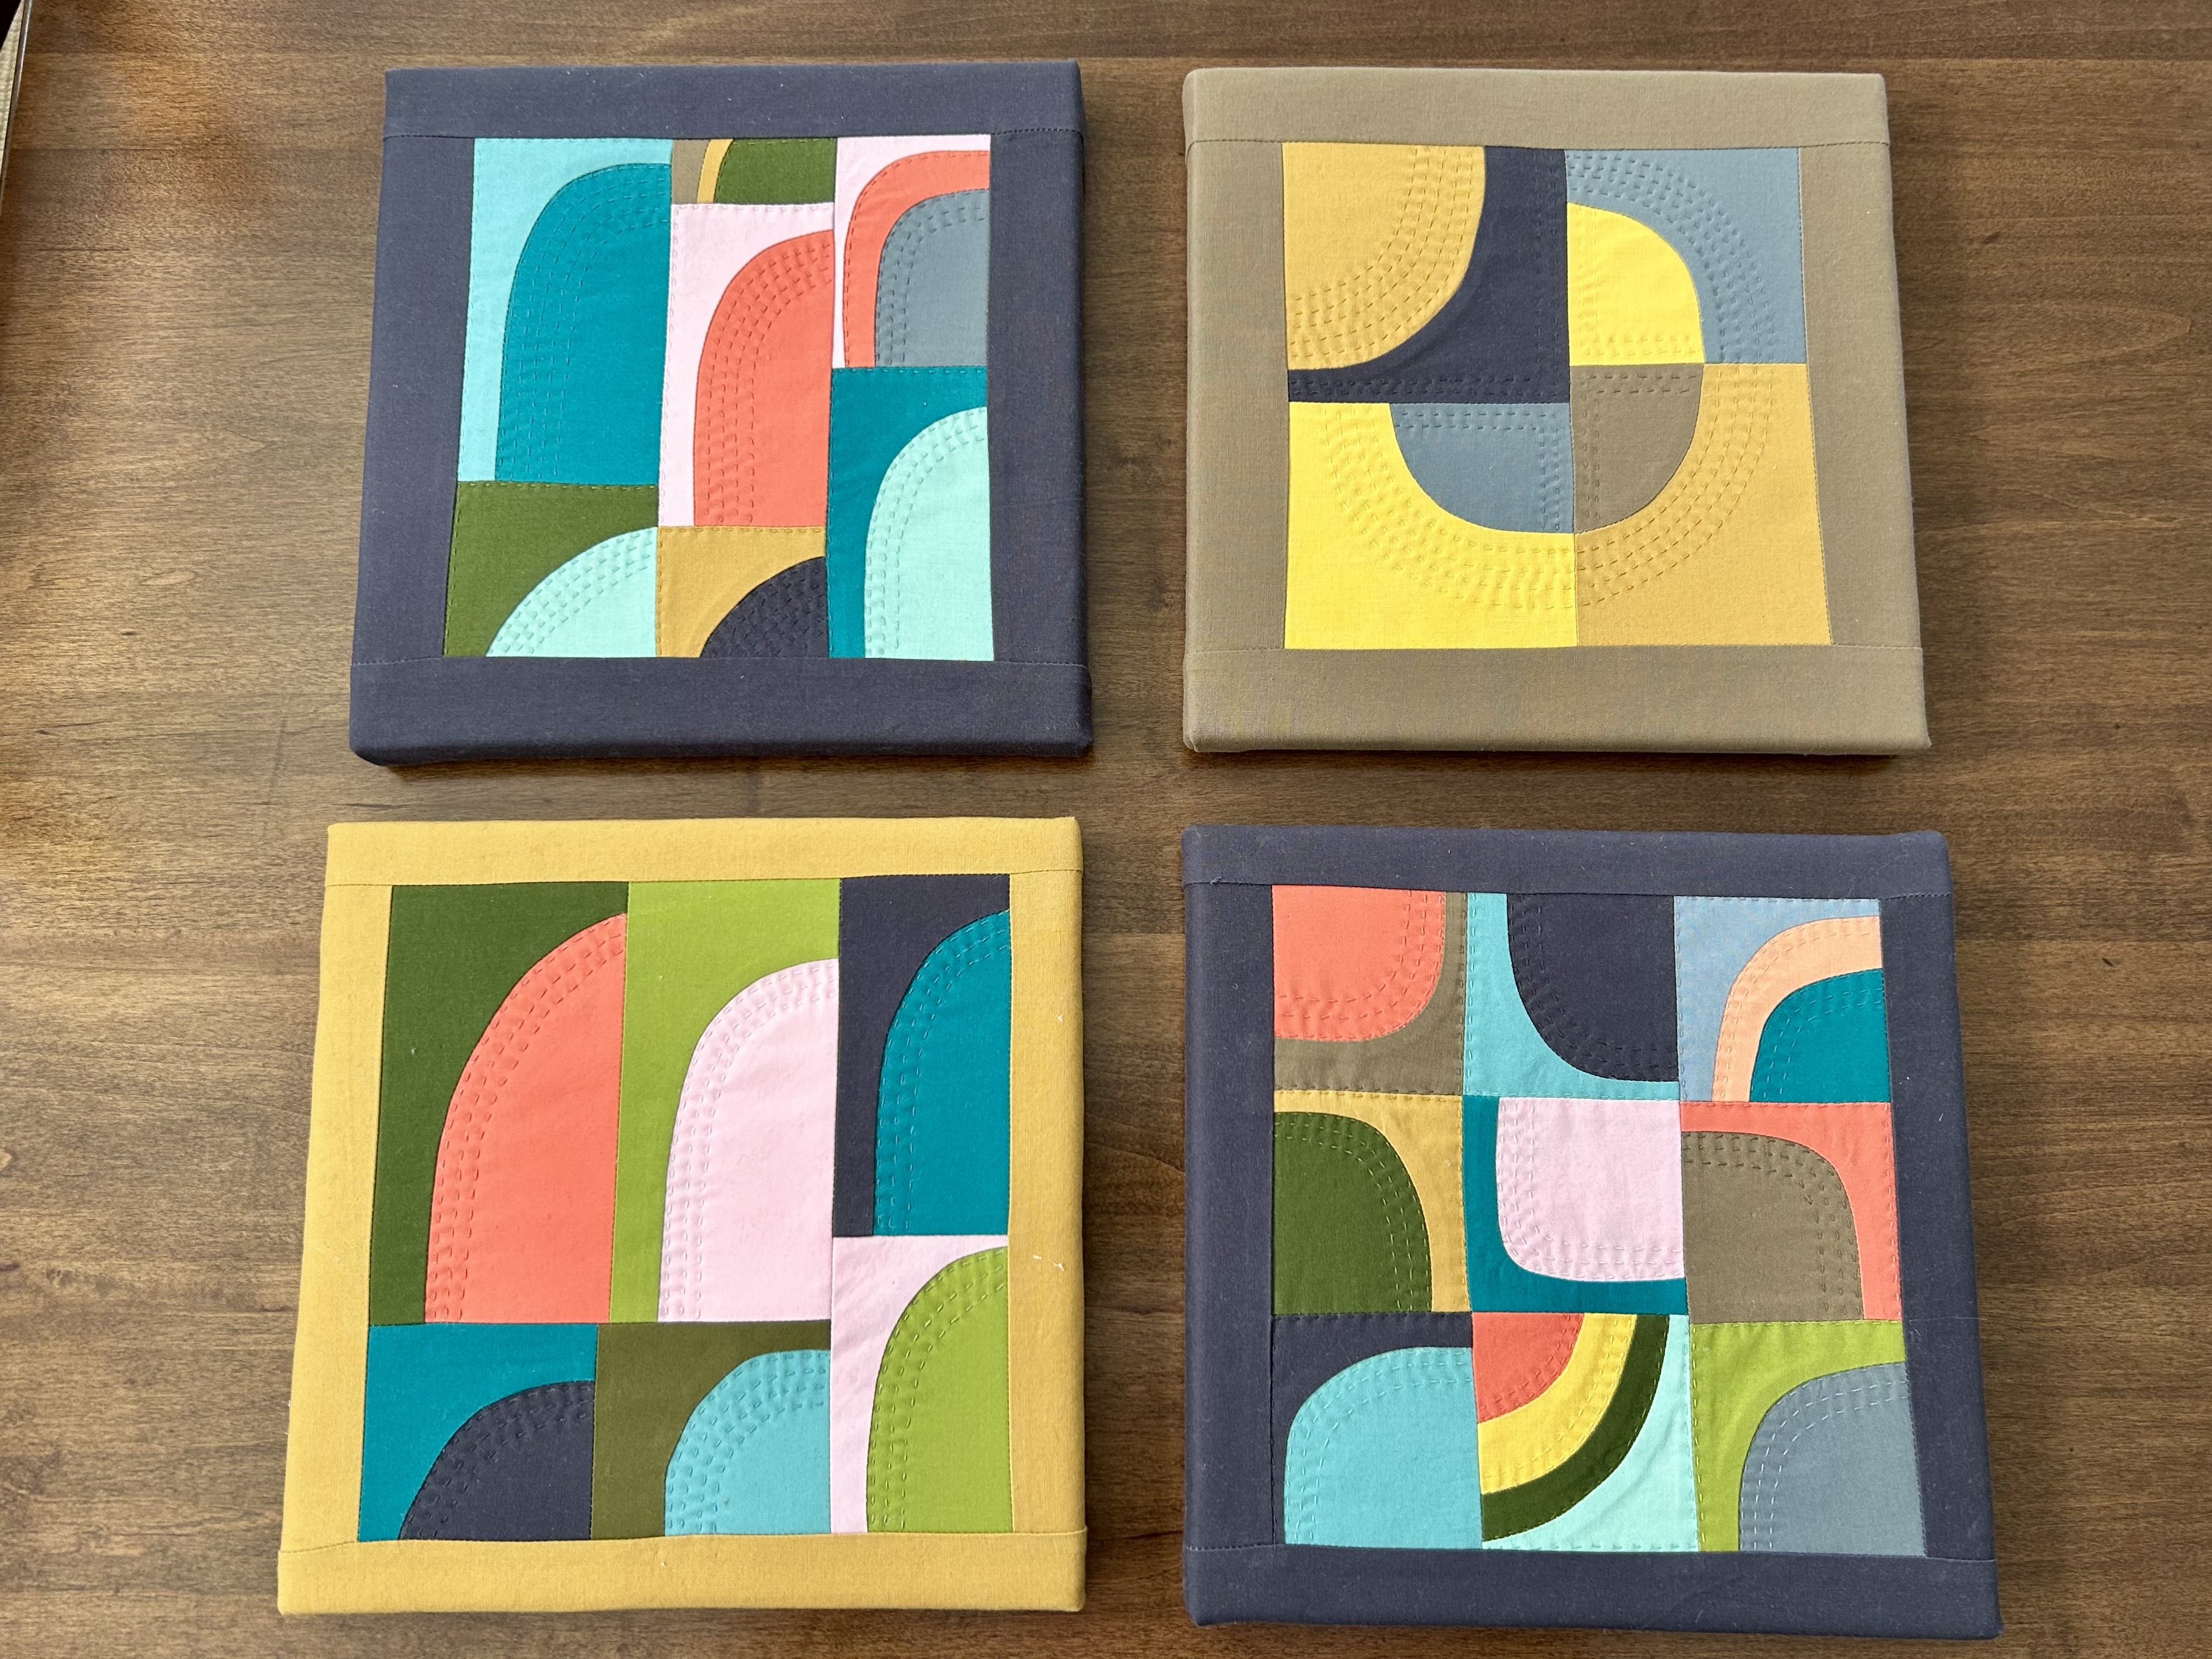
“Log Cabin” was the second month’s project, and here’s where I started learning how to put a project on stretched canvas. Tara gave us MANY variations of this narrow log cabin form, including triangles and hexagons in all sorts of sizes. I had to make myself STOP.
I hung this one in my quilt room, but all the rest of this month’s work have been gifted.
“Abstractions” was the third month’s project, and again, I made many different blocks with this method, plaing with density and color combinations.
I hung this one downstairs, and I smile whenever I see it.
“Wayward Arcs” was the fourth month project. And predictably, I had a lot of fun with this improv curve method and hand stitching.
“Big Slice” was the fifth month project–a new Tara Faughnan “wedding ring” block. I had made her older version years ago. I loved her fabric palette for this project, so ordered those fabrics and added a few more colors from my stash. This one is waiting in line for the longarm. It is 60 by 60 inches.
“Grid Work” was the sixth and final block idea.
I had made a type of grid work project last year in our Charleston Modern Quilt Group’s Sit and Sew, taught by Cathy Beemer, so after viewing projects shared on our online Community page, I moved to this idea of a city scape installed on stretched canvas. It wound up being 24 by 30.
Here’s the gridwork type of work I did last year and a picture of my recent treasures on stretched canvas hanging alongside.
After a lot of thought, I hung my Grid Work project, now called “City Scape” in my tv sitting room. It really makes the space next to my tv come alive. Here’s the view from my seat. The improv quilt on the chair is made from all the blocks I did in Blocks1.
Blocks3 will sign up in September. I’m thinking of doing it again. These past two years have been rich in experiences and new methods learned or old lessons expanded. Go to Tara’s web page to get her newsletters.
It’s April, and Tara Faughnan’s online class Blocks2 is finished for this year.
The 6th month March project block was “Grid Work.” I was late in the month starting to play with it, but while being late I checked into our Community page several times and got inspired by the kind of city scapes people were making. Some made whole small quilts of this kind of “grid” block–some even tried the funky blocks and made whole small quilts by joining their many blocks.
My project took me about a week to make and wound up being stretched on canvas that was 24 by 30 inches as I needed more room at the top for a big, orange moon.
I did not try to add in hand stitching as I just wanted this piece to be really graphic.
I am very pleased with this project and now am not sure where I want to hang it. It will probably wind up in the upstairs quilt studio.
What a fun class this year’s Block2 class has been!
As I noted in an earlier post, I signed up for Rachel Hauser’s “Scrap Cabin” quilt-along starting in January. (Her blog is Stitched in Color, and she is a really creative scrappy quilter.) I am in total love with Rachel’s border for this project and would probably make it based on that fact alone. BUT, this project will also chew up leftover cut fabric strips BIG TIME. I’ve been reorganizing my strips and am looking forward to using many of them up.
Some of you have also signed up for this project. Rachel’s first quilt was made from two analogous colors, blue and a pink/magenta.
For this sew-along, she is making blocks with complimentary colors–and here’s an example she gave.
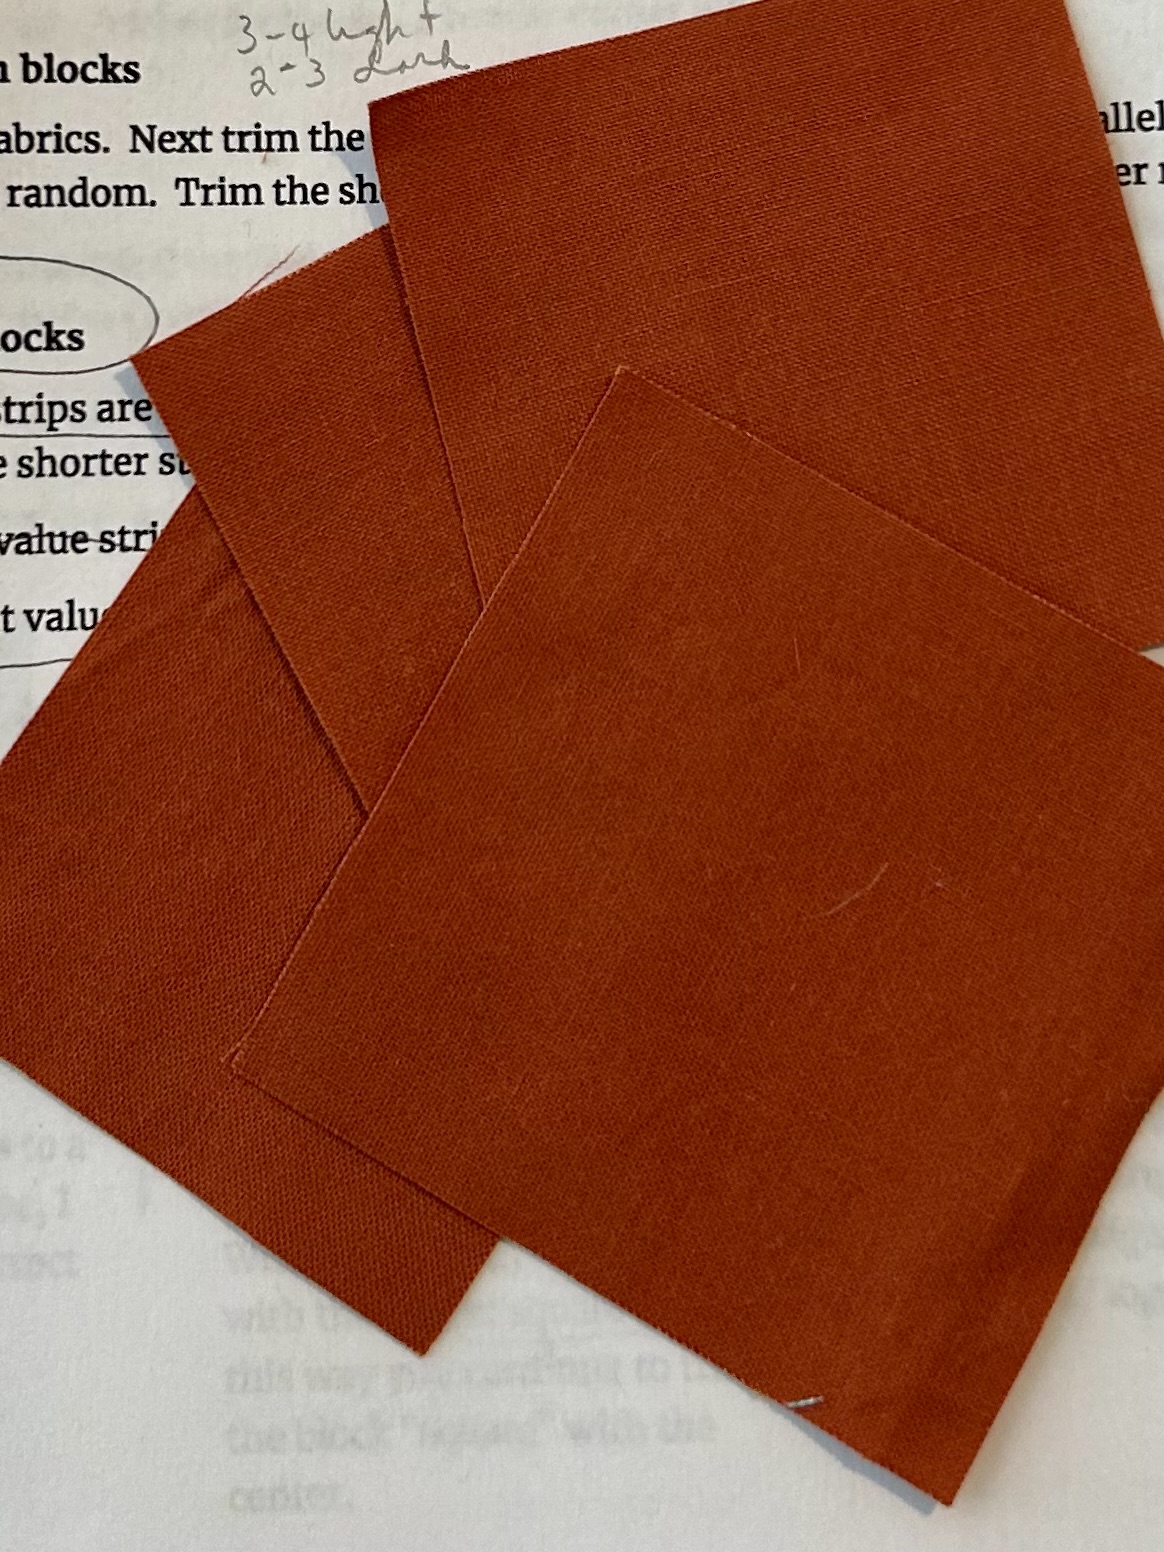
I’ve been pondering what color to use for the “chimney” block at the center of these log cabin blocks, and I settled on this brick red. I like it, and I have enough of it in my stash. Rachel used a mustardy gold solid, which works well, but if I wanted to make a set of blocks using gold/yellow, Rachel’s color wouldn’t work well. This brick red might not work with clear red strips, but I will have to see what those colors do with each other–adding in the idea that alongside a red would be some other color as well–which could “buffer” the brick red. I call that…creative play.
Here are the first colors I’m going to use: blueberry and lime green/pickle. And I’m testing out the block right now to see how that goes. Of course I am! I mean, the design wall isn’t nearly full enough, LOL.
Tara Faughnan’s Block Studies 2 online class will release a new project January 1st. Meanwhile, I hung one of the “Abstractions” pieces I installed over stretched canvas on the wall in my quilt room–next to the Maria Shell inspired project that a local quilter here taught us (Cathy Beemer) in our Charleston Modern Group’s monthly Sit and Sew. “Abstractions” is a bit like this Maria Shell style. I suspect I will hang more pieces made in upcoming months on this wall. I couldn’t part with this “Abstraction” piece.
Then there are those potholders… They are now calling my name, LOL.
I had a quiet Christmas as both my families traveled away, one at a time so they overlapped with being here. But both families had also flu running through them, and so I stayed away, discretion being the better part of valor I think. Besides, I don’t like the commercialism of Christmas, though I love this dark season that is filled with light, hope, rest, and realized joy for all that we do have.
Add in that the painful knee strain reappeared, and was worse this time. I decided to get a good brace, spend time with a heating pad, and to really let it mend this time. I do so miss my walking though. It is much better now, but not totally healed.
I have SO MANY wonderful sewing projects happening, and I just delved into those–alongside spending more time reading (I’m halfway through the Mitford series now (Jan Karon) which is peopled by people I like and with whom I want to spend time–unlike much of what is on tv or described in current books these days. I also have listened to 25 of the 28 Tony and Anne Hillerman books–two of the early books aren’t on Audible or Libby, and Anne H’s most recent comes out this year. I love the quiet and peaceful spiritual way of the Navajo people described in these detective mystery books. (Some have been recently made into a tv series (Dark Winds), which led me down this path.
Here’s what the design wall looks like right now:
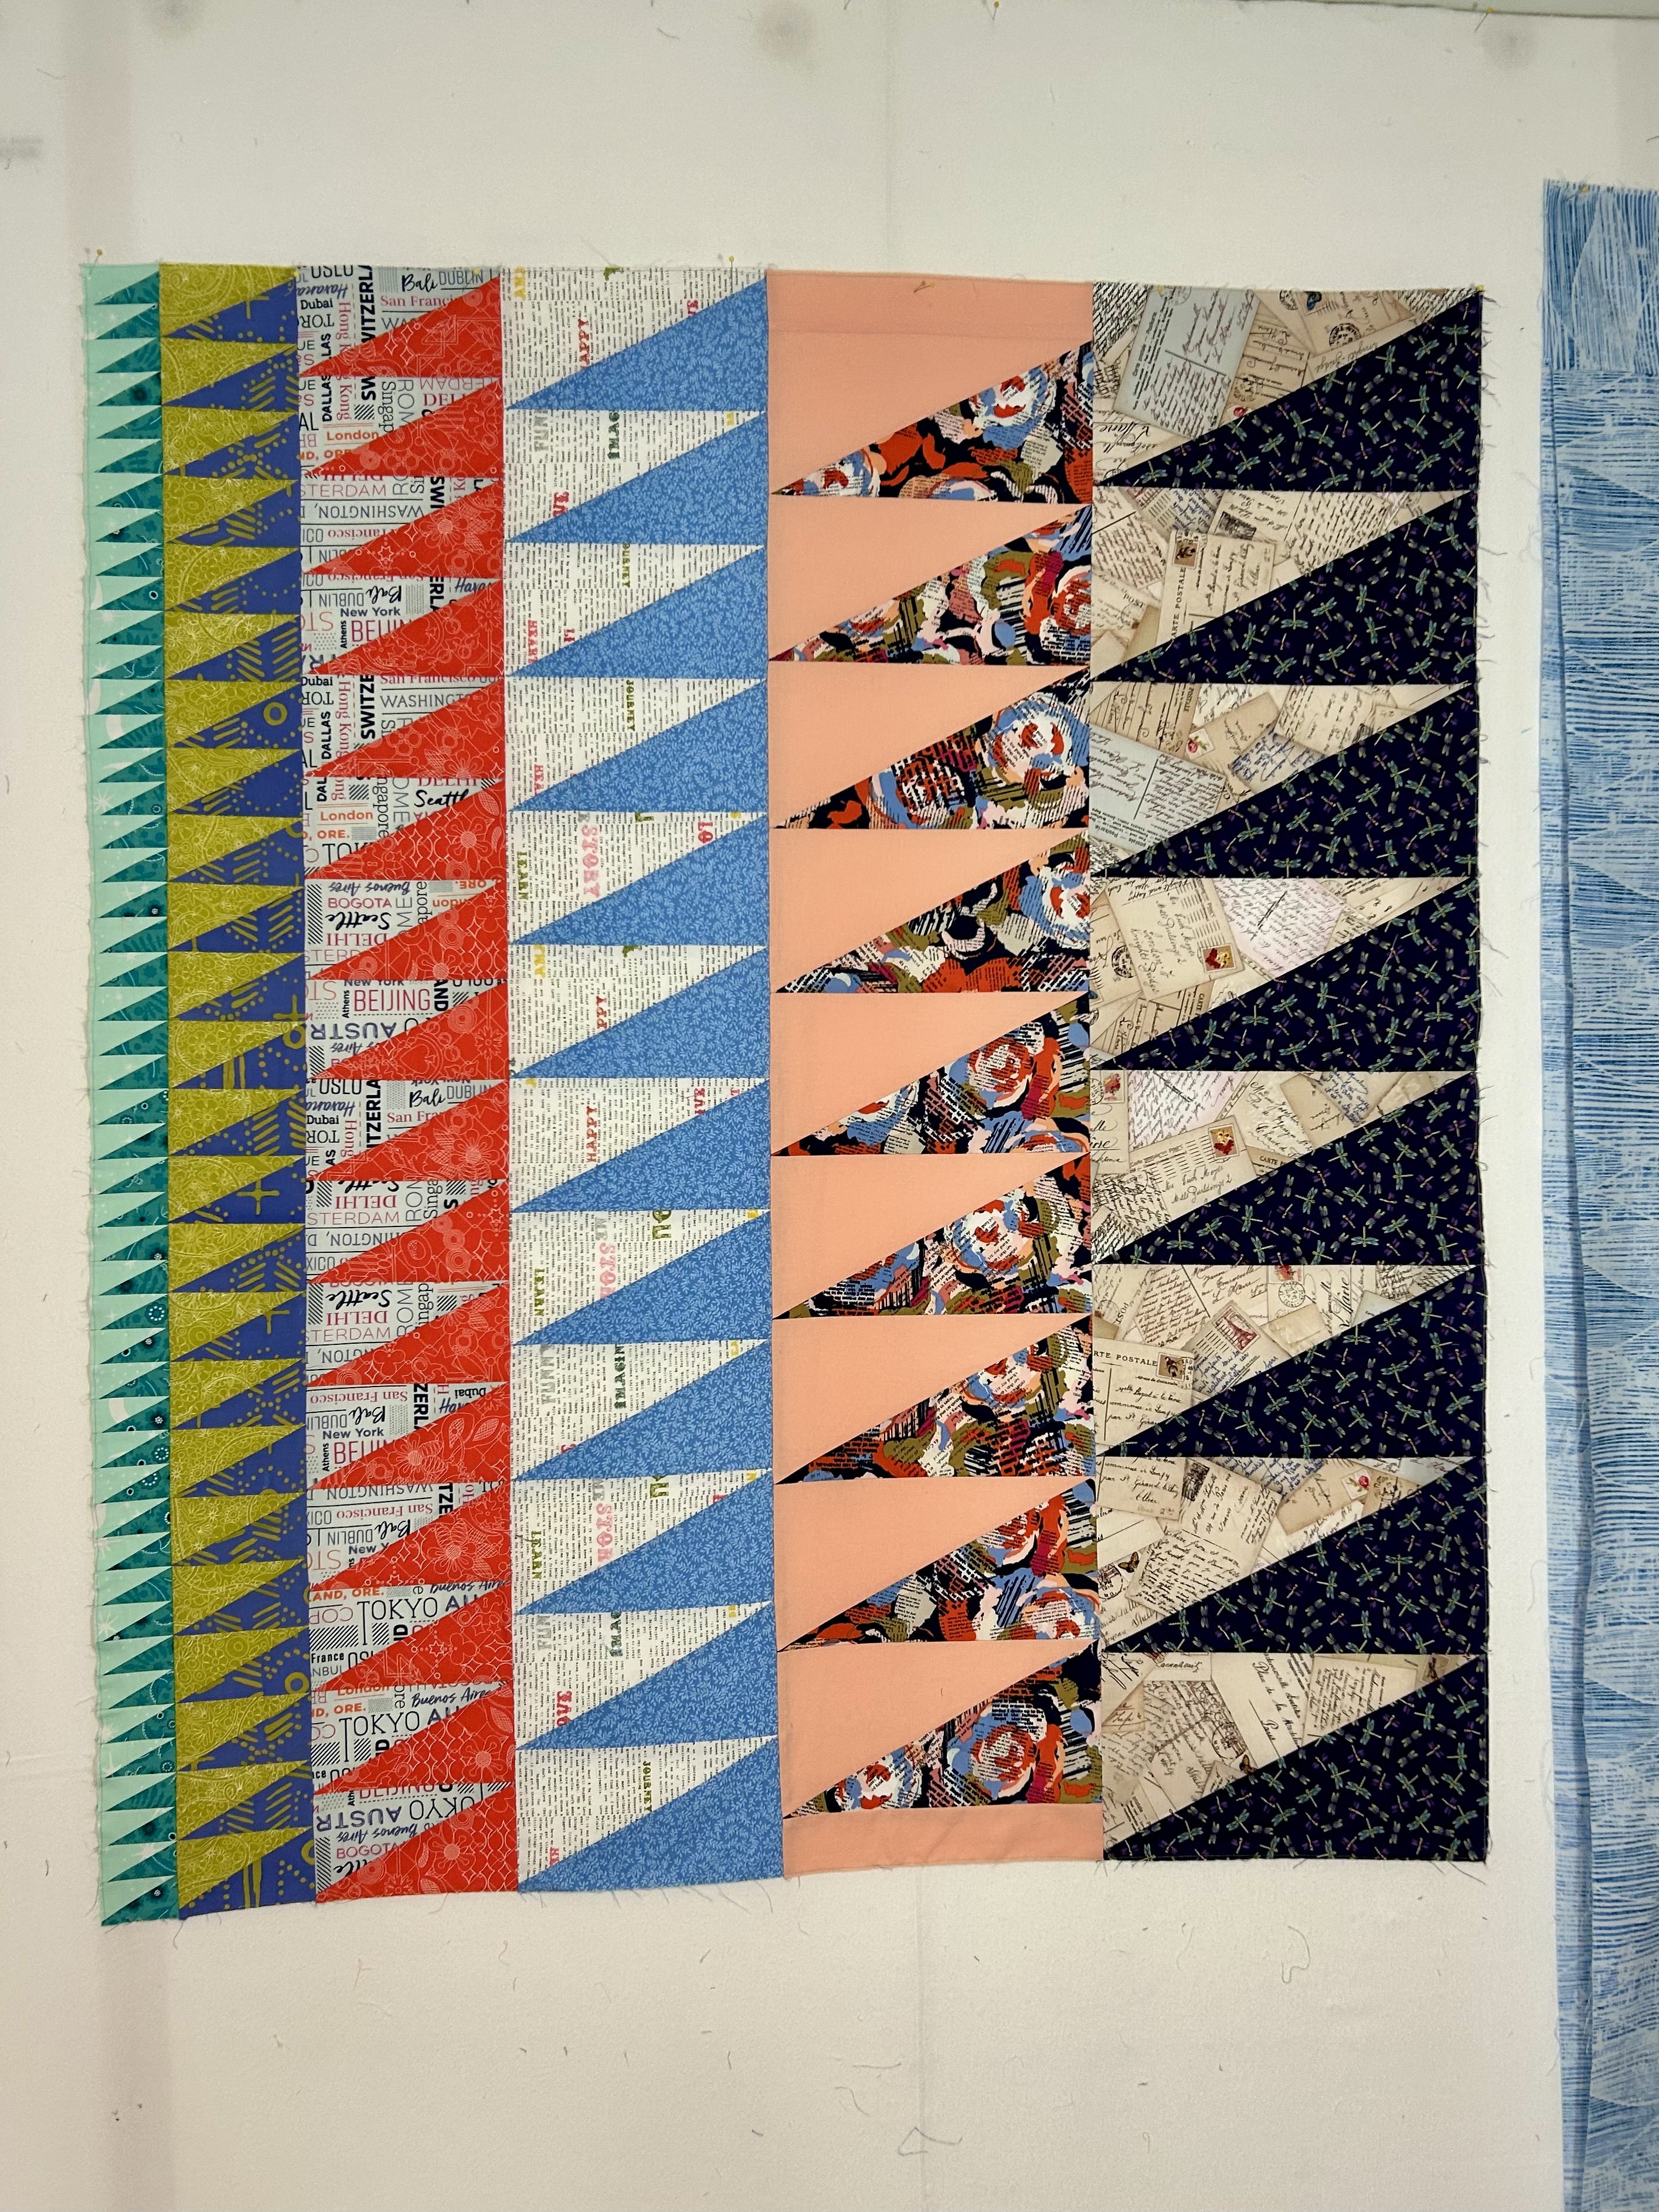
Here’s the third quilt in my half-rectangle triangle series, made with the Hurty ruler (Latifah Saafir). “Dancing Hourglass Diamonds” has been so fun to make–one’s eyes go all over the place to see the diamonds that form with this block learned in Tara Faughnan’s Block 2 online class–the diamonds along the diagonal and straight lines, yes, but also medium size and large diamonds that form and shimmer before your eyes let them go again.
I thought this quilt needed a border to control the chaos, and this fabric was in my stash, and it brings out the blues in the quilt. I’m going to back with a wild but gorgeous print bought on sale from Hawthorne Supply Company’s Black Friday sale. I don’t know yet about the binding.
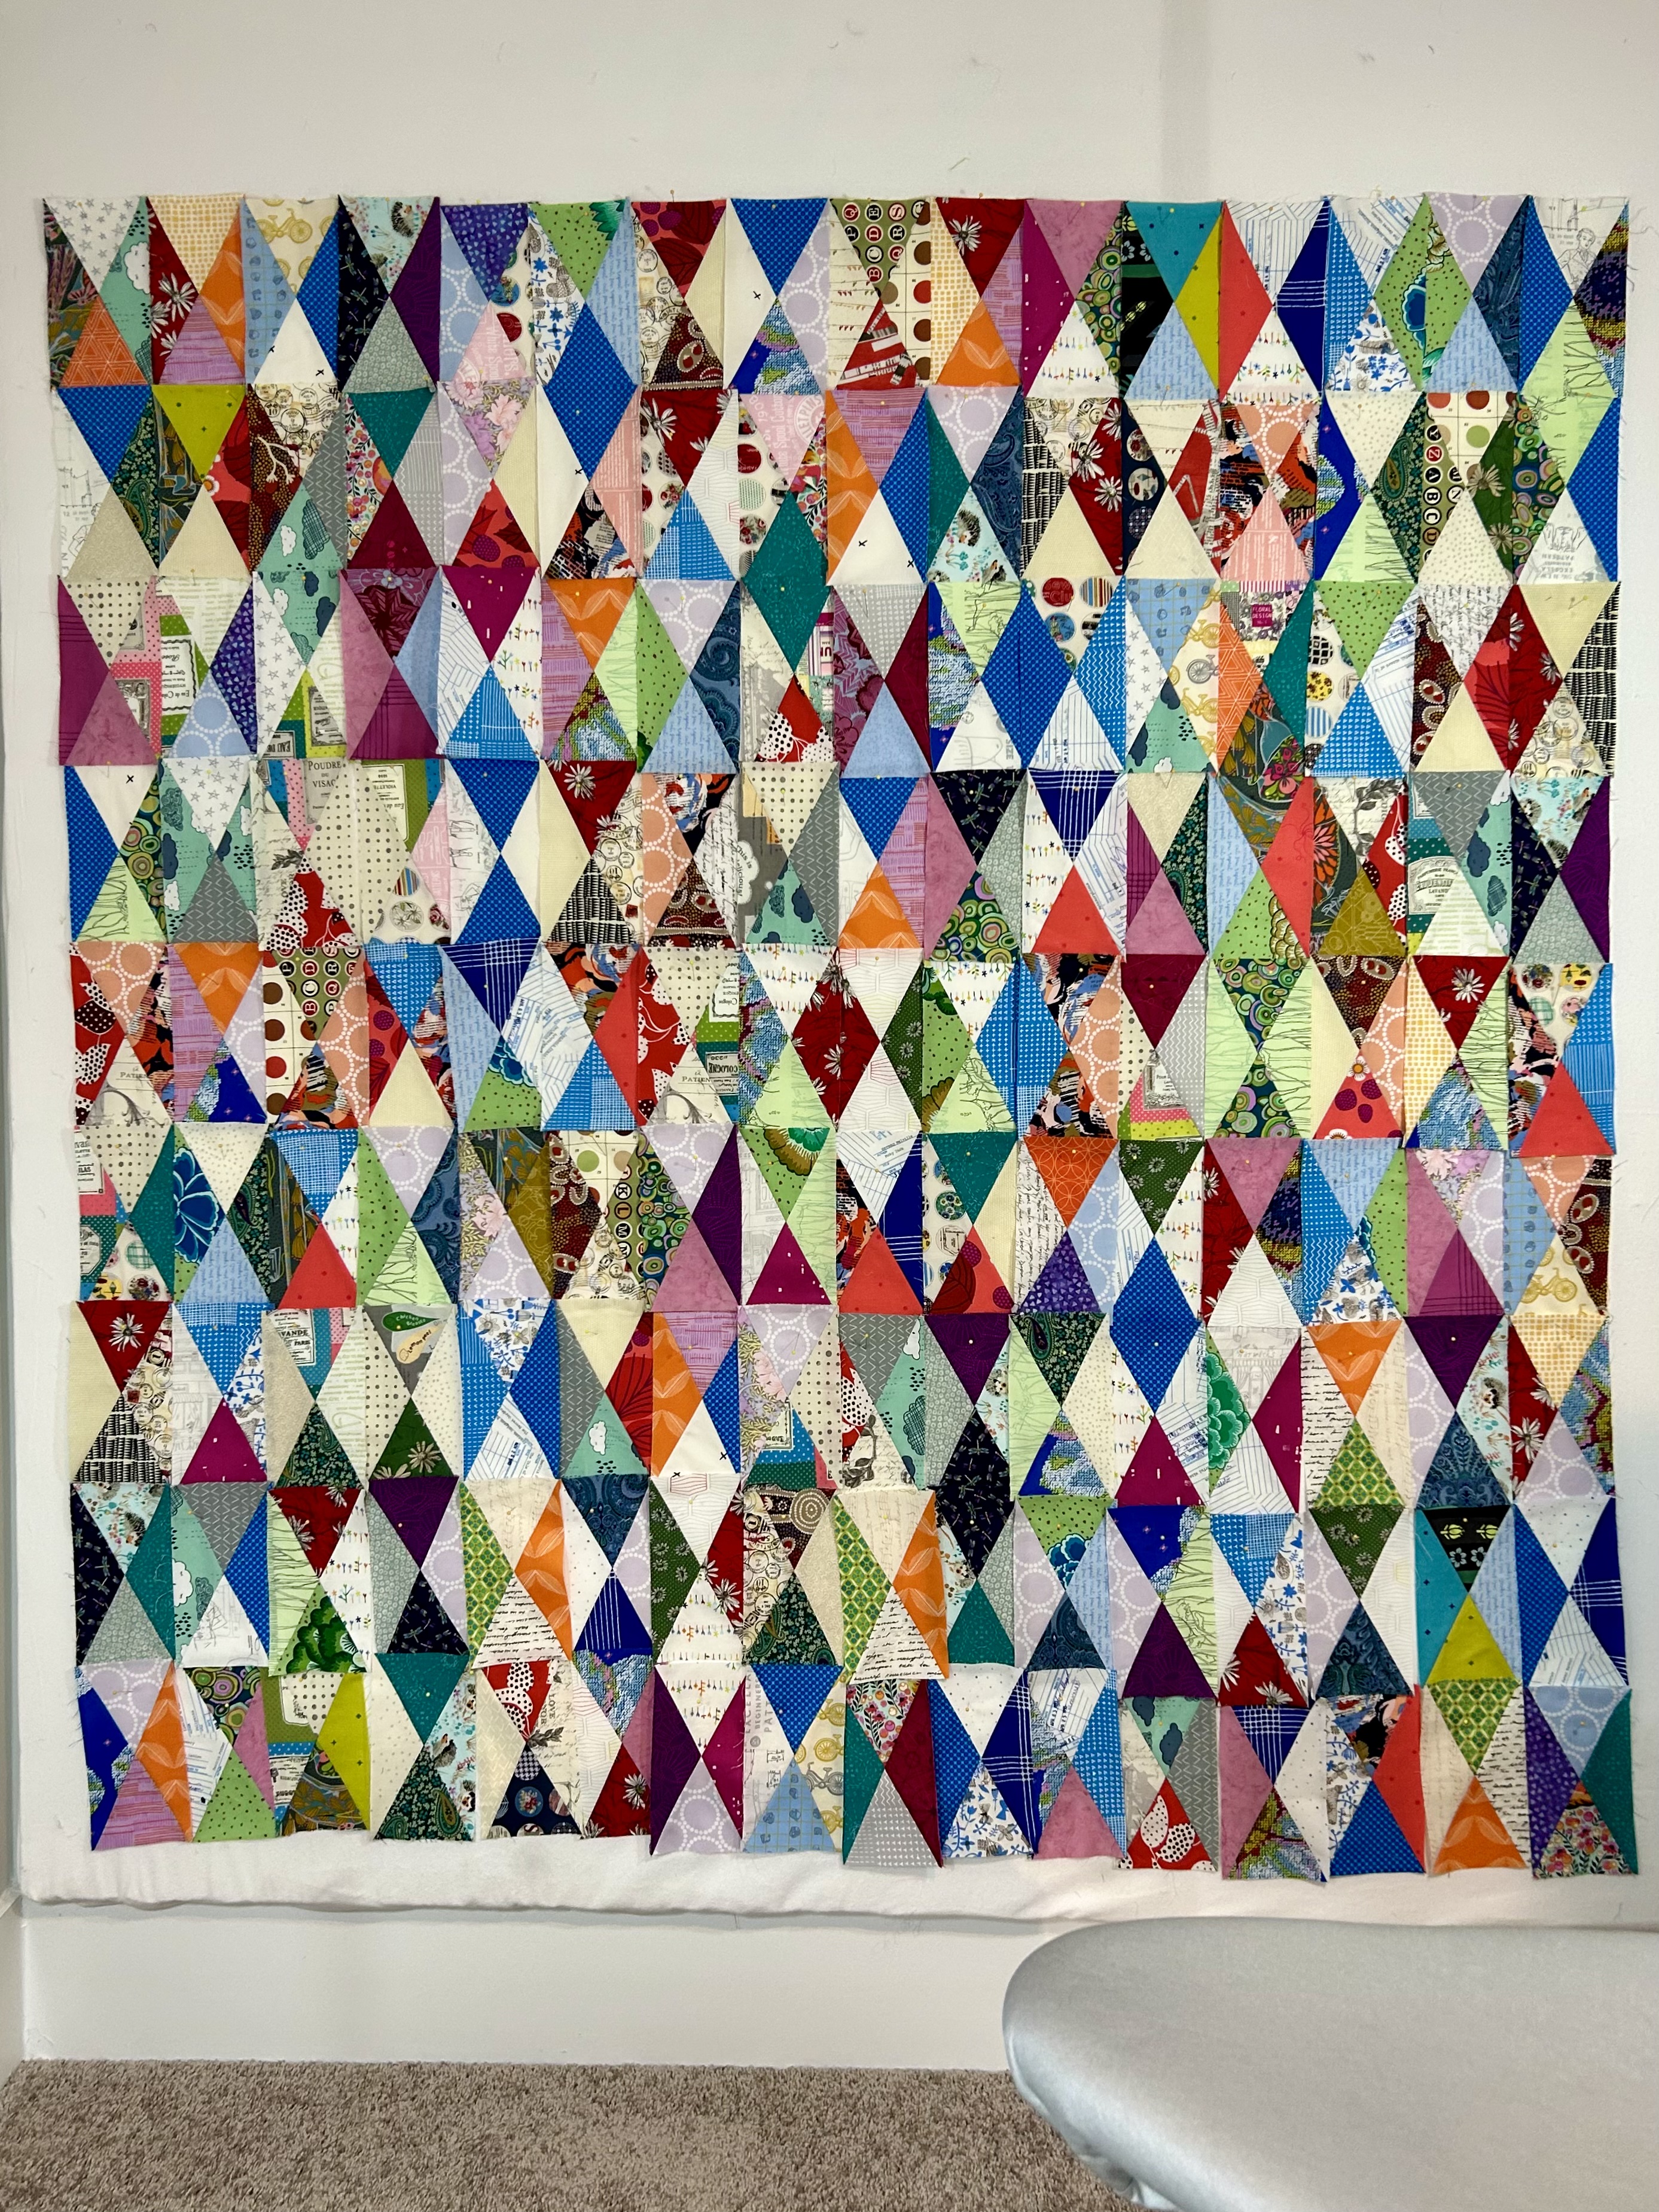
Here is the fourth quilt in this series, “Gradations.” The strips are a mathematical gradation–and all but one measure 48 inches. The wild print set in light orange just got strips to even out that row. These blocks are 12, 10, 8, 6, 4, and 2 wide. At 43 or so wide and 48 long, it is either finished or needs something. I’ll just look at it for a while and think on it. I don’t really see it as a wall hanging. And it doesn’t feel like a baby quilt. Maybe this part needs to be the center of something???
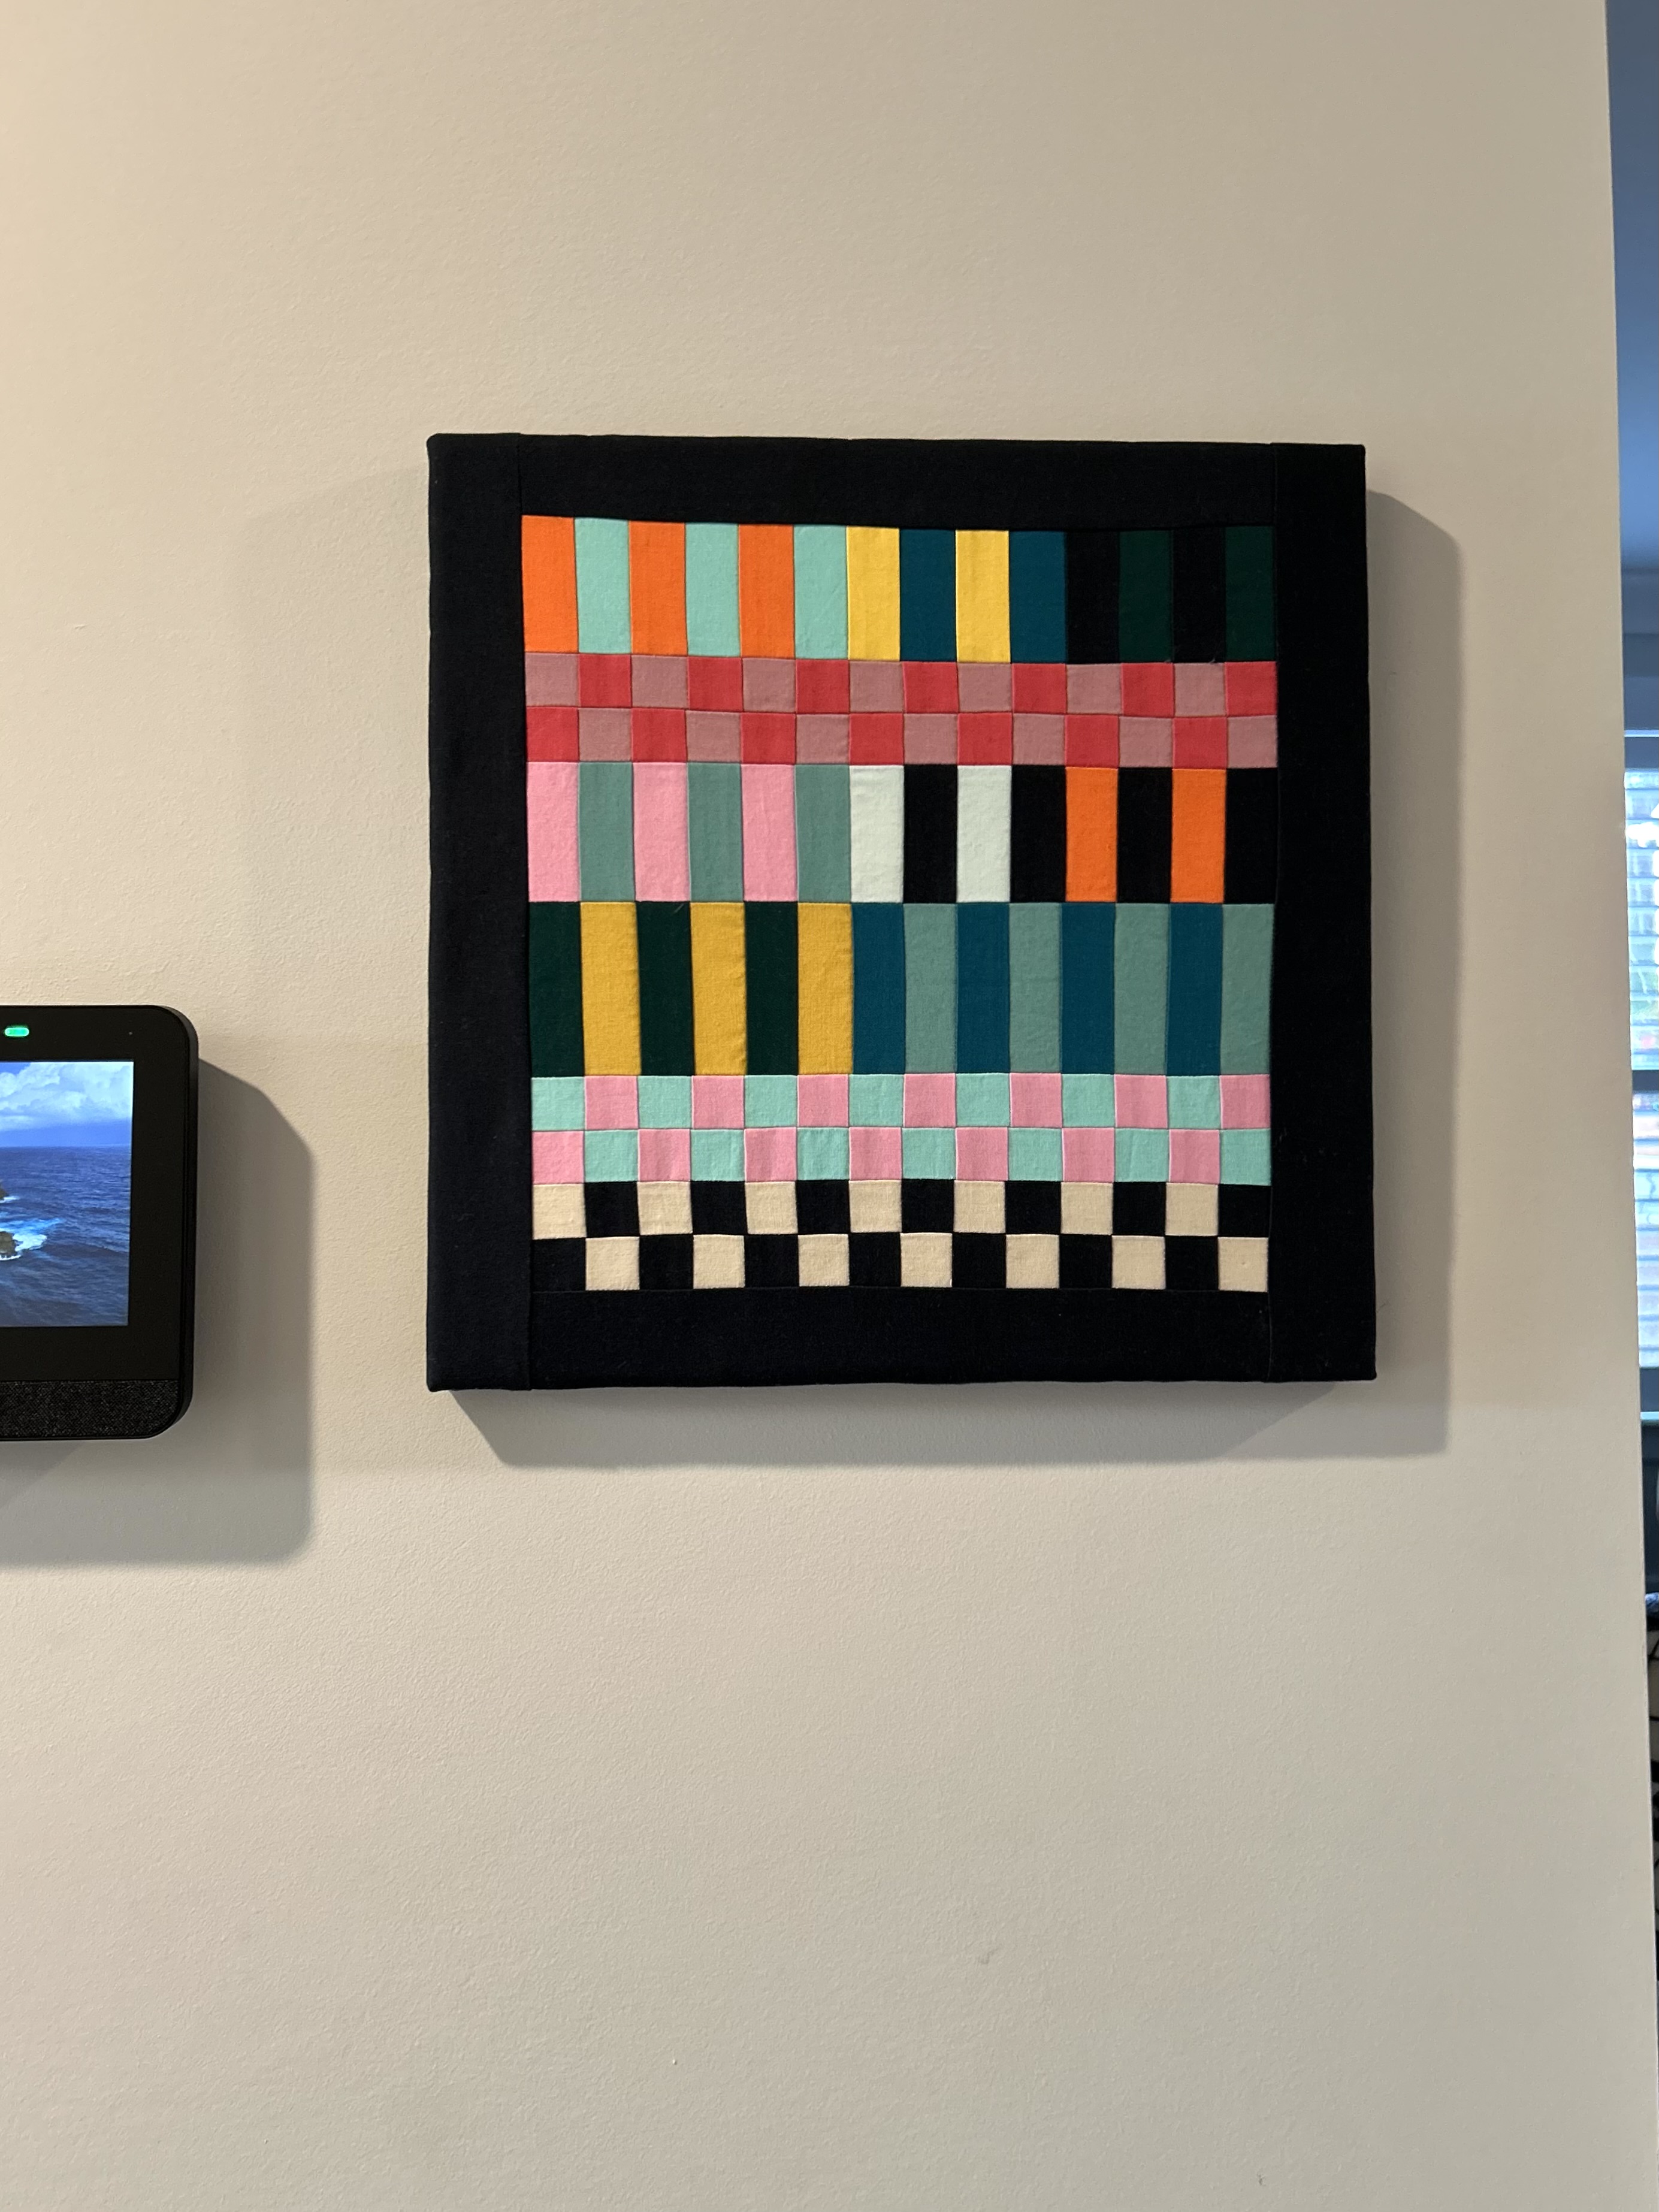
“Crosses” is loaded on the longarm, and I did one pass days ago. But until this quilt is done, I didn’t have any binding handwork for tv at night. I find hand sewing so soothing. “Crosses” isn’t a large quilt, and I should make myself do one pass a day until it is finished. (“Crosses” is made from the 3 1/2 inch squares of Cotton+Steel/Ruby Star Society fabrics I cut up years ago in Maine.)
With no handwork to do, I started making funky log cabin blocks by hand–and one just funky block in the center. I was inspired by Tara Faughnan’s video and discussion of how she hand stitches blocks at night in our online Blocks 2 class. I learned several new methods I did not know. I think I’ll finish this project up with 12 blocks.
Here’s the 11th block all ready to sew. Maybe the 12th will be a dark green? I don’t know yet how I’ll sew these blocks together, but it will be an improv quilt. Probably it will need a solid field fabric to join everything together.
There are, also, other projects happening in the quilt room. I broke down the last of the separated Cotton+Steel/Ruby Star Society strips and put them into the regular bins–1 1/2, 2, 2 1/2, and 3 1/2 strips–separated by neutrals and colors. And as I pawed through these boxes for the funky log cabins, I isolated some shorter strips, starting with these greys, and sewed them together and cut them into 2 or 2 1/2 blocks, in strips. ( I have smaller bins of cut 2 and 2 1/2 blocks and one of just small scraps–and ***note to self, I should/could be sewing together 4 or 9-patch blocks as leader/ender projects from these cut blocks.)
There are 4 or 5 potholders ready to be made–layered with Insul-Brite and batting. I’m going to try to use leftover binding strips cut on the bias to bind them. I have a pile of those.
AND, upcoming projects are looming on the January horizon, along with New Year’s, but this post is long enough for today.
I’ve been making more rope bowls in these past few days. Once I set up the machine for that work, I tend to not stop with one bowl. These bowls will be gifts, of course.
Thanks to Rick Sanchez whose video on YouTube has helped me so much. I finally tried the little rosettes to end a bowl–also thanks to the help he gave our modern group’s November Sit and Sew meeting.
I use 1/4 inch thick rope, and Rick uses a slightly lighter version. My machine is not happy with sewing a line across the rosettes to hold them in place with my thicker rope–and I don’t want to use a glue gun and glue to install those rosettes. What I learned is that if I put in a bigger needle (16 inch) and go very slowly, that works, though there are complaints. If I use a zig zag stitch, you don’t even notice where the installation sewing line is. Aren’t they cute? I think they are cute.
I am getting much better at this whole rope bowl process, though I have not yet tried a rectangular shape. Hold on to your hats–I’ve got some Rit dye and will try dyeing rope in early 2025–with likely the help of my sweet neighbor. I want to do it all outside as that dye stains everything except stainless steel. Cold water from the hose can set the finished rope–and my neighbor has a plan for how to discard the spent dye water so neither of us ever has the dye in the house. (I can boil water inside to take outside.) There are no laundry sinks here. I’m going to use two colors–one on each end of the rope hank. This plan got hatched after, again, Rick Sanchez did some beautiful rope dying.
The blocks for the THIRD quilt in my half-rectangle series are done and on the design wall. This one uses the “hourglass” half-rectangle triangle block we recently used in Tara Faughnan’s online Block 2 class. I’m sure I’ll move around these blocks for some time while I work on other projects. Seeing this picture helps a lot. But how fun is this one??? It makes diagonal lines of smaller triangles and there are secondary patterns all over the place–some just hints that your eyes try to make happen. (I have its backing and binding ready to go when needed.)
On the other side of the design wall, the FOURTH quilt in this series is trying to happen. This one will probably end the series. The next diamond (graded down in size) will be this light blue–with perhaps a busier low-volume fabric. I’m not crazy about how plain the light blue fabric is, but I’m on a mission to use up stash with this project, so…
That orange fabric below the line of scrappy log cabins will likely be the next color–but who knows. I don’t.
I have to stop and get the crosses quilt on the longarm because I have no hand sewing for nightime sewing in front of the tv. So I’ve just been pulling from the random small fabrics in my little bin of scraps and making the long cabins and other blocks at night–hand-stitching and hand-cutting the pieces together. I have NO IDEA where this is going…but my hands are happily busy at night. I do square these blocks up when I think they are “done.”
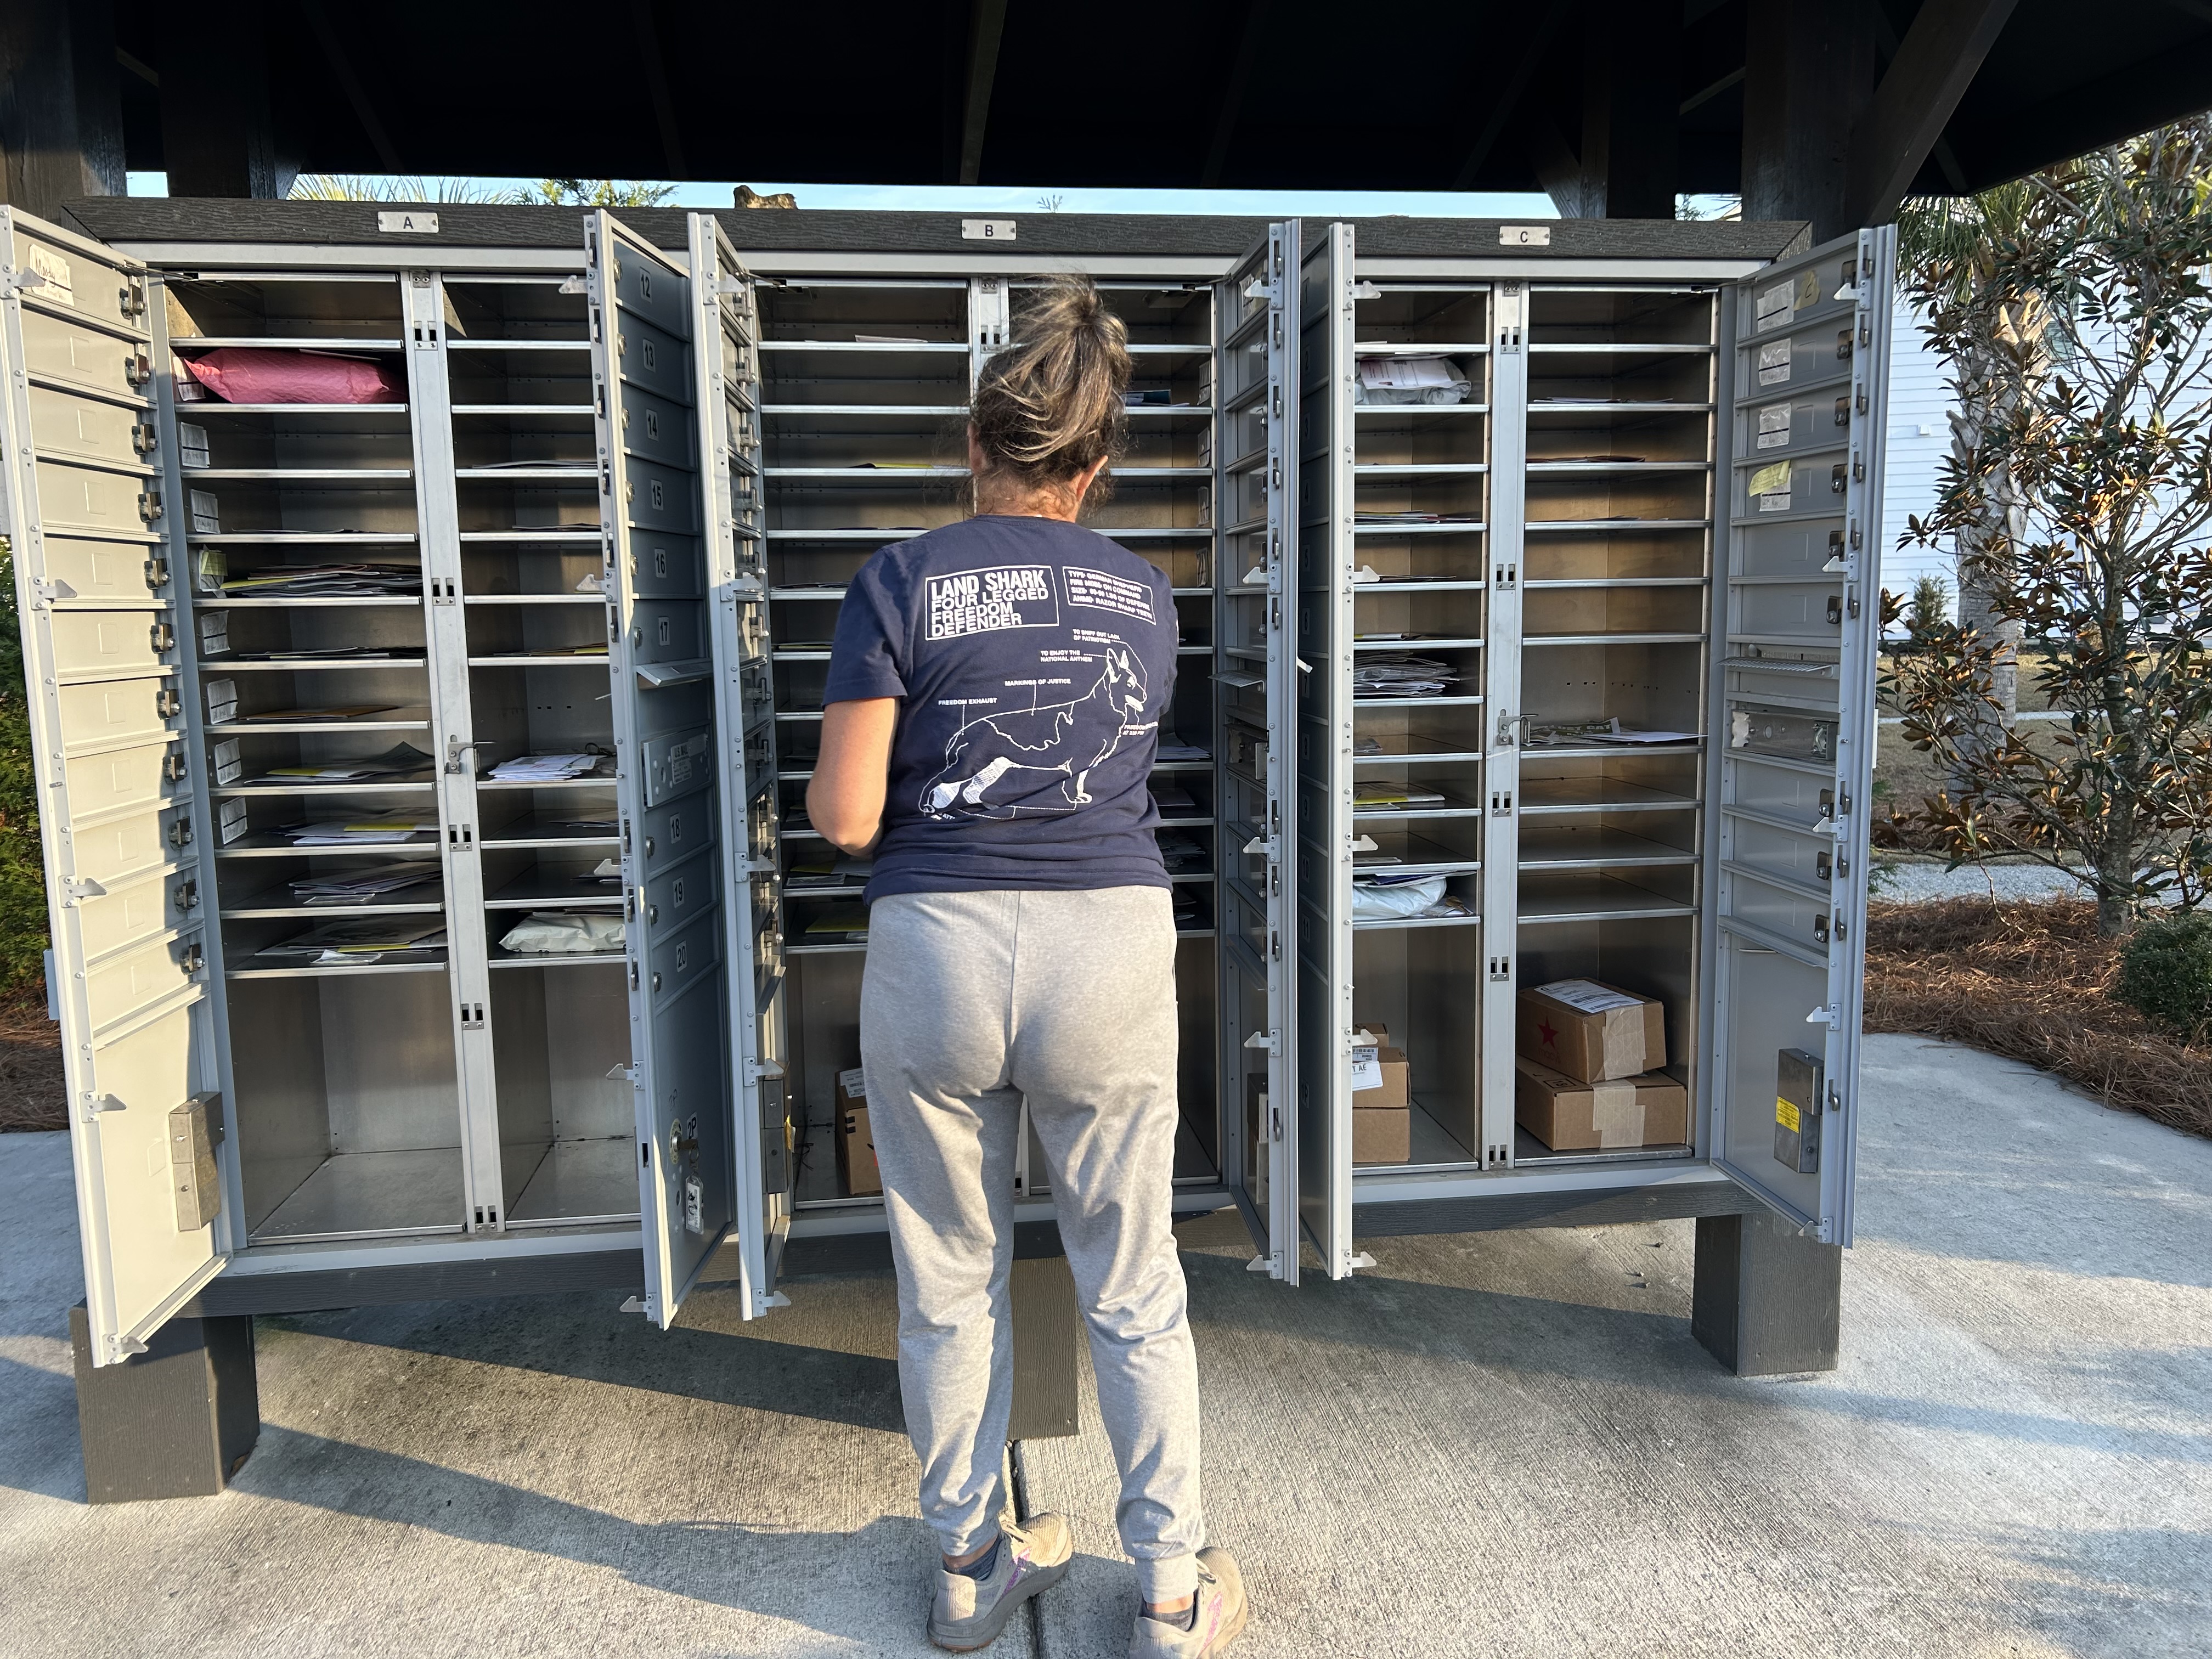
Our little kiosk is up and is slowly gathering books. (That big roof is on the mail kiosk–and does not overhang the library box–it’s a camera illusion.). But isn’t the kiosk adorable?
I went down the other day to check for a mailed package–and found the mail person with the whole kiosk open–and I thoght that was pretty interesting. When we get a package that won’t fit into our narrow “box,” it goes into ONE of the bigger bins below–and we get a key to open that box in our mailbox. Once in the bigger box and the door is open, the key cannot be extracted. The mail person said that for packages that don’t fit, she has to drop them off at our houses. (Can I just say that sometimes that takes several days to happen!!!!)
There is a storm system swirling around, but so far, we’ve gotten only very light rain off and on from it. Maybe tomorrow. I wrapped my outside faucets against the freezing weather (and now it is warmer again), so I watered the two camellias that are blooming or about to bloom with the big watering can–after removing the tarps and grocery bags I put on them to protect them from our recent freezing nights.
Kalenchoe is inside and covered with blooms. When my neighbor gifted me these plants (three of them in the container) last March, they had huge single heads made up of tiny flowers all massed together. There must have been a process to make that happen. Here, these plants are just “doing their own thing.”
Have a great week everyone. Maybe dial back any Christmas stress and just enjoy the season. That’s my wish for you anyway.
I’m sorry I’ve been AWOL, sort of, these past days.
But I’ve been…busy.
The screened porch, my “outdoor room,”got tiled. My neighbors tiled theirs, and they held my hand about organizing getting mine done. It’s so pretty, and more on that in a separate post soon. The concrete sits right on the clay here, and it was so ugly, so stained and dirty looking.
I have been having so much fun with this month’s “Block 2” block in the online class with Tara Faughnan: Log Cabins. And with learning how to install blocks on stretched canvas frames. Here’s the one I mounted yesterday–using the fabric palette I pulled in early November. It’s…so handsome.
With my sweet neighbor in tow, I found Michaels’s yesterday, and they had such a lovely selection of these stretched canvas frames. And the prices were terrific! They even had a “buy one, get two more free” sale, so I came home with 3 of the 12-inch frames as well. The frame above at 18 by 24 was perfect for this piece. Michael’s has 3 levels of quality to choose from, and the cheapest one is perfect for my needs as it is thinner. All of them are coated with acid-free gesso.
I will take a picture of ALL of this month’s completed projects when I finish the last one I’ll make this month. My goal is to finish it today.
It’s time to return to the design wall projects. And, I do have the third quilt in my half-rectangle series underway. It uses the half-rectangle “hourglass” form I learned in last month’s block class, which featured the hourglass block. And today I’ll try to finish the “Crosses” scrap quilt that is all laid out and about half sewn together. (The adorable backing for it came yesterday and is already washed. I’m nearing the end of sewing down binding on the second quilt in the series so I’ll soon need another hand-sewing project.)
Both of my quilt groups met this week: one at night and one the next morning. In the modern group, our “make the Churn Dash block modern” challenge quilts were due. It was so fun to see the awesome creativity our members produced. I will do a separate post on mine soon.
I was very late to the morning quilt meeting as it was also the day to retrieve the raw milk, which comes every other week and which sells out now in a few hours. The delivery was running late, so we all just…waited. But, success, and I delivered the milk the next day to my two sons’ houses, which sometimes includes short visits at each house or outside in the driveway. I absolutely thrive on raw dairy and have for over 20 years now. (In my book, commercial dairy is a dead food that is almost, now, a fake food. No wonder it disagrees with so many people.) In two weeks I use 3 half-gallons, and I freeze one of those as an emergency back-up and just switch the frozen one out when I get the next three jugs. See the gorgeous cream on the top? Yummy!
And now it’s time to shop for the Thanksgiving dinner. I’ll provide a green salad, roasted Brussel sprouts, and the roasted carrots/sweet pepper/garlic dish I like. I went out to Chucktown Acres farm with DIL Corinne to get our organic, locally raised turkey, and they had raw butter as well, so I came home with three containers. Two went to the freezer and one went with Corinne to be used in the mashed potatoes–a dish the children have requested.
We’ve had a cold spell. Or what gets called “cold” here in coastal South Carolina. I turned on the heat this week and am in warmer clothes. And it’s been too cold to have my noon meal out on the porch, which I miss. But the cool weather is great for walking, and it is sunny and so cheerful outside. I’ll need one more grass mowing I think, but that should do it.
And, now, hurricane season is over for the year! Here, we dodged a few bullets that proved to be terrible for others in the region–and that’s a story that is still ongoing. Western North Carolina is suffering terribly.
I am having such fun with this month’s block play. Tara Faughnan gave us a whole packet of patterns that included much more than recognized log cabin forms–we also got triangles and a big hexagon. I am still playing with these patterns. (Tara uses a foundation piecing method where the template patterns printed on regular typing paper can be reused over and over.)
I noted some time back that Tara takes her small “play” blocks and mounts them on stretched canvas frames. I was intrigued…
So, what emerged for me was a really fun–and at times frustrating–learning curve. I ordered 10-inch square canvas frames, a hand-held stapler, and, eventually some felt for the back and some little sawtooth hangers.
Here’s what happened:
The hexagon was just totally scrappy, made from my strips to try out this pattern, and I will make another one as it was so fun.
I quickly learned that I needed a bigger size outer block than a 12.5 inch square to make the corners square up nicely. (There are online videos showing how to do the corners–indeed, how to do the whole process.) Something like a 14-inch square is better for me.
And, I discovered that my cheap stapler…had to go. And that maybe the staples I was using were too large, too long. The length of a staple is called its “legs.” I adore tools, as many of you probably recognize, so I purchased an electric (battery driven and rechargeable) stapler, but have not tried it yet. I also got a smaller staple. The stapler is all charged and ready to go.
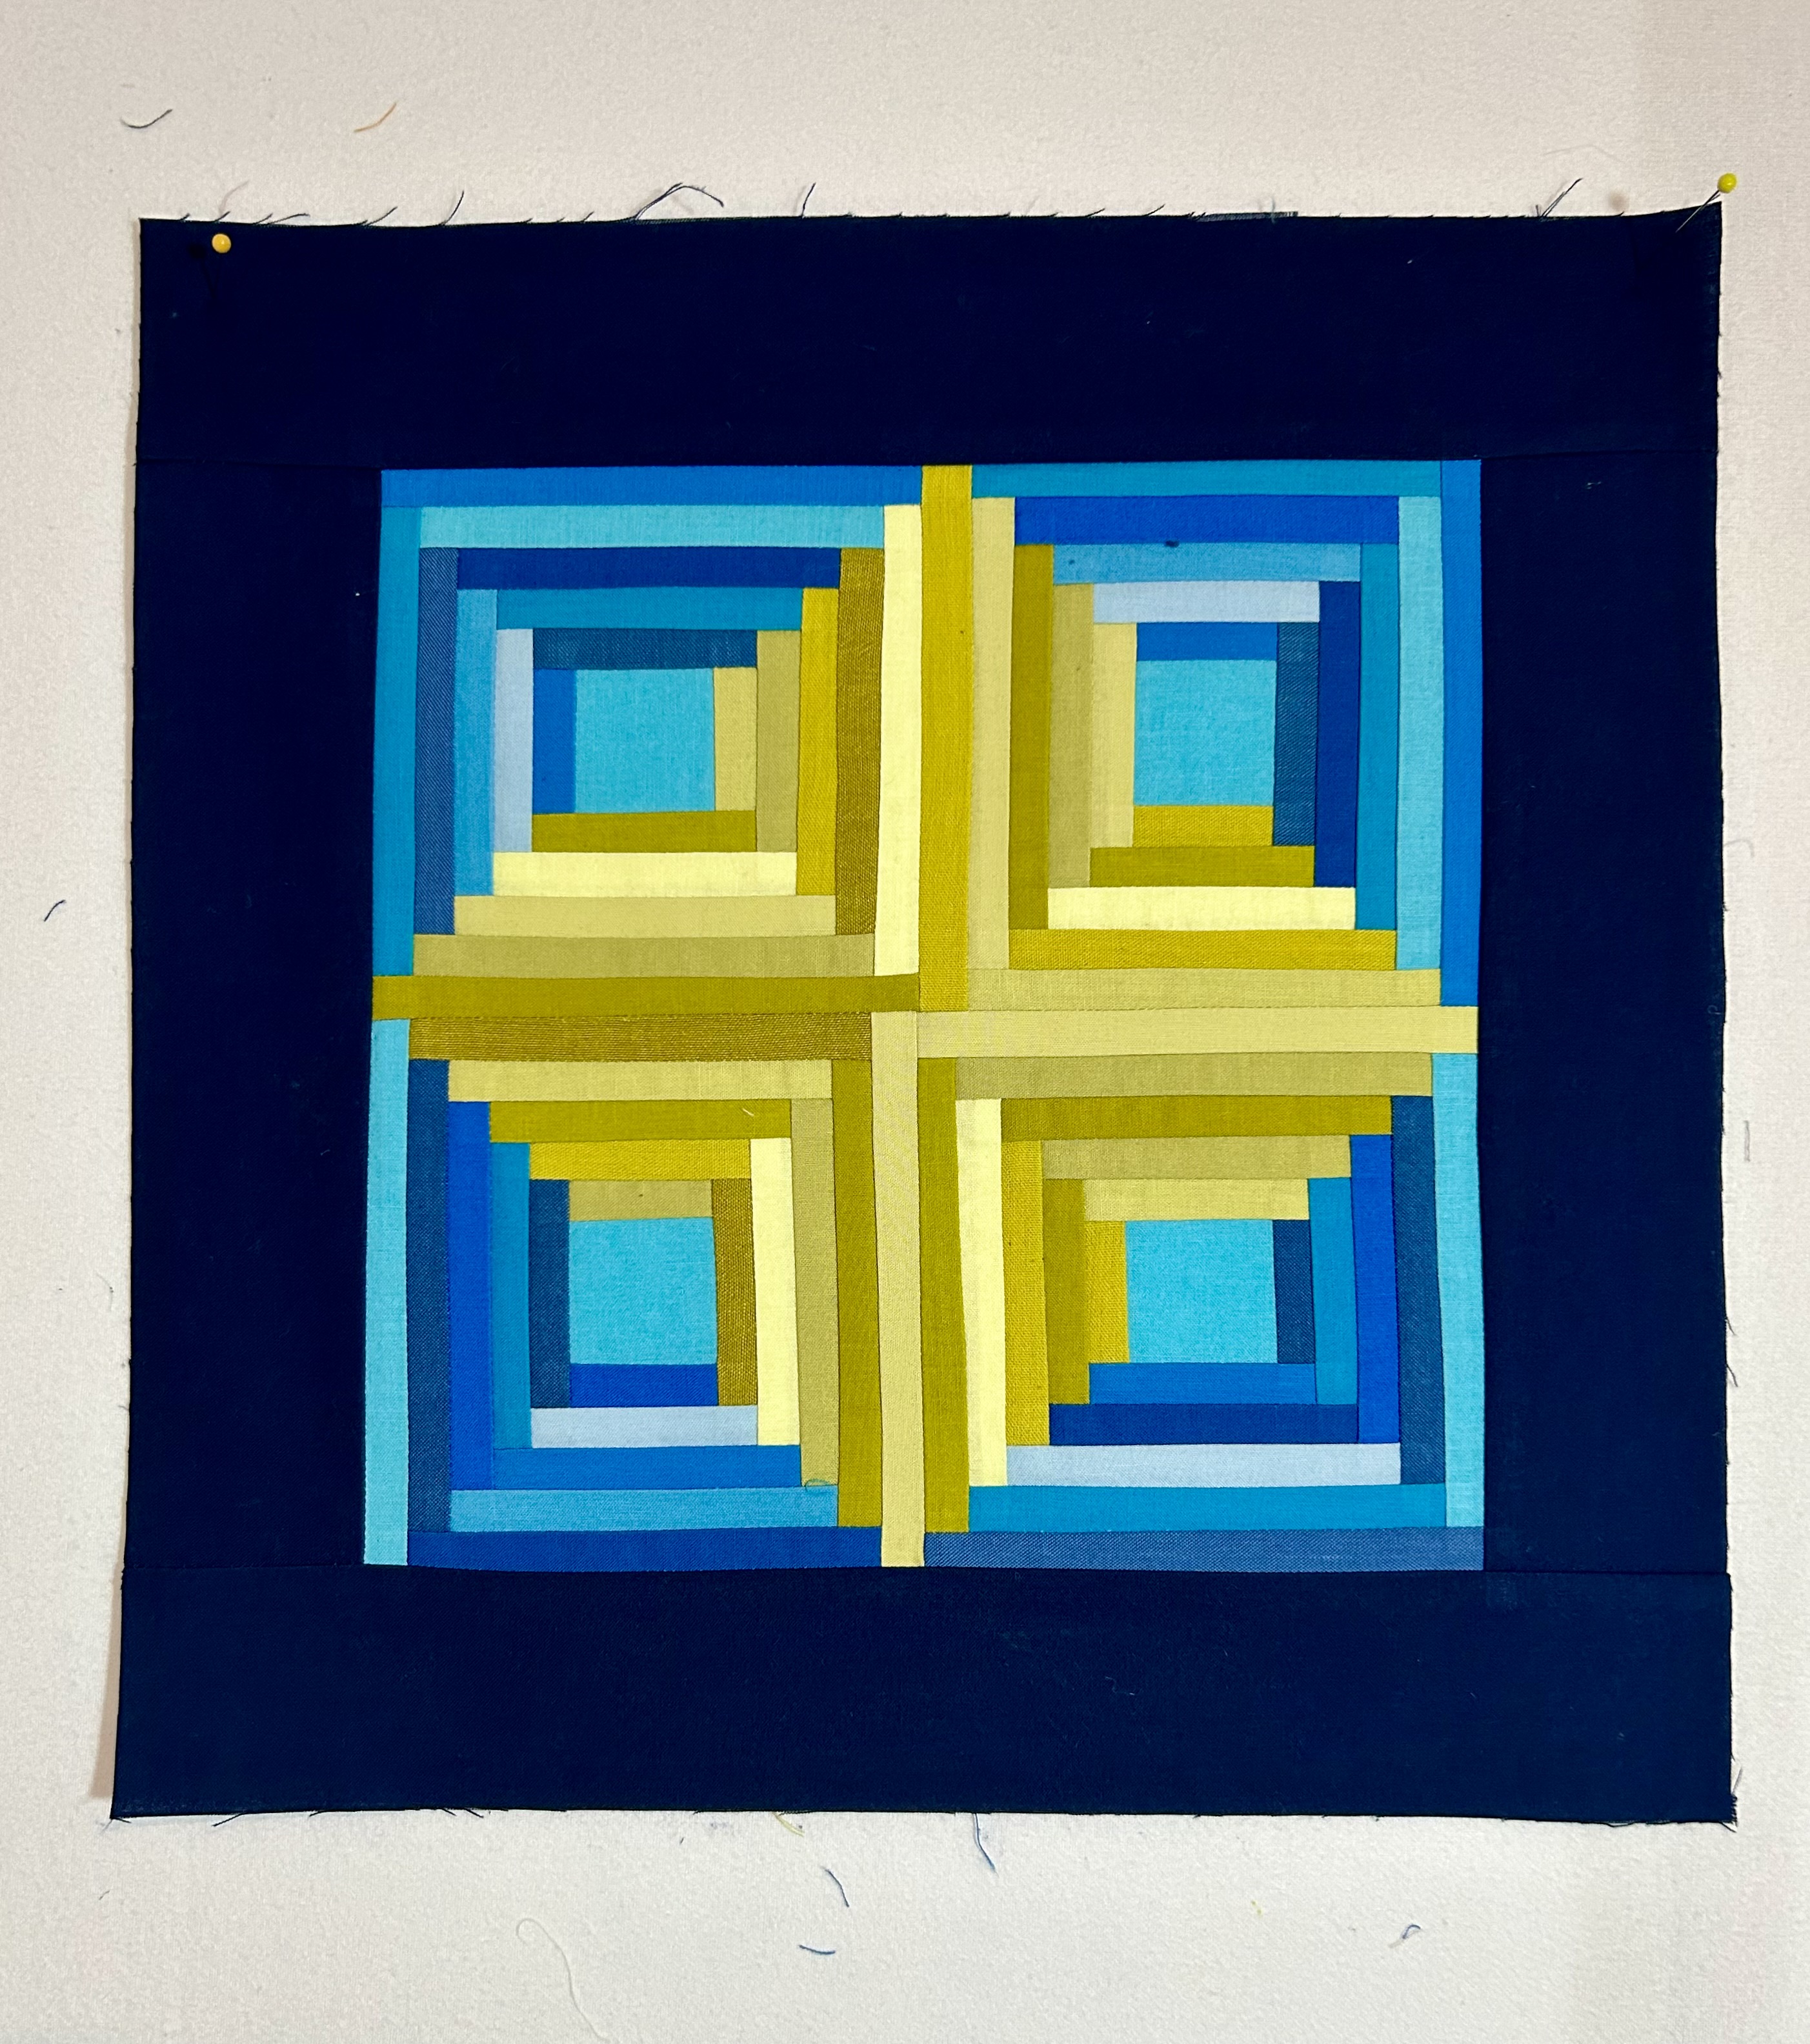
For this block–which needs its dark blue border–I ordered some 12-inch canvas frames. And I can’t wait for them to come. Maybe today. (This block is made from the palette that I pulled for this month. And, yes, the yellow green fabrics featured uses Kona pickle as its key color.)
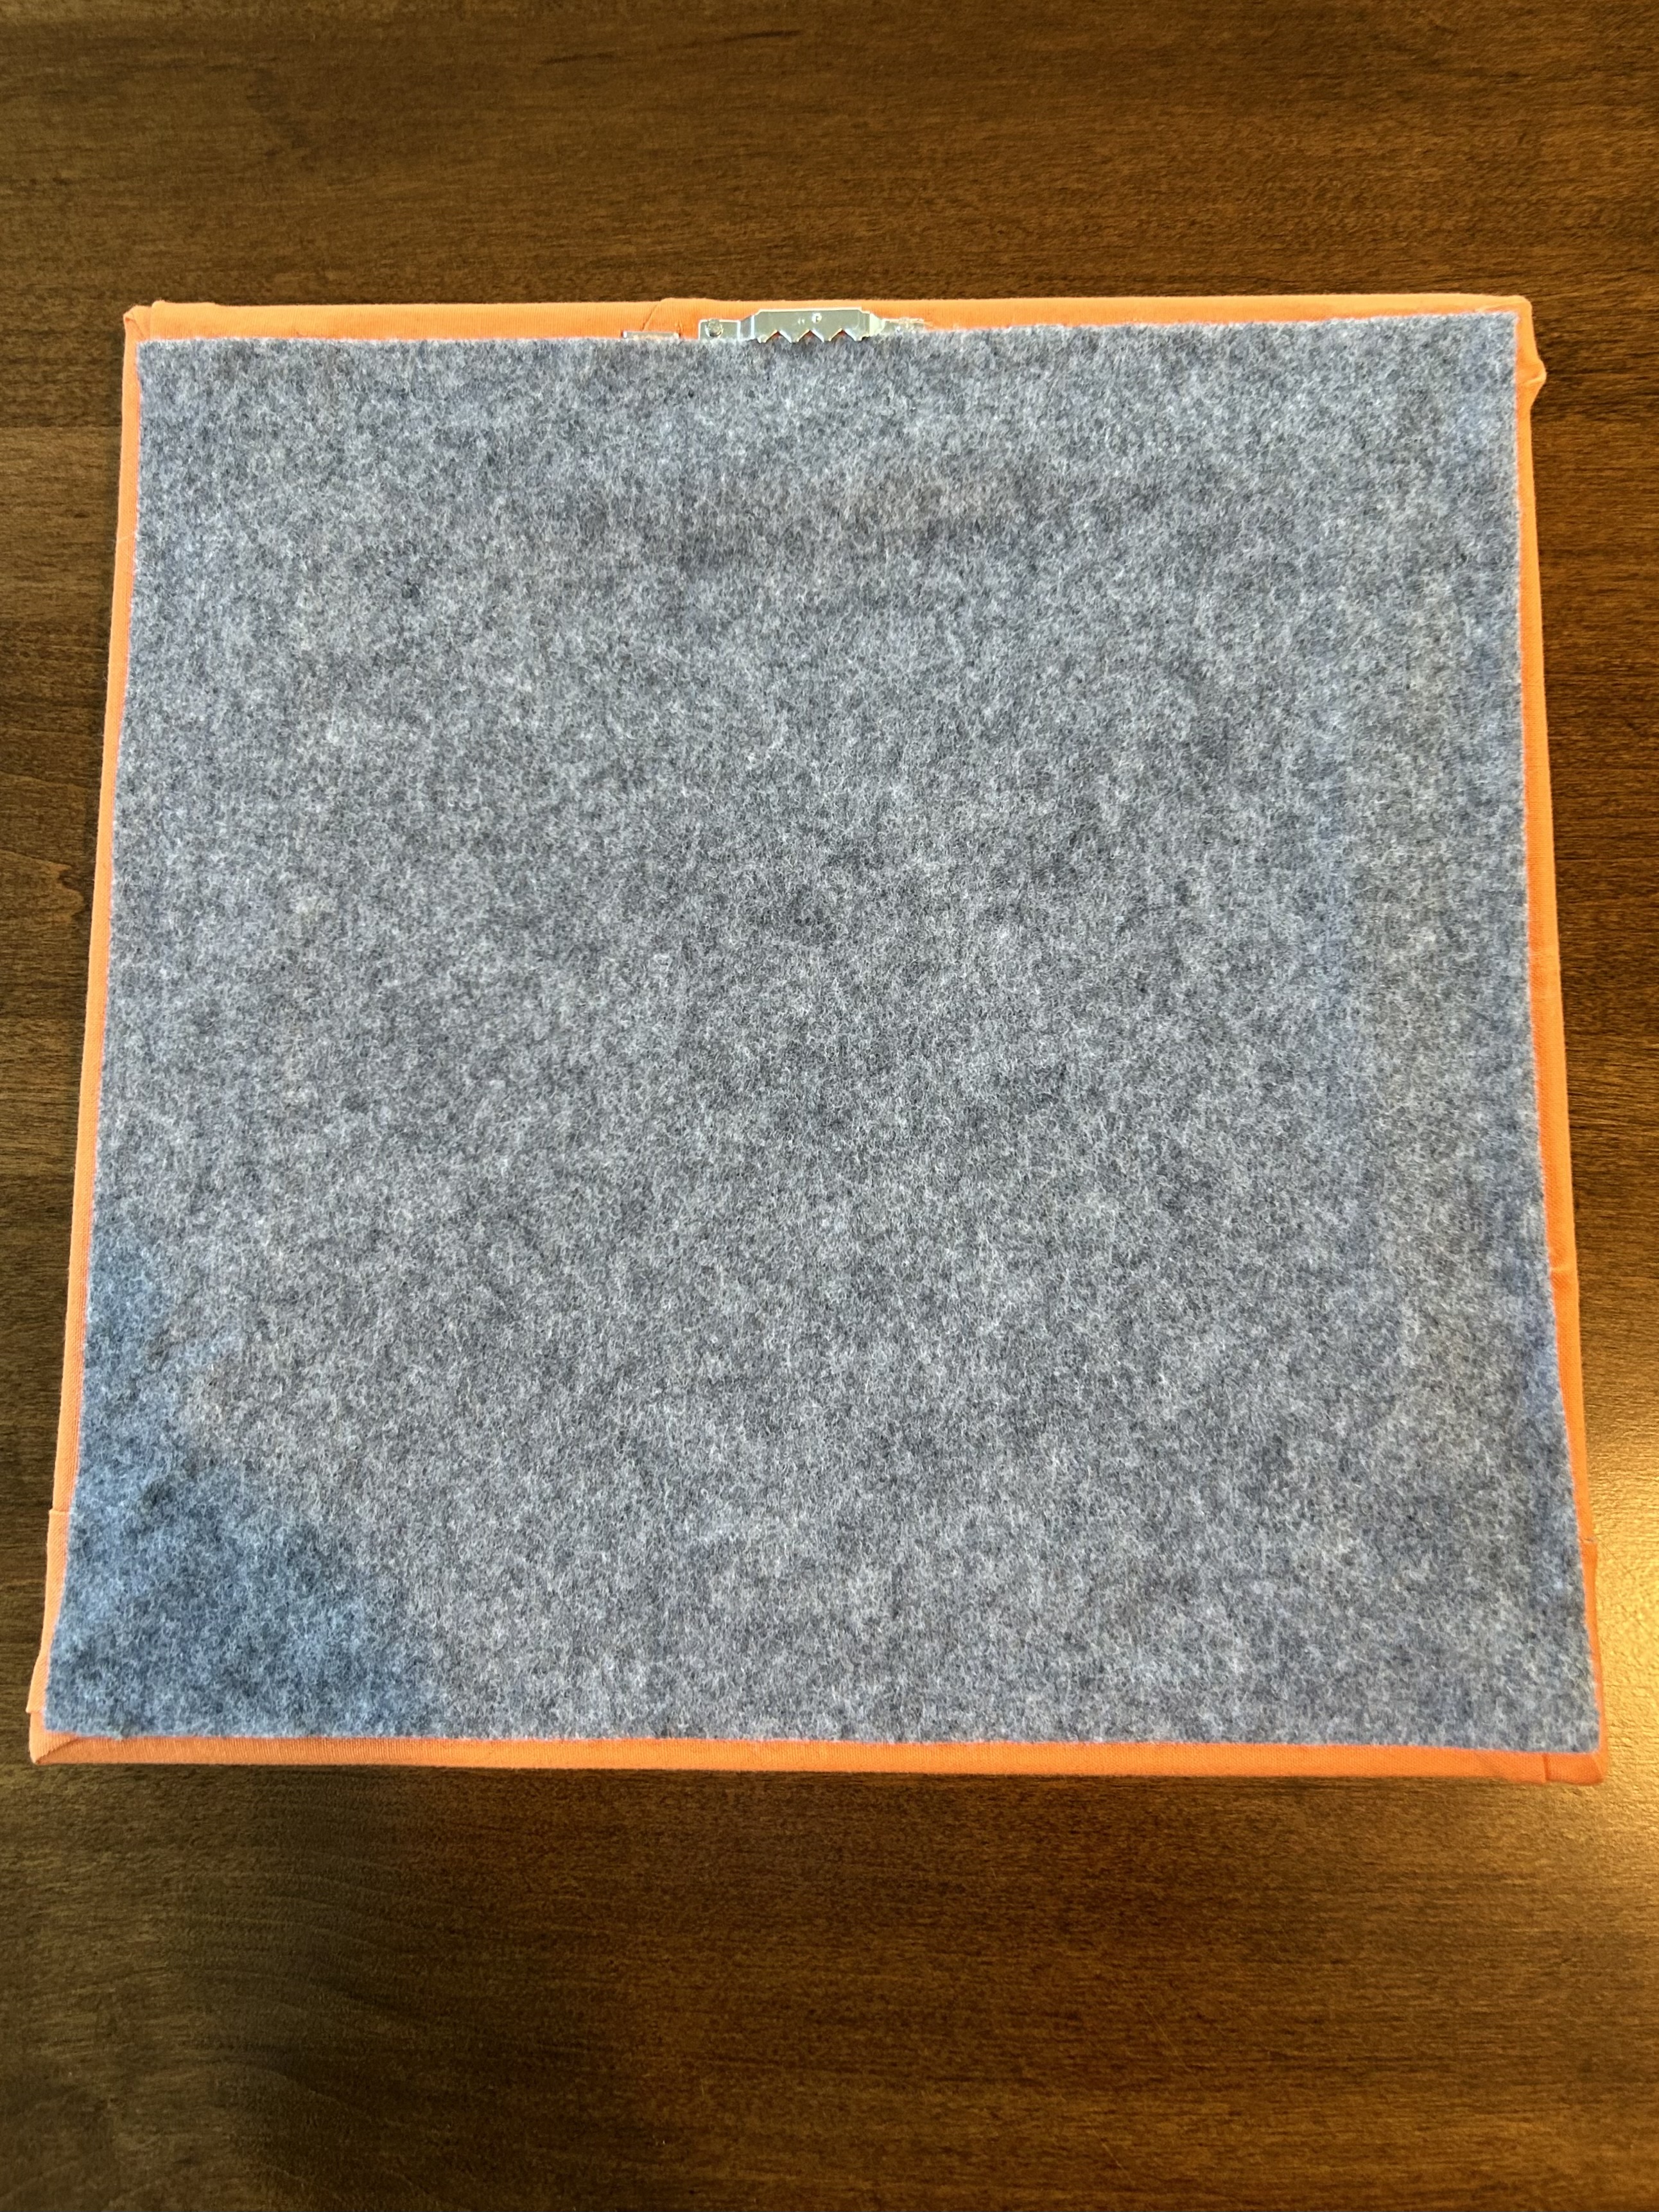
I wanted the backs to look nice, so that was a learning curve too. The trick is to get a wide enough felt backing (glued down) so that the sawtooth hanger still can work and so that the felt covers more of the back.
I redid the borders on the hexagon block so that it had wide enough pieces to go around to the back without struggling and stretching–which can throw off the alignment on the front. But this felt could have been cut wider. It was my first try. I glued it on the edges with a strong “tacky” glue–the same one I use for rope bowls to stabilize cut rope ends. (Note that the fabric on the left bottom corner is closer to being an almost perfect fold–which should run next to the edge of the canvas.)
This one is better:
Nailing the tiny nails into the sawtooth was an issue–until I used a pincher type pliar to hold that tiny nail until I got it started. (That pliar is also good to pull a staple if needed, along with a screwdriver thin enough to pry out the staple.) And I taped the sawtooth center to hold it steady while I nailed.
Now, I am waiting for the 12-inch canvases to arrive (along with more 10-inch ones). And I’m still sewing blocks. More on those later.
For this block, I made a tiny quilt and hung it in the front hall. I just used the leftover grey strips to make it–and try out this pattern. It’s kind of funky–and I like “kind of funky.”
But…hmmm. For these long skinny log cabin types, what about a rectangle frame??? I love the neat look of these blocks on stretched canvas.
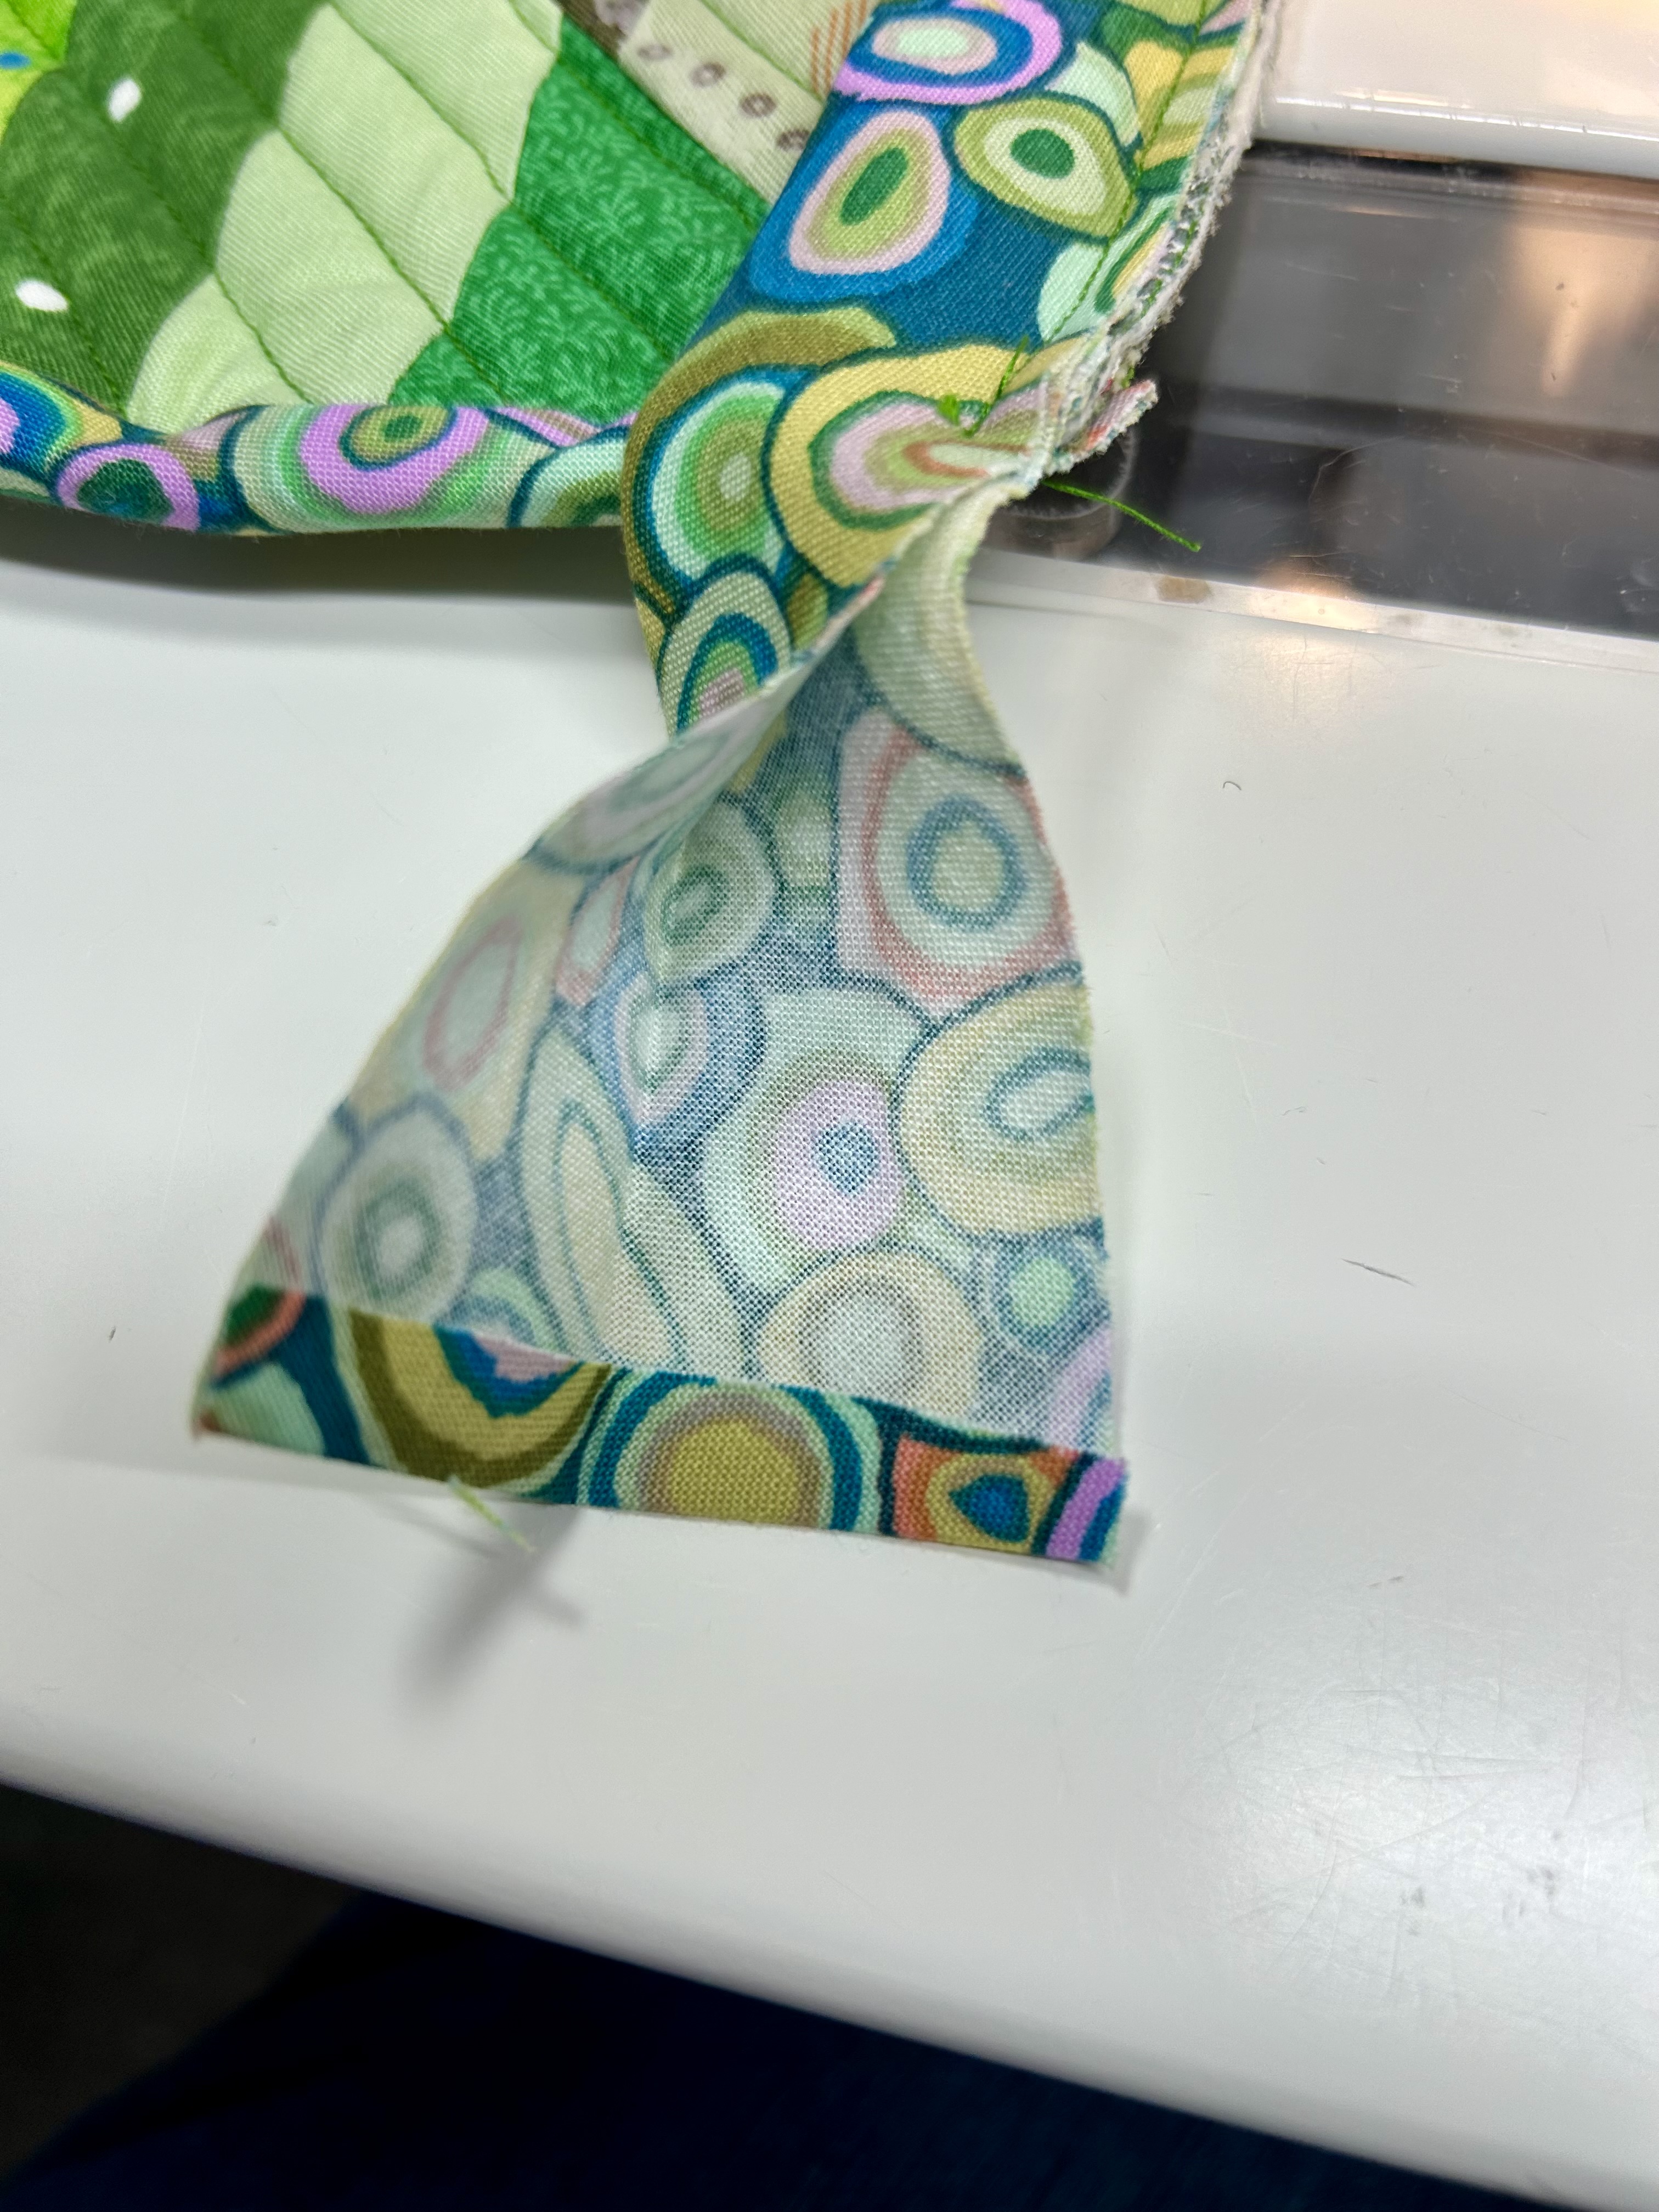
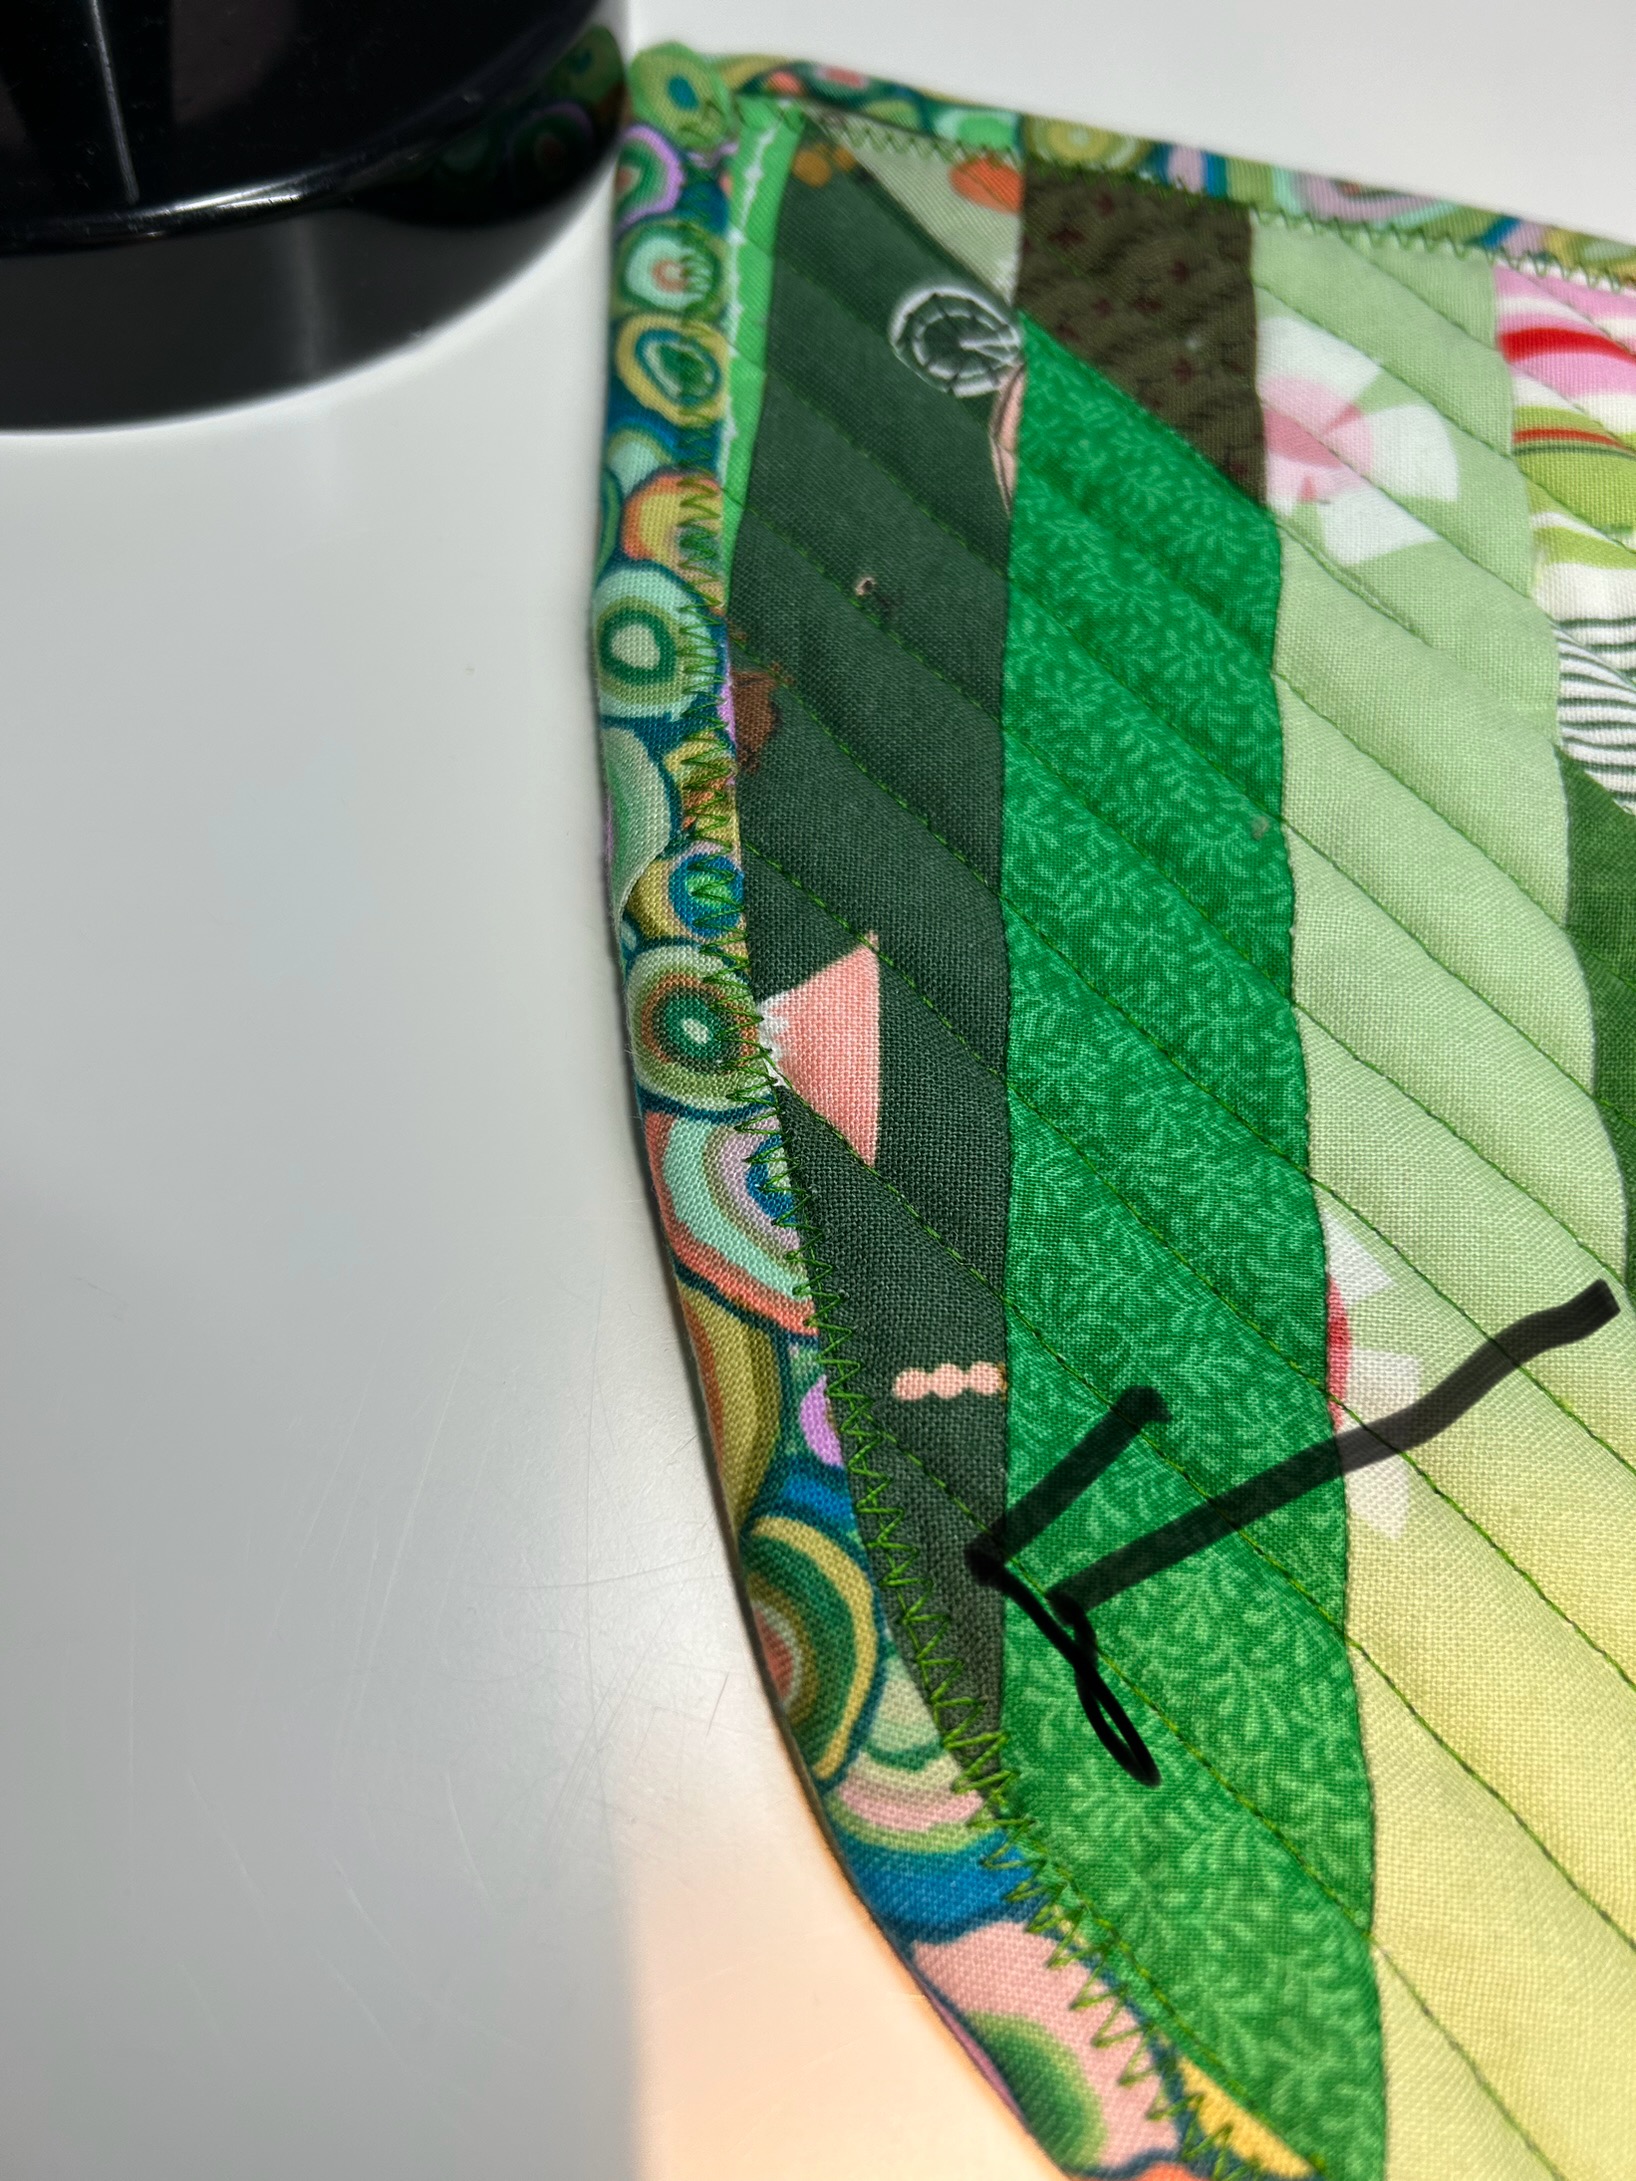
This curved leaf potholder from Amira Ameruddin–found on Instagram (amira__little mushroom cap)–really needs a bias binding. Note that I made my top and bottom as Amira showed, then used a freezer paper template to cut out my leaf as I was hopeless with freehand cutting.
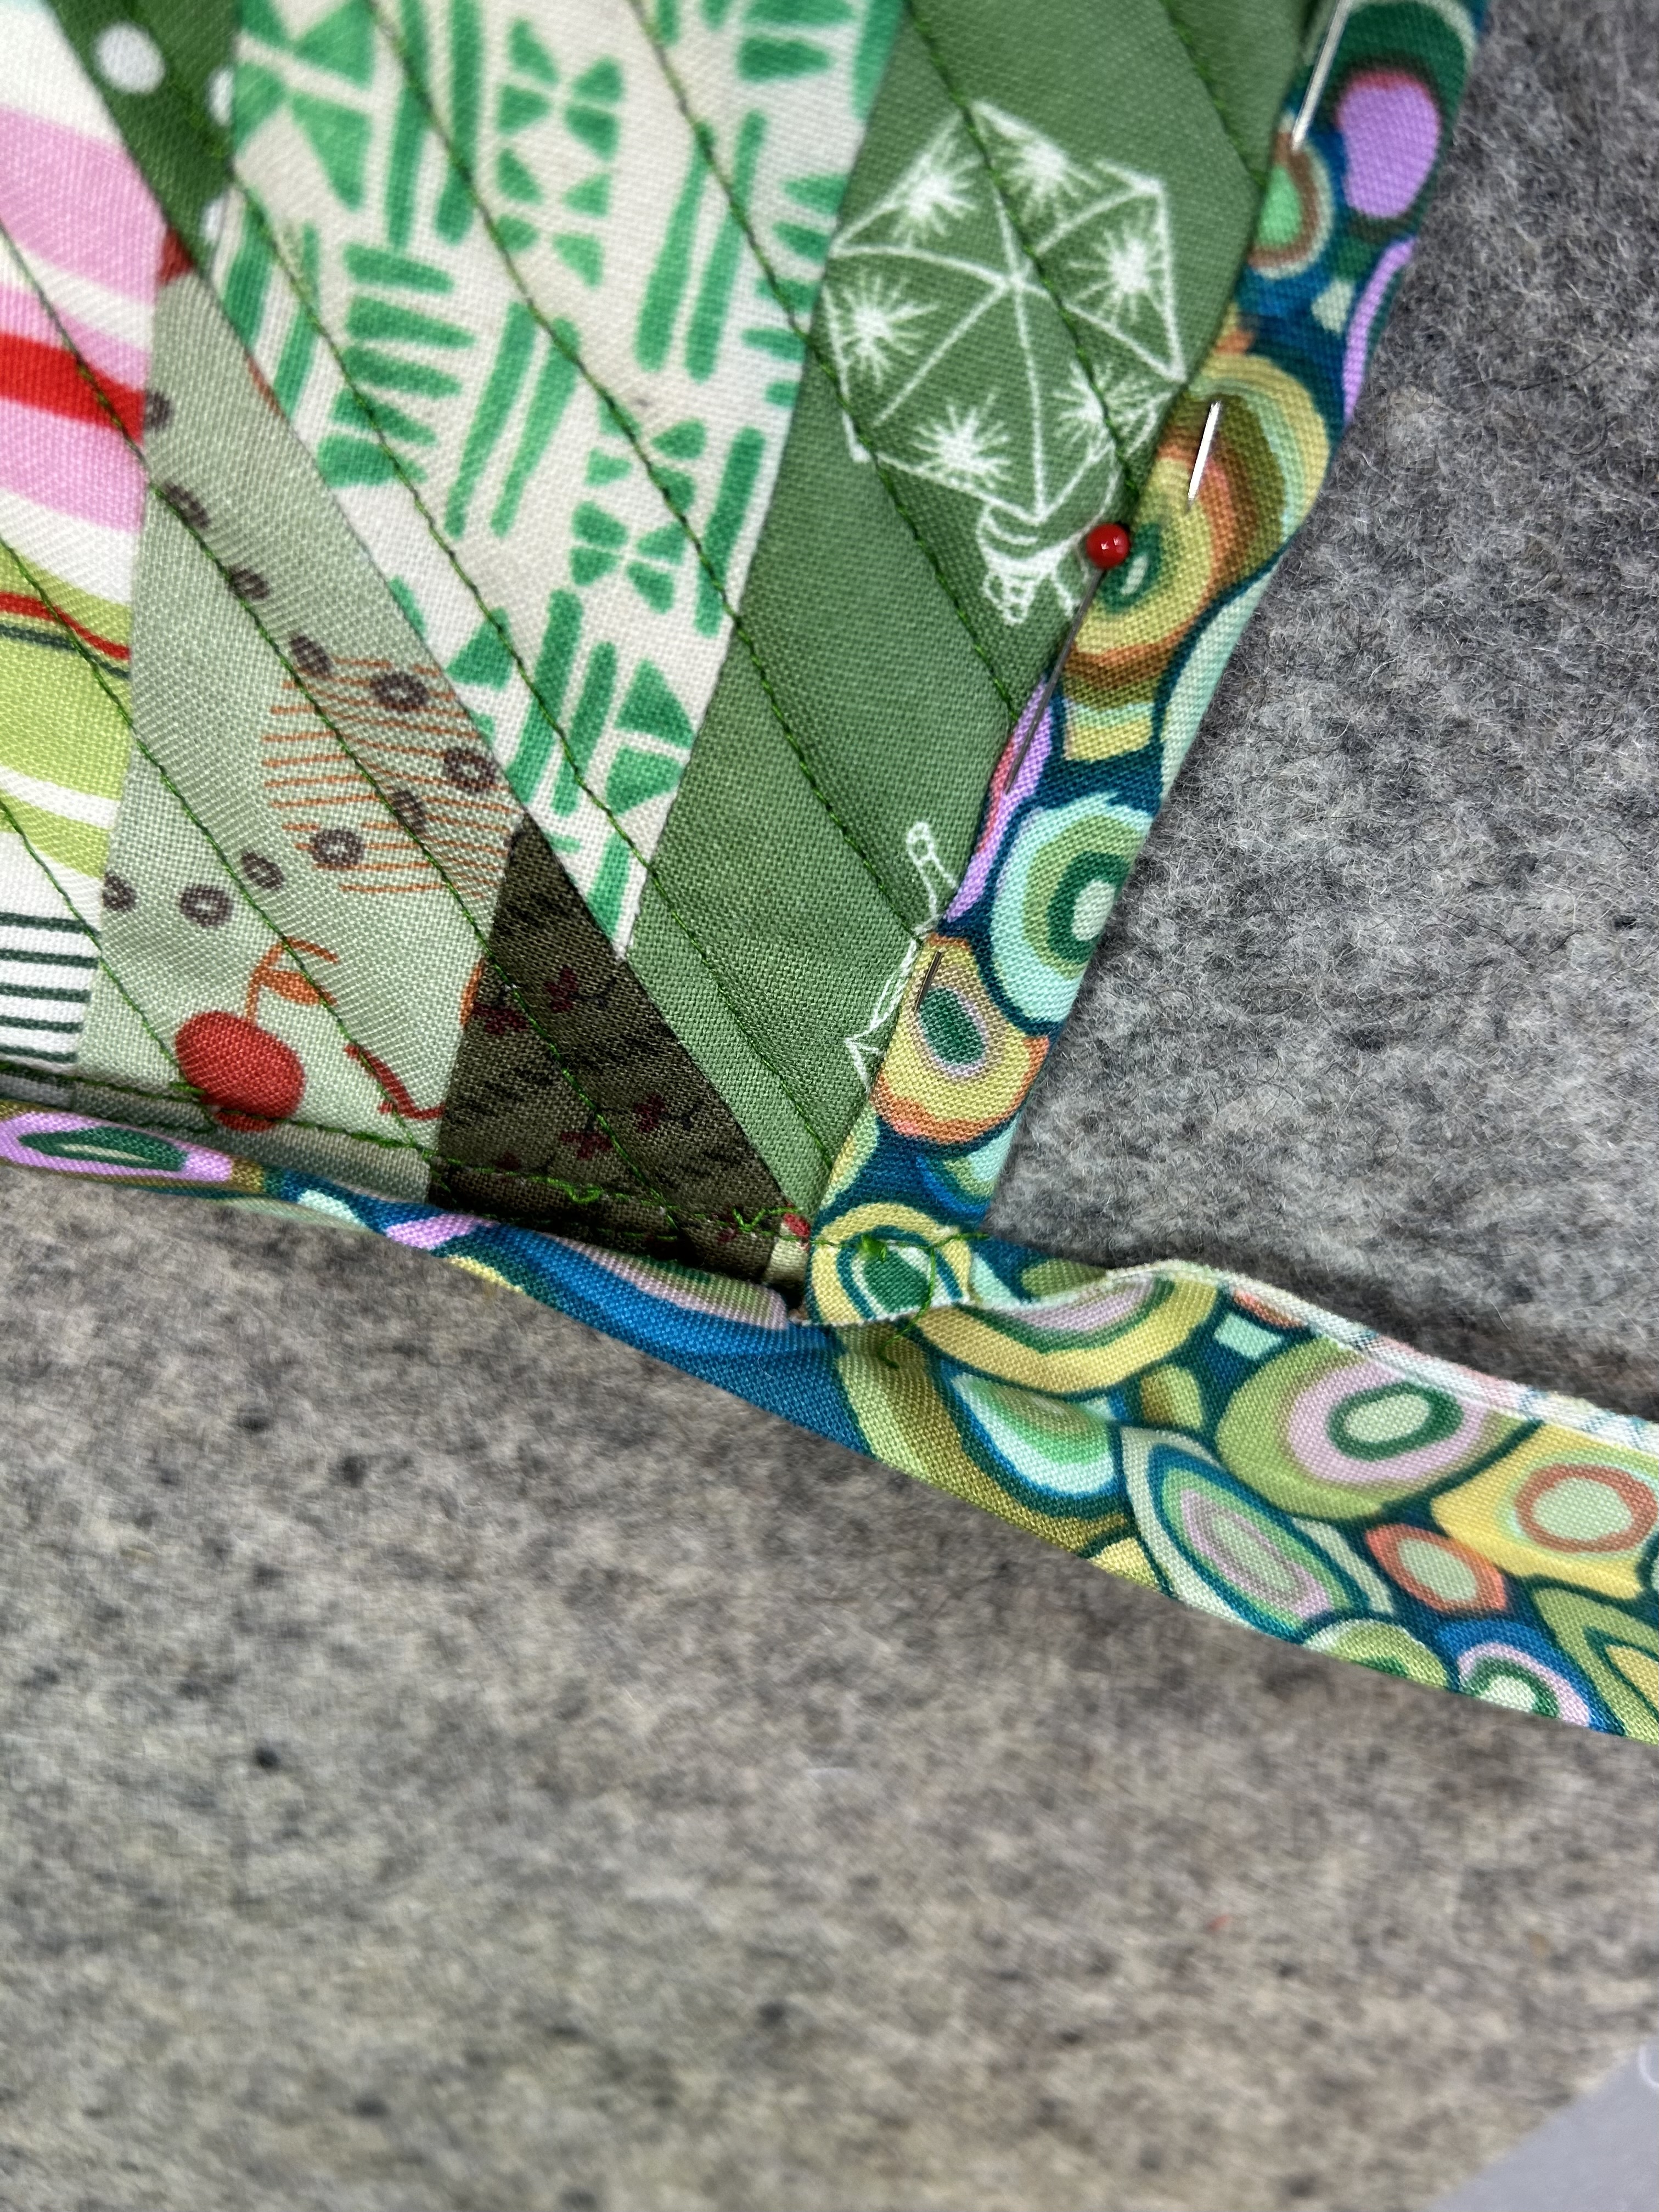
Start binding on the right side of the bottom of your leaf–after choosing which side you want to be the top side of your potholder. At the pointed upper end, treat that like a normal mitered quilt corner. ***Note that when I am almost to the end, I folded the binding at the start over.
Overlap the binding and sew to the end of the potholder edge.
Back up to reinforce.
Trim the hanging strip–and turn under and press the end you just trimmed. **Note that I trimmed this one a bit shorter than I should have.
Fold the strip in half and press it so you get a center line.
Line up the cut edge with your pressed fold center line.
Press and pin the hanging strip together.
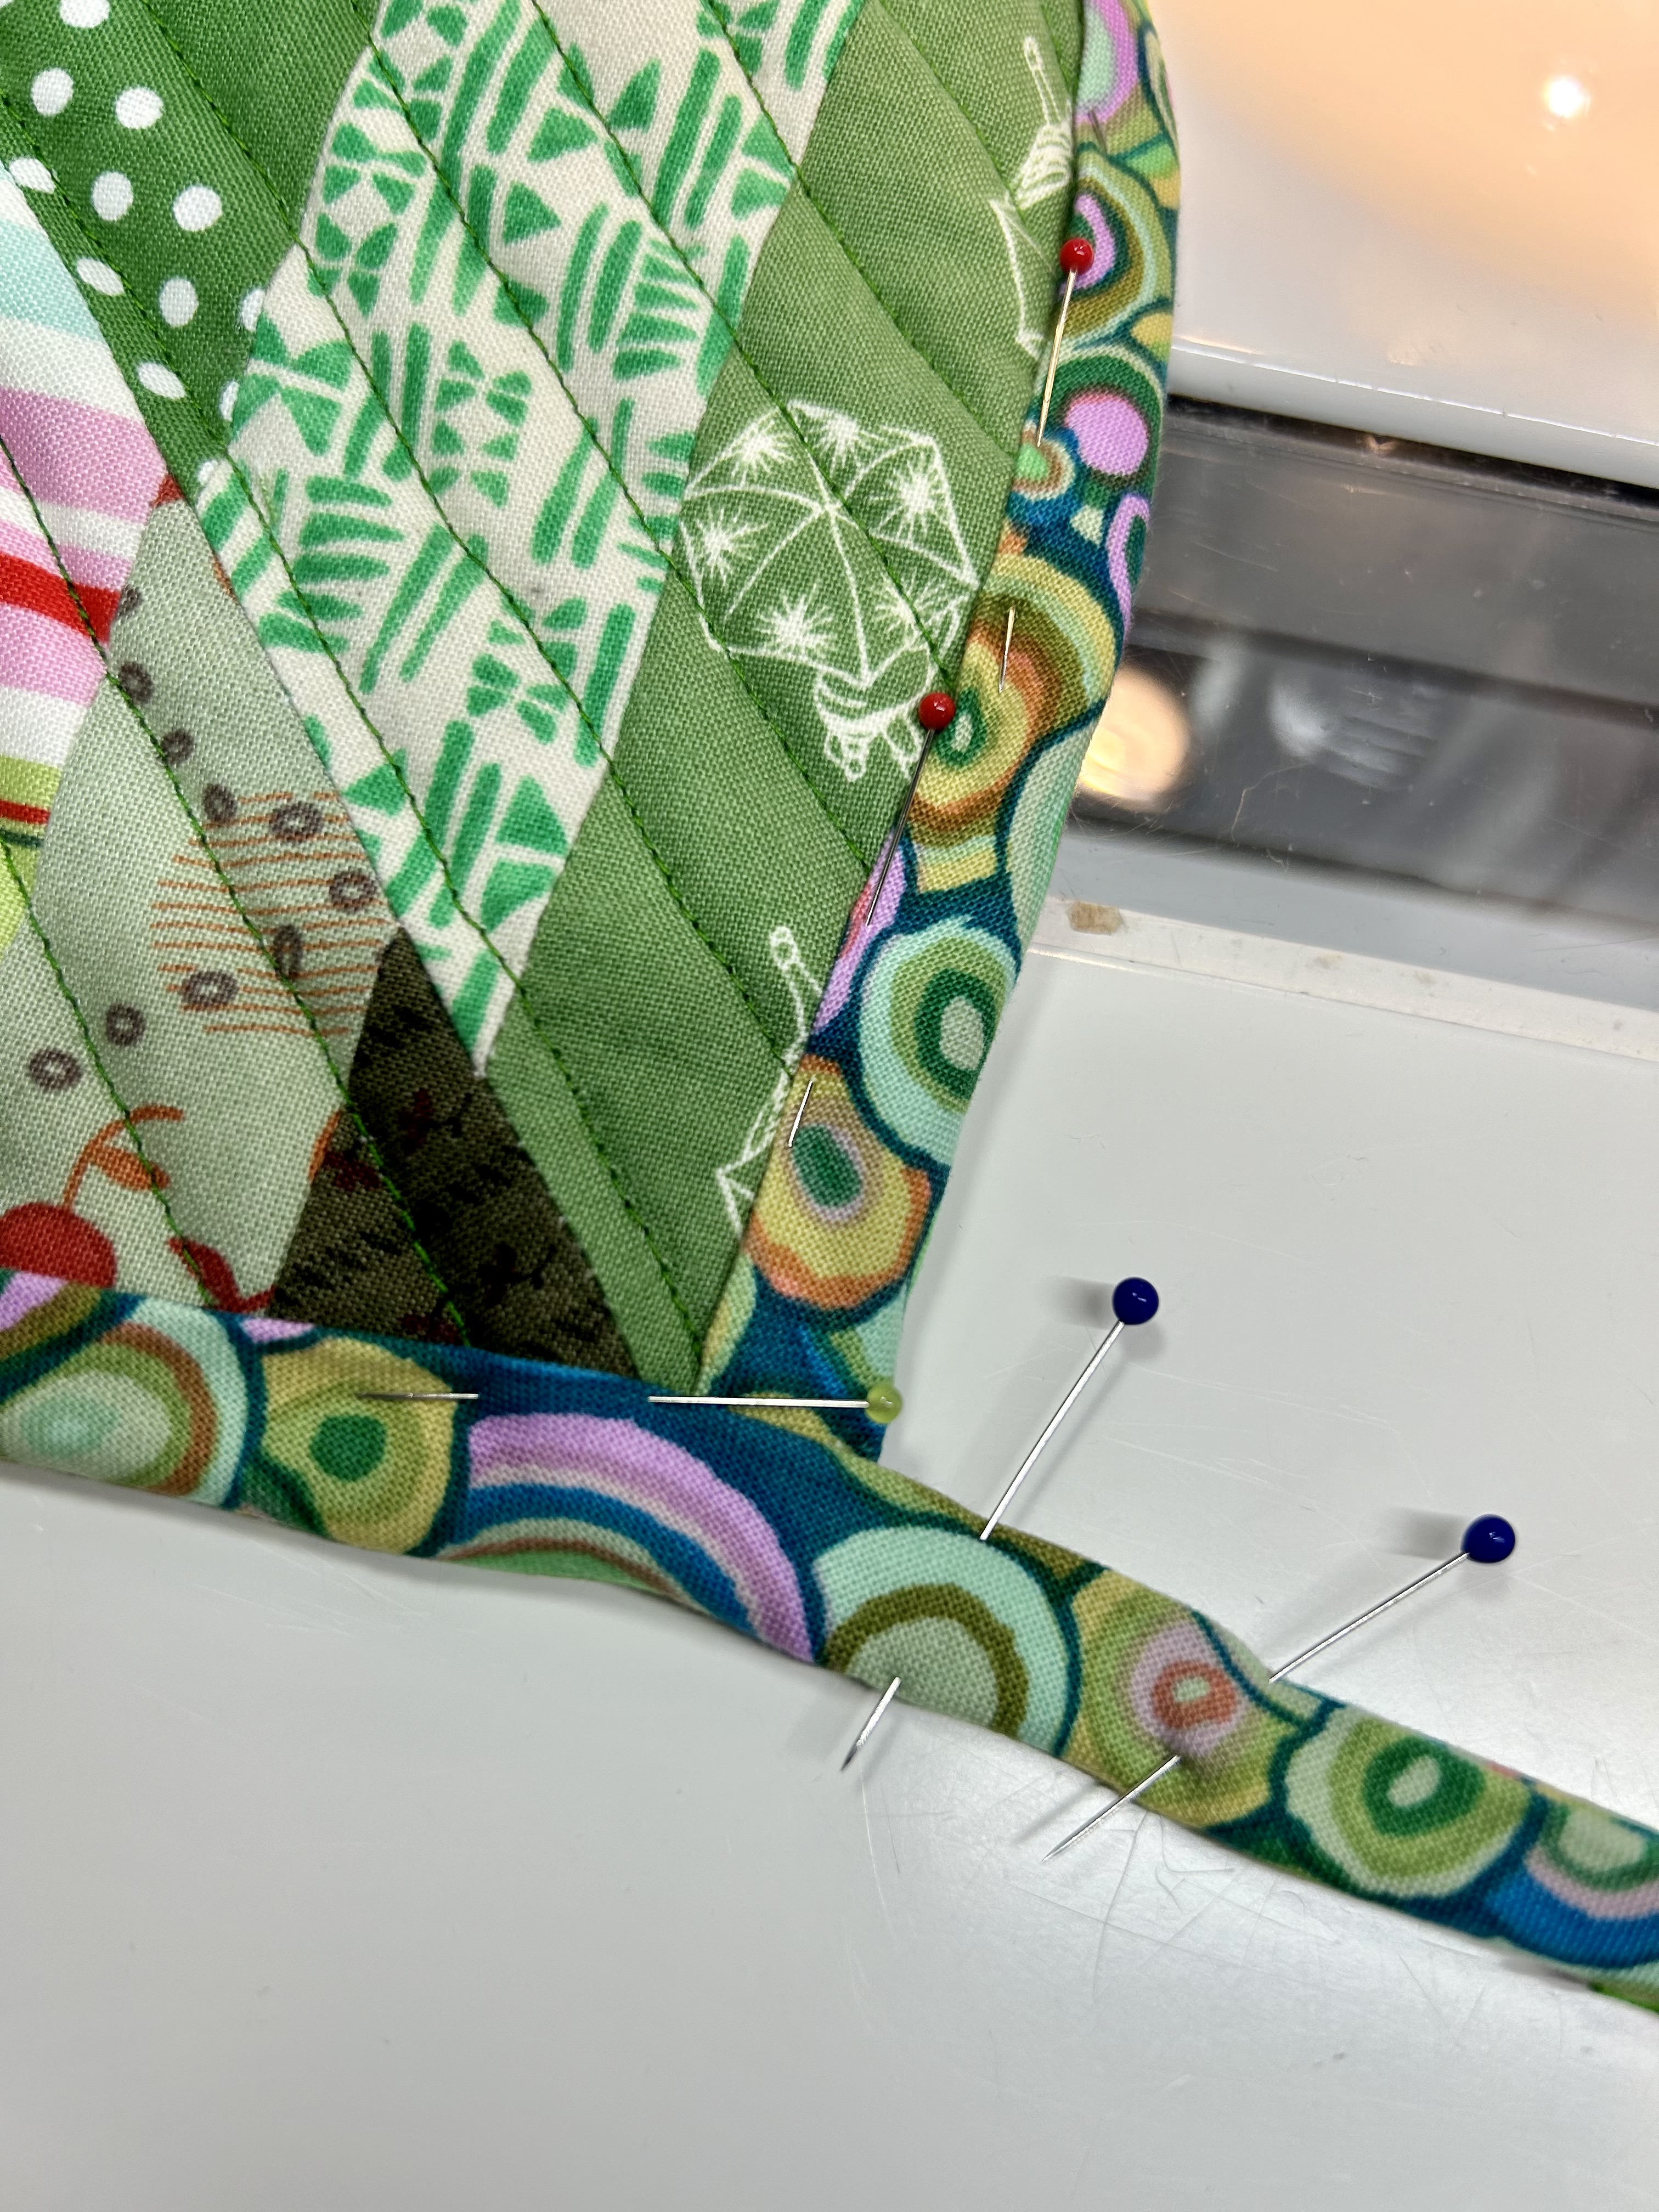
Close up the bottom side and pin. ***Note that to zig-zag (or however you want to sew down your binding) you will be doing that from the top side AND ***you will want your pins to be pinned with the heads on the bottom as you sew, so you can easily pull them out as you proceed. So, my pin below will need to be reversed when I pin the binding down.
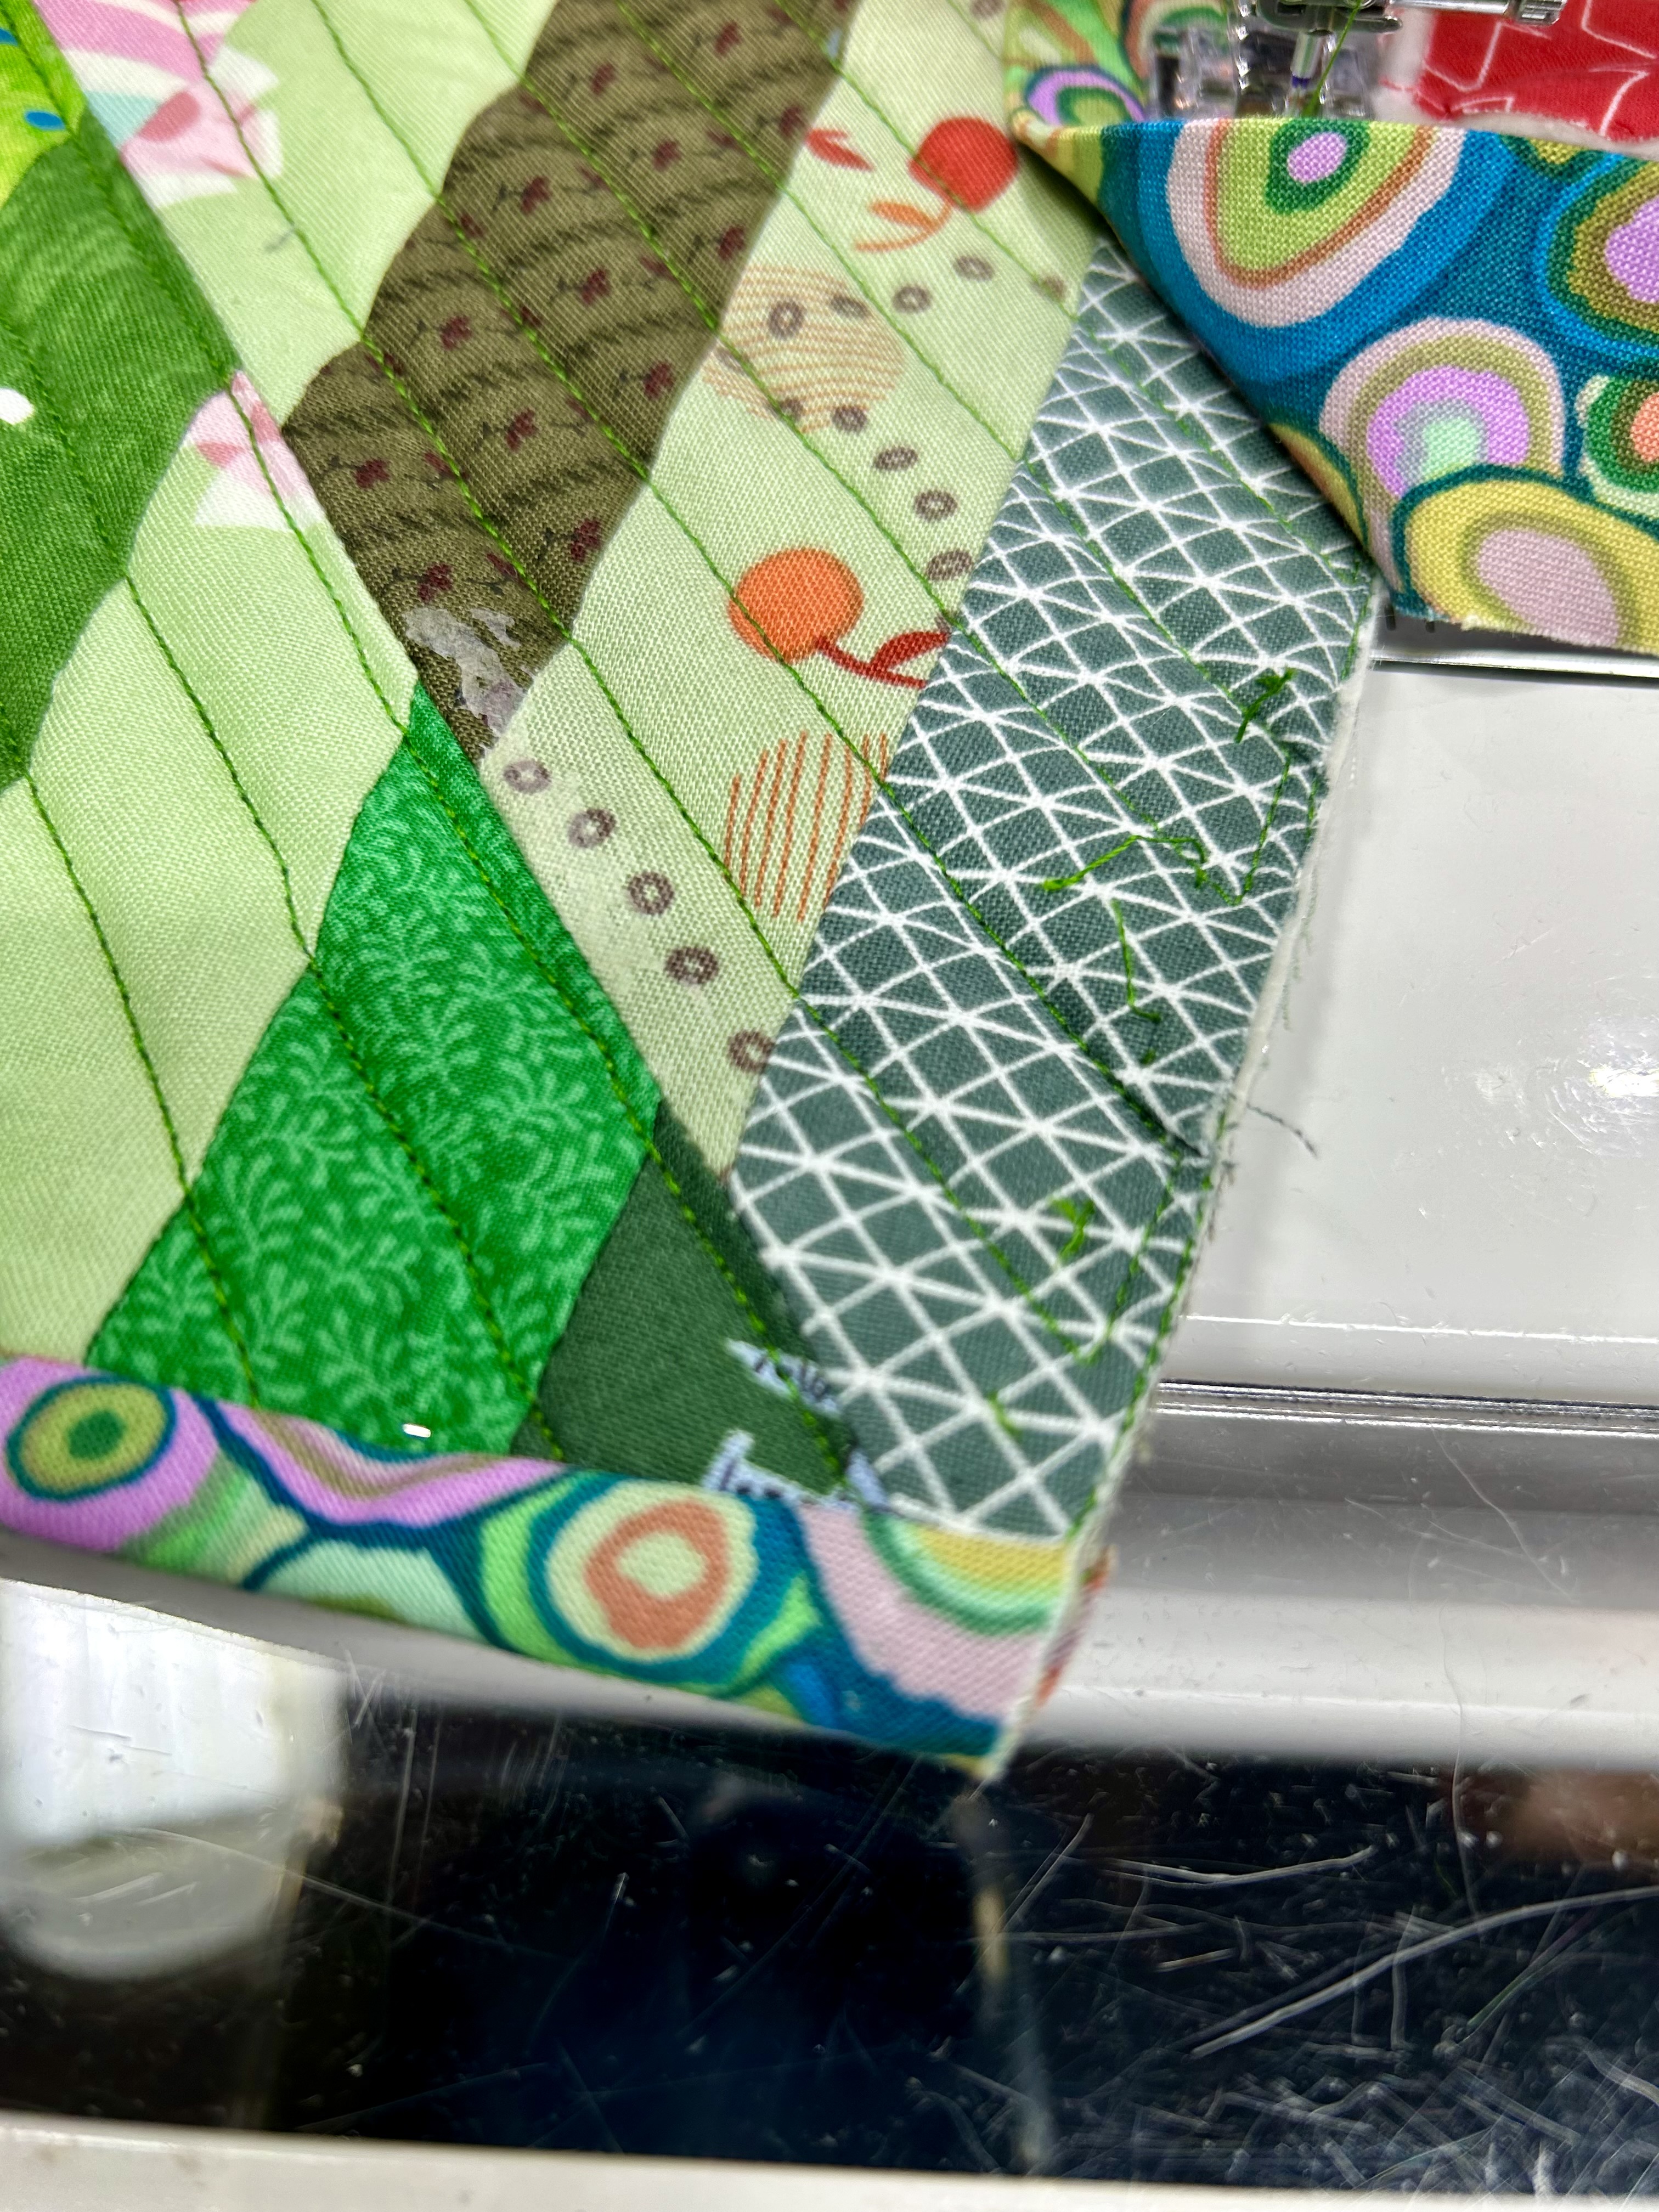
On the top side, sew down the binding. I use a zig-zag stitch–and I remove the pins as I go around. ***Start at the side that is underneath where the binding ends–not the strip side. And just start at the edge of where the top binding lies–not on that upper binding.
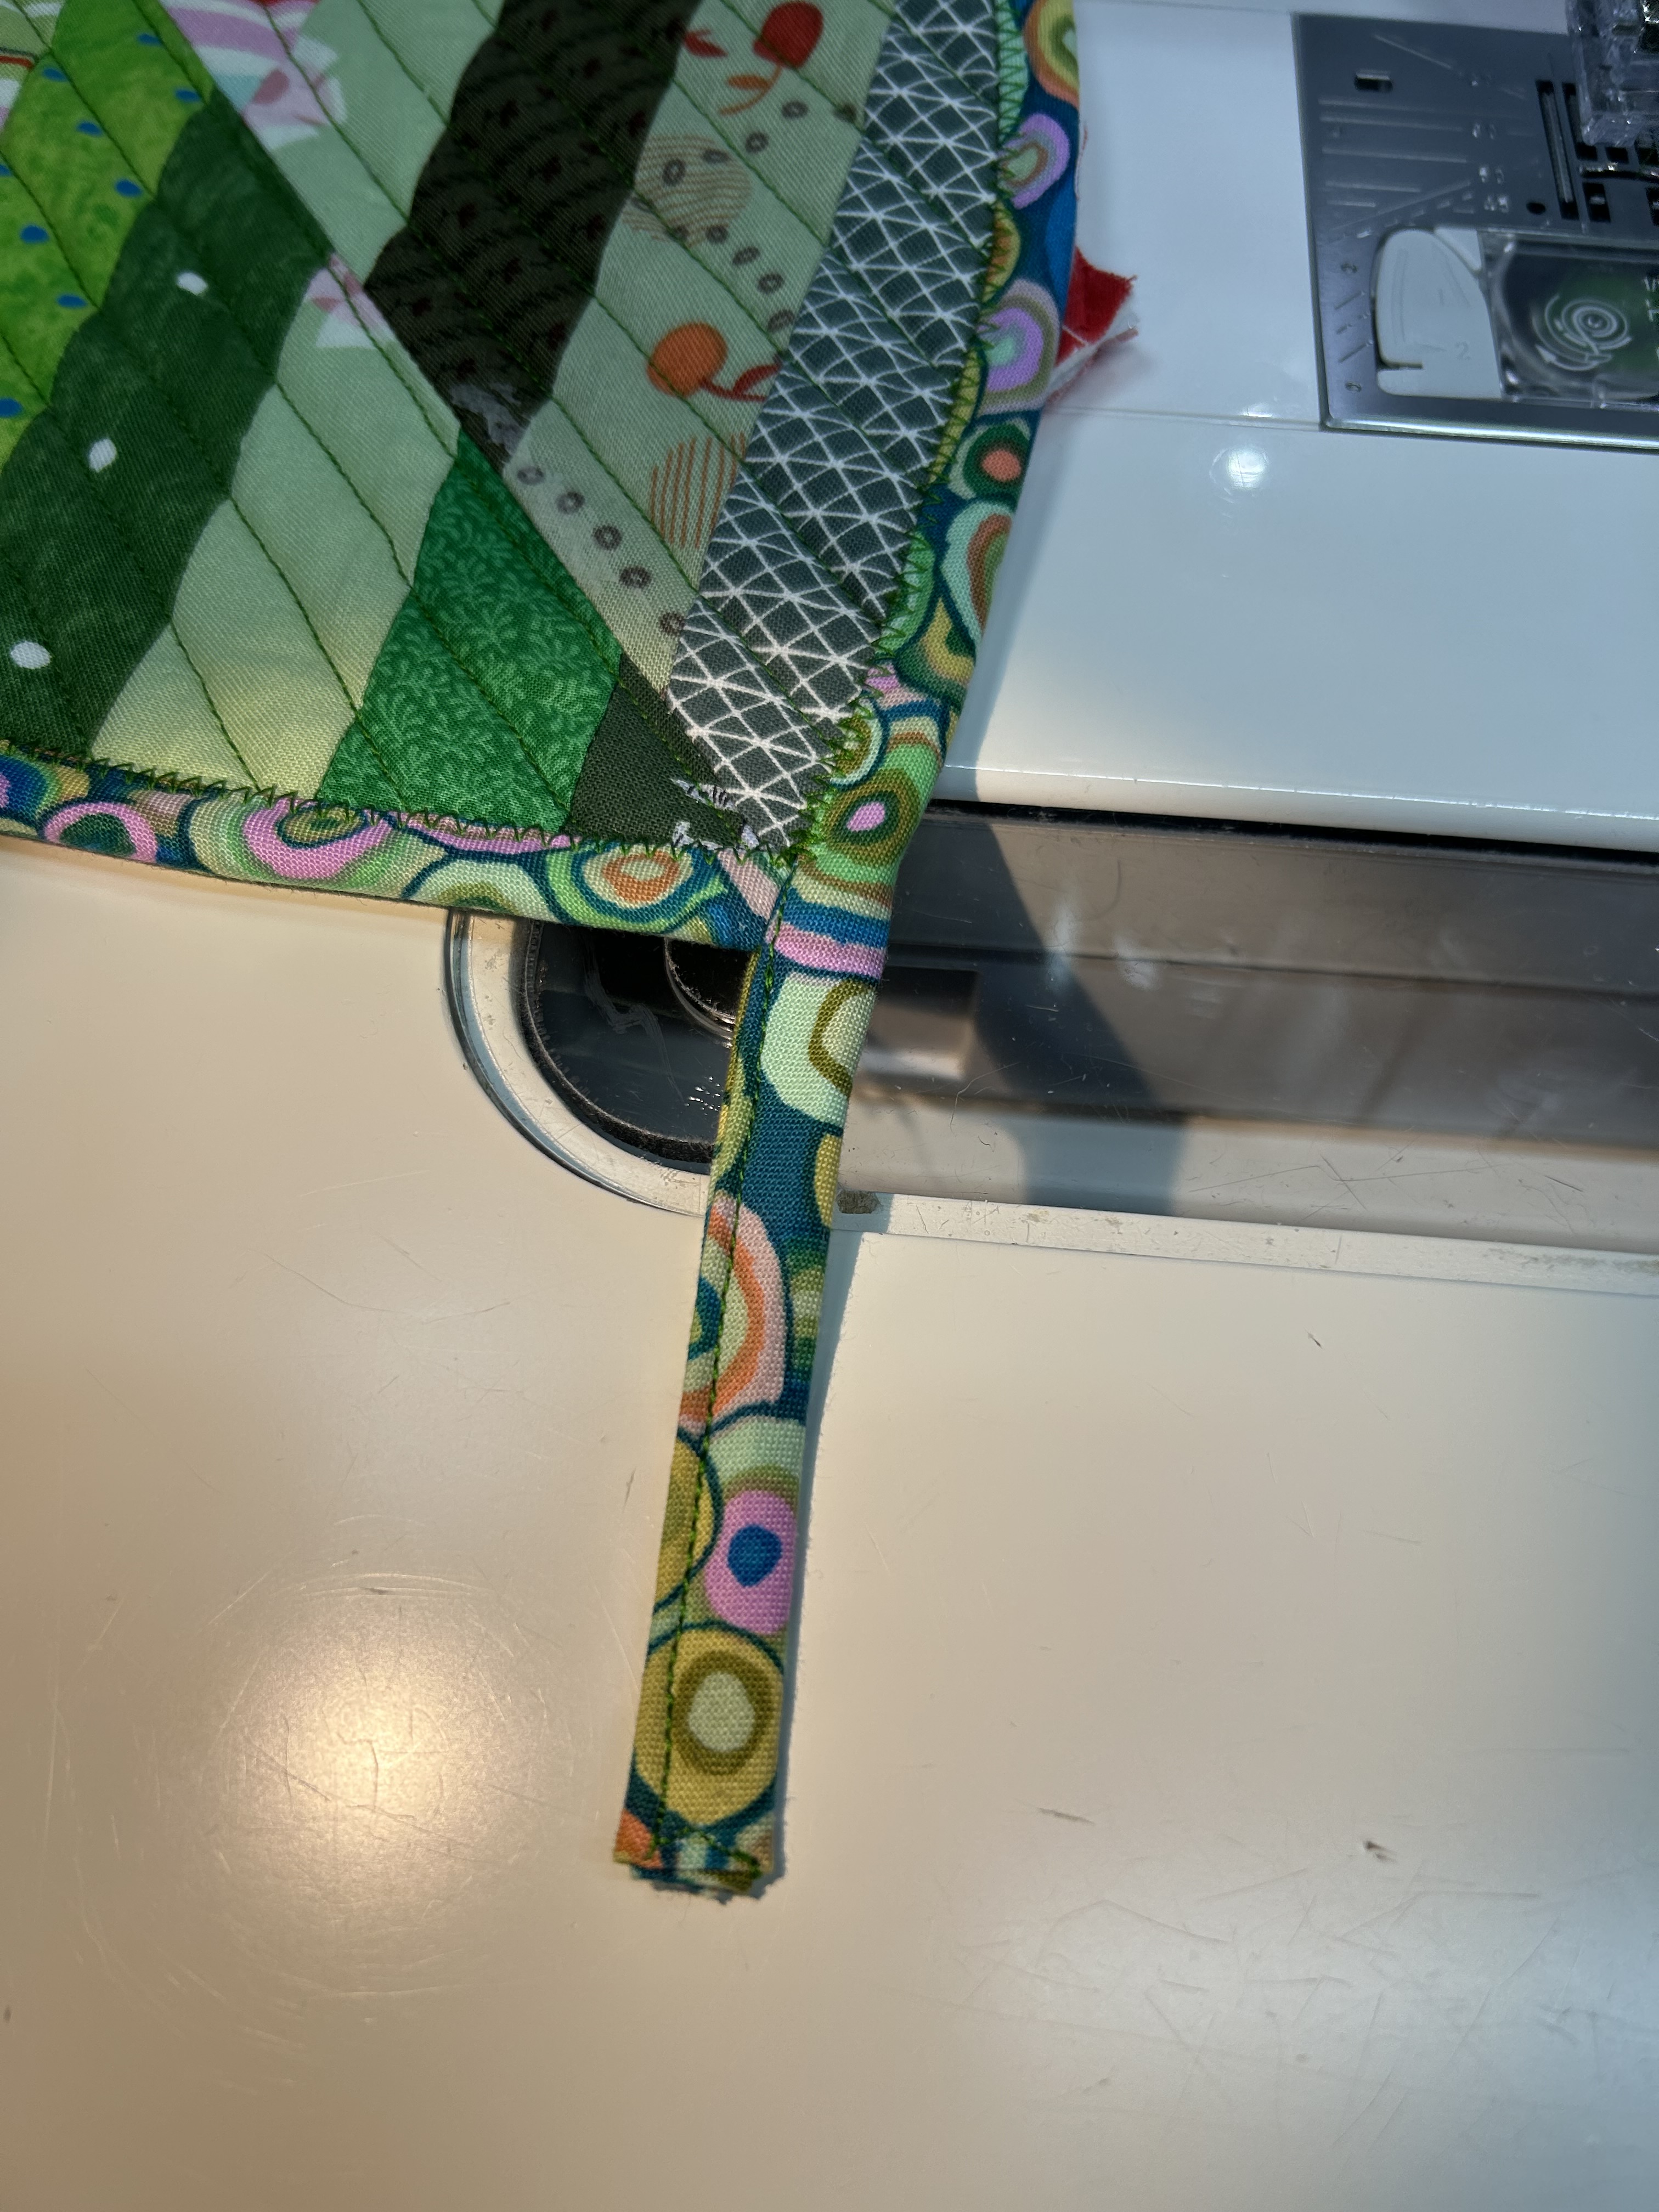
When you get back to that starting point, change to a straight stitch and go down the length of your hanging strip. Sew down the folded end as best you can. It can be tricky to handle the thickness, but if you turn the potholder and use something to help the feed dogs grab the bulk, you’ll be ok. I suppose whip stitching that end closed is not a bad idea either.
Turn the loop and sew it down. ***Turn to whichever side you think would be the best back side. I found that sewing it down outside the bulk of the binding was easier.
If you missed grabbing some part of the binding, just catch it with a hidden whip stitch done by hand. I am terrible at this machine sewing down of binding–and on this curved leaf potholder with the added layer of the Insul-Brite, I think maybe is also a factor of making the binding thicker and trimming well before turning the binding and sewing it down.
This machine sewing of a binding has been a learning curve for me.
I’m getting there with each try. And these potholders are visually forgiving and will be used and washed, so there’s no need to be crazy about perfection.