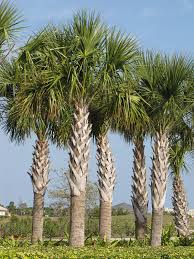
The Sable Palm is a palmetto, but I mistook that in an earlier post and called a regular low shrub that is also a palmetto and called a palmetto the South Carolina state tree. The Sable Palm is the real state tree and is on the South Carolina flag.
Here’s a link to that flag if you want to see what it looks like.
And here’s what the blooms look like. They have been “blooming” for several weeks now.
Here’s a close-up.
Fruit does form after these blooms–a tiny pea-size darkly colored edible fruit–but it is mostly seed and skin.
Local people say that when the blooms die back, they are a mess to clean up. That is probably also true for the palm fronds when they die as the tree grows upwards and forms new palms.
The dried upwardly facing pieces on the trunk are the remnants of old palmetto fronds that died. This area of the palm is called the “boot.”
And that’s all I know about the South Carolina state tree for the moment.
DIL Tami Enright shared this informative interview on South Carolina ETV the other day.
I think some of you might enjoy it.
Tami is a co-founder of The Bee Cause and its Director. The Bee Cause now has hives in all 50 states and in some international countries.
In this video, Tami not explains the history of The Bee Cause but what we can each do in our lives to help create a habitat for bees. Small acts can make a difference.
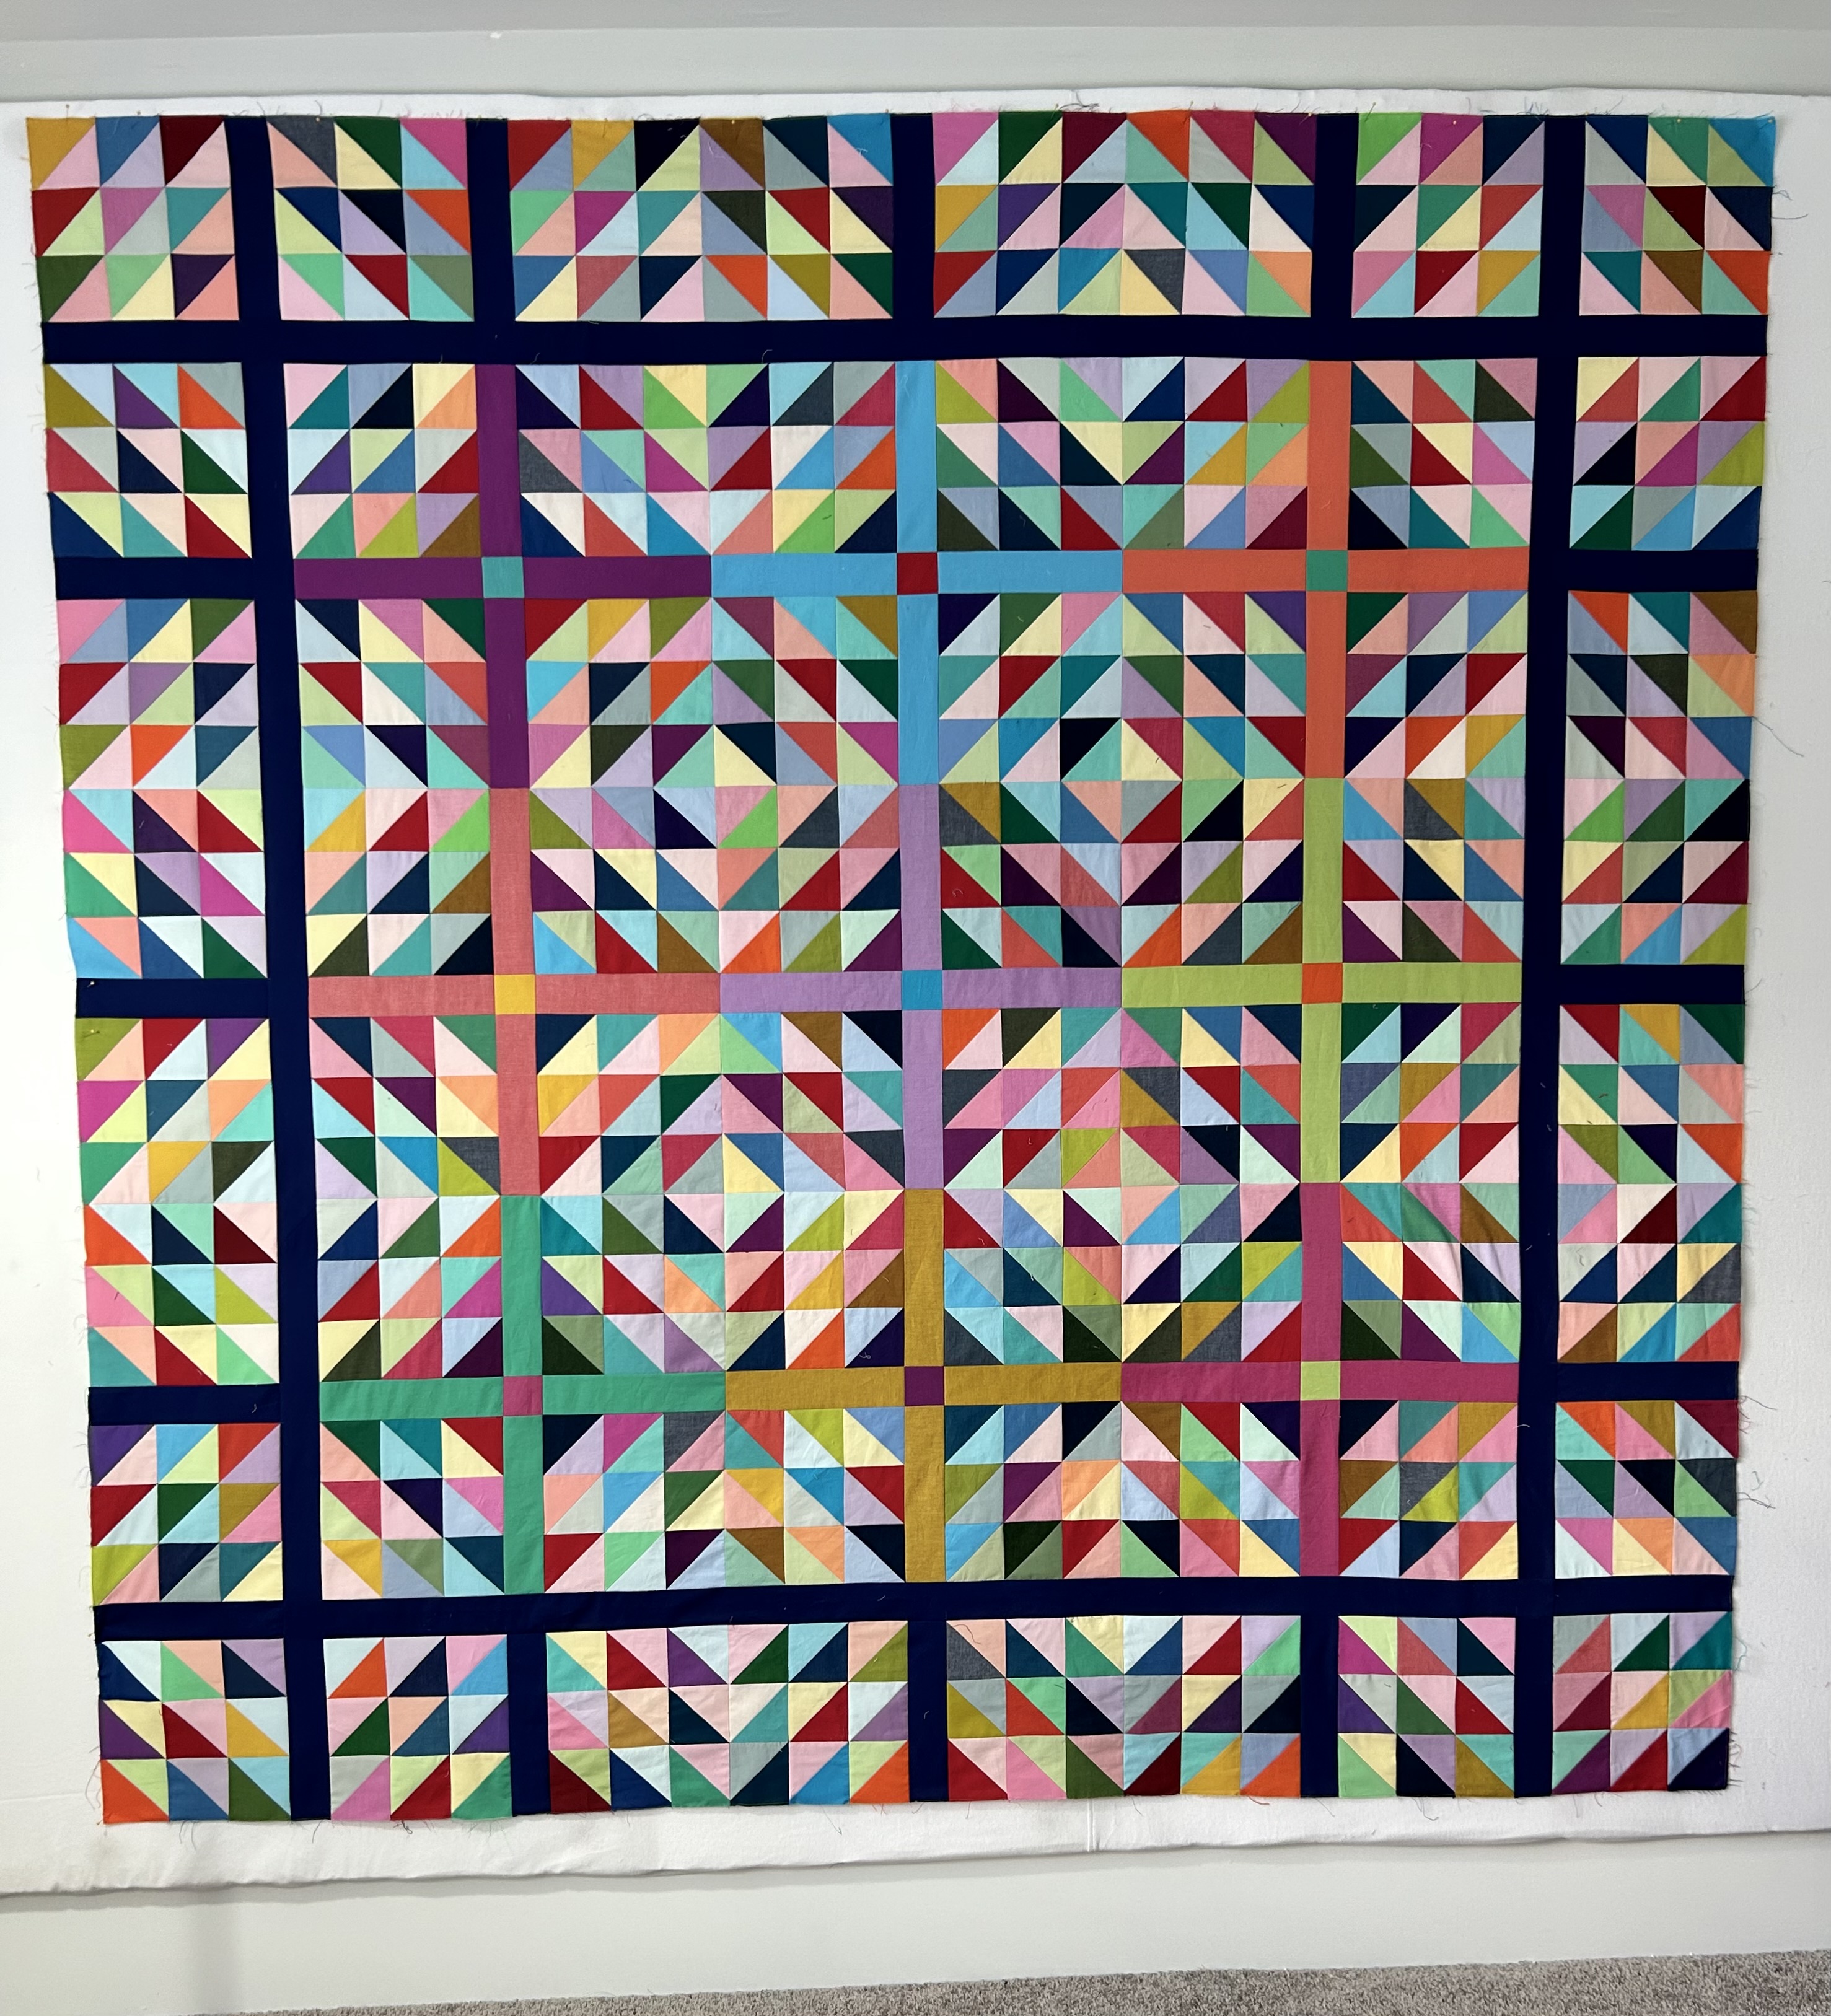
I finished the half-square triangle quilt made mostly with solid scraps–at least it started that way. But soon I did have to cut some fabric from my stash of bigger pieces as I got picky about balancing colors around the quilt. And don’t laugh, but I did order a few colors I felt I needed when some ran out. The colors in this quilt are way more vibrant than I am able to capture on my phone and in a room where it is tricky to get light where I need it for pictures.
The blocks are 9 inches finished, so it will measure out about 82 inches square. I am thinking of naming it “Inspired by Tara Faughnan,” since that is the truth and since I adore her quilts. She just released a lovely pattern made with solid half-square triangles–but without internal sashing. However, I was drawn to my idea below by a quilt that hangs behind her on some pictures and videos.
I am totally in love with the secondary patterns that form, depending upon how one places these half-square units. Dynamic designs are totally possible–and that’s without getting to color choices beyond just light/dark units. I had such a good time with this one. It tantalizes the eyes.
I will likely put it on the longarm pretty soon as I have a backing for it that I like a lot. I have no idea about a binding. Maybe the dark midnight purple of the internal sashing, a Kona color I love, but whose name escapes me for the moment.
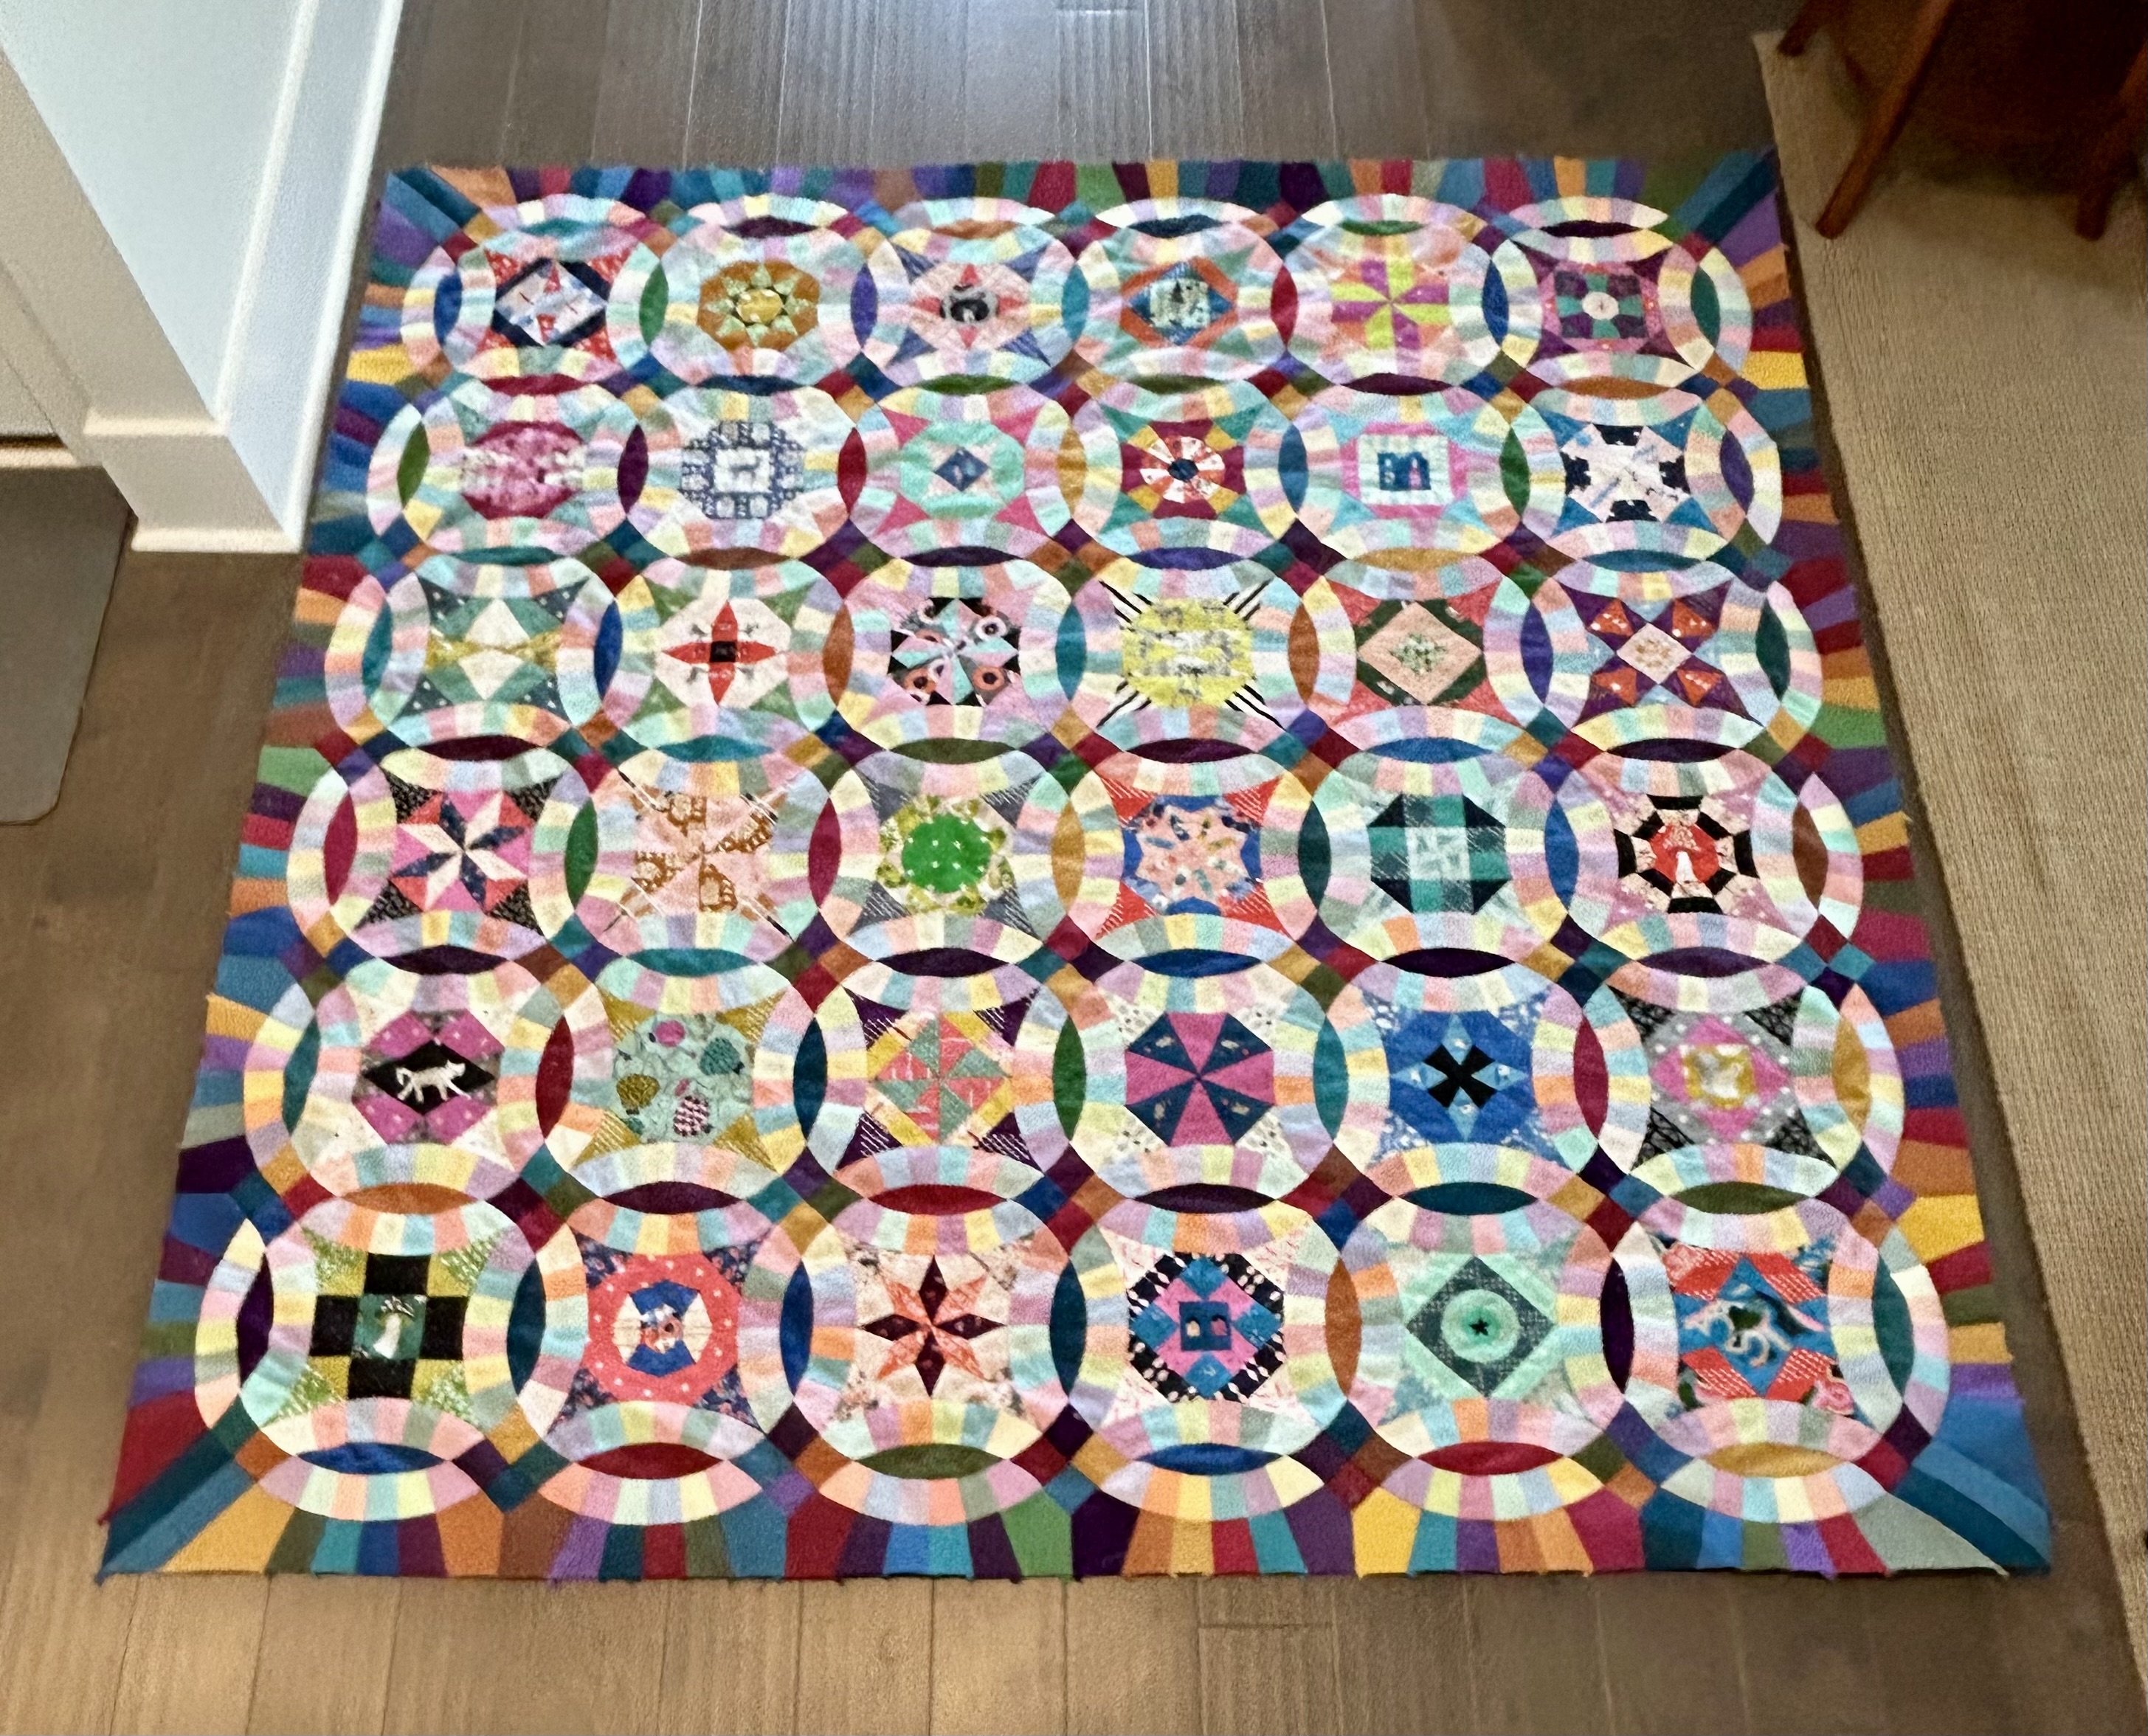
Then, YEAH!!!: here is the FINISHED QUILT TOP FROM HELL. The dark border just makes this quilt–in part I think because it draws out the internal dark shapes that repeat.
Here’s a close-up–the quilt is about 73 inches square when finished. And it has not been pressed since I took out the paper templates (except for the border). I’ll press the border really well and then remove the final paper templates. Then I’ll press it again and likely baste it for hand quilting on the longarm–maybe before “Inspired” gets quilted as basting on a longarm does not take up much time.
I started this quilt in June 2018 and there are, literally, a hundred thousand or more tiny stitches in it. The prepping of all the templates also took many, many hours. Five years, and she isn’t totally finished yet. But, soon… And she needs a happy name–maybe even “Happy”–as in “I’m happy this one is finally over.” I’ll put on a hanging sleeve before I bind her. And she is the last of the handmade quilts for my seven grandchildren. Now there are seven of these handmade quilts.
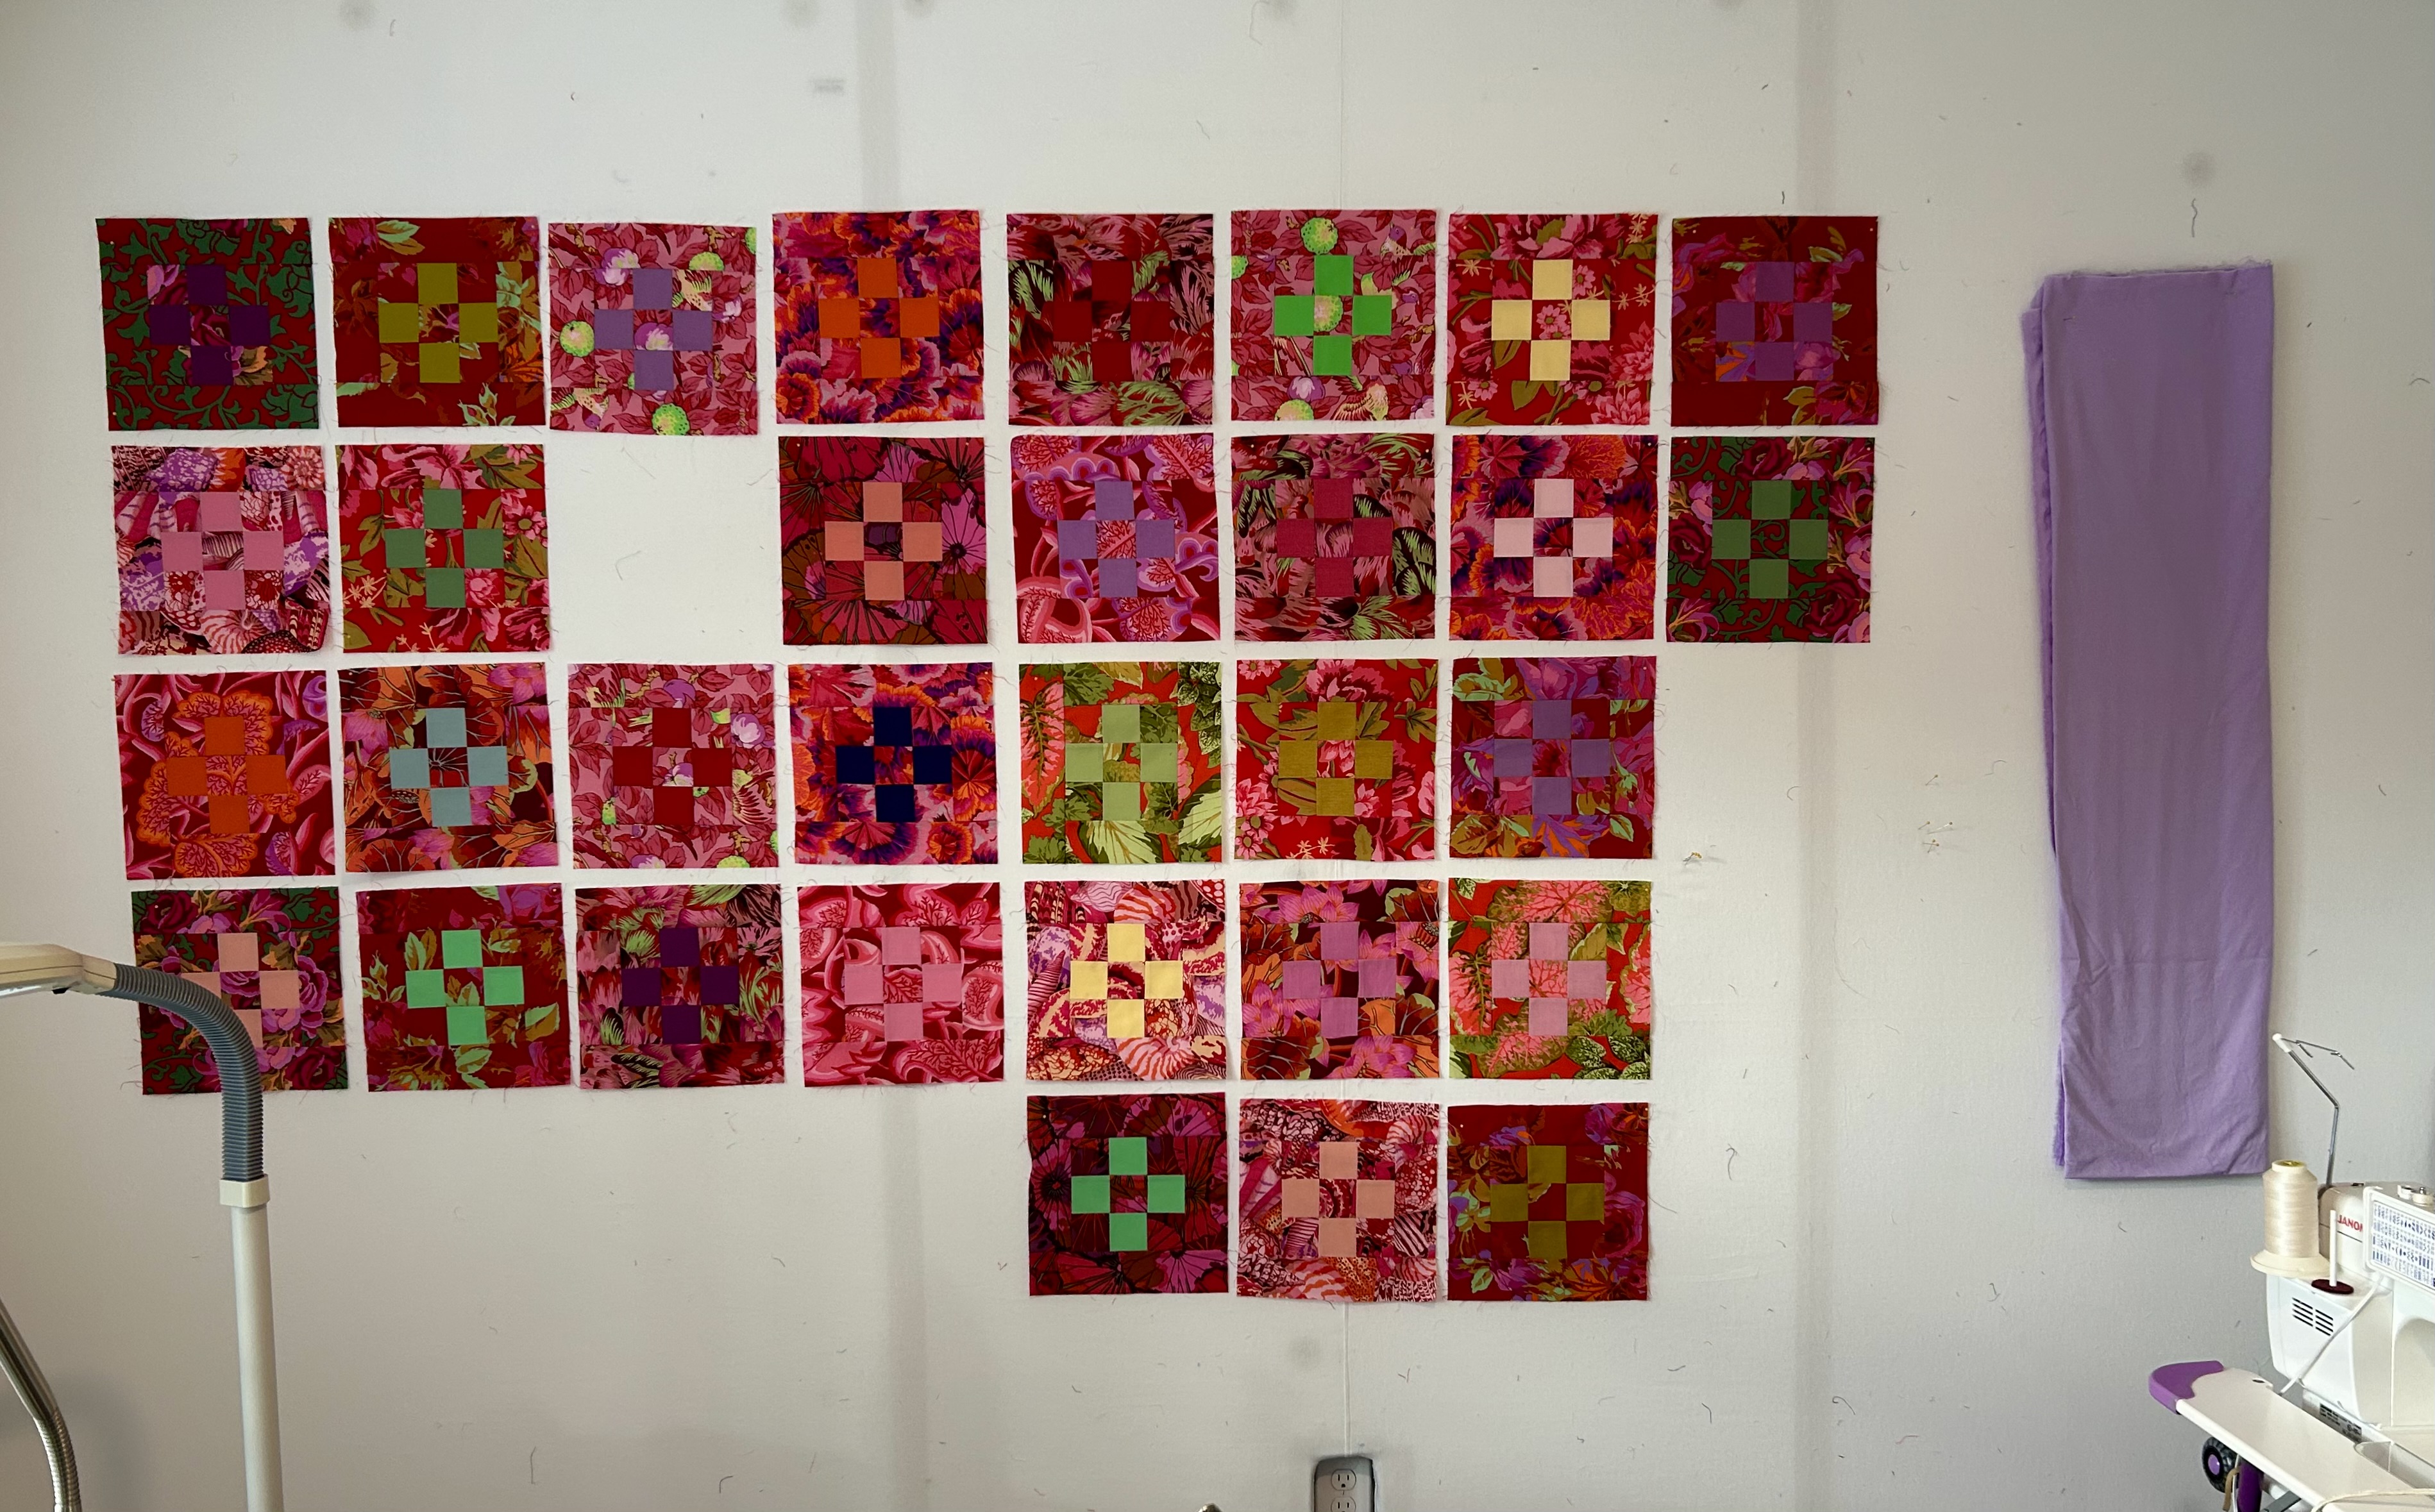
Big Red (that will NOT be its name) is now on the design wall. It’s hard to get the color red to show well in my pictures. This quilt made from Kaffe Fasset prints bought in a kit many, many years ago. The reds are vibrant and not at all muddy. The lavender (Kona Thistle) will be the 1-inch sashing and the binding. The 8-wide 10-inch blocks will go right to the edge, so using the same-color sashing fabric for binding will pull everything together. Right now it would finish at 87 wide, but I might go at least one more row long so it wouldn’t be square. I’m not planning to use corner stones between the rows, but you never know what will happen. And of course I’ll move blocks around like crazy as I add them.
I’m so excited about putting the Modern Quilt Society’s “Summer Camp” mystery quilt blocks on the design wall–so I’ll likely do that as soon as this red top is all together. That mystery quilt reveal for the public will be September 1st, which will arrive pretty fast, given that I have so many projects happening.
I brought Traverse downstairs yesterday, and I’ll start hand-quilting it as soon as I have the paper templates out of “Happy”–which may happen tonight.
I’m so looking forward to trying out new hand-quilting skills gleaned from Tara Faughnan’s online hand-quilting class. I have a thinner backing (Cotton Couture), a thinner batting (Dream Cotton Request), a new thimble with a ridged top, some new needles, some of those little finger guard circles for the finger under the quilt that has to meet the needle point, some new thread conditioner, some new thread, and a whole lot of excitement.
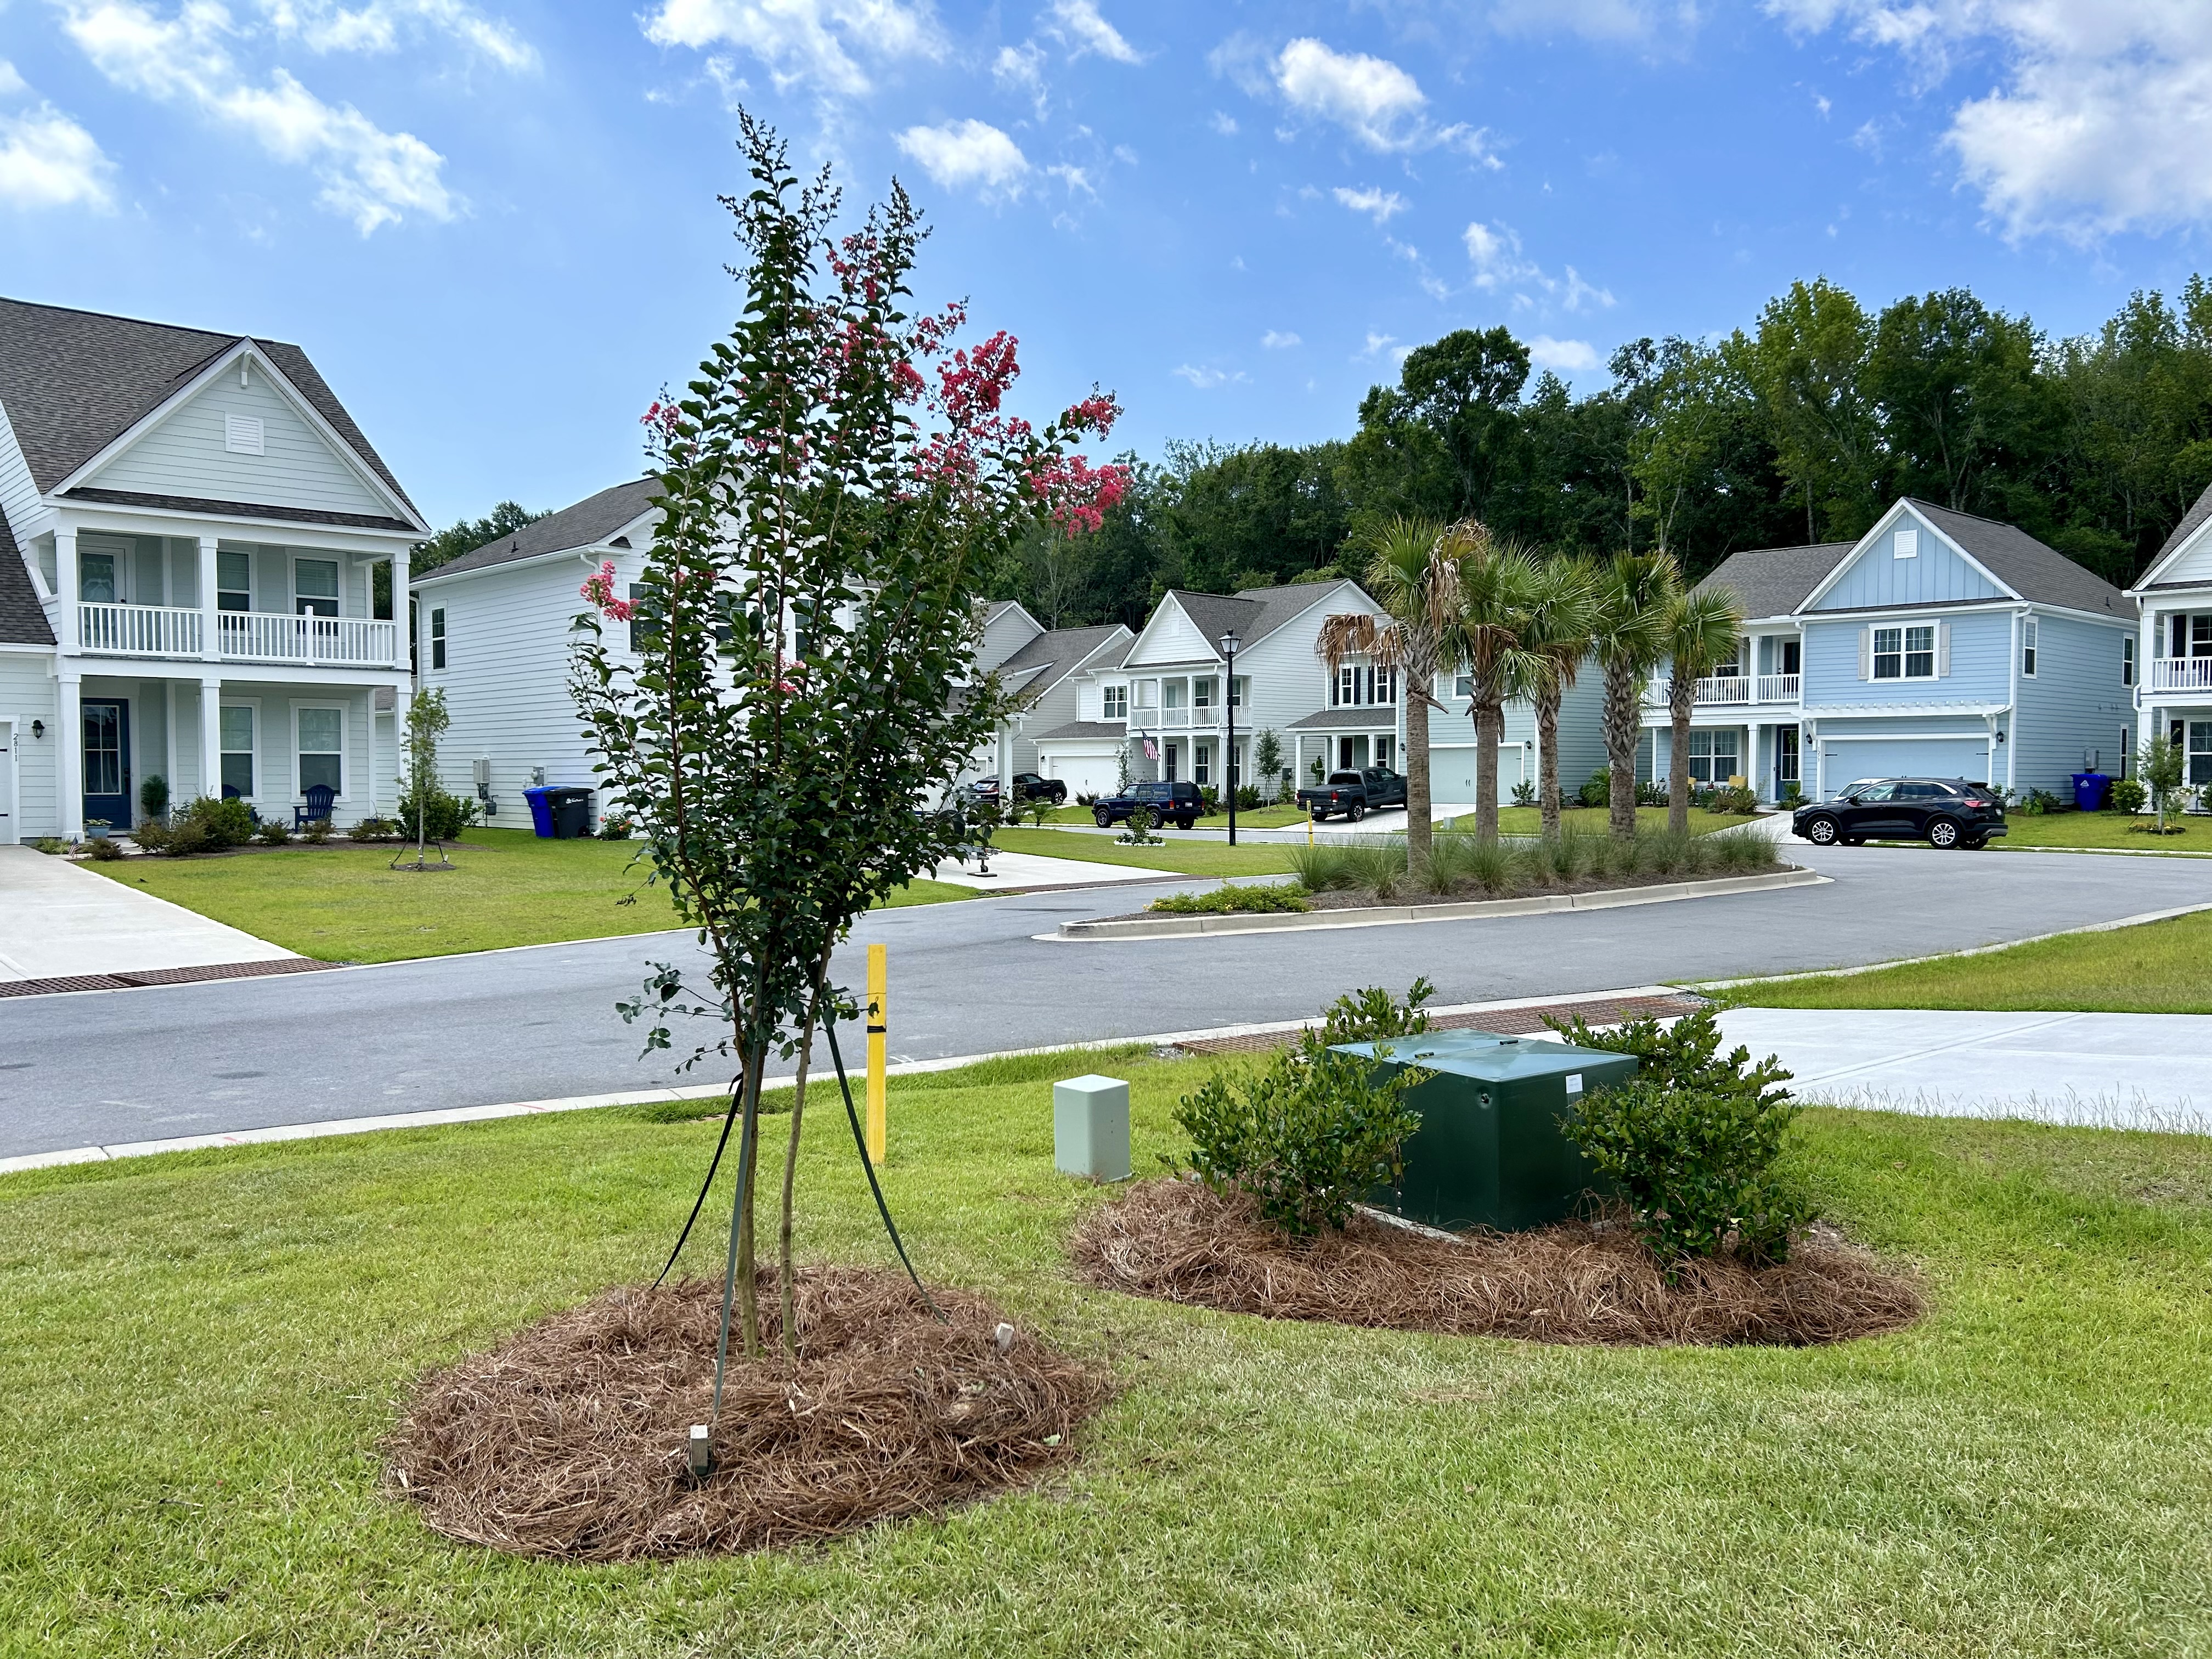
I’ve been worried about this tree in my front yard–a willow oak planted by the developer.
These trees are hardy here, yes. But they will get HUGE and will dwarf the house, the front yard, the street and the neighborhood. Plus the roots that develop get huge and thick and can spread far and wide–disrupting…the street, the driveway, the house foundation (?), and so on. I am hearing some real horror stories.
So, I contacted Estaben Hernandez (EstebanHernandez Luxury Painting). Estaben is also a carpenter, and his brother has a landscape business. These two guys are a part of a network of young men who are hard and willing workers. Estaben made taking out the willow oak and replacing it with a gorgeous Crape Myrtle an easy event. And I am so grateful. He and his guys chose a beautiful tree for me. (I wanted a watermelon pink color.) And the willow oak went to one of the guy’s brother’s house, where there was ample room for it.
I made a trip to Loews and got new pine straw for these two beds and put it down myself. The pine straw is light to move and easy to put down.
Now, all I have to do is pay attention to how much water this new tree is getting. And I already do that with the grass and the beds I have planted. (The roses are blooming like crazy again and are so cheerful. The flowers are smaller, but that’s due to the heat.)
I find myself following the afternoon thunderstorm possibilities–especially in the strong heat we have had recently. (It was 102 on my back porch one afternoon last week.) You would think this storm would have provided some good rain. Well, it did for some west of me. For sure. We didn’t get one drop out of these scary clouds.
But we did get a good rain a day Saturday evening. So I’m good on the watering for one more day. I usually water early evening, so the plants can take all the water in without the sun drying everything out too fast. The night temps are in the 80s, so leaves don’t stay wet long. Plus, the extreme heat would fry a plant’s leaves that were wet if I watered during the day. Early morning watering might be ok, but is not as ideal as early evening watering.
Today it is a bit cooler. High 80s and into the 90s mid to late afternoon. It is late July in the tropics–and August is coming. My house is cool–I run a dehumidifier upstairs in the afternoons–and floor fans on low to keep the air moving–and that helps a lot. High humidity makes everything feel hotter.
And they result is that the eggs are so tender and velvety–so much better than the old poaching pans with which I grew up.
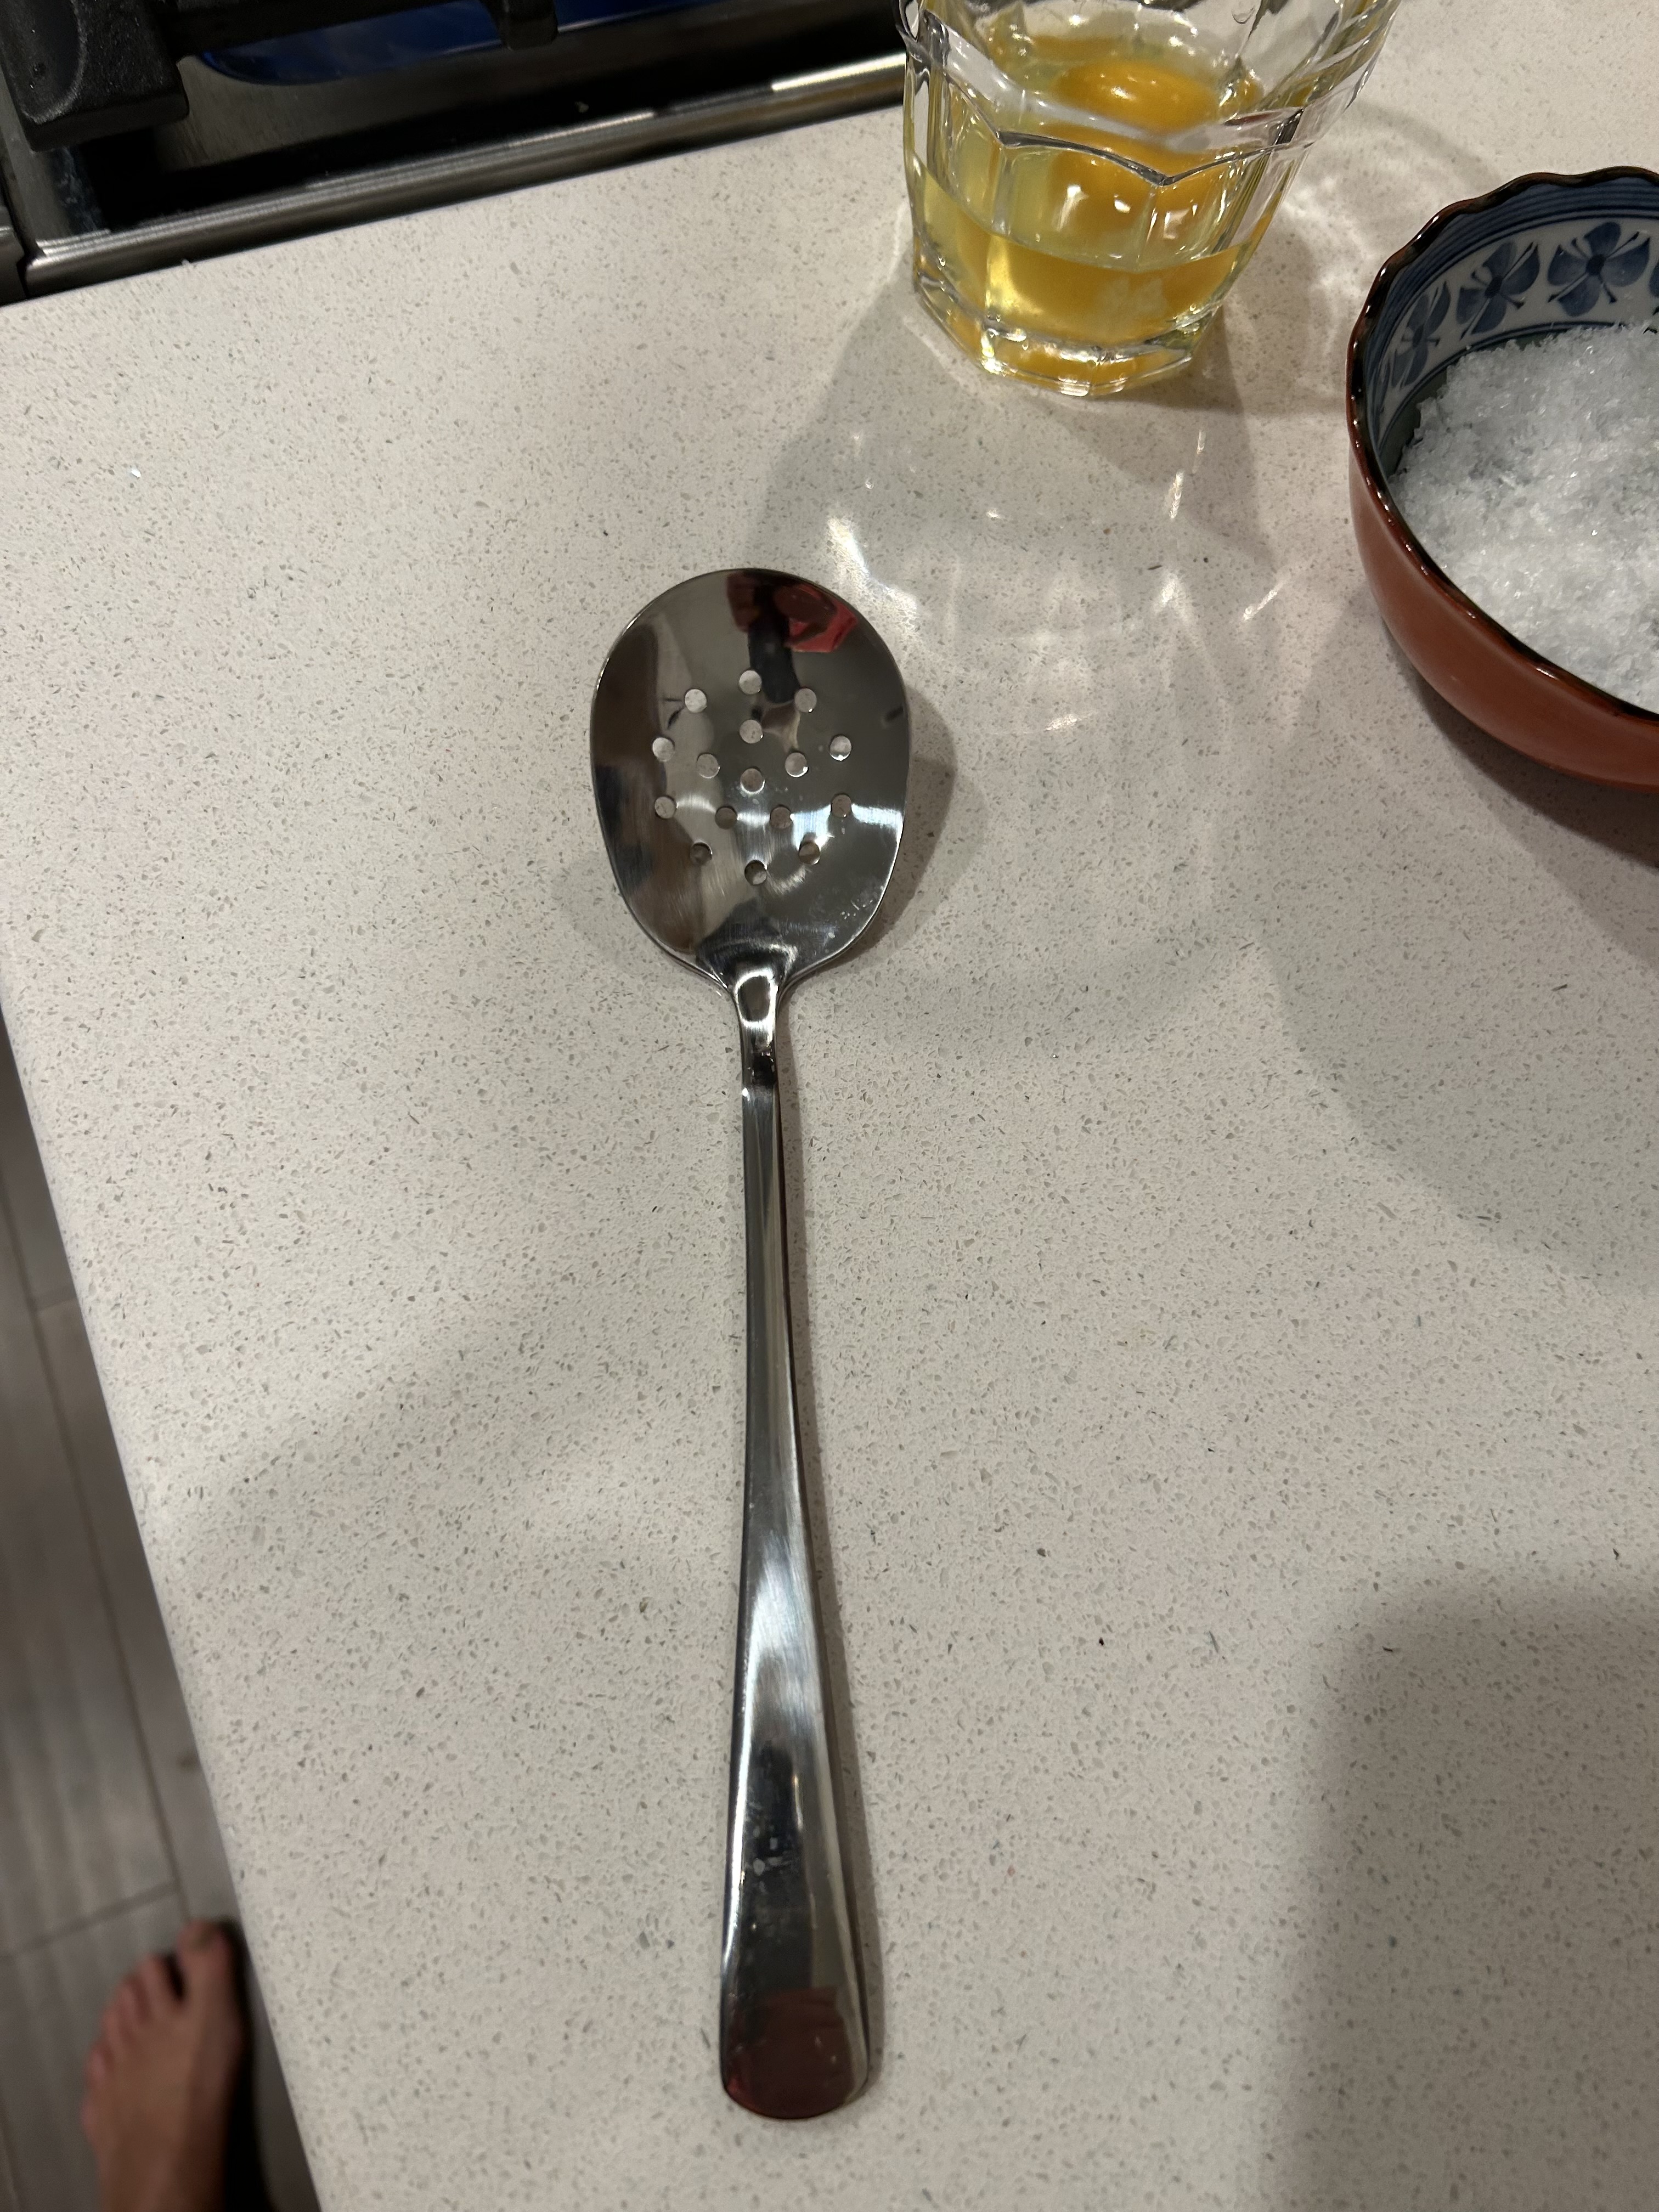
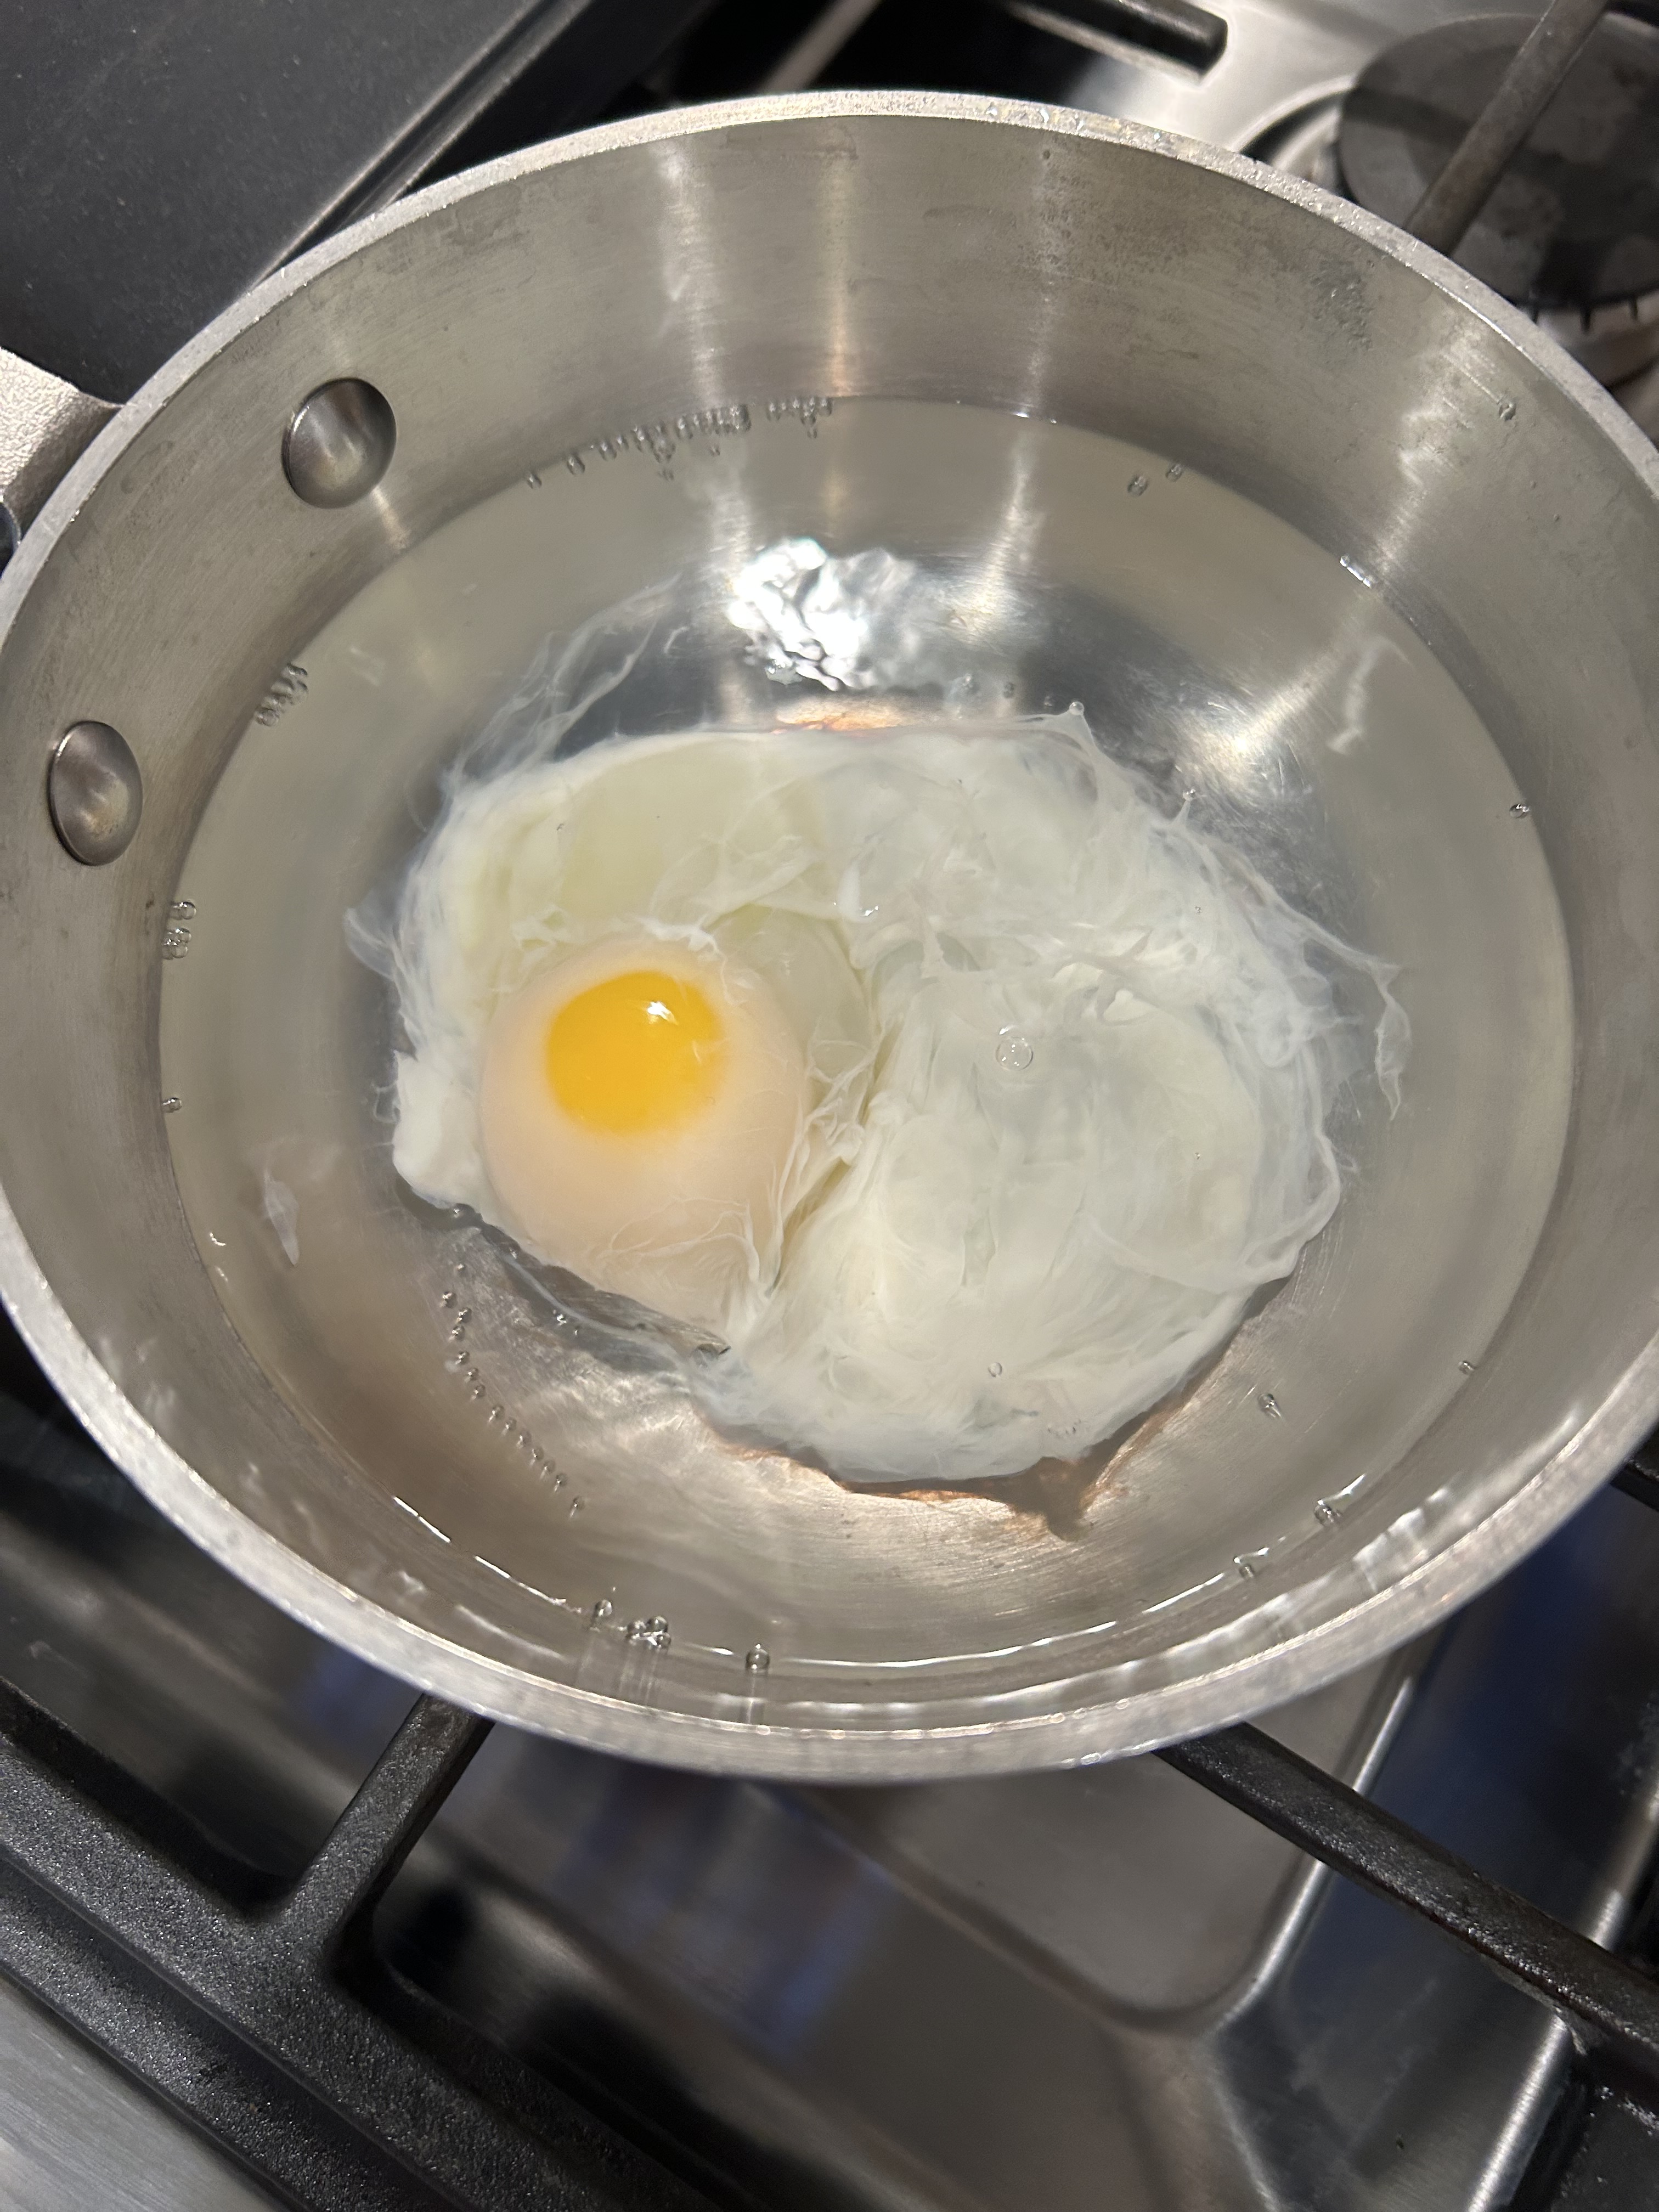
You need a regular, pot of water that you bring to a SIMMER ONLY. More than simmer makes the egg white come away from the egg. There should be no bubbles on the surface of the water. Some use a wide flat pan, especially with more than two eggs. The water has to be deep enough, so a wide flat pan might need a cover, with the heat turned off. (See the video below.)
And you need a utensil with holes to pick up the egg when it’s ready to your satisfaction. A flat spatula works well too.
Break your egg into a glass or a ramekin. Ramekins are shallower than this glass, but I just grabbed what was near. Use only one egg per glass/ramekin and don’t cook more than 4 at a time. You can reuse the same simmering water if you want more eggs.
Many add a teaspoon of WHITE vinegar to the water as it helps the whites stay put. I often don’t, but after looking at the video below, I’ll try the vinegar addition again.
Slide the egg gently, gently into the water. The video below uses a cover and a timer to cook the egg to soft boil–and turns off the heat. I just watch the egg so I can tell when it is done to the consistency I like. I can also spoon water over the top GENTLY if the top needs more heat. This pot is smaller; I would use a bigger pot for more eggs.
When done (either decided by eye or a covered pan with the heat turned off and a timer as in the video below), remove each egg gently. I like soft eggs with golden yolks that will run out on my salad. But harder boiled are lovely too.
I needed some protein for this supper salad, so the poached eggs were perfect. And, delicious.
And, this bit of easy cooking provided the bulk of two days of meals–given that I eat two meals a day: dinner at noon and something fairly light for supper at night.
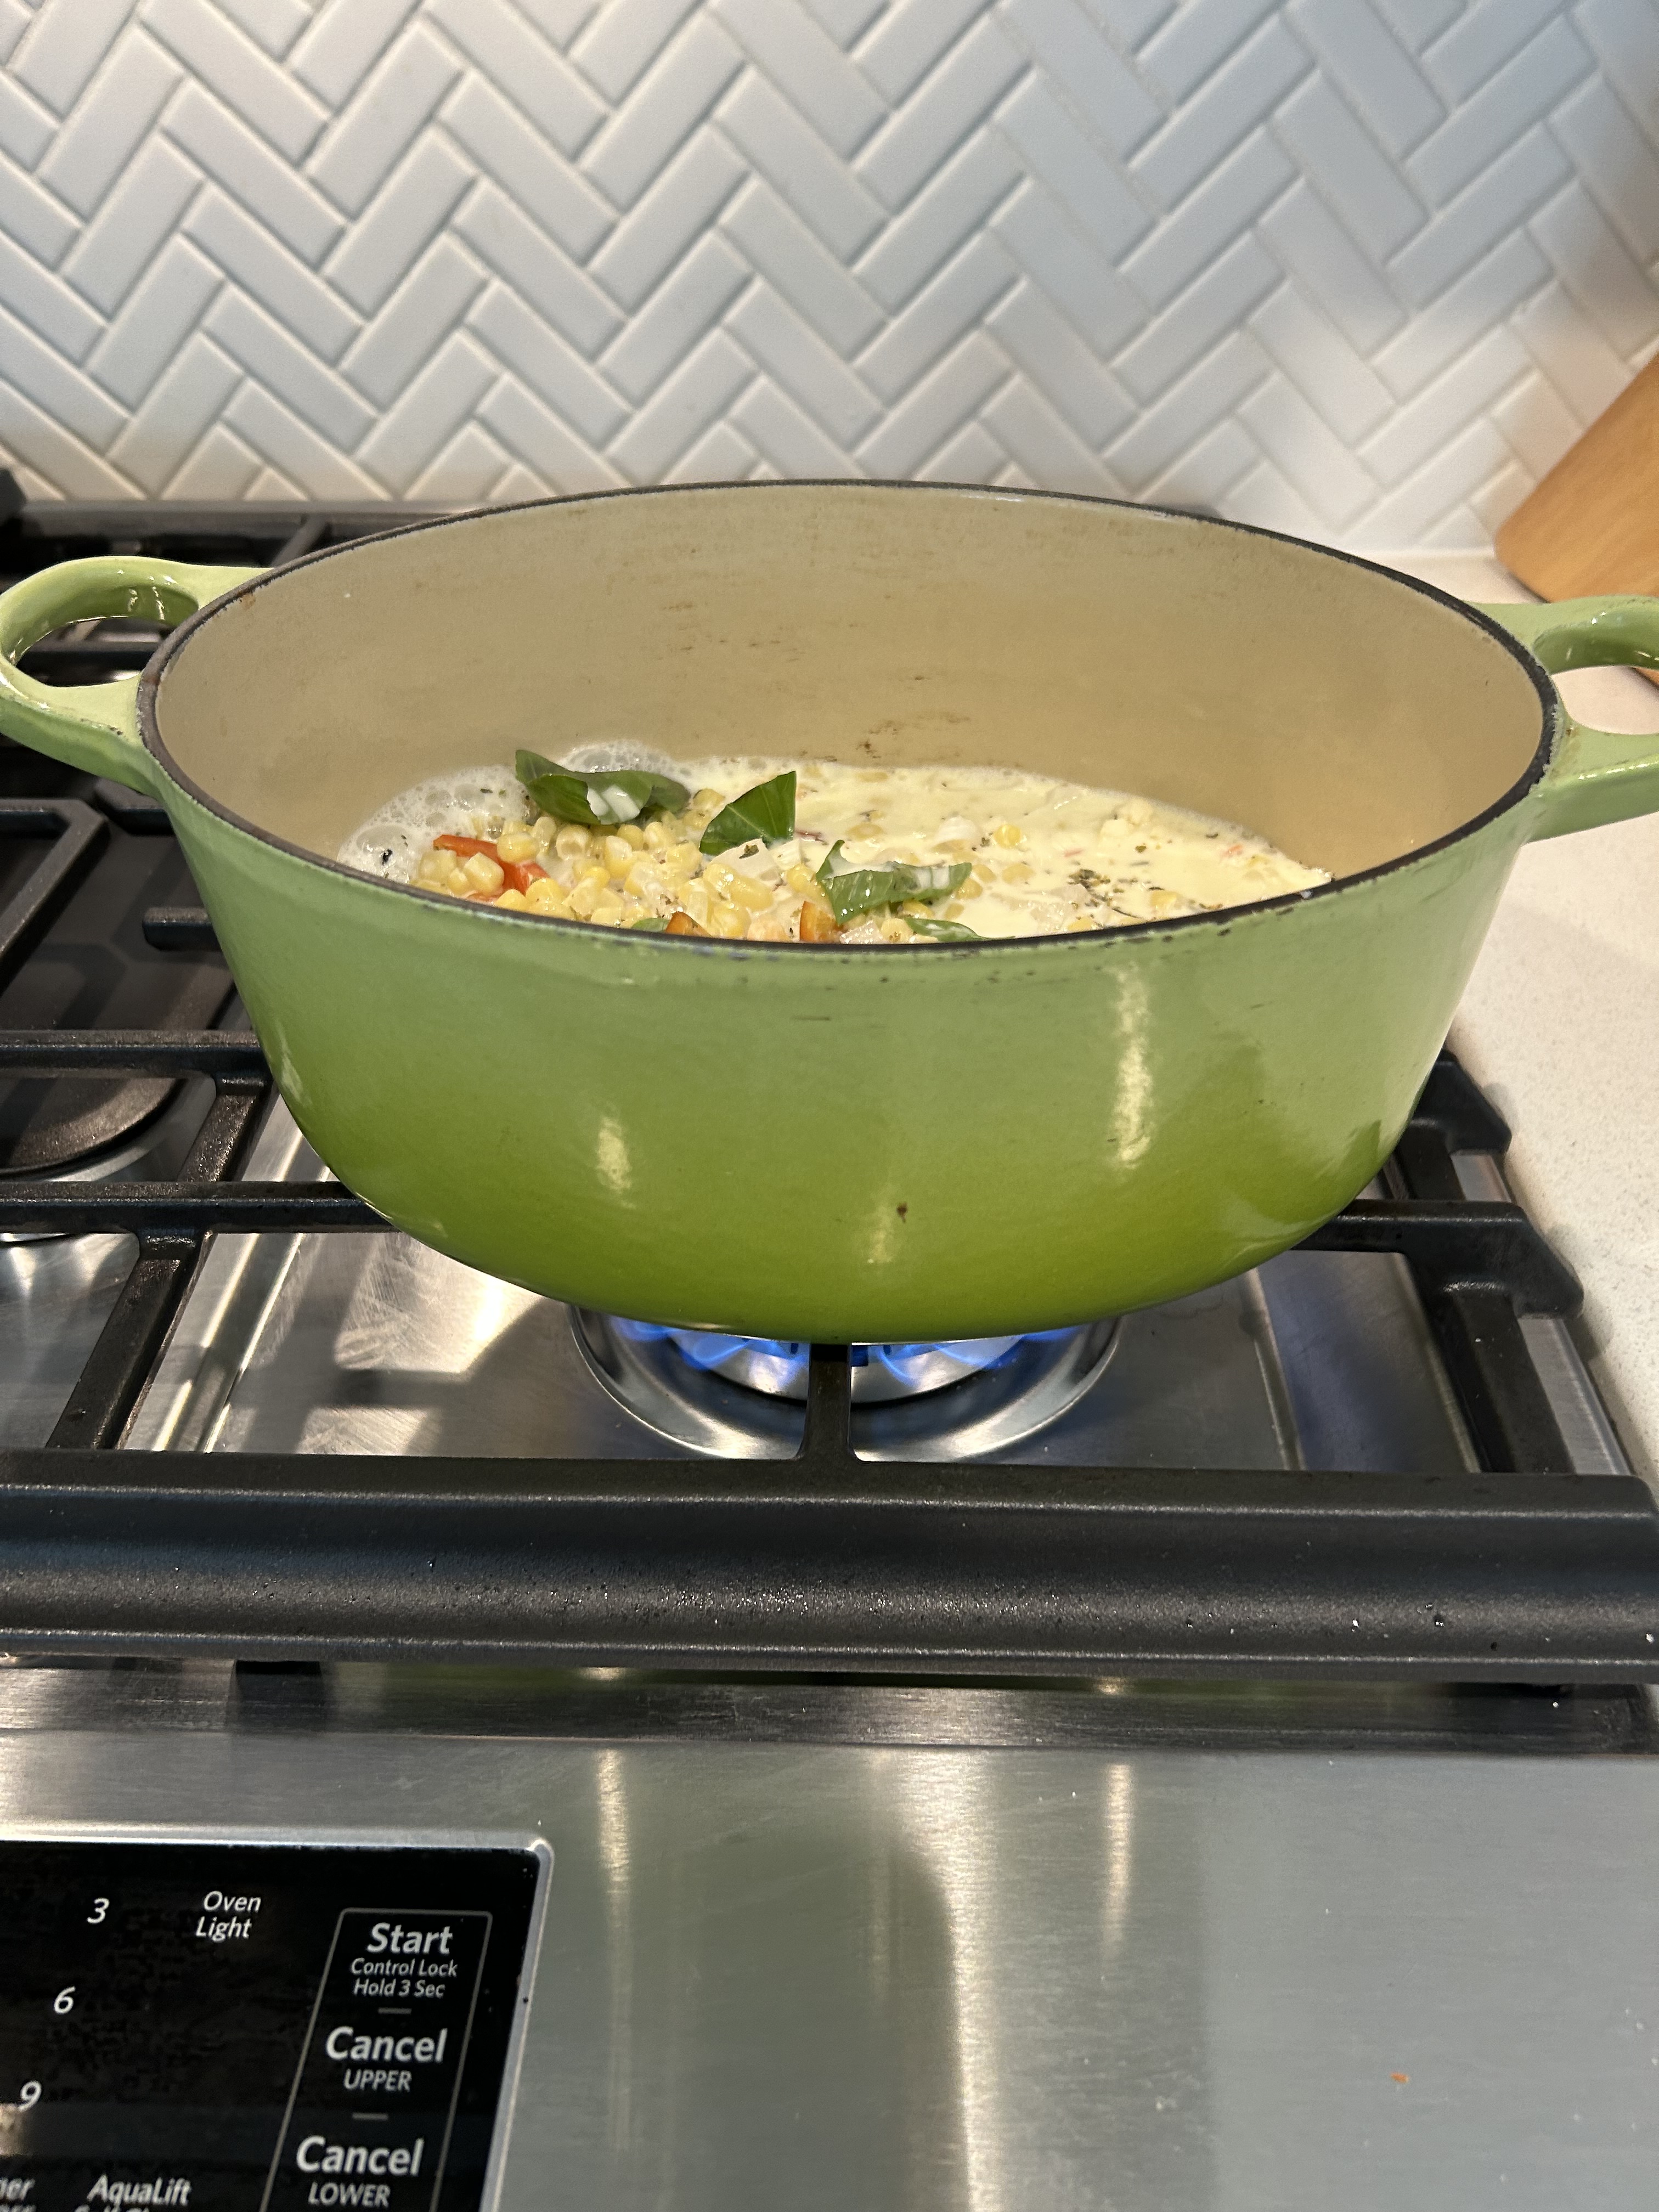
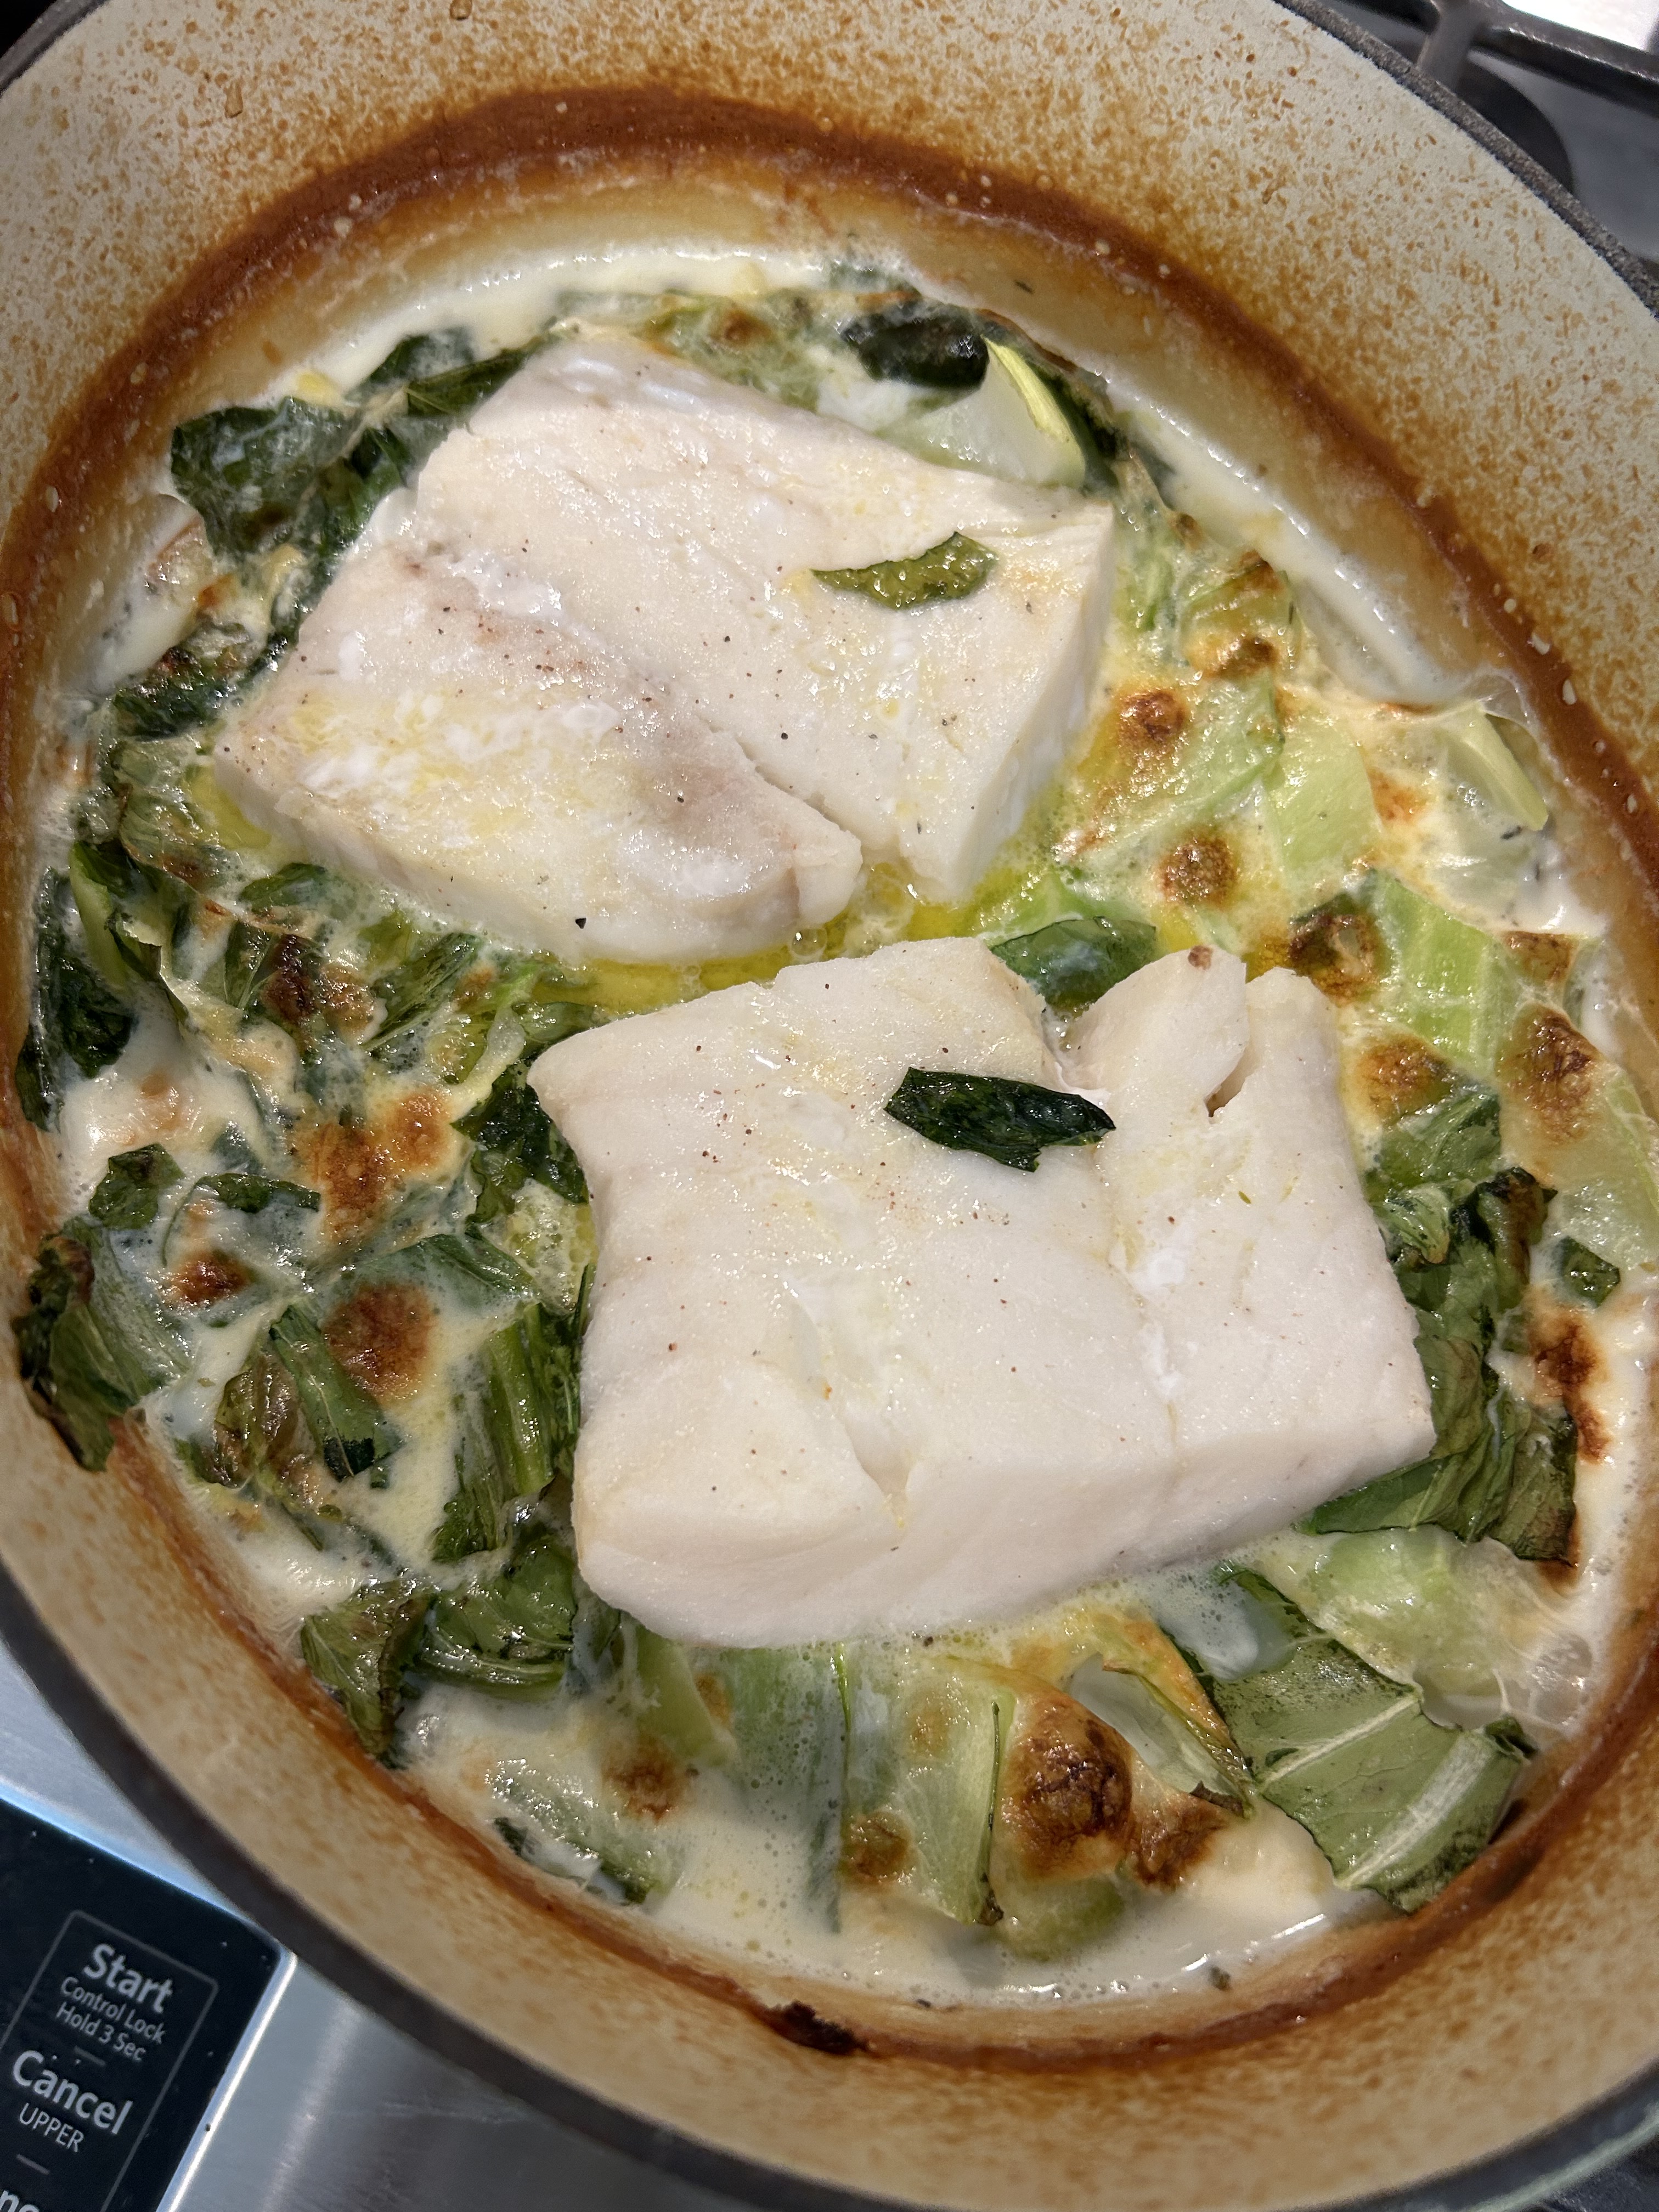
Yesterday I wanted fish–which I have not had for some time now. I keep frozen wild-caught fillets in the freezer. And this time I had cod, which I defrosted early in the morning. You can flash defrost meat by putting it on an iron of some type–I have a griddle I use, but a skillet would work too. Just make sure you regrease whatever you use before storing it again. Today I thought I’d use a deeper, heavier pan to make my dish.
I layered the bottom with two small unpeeled potatoes (a little bigger than eggs maybe) into the bottom of the pan–thinly sliced. I added some diced sweet onion, carrot, red pepper, and some frozen corn. Salt and basil from the garden went in on top of the raw whole milk.
I heated the pan on the stove until the mixture was bubbly and put it in the hot oven COVERED for 20 minutes.
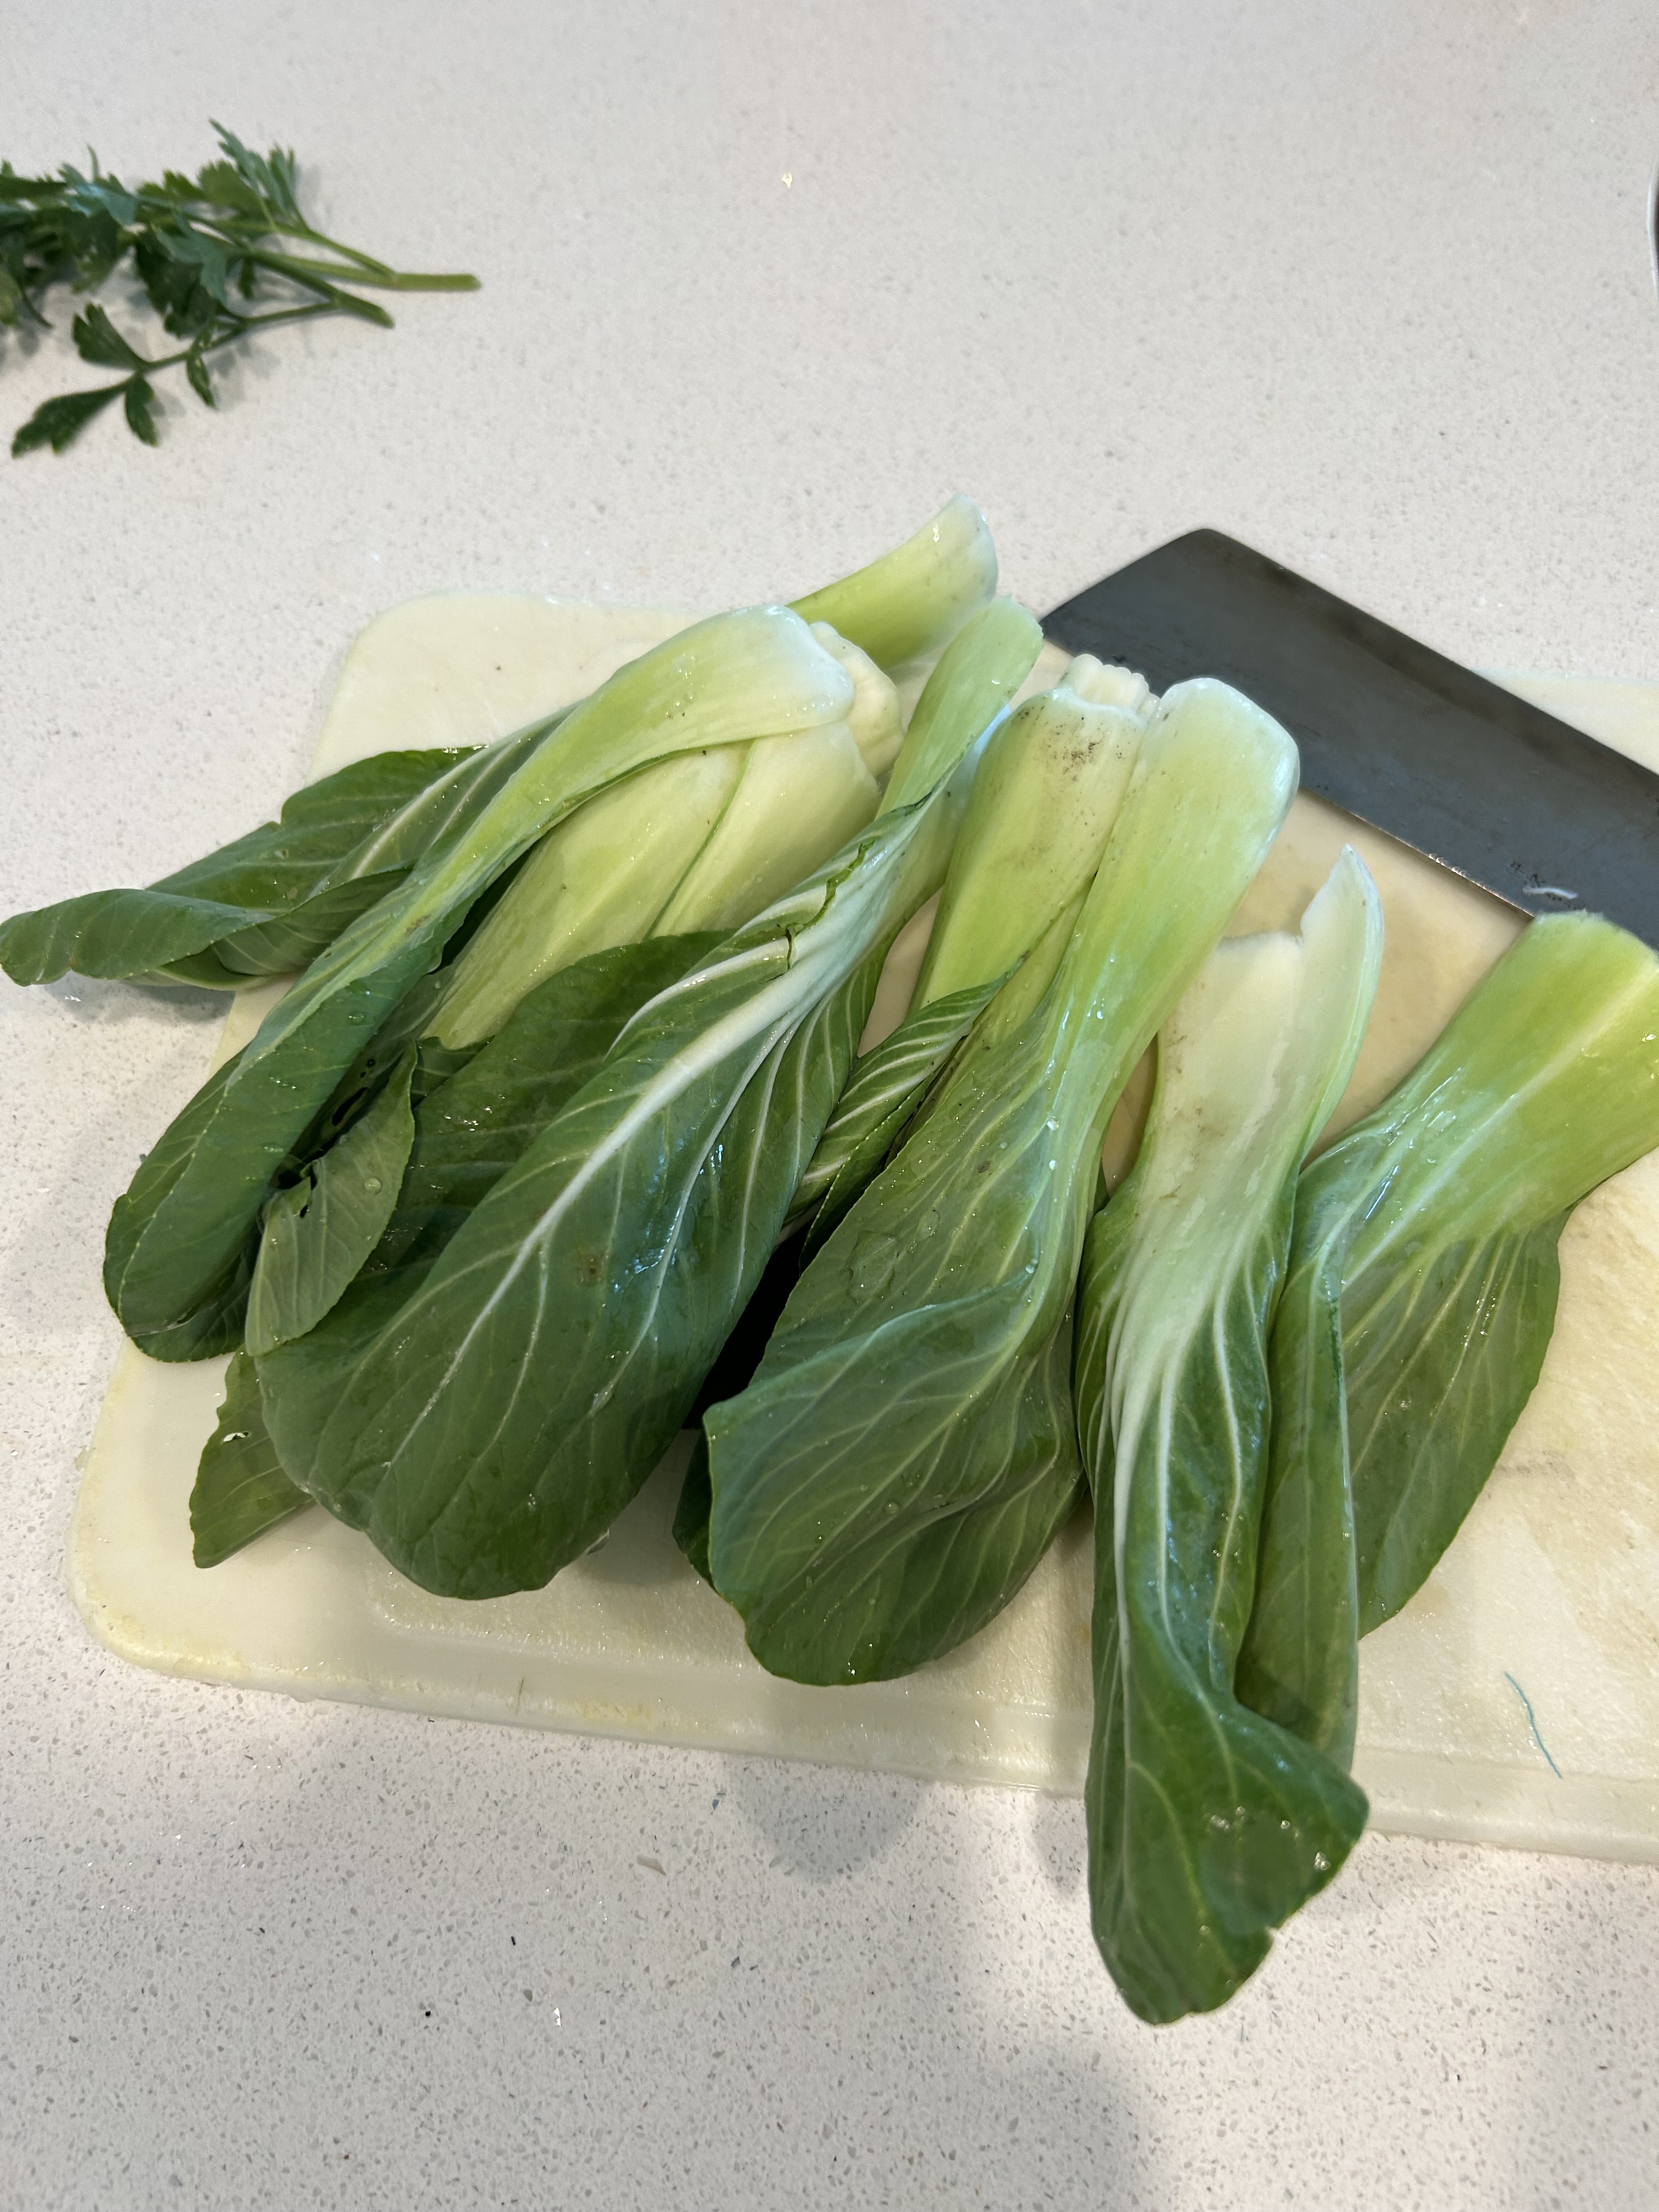
Meanwhile, I washed and chopped two baby bok choy. I love that vegetable and often flash stir fry it in a good fat with seasonings. I do not like it overcooked–the bigger stem pieces should be al dente.
I layered the bok choy on the top and put the fish fillets on top of the mixture. I added more salt and some butter on the fish. I covered the dish again and put it in the oven for 10 minutes and then uncovered it for 10 more minutes. My oven does not brown well, so I broiled the dish for about 5 minutes–keeping a close eye on it so I didn’t burn it. I wanted a little color, that’s all. The fish were done.
This method proved to be a great way to add fresh greens to a dish–and now I’m wondering about adding frozen broccoli crowns at this step.
I topped my dish with chopped parsley from the garden. And, yum!
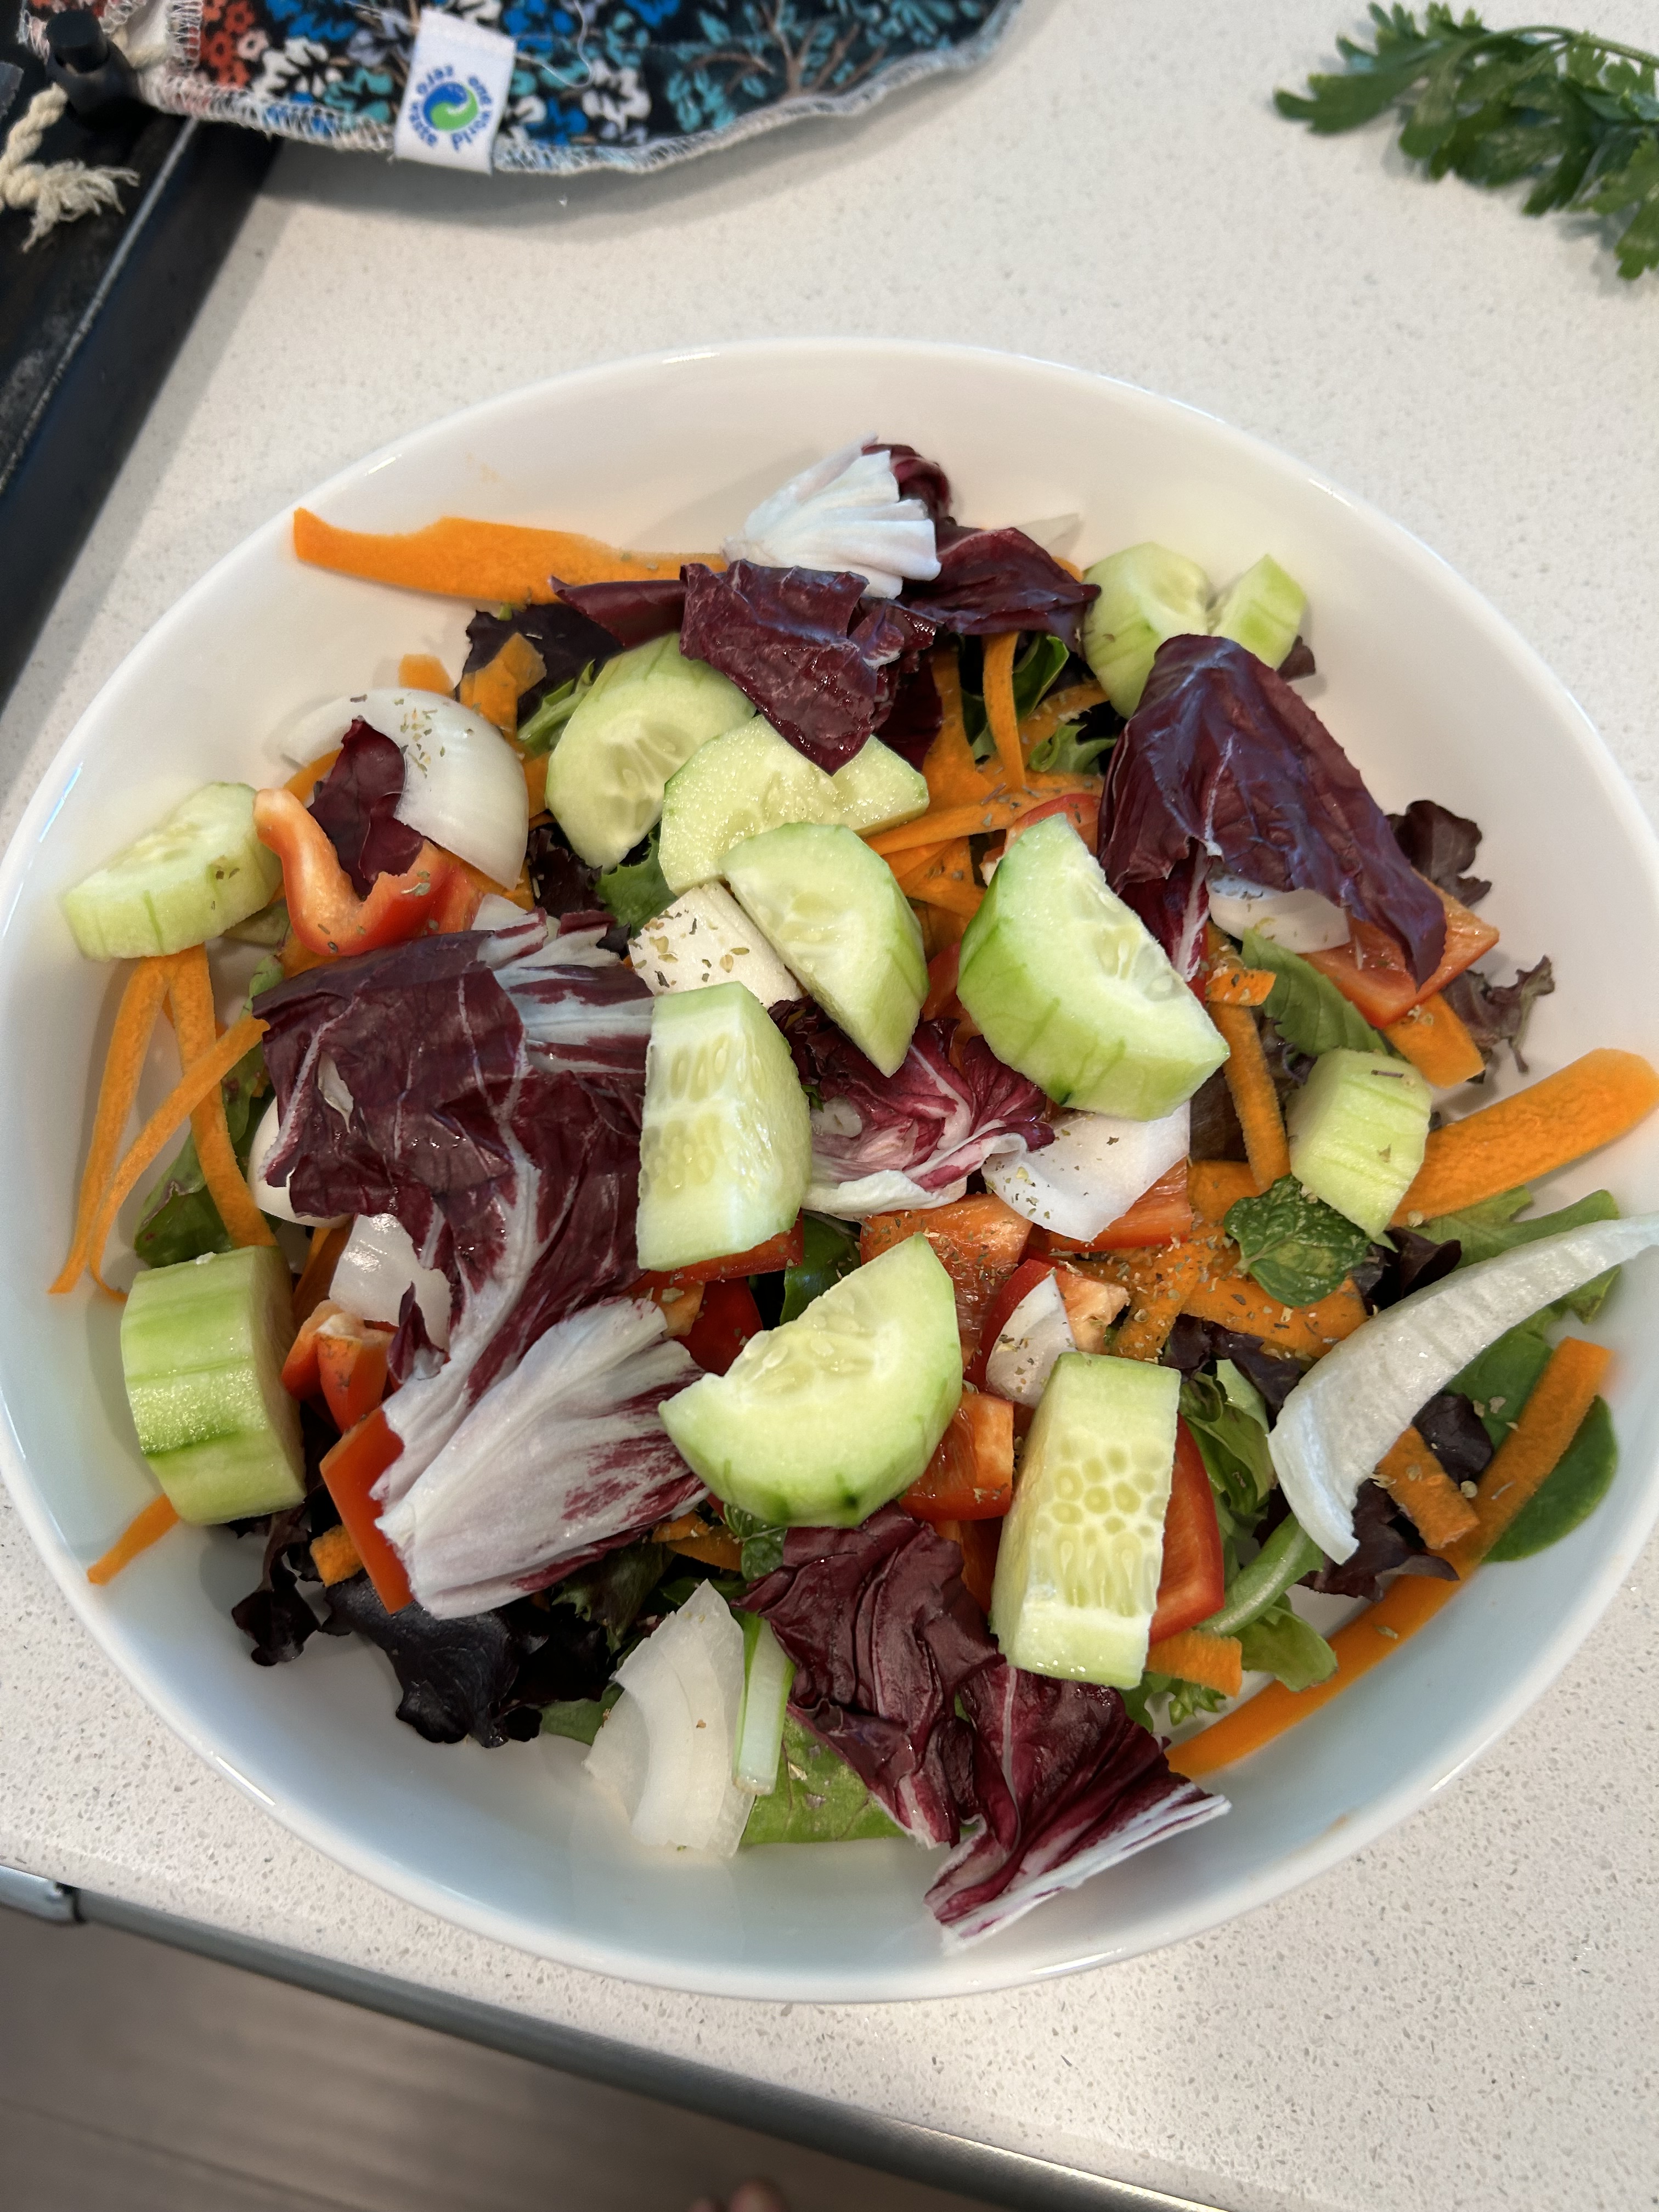
While the fish was cooking, I put together a salad for supper. I could either top it with the other piece of fish or add some other protein. If I used the fish, I’d still have a nice chowder to eat–and I could always defrost another cod fillet and bake it for the salad or the chowder.
I wasn’t terribly hungry after the large and rich dinner at noon, so I just soft boiled some eggs in a pan of water–yes, I’ll do a future post on how I do this quick and easy task. These poached eggs are velvety soft, and you can make them as hard or soft as you like.
For dinner today, I’ll have the rest of my fish dish. But there is a lot of the “soup” to eat, so I’ll save some and add it to a soup I took from the freezer to have for supper. I’m always happy to have “assets” in my refrigerator or freezer. I’ll cut up an apple at supper to have something sweet.
And tomorrow I’ll need to visit the grocery store for more fresh veggies and fruits. But NOT today. Today is mine to enjoy without tasks I need to do.
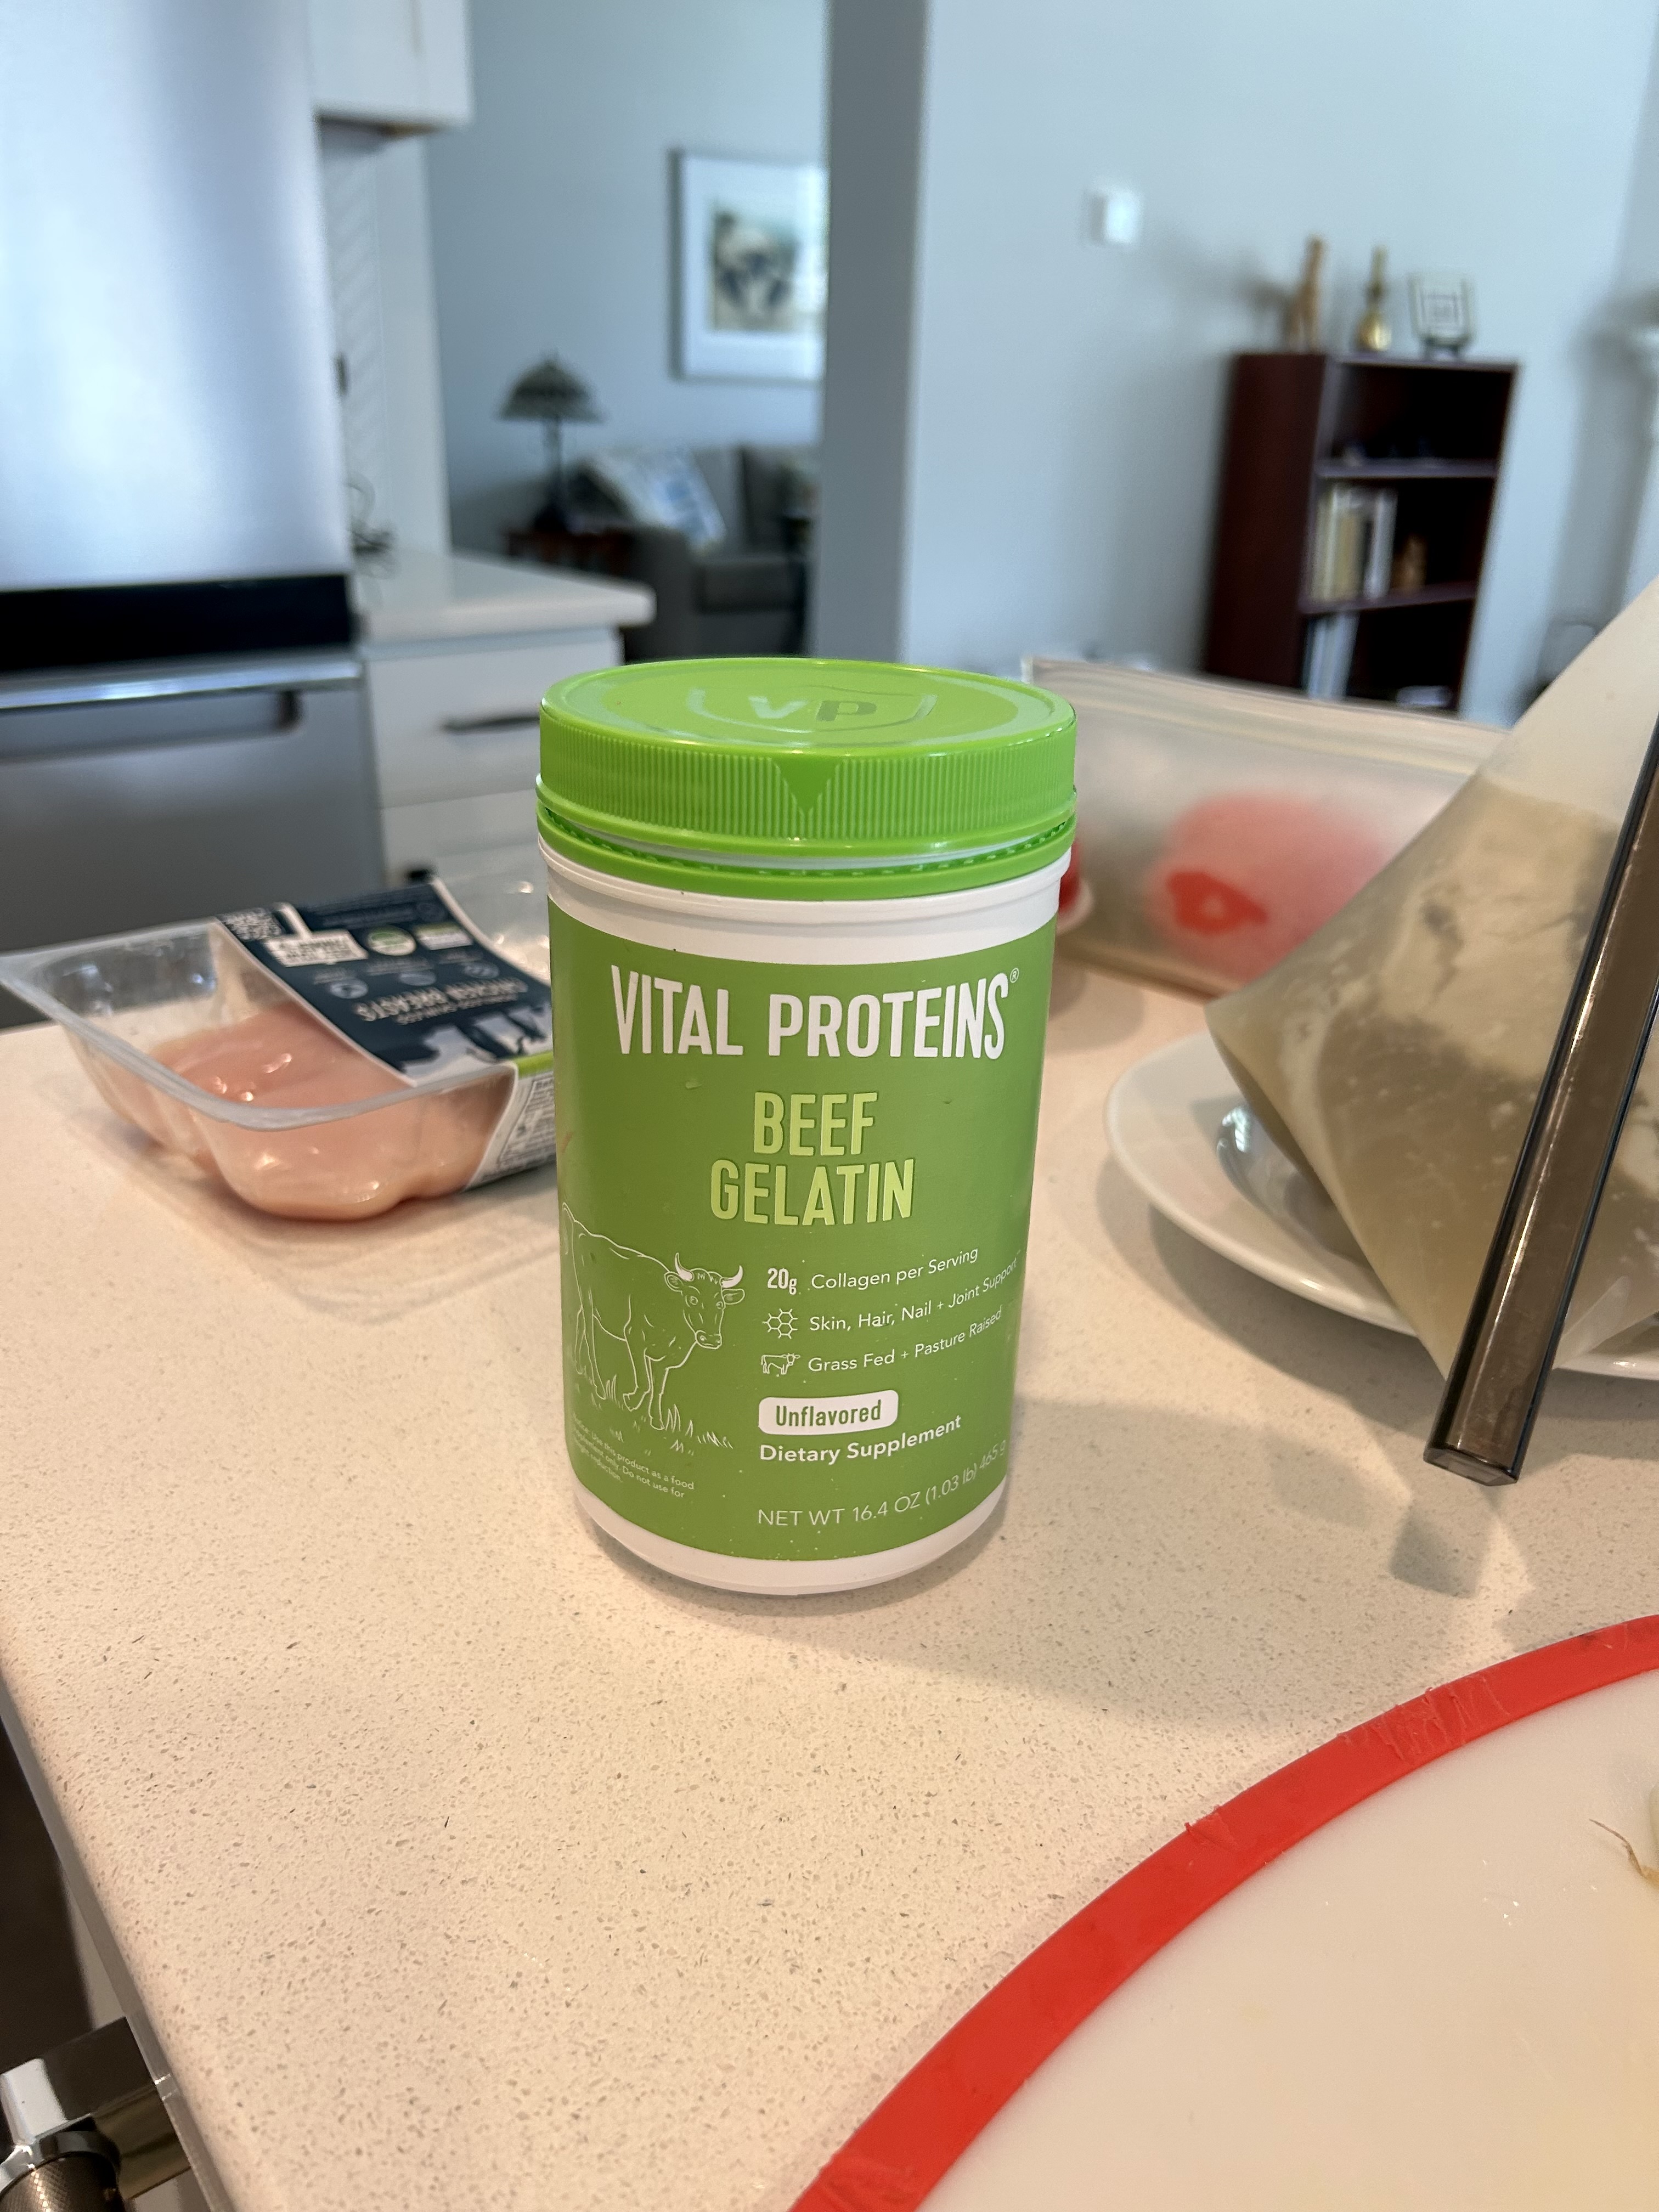
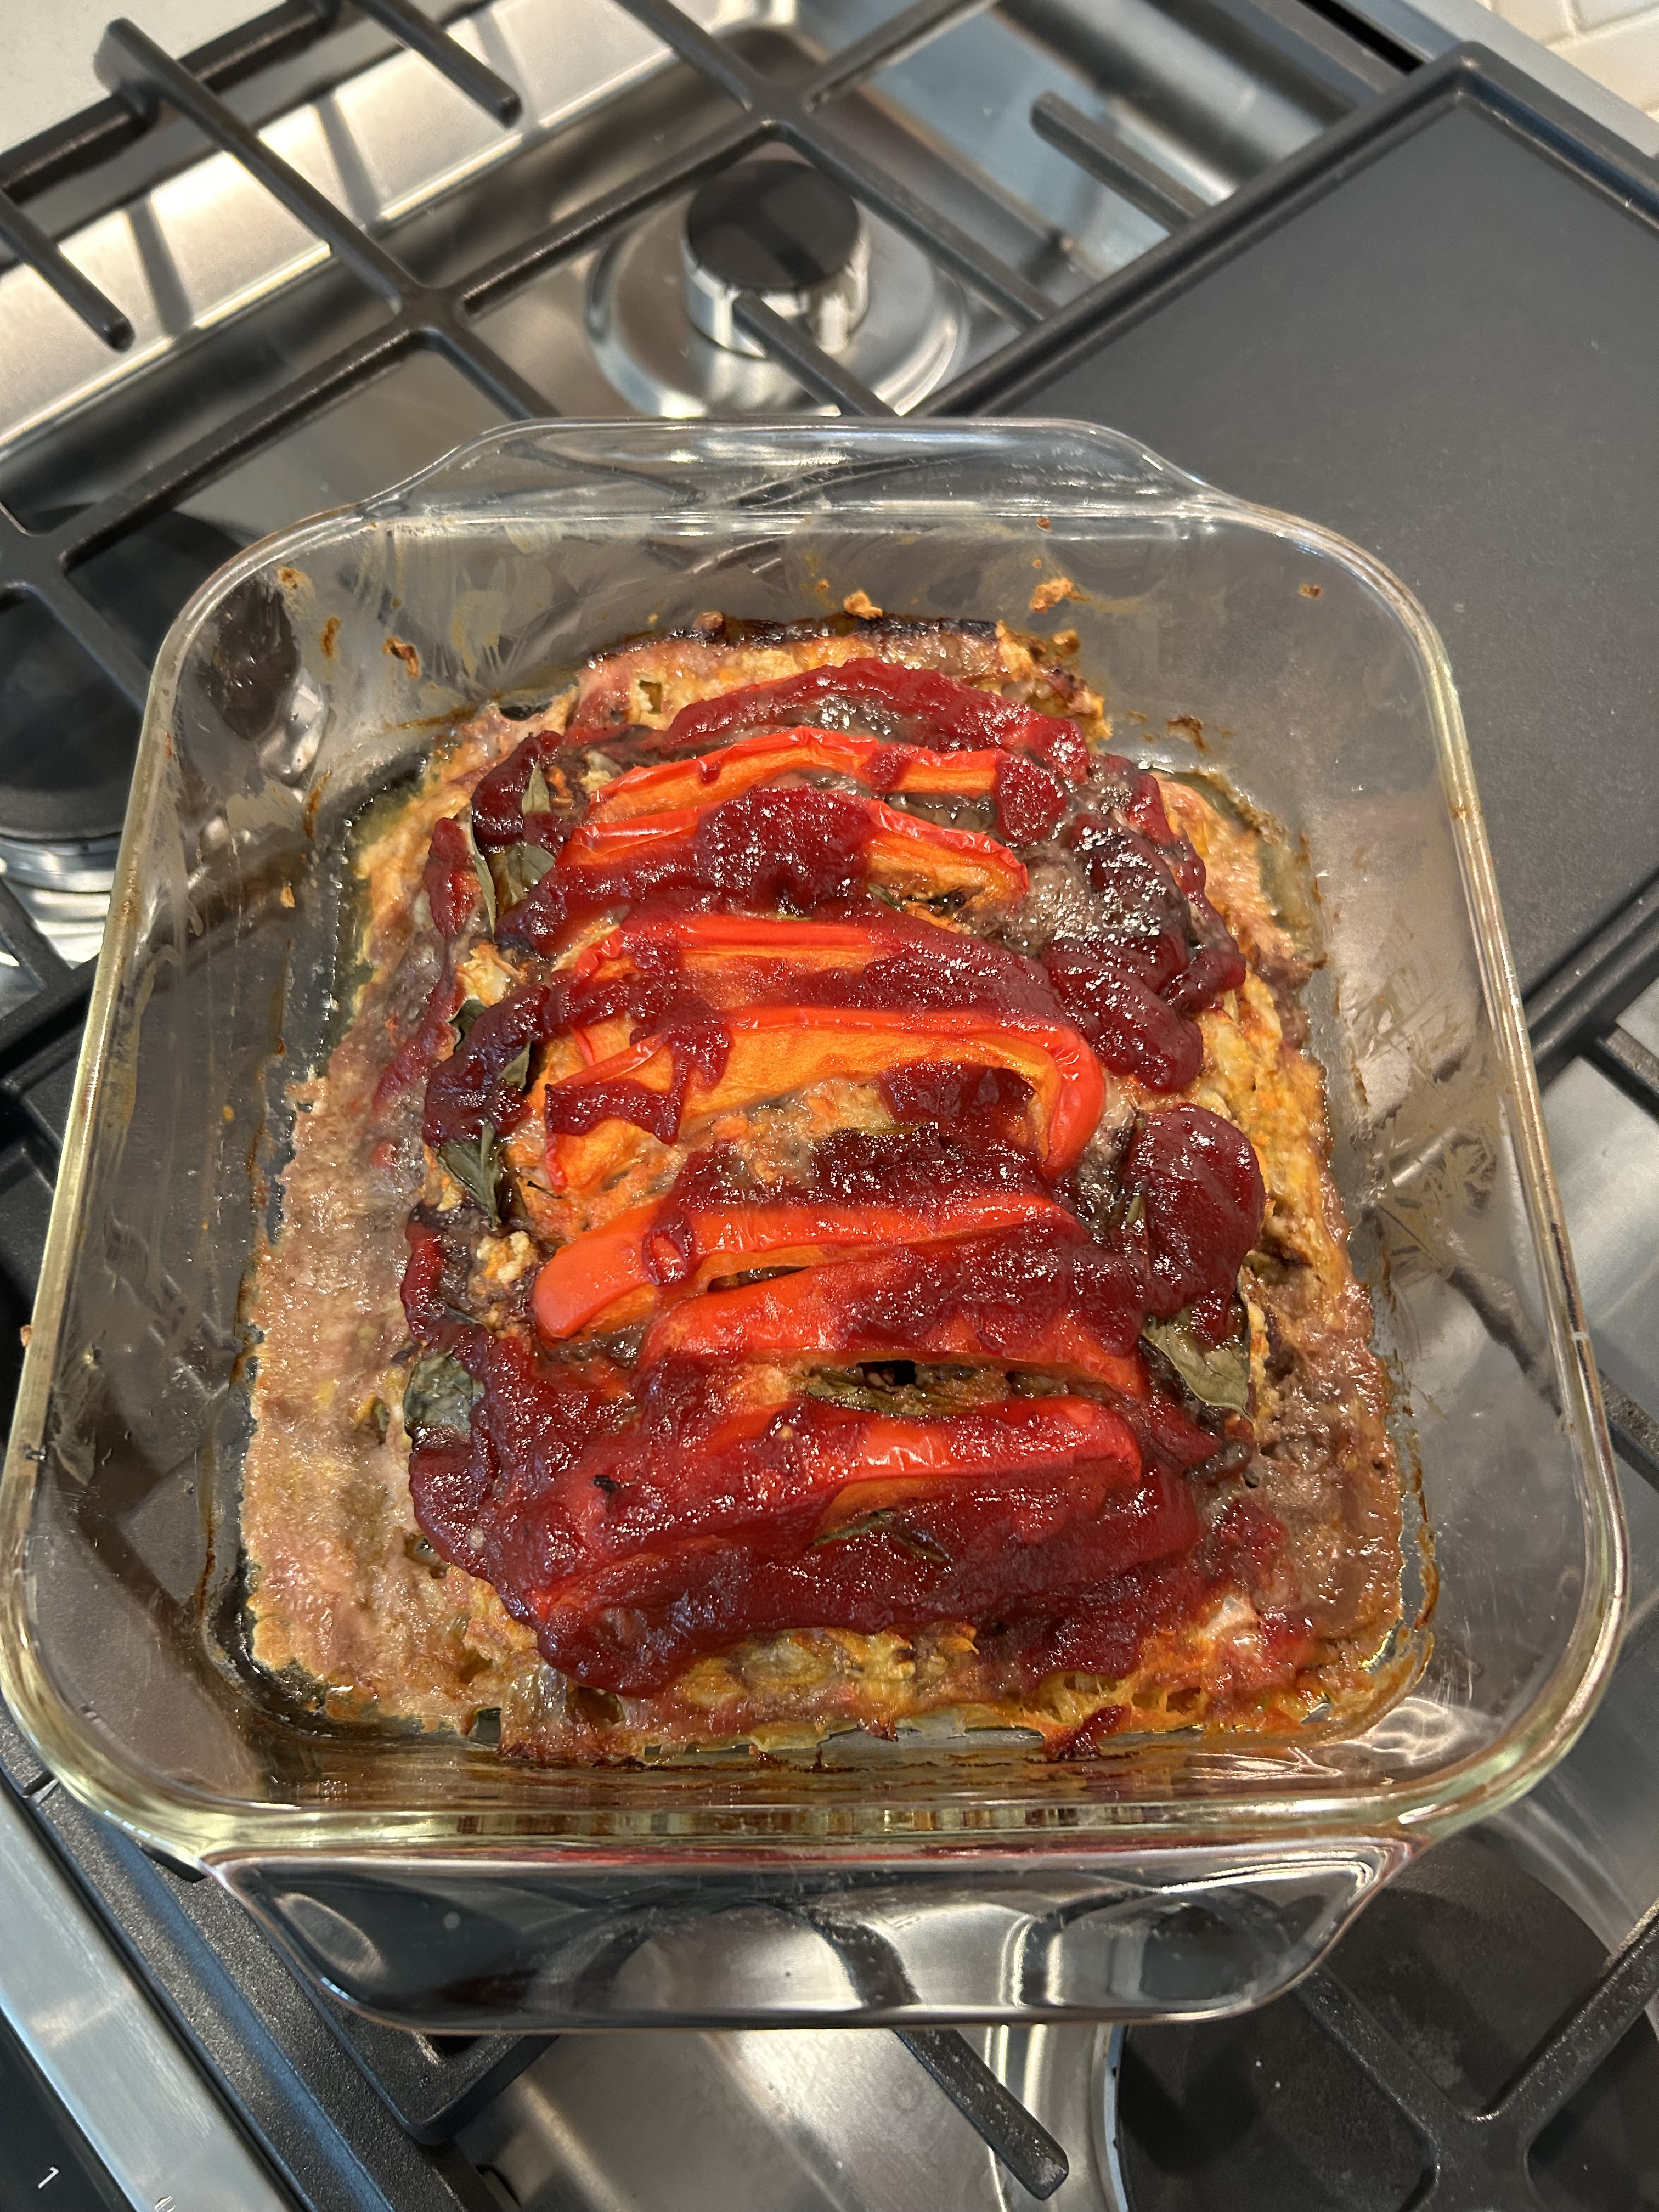
I am always looking for ways to use my beef gelatin.
Why not add just a tiny bit to the meatloaf I was making?
I’ve blogged about my basic meat loaf recipe many times now, probably, LOL, more than many want to read about again. But for the moment, I can’t find the last time I wrote about making meatloaf. Basically, I use ground hamburger or bison, to which I add an egg, some oatmeal, some good fat if the meat is too lean, some cream sometimes, some grated veggie (carrot, zucchini), some chopped onion, some cheese (mozzarella for me), some herbs, and salt.
I just sprinkled about a teaspoon or less of the gelatin over the egg and cream before I added all the other ingredients–so the gelatin would soften.
You all know that I cook with what I have on hand for the most part. This time I had half of a red pepper and some fresh basil from the garden.
I added some Annie’s Ketchup to the top as it is the only ketchup I can find that has a few ingredients. Ketchup is the closest I can get to tomatoes these days. I use it only on meatloaf and don’t add it too often.
Yummy!
The gelatin added a nice texture–but no flavor as it is flavorless. When cold, the loaf is very firm.
This one is a win-win.
*I don’t use ground chicken as these days it has added spices I can’t eat. Probably ground turkey does too, but I’m not sure about ground turkey anyway. Experimentation is often not a good idea for me, so…why mess with what is working and working well.
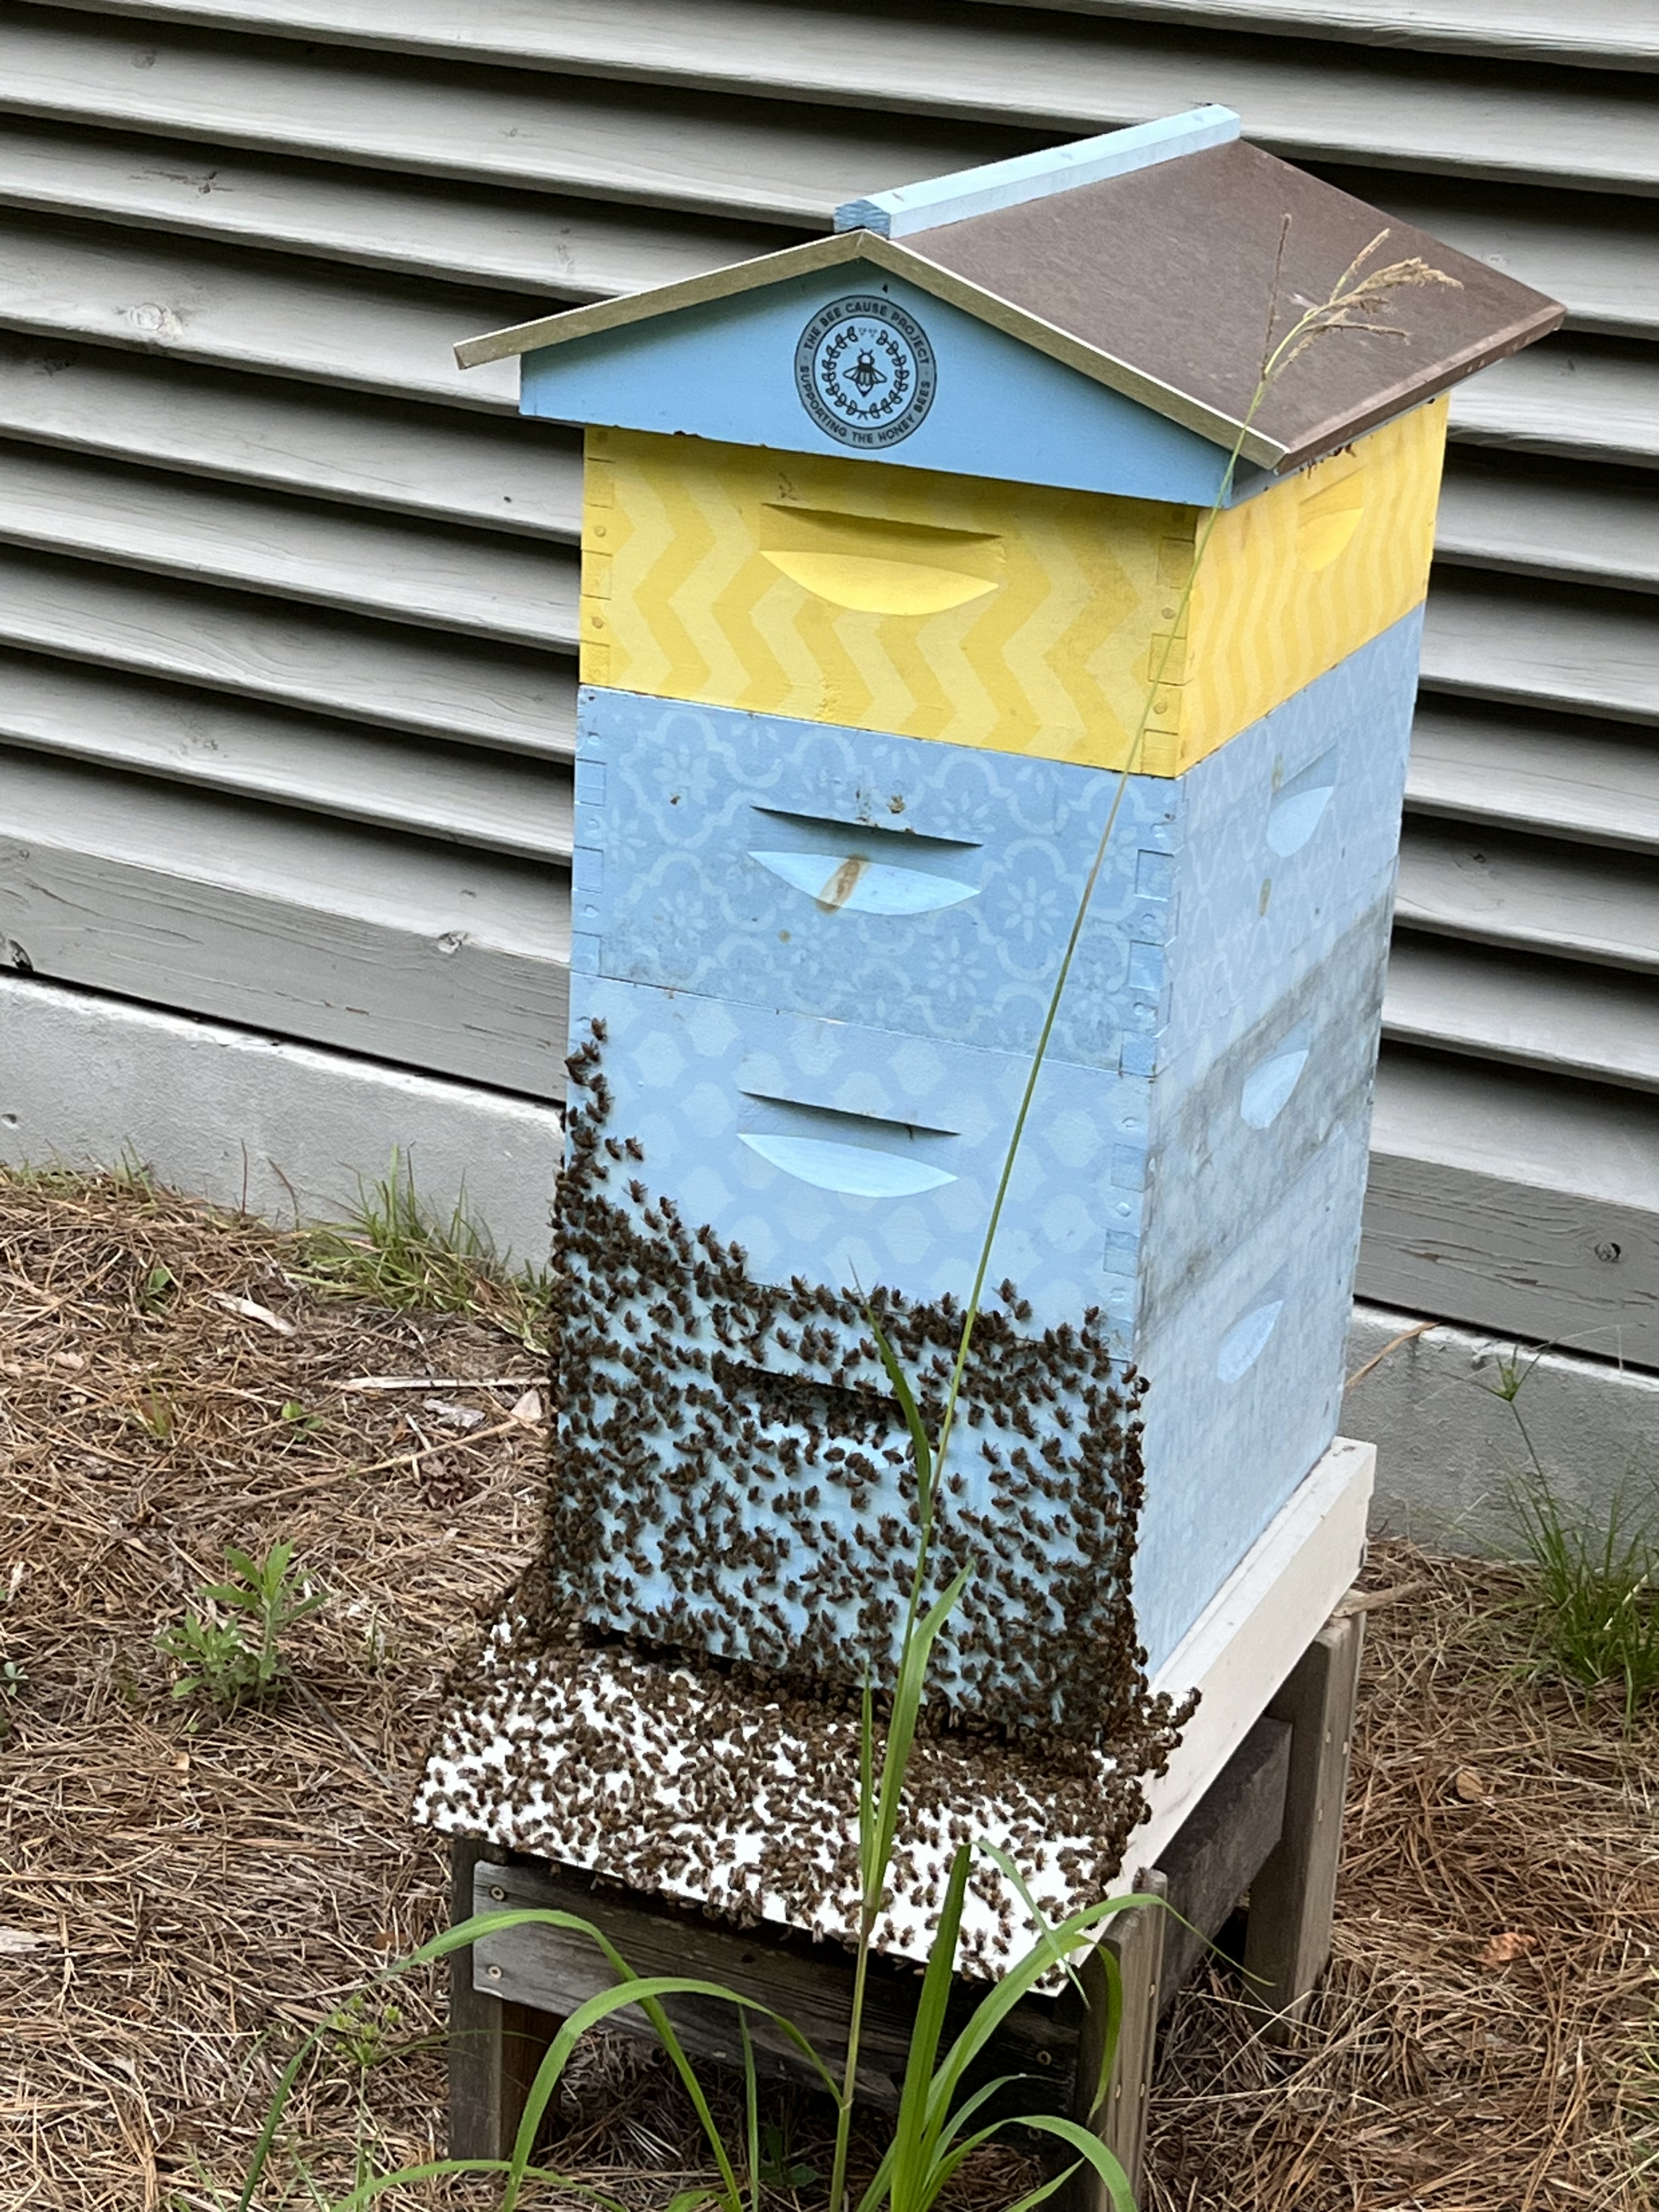
Daughter-in-Law Tami showed me this video of the hive in her back yard recently. And I saw the hive for myself last Sunday.
I’m really interested because I’m going to get some of the honey from this hive in the near future, yes, but also because beekeeping is a very big practice in my family and in this area.
Tami told me that some of the bees are outside the box for a variety of reasons: it’s hot and humid here now with temps in the mid to high 90s, the bees might be contemplating a swarm from the hive, and/or it is crowded inside the hive as there are now a lot of bees. The presence of bees outside the hive is called “bearding.”
Tami also said that it is very normal for bees in a hive that is this healthy to create a swarm and that beekeepers should let them carry out that intention if the bees want to swarm. Reducing the size of the hive by some bees swarming gives the remaining bees a chance to rest. It also gives them time to clear out the mites that can and do infest a hive. Mites, Tami, said are the number one danger to a bee hive. Mites set up and live in the empty little wax hexagon cells the bees have just created to store their honey.
There are FIVE “supers” (the narrow upper drawers) on this hive, which means that there are a lot of bees involved and that they have had to work hard to try to fill up each drawer as it is installed. She will harvest three drawers in the near future, especially if the bees swarm, as that will leave less real estate at mid-summer for the bees to try to fill with honey. The bees will need two supers of honey for the winter–more than that means they have to keep a lot of the hive warm all winter, which is also hard on the bees who need to rest in the winter.
Here’s the hive earlier in the year with three supers installed. The bottom thicker box is the brood box where the queen lives. (I think that’s right.)
Here’s a very bad picture of Tami. She is the co-founder and director of The Bee Cause, an organization that strives to preserve bees and to educate people about bees. The Bee Cause now also tries to educate people about the natural world and how humans interact and are impacted by the natural world–which includes the destruction of natural habitats. Bees, for instance, alongside other pollinators, pollinate most of the plant crops that humans rely on for food. If bees and other pollinators are killed by human practices, the end result will be a huge loss of the foods that humans need.
Here’s some recent honey from a beekeeper who works closely with Tami. This honey is the honey that I keep on hand all the time.
Honey is also a wonderful medicinal–both to eat and to use for wounds. But that is a tale for another day. And honey does not really go bad and can remain viable for thousands of years.
Honey and some maple syrup are my only sweetners.
And now you can understand that I am trying to do my part by planting plants that bloom and, therefore, nurture pollinators. And, also, why I am trying to create a healthy habitat around my house, as with the use of pine straw bedding that provides a home for many creatures and hand-weeding my new sodded grass until it gains enough purchase to thrive on its own–which it now has.
Finally, perhaps you can understand also why I am very sad at the amount of chemical use taking place in my new neighborhood and in this region–herbicides for the grass and “weeds” and insecticides for “the bugs.” Note that spraying Round-Up (glysophate) for weed control is very dangerous for people. We know that now. The data is very clear now. And indescriminate spraying for mosquitoes kills ALL the insects, bees included.
I am not against judicious use of chemicals when needed around a house. Chemicals that kill termites, for instance, can be put around the foundations or into traps set near a house’s foundation. And inside baiting for roaches is confined to specific spots. In Maine, we had to solve an infestation of carpenter ants and…ick…bedbugs brought in on our luggage. Both solutions were chemical.
The natural world has a power of its own, you know. And we violate it at our own peril. We are, perhaps, a self-solving problem for the natural world.
Flank steak may be most favorite beef cut. It just has awesome flavor and is tender to eat. And, I don’t know, but there seem to be more of them in stores in the summer than the winter.
Yes, I like rare meat. More of the nutrients are preserved in rare meat than well done, and it is way more tender. You want to cut flank steak on an angle and in thin slices.
Store extra slices with the juice added to keep them from drying out. You can reheat them if you like by putting them into a heated oven and turning off the heat–let them sit, with juice, for about 5 minutes. You could cover them lightly.
Or, you can eat the meat cold.
Red meat is the only place one gets vitamin B12 IN A FORM THE BODY CAN USE. Red meat has been terribly demonized in the past few decades. Yes, CAFO meat has problems–but grass fed beef is more and more available in local grocery stores. Or from small farmers. I just do the best I can and sometimes just buy…a flank steak.
And, remember that lamb is a red meat. And, bison.
PS: that wooden cutting board was a wedding gift in 1966. I just wash it with soap and hand dry it after use.
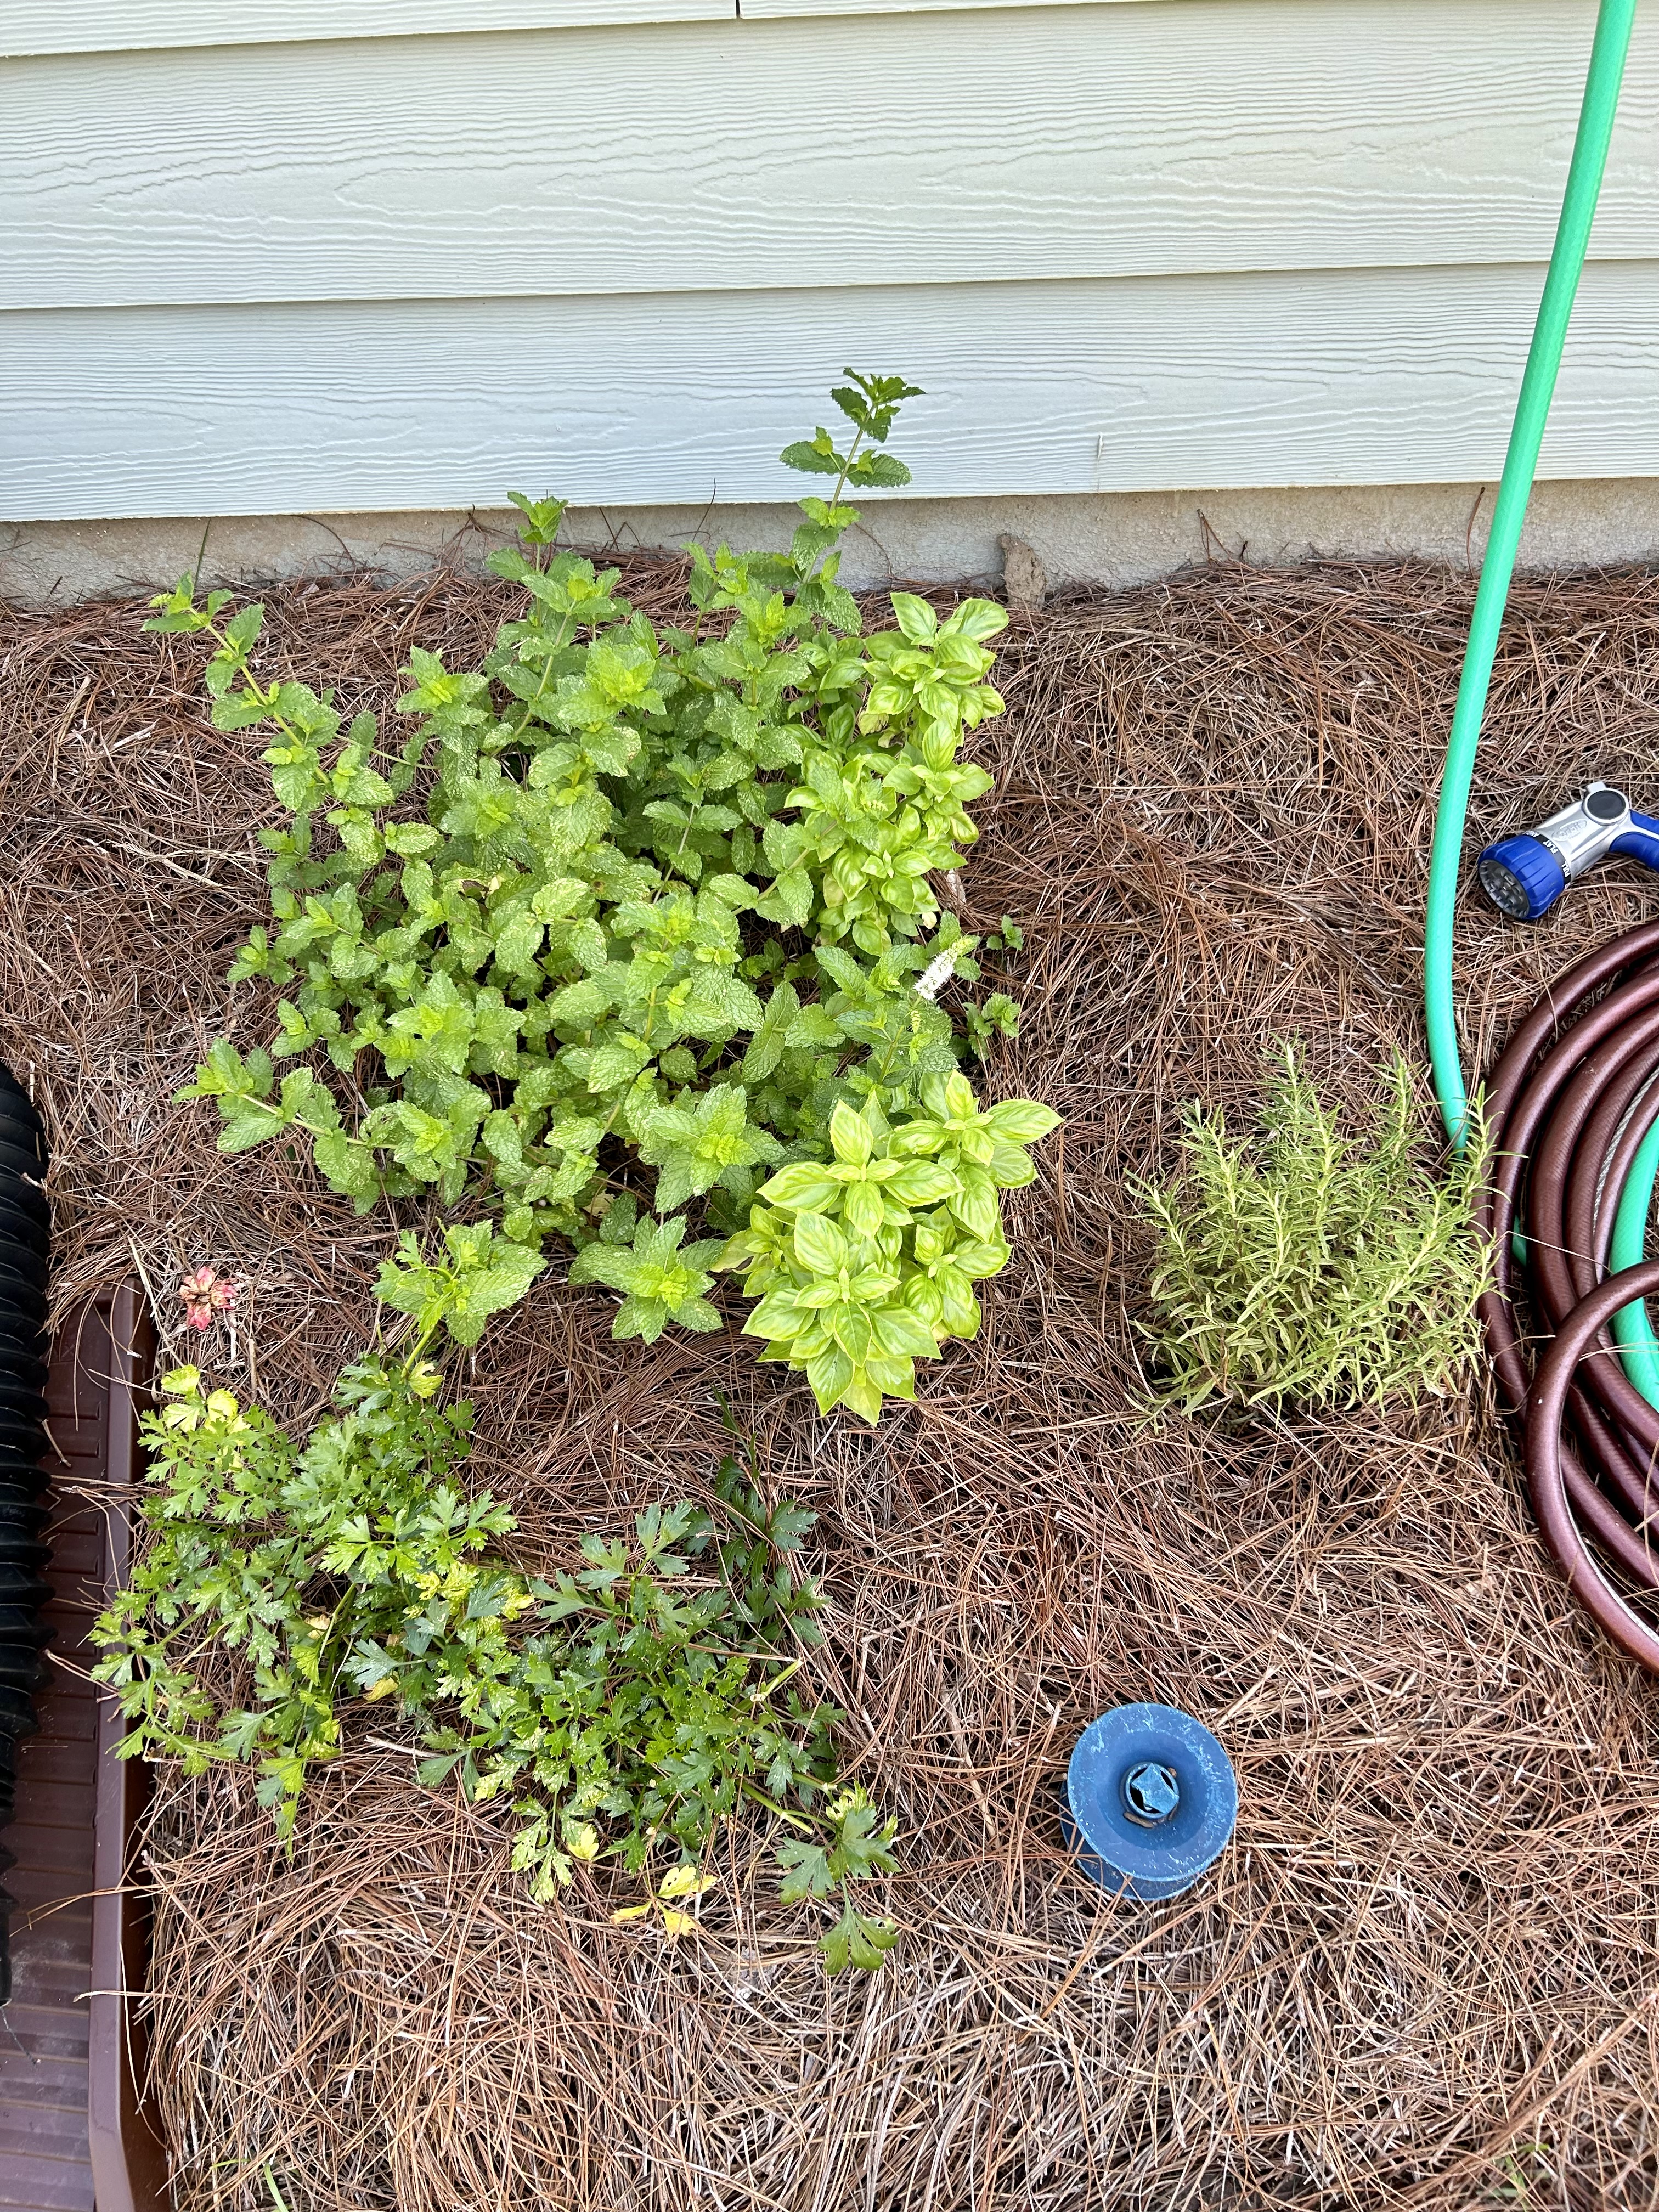
The first thing I planted when I got here was herbs.
The herbs are thriving!
In the bed by the screen door, I have rosemary, sage, two kinds of thyme, chives, and lavender.
I purchase fresh dill at the local grocery store–and it lasts for a good 10 days. Dill is harder to grow (for me anyway) for some reason.
I just moved the three rosemary plants from the big container on the porch to the outside as I thought they needed actual dirt.
The mint, basil, Italian parsley, and now one of the rosemary plants are around by the back hose–where it is easy to give them water. The yellow leaves are an indication that they need water and less heat. (It was 102 on my screened porch late yesterday afternoon.)
My grandmother’s mint is growing well on the other side of the house–at the end of the long bed there in a spot that is sunny for most of the day. It’s happy there.
I can’t imagine cooking without fresh herbs, especially in the summer.
A friend sent me this article about plants that repel bugs. I was amazed at how many of these plants are in my gardens here.
The Asiatic Jasmine (which is not jasmine) is spreading well. It will cover that bed by next summer I think. My grandmother’s mint is at the far end. Recall that my SIL in Maine had some mint from my Maine garden, and she mailed some to me about a month ago.
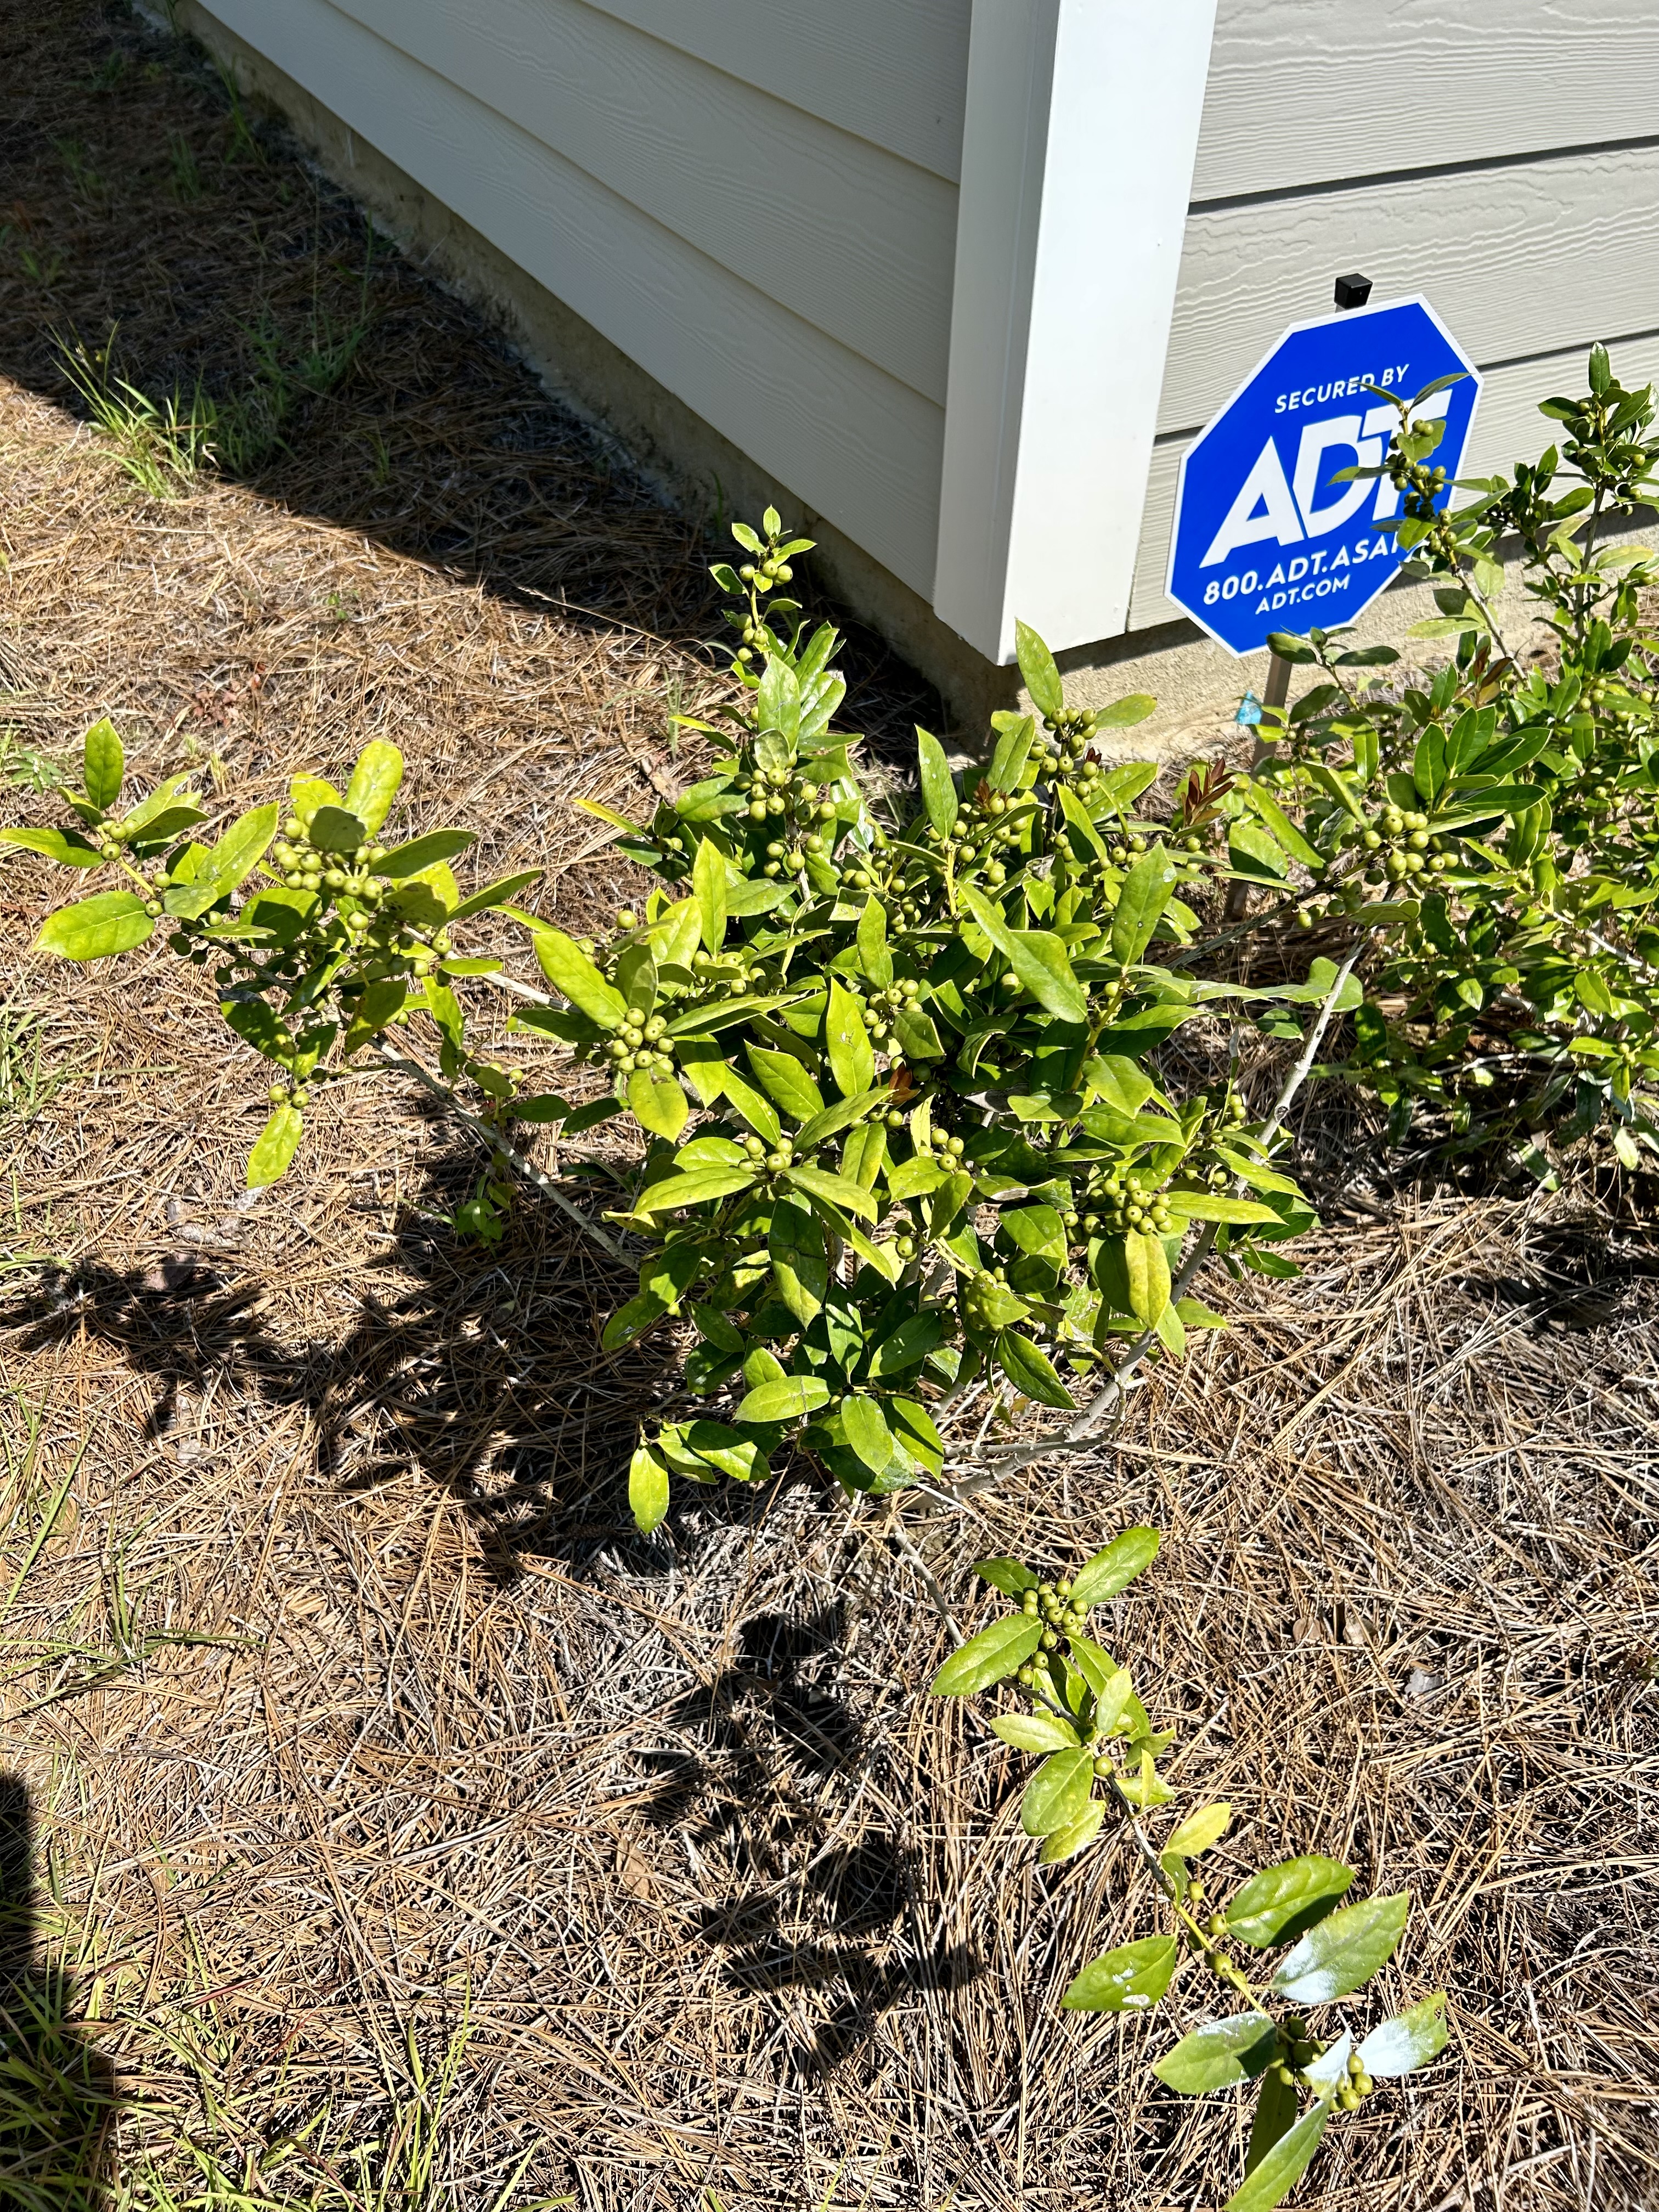
This plant was installed by the builder. It’s a Chinese Holly and is very hardy here. I have about 5 of these plants around the front of the house. This one has been loved. I’ve watered it and fertilized it.
Here’s one that was waiting for its house to be occupied by renters and has not had any care. I was interested in the difference between the two plants in color and in the presence of mold, or whatever that white stuff is.
Part of what sold my house in Maine was my beautiful gardens there. And the healthy habitat I had created. It’s too bad landlords don’t realize that an investment in plantings will help sell a home for more money.