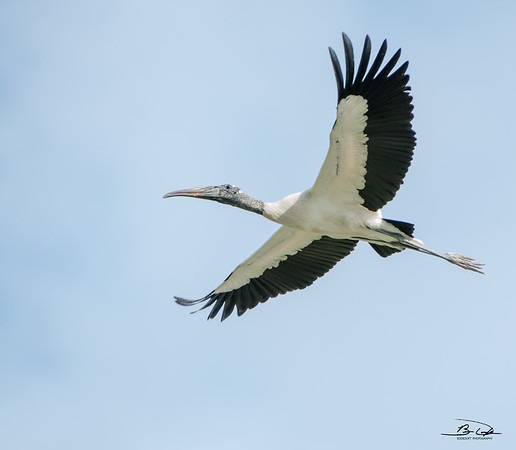
Another “Four-Patch Fun” Quilt Top

This quilt is the 8-inch version of Bonnie Hunter’s 2025 Leader/Ender free block–which she reveals every year in July. Plus, I used her sashing variation in my quilt–which will be a gift to my backdoor neighbors here as they are expecting their first baby (a girl) in late November.

All these fabrics came out of my stash and my strip bins.

The backing arrived, and it is adorable and perfect for this quilt. I will get it on the longarm soon.

Still need to figure out a binding though.

The design wall is filling up again with fun projects. I’ll post pics of what is happening in a few days–when I get more blocks up there.

Here it is Monday again! Have a great week everyone.

Binding a Quilt

I don’t like to play “binding roulette” with my quilt bindings.

So I lay the quilt on the floor and lay out the binding until I’m sure a binding join is not going to wind up at a corner.

I’m loving this rusty dark red color in this quilt and for the binding.

I also pin my label to a corner while laying out the binding–for me the bottom right corner though it doesn’t matter really, especially as quilts when used never stay in an “upright” position.

Before sewing the binding on the front of the quilt, I baste the label down at the quilt’s edges. I use an 8-inch square folded on its diagonal and pressed into a triangle. When I’m ready to hand-sew the binding on the back, I start with sewing down the top of the label on the back of the quilt.

My labels are “funky” by design. And I leave room on the label to be able to write a message to the recipient when I give a quilt away.

I chose the added name “Lovey Dragonfly Quilts” the summer we explored Maine (2003) before choosing to move there in 2004 because of the highly colored dragonflies which are everywhere in the summer, but are really dense around the many lakes. And “Lovey” is my grandmother name. I have never had any intention to make that name a business as I never wanted to have my creativity curtailed by someone else’s desires for pattern or color or size. My quilts make so so happy because I just let them happen. My quilts come from “play” for the most part, and that is what makes me the happiest.

Here’s a quilt (Traverse design by Tara Faughnan) and label that has been washed. I can still write on it if I need to. But this one is mine for now and is completely hand quilted via the “big stitch” method with thicker threads. It lives at the foot of my bed.

Just a bit of what I do with my quilting, for whatever that is worth.

A Productive Day

What a gorgeous day here today.

I woke to temps in the high 60s. Suddenly my shorts are feeling a bit…cool. But It’s a great day to walk.

I spent most of yesterday’s sewing time getting the Stacks 2 quilt off the longarm. And, it suddenly got its name: “Oh! Wow!”

The texture of the “Scrumptous” pantograph iswonderful…for this quilt. And, note, this is a Tara Faughnan pattern from The Color Collective’s first year in 2019.

When I was making blocks, I was thinking about 63 by 63, but decided to add two rows to the length to make a nice long lap size for longer people.

It’s trimmed, and today’s first sewing will include sewing the binding. So, yeah, I’ll have some hand-sewing tonight.

But, now, about that walking business…

Sunday September 7: Quilting Projects Update

Good Sunday morning!

The Monarch butterflies are, once again, here–on their way to their breeding grounds. What a pleasure it is to see them flittering around the red roses when I sit on my porch.

“Stacks 2,” a design taught by Tara Faughnan in her first “The Color Collective” year (2019?), is on the longarm. It is interesting to me that Tara has never released this pattern, as she did for many others from The Color Collective’s five years. I still find it very graphic and interesting. I used the remnants of cut blocks and fabric from this project that I saved when I finished the first quilt. So, six years and a new home later…

It’s a handsome quilt.

AND, I just signed up for Tara’s new “Blocks” class, which will be starting October 1. I debated, but these classes really do give me so much room to play.

“Four Patch Fun 2”–made with the free 8-inch version of Bonnie Hunter’s 2025 leader/ender block, released in July–is ready to be sewn together. Note that I used the setting version that adds sashing. I might still be moving blocks around–I moved some yesterday–so I’ll let this one simmer a few more days while I play with other design wall projects. (This quilt’s destination will be a baby girl who will arrive in my backdoor neighbor’s home late November–and this quilt will be the third that I have given to new babies in our neighborhood.)

Play Progress:

I won’t proceed with “neutral Stacks 3” until I finish the new “Four Patch Fun” quilt and the “Crayon Colors” log cabin quilt made from solid strips AND have played with more blocks for whatever is happening above “Crayon Colors.” That is some sort of improv project… And I did add a block to the grouping yesterday. Play like these blocks will use up some of the cut solid strips and bits, but play like these blocks also gives me MORE creative energy and ideas.

The new leader/ender project seems to be making more placemats. Four are now layered and an orange one is almost ready to layer. The goal is six placemats. Then I’ll switch to another leader/ender project with these 2-inch cut squares. I have an idea…

I will try again to put on bindings using my sewing machine to sew down the front side.

We’ll see…

Have a great week everyone!

“Four Patch Fun 1” Donation Quilt is Done

My Charleston Modern Quilt Guild challenged its members to make a scrappy donation quilt for a local organization that manages foster children–to be due at our September meeting. Meanwhile, Bonnie Hunter shared her 2025 leader/ender free block in July. I loved the block and could not limit using it to a leader/ender project. So, it quickly became a primary project. This is the 6-inch block, and it is easy, fun to make, and uses up LOTS of scrappy strips.

I bound this quilt with this adorable grey backing fabric with its school of swimming fish–which is fitting in our tropical coastal location. So, I used a medium grey thread to quilt, and the pantograph is “Garden Frills Too” as I thought it needed some curves.

I wanted this quilt to be gender neutral, and I think it is. And I wanted to use lots of colors, which I did.

I’m not done with this block, LOL.

Sharks’ Teeth: A Beach Find

My younger son’s family LOVES to hunt for beach treasures after a storm. Sharks’ teeth are a coveted find. After hurricane Erin’s winds crashed on our shores, they went out to hunt.

Here are their finds: small shark teeth…

And TWO really big ones, which are a rare find.

They showed me with faces still lit up with excitement and joy.

What a Great Board Game!

Looking for a new game that is good for all ages?

Go no further than Mexican Train–a dominoes type game that is so fun. Indeed, quilter Bonnie Hunter revealed a bit ago in her long-time daily blog that she and her husband and friends spent an evening playing “a cutthroat game of Mexican train.”

My two families here love games: board games and card games of all sorts. And it doesn’t have to be a rainy day for any of this crew to enjoy some time playing a game.

My younger son’s family recently introduced me to Mexican Train, and it is my new favorite board game–mostly because it can be played by younger children who know their numbers and have the attention span to play and by adults who who would play at a more complex level.

My son Bryan Enright is slowly developing a web site called “Shore Things” that is all about the Low Country. (He does work full time so adds to this site when he has time.) He has included a section on “Rainy Day Games” that lists lots of games they like, with links to where to buy them–so you can see what each game costs.

On this “Shore Things” site there are lots of pictures of our beaches, for instance. And, some of this area’s rich history. And, some advice on practical issues that arise here, like handling the humidity.

Know that this effort is a work in progress, but just google “Shore Things.” Or use this link:

shorethings-chs.com

“Summer’s Solstice” Quilt is Done And The Series is Complete

First, I DID go back and take apart the first quilt in this series so that I could fix the blocks that were reversed. And can I just say that I NEVER, NEVER, EVER want to have to do that job again. (Many thanks to longarm quilter Wendy Currie for walking me though how to go about making this repair and for the encouragement to go ahead and risk doing it. Wendy lives in Thunder Bay, Canada, and we connected online years ago. She knows me well, for sure.)

Fixing the two blocks was possible I think because they were on the edge of the quilt. If they were more to the center, I don’t think I could have taken them out with the batting and backing in place and the longarm quilting done. Fixing blocks in the center would have required taking apart the quilt from the flawed row to the bottom edge. As it was, it took me THREE days to complete this task: unsewing the longarm stitches, removing the two blocks and resewing them in a very tight space, loading the quilt back on the longarm without using sturdy pins that could have harmed the quilt top (I used bull clips), lining up stitches with the pantograph, requilting, then burying LOTS of threads, and then sewing the binding back in that area.

So, here’s the first quilt in my series, “Fall’s Splender.” To remind, this series started with wanting to use the Cat’s Cradle big ruler again and the palette I put together using a Kaffee Fasset fabric I bought on sale at least 15 years ago. It is Beach Balls, and comes in varying colorways. Looking at it years later, I thought it looked like the colorful fall winter squashes so common in New England in the fall. Eventually I researched the fabric and found it wasn’t squashes at all.

Now I’m happy and feel like I can gift this handsome quilt happily. I let this issue simmer for weeks and weeks until I knew I could not live with it, even if I ruined the quilt trying to fix it.

To remind, here’s the fabric that generated this quilt series. (The pink in this photo of the quilt front is actually a quiet salmon like the color in the backing.). And, LOL, I still think these are squashes and not beach balls.

The pantograph is Check and Chase by Lorien Quilting. The cotton thread is a warm gold from Signature threads.

I have the small and large Cat’s Cradle rulers, and I wanted to see if I could combine using them in a quilt. Oh yes, I could! Here’s the second quilt: “Spring’s Song”–made with 4-inch and 8-inch blocks created by the Cat’s Cradle rulers. The small one stops at 4 inches, and the large one at 8 inches. (If you try something like combining these blocks, press all of your seams open.)

Mercy! I love this quilt! I can see all sorts of other combinations to use based on what I’m seeing here. This kind of creative play is what I most enjoy in quilting.

Here’s the backing, which I had in my stash and which produced the name and the spring green cotton thread color from Signature threads. I LOVED the spring green of the trees in Maine, which made them look all soft and fluffy. The pantograph is Arcadia from Patricia E. Ritter.

And here’s “Summer’s Solstice”–also made with the Cat’s Cradle rulers using 4 inch and 8 inch blocks. I had thought to use the small blocks like sashing between the large blocks, but that didn’t work for me as it was way too busy.

And here’s its gorgeous backing–“Shooting Star” designed by Anna Maria. (It isn’t this pink and has lots of the rich green/brown that is in this palette and more of the orange shades.). The thread color is a warm brown from Signature threads, and the pantograph is Garden Frills Too.

These quilts are all 64 by 64, which makes a nice lap size, so here’s a pic to give you a sense of the size:

So, now I am done with this series and will put this palette away. But I’ll be using the rulers again, especially the large one. These 8-inch blocks make quick and easy graphic donation quilts that are a perfect size.

And finally, here’s a picture of the first quilt BEFORE I fixed it. Look to the bottom left, third row up.

No, no, no…

I hope I don’t make a mistake like this one twice in almost 30 years of sewing quilts. And the mistake I made was sewing rows and putting them on the ironing board to join to the previous rows on the ironing board, which prevented me from seeing the two reversed blocks. Usually I put sewn rows back on the design wall before sewing chunks of rows together so I can see the whole pattern.

To sew fast, sew slow.

Have Scraps You Want to Use?

If so, don’t look at this post from Rachel LaBour of the blog Stitched in Color. I bought TWO more of her patterns for scraps. You have been warned, LOL.

Rachel is an extremely gifted scrap quilt designer!