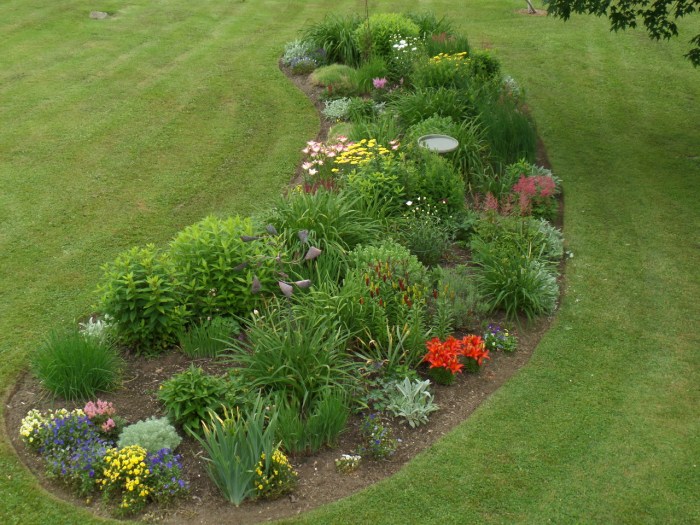
Friend Roxanne Wells sent this picture of her garden this week—with the day-lilies and phlox adding to the color.
SAMSUNG CAMERA PICTURES
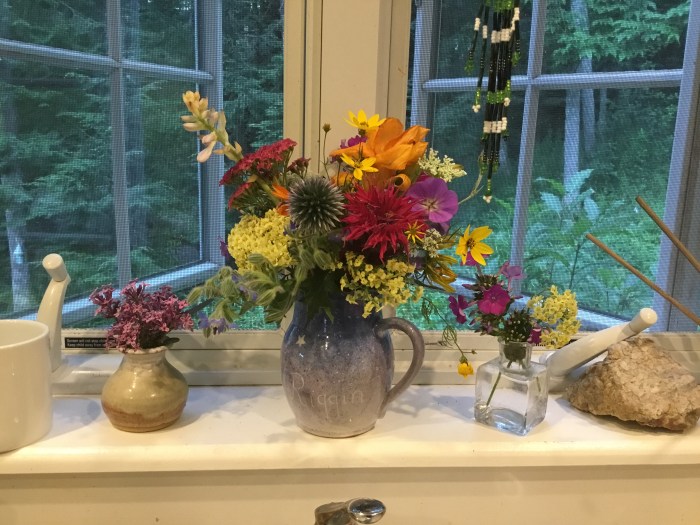
Here’s my kitchen window today.
I finished sewing a grid on the little circle quilt with the domestic.
And now I’ve almost finished sewing matchstick gridding on to “My Bedrock.” Sewed late last night, actually. Will finish this one tonight, “god willing and the creek don’t rise.”
I’ll trim both of these smaller quilts at the same time. The binding fabric for “Little Circles” is in the mail, and I have the binding cut for “My Bedrock.” I have to organize a hanging sleeve and label for it. Then I’ll have some night-time hand sewing instead of the pesky EPP project that will probably take the rest of my natural life—or so it often feels like that to me.
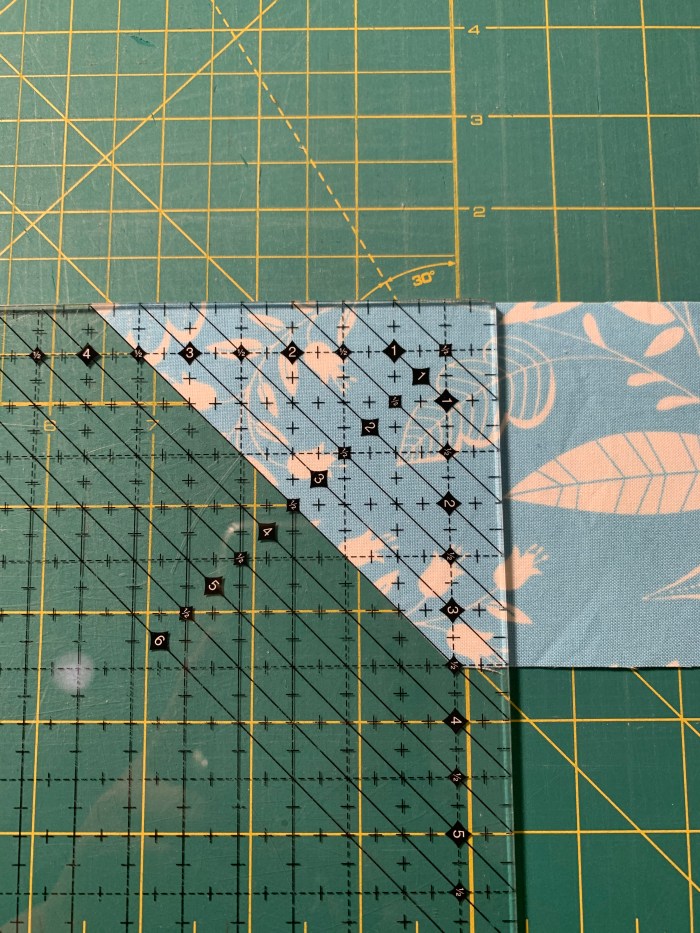
I got this ruler when Bonnie Hunter recommended it during one of the annual mystery quilts I did with her. (They start the Friday after Thanksgiving, and all info is on her blog, Quiltville.com, including I’m sure more info on this ruler.) This ruler has now replaced SEVERAL other rulers I had been using a lot. Buying info is on the ruler picture below, but http://www.antlerquiltdesign.com will get you there too.
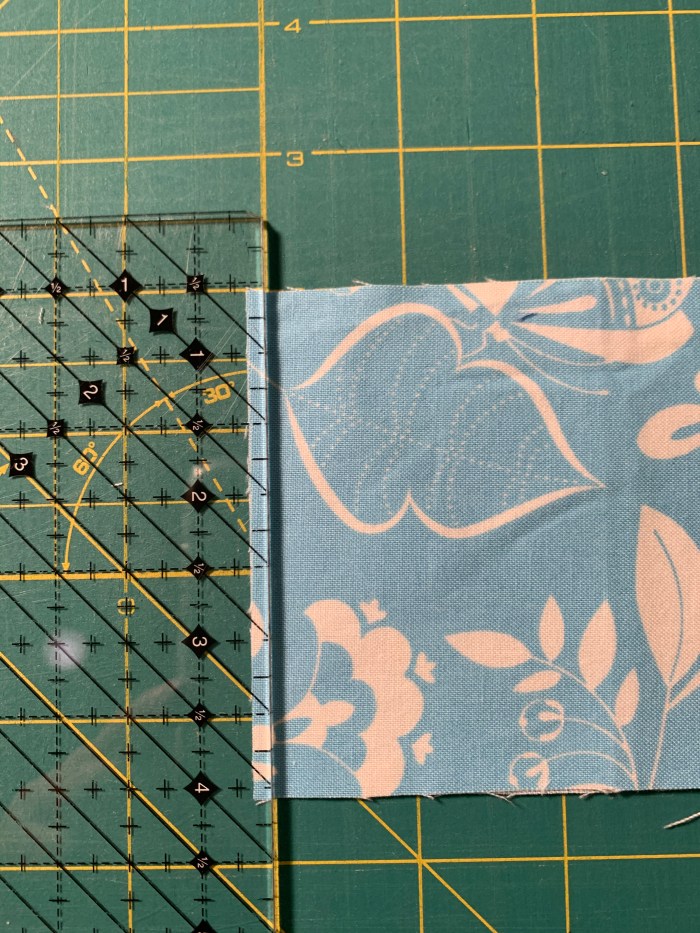
Let’s talk about flying geese blocks to show how this ruler works—and specifically a goose block which will measure 3 by 6 finished. First cut 3 1/2 inch strips. This ruler can “sliver trim” the end of the strip. And it can sliver trim other blocks to size as well.
To prepare the goose body, cut 6 1/2 inch pieces of fabric. I layer these and cut multiple pieces at once. If you fold your strips in half, lengthwise, the bottom piece will face printed side down and the top piece printed side up. You can clearly see the orientation lines at the top and bottom of the ruler.
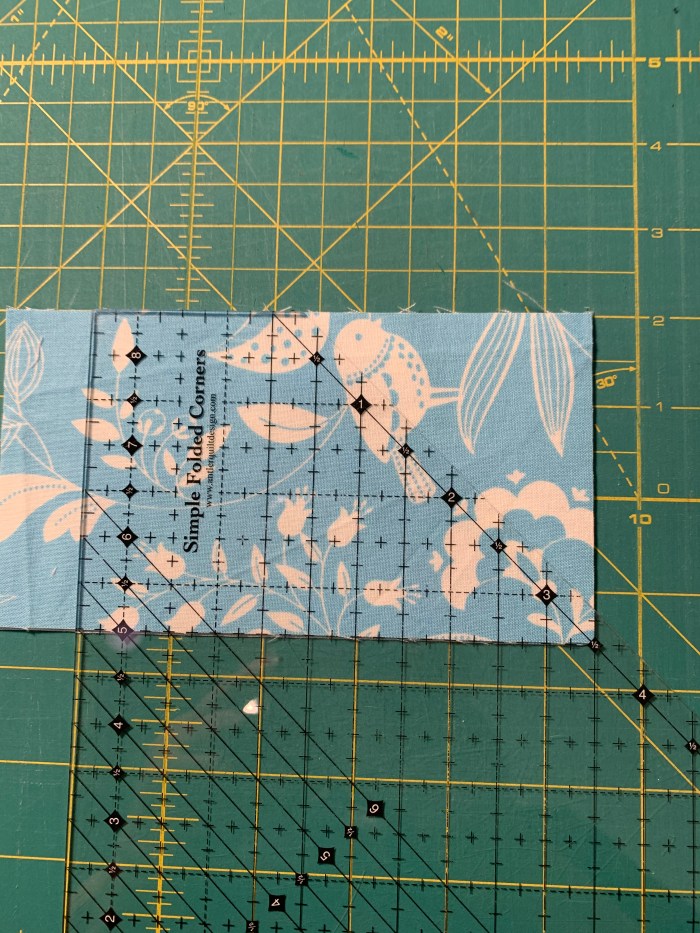
Next, trim off one side of the goose body—where the half-square triangles will fit. These cut triangles are smaller and mine get thrown into a pile to be used for another project—maybe a quilt of half-square triangles where one side is a neutral??? See how the orientation lines fit on to the strip at exactly the 3 1/2 inch mark—along the edge to be cut and on the left side of the ruler to keep the cut perfectly straight. At this cut, you are cutting for the right angle for the join with the half-square triangle you want for your goose block.
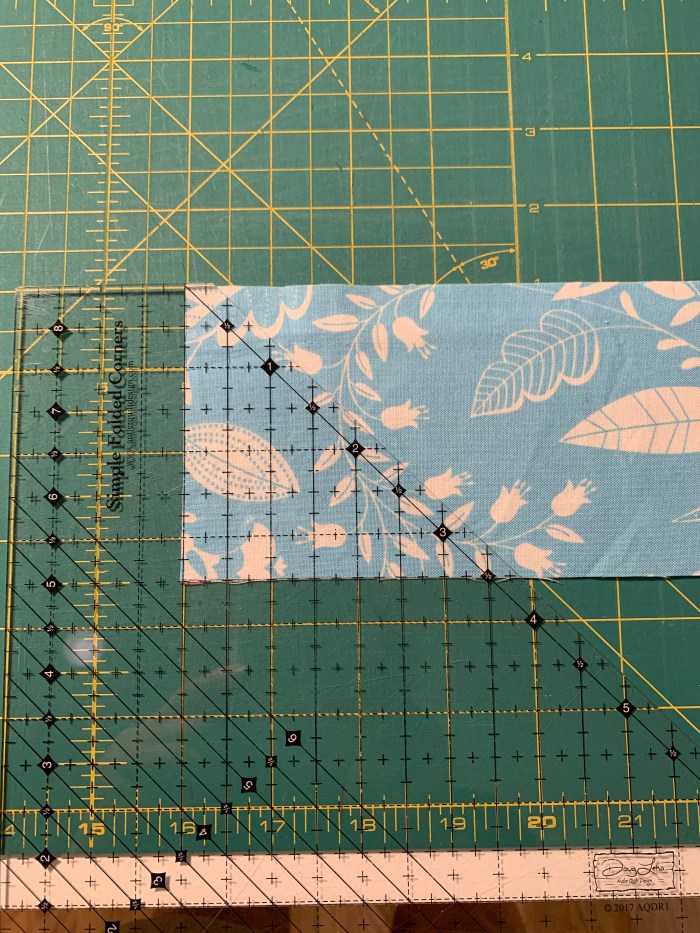
Next, cut the other side of the goose body strip. Here, the orientation is along the cut side. This is one place on the the ruler you might want to use to sliver cut one side of either a half-square triangle OR a sewn block that you have folded in half to trim.
Here’s how you cut the side units that will join to the goose body—from your 3 1/2 inch strips. Again, if you fold your strip in half lengthwise and cut two or four pieces (or more) at once, they will be perfectly set up to piece to the goose body. (The bottom piece will face right side down.) Of course you would sliver trim the left edge first.
For the next cut, you will again use the diagonal marks to orient the ruler. And you will repeat these two cuts across the strip until you have the number of corners you want. You can use this corner of the ruler to sliver cut two sides of a half-square triangle OR a sewn block folded in half.
All the pieces will fit together perfectly when you sew them.
This project is a leader/ender project for me. And it’s growing pretty fast.
I’m using some of the pre-cut 3 1/2 inch strips in my Bonnie Hunter scrap user system AND cutting more colors as needed. This one is a great stash buster for sure. It will probably wind up being at least 10 rows wide and 20 rows long. At least…
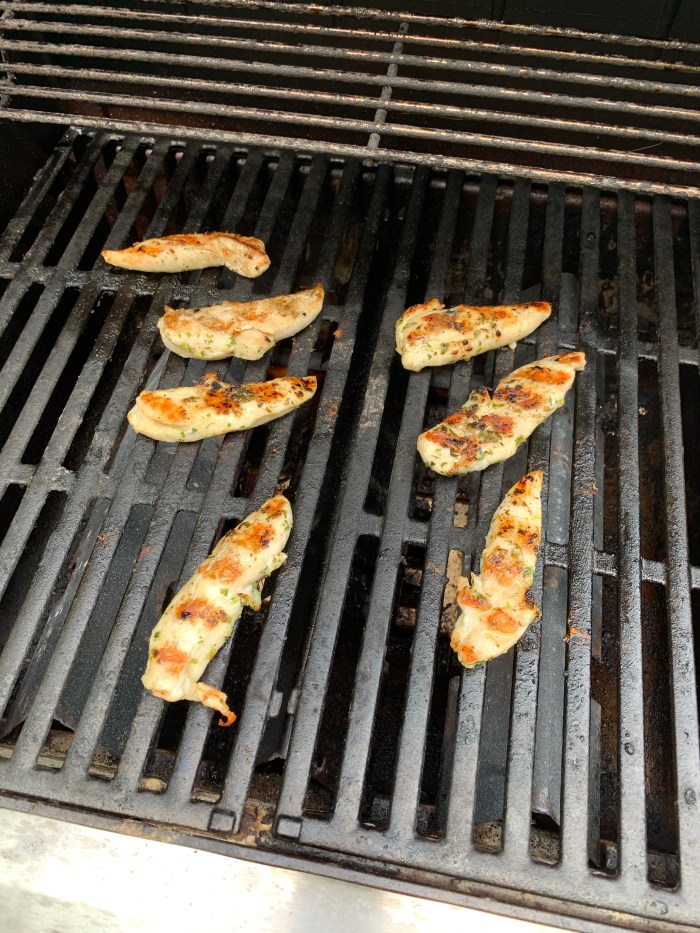
I took AC to the dog park for a pleasant hour in the morning and then came home HUNGRY.
I love that my little grill is “all ready to go” on my back deck this year and that when I fire it up, it is hot in under 15 minutes. I splashed some olive oil, salt, and herbs on some chicken tenders and they cooked in 6 minutes flat. AND smelled delicious.
I have a bag full of arugula from Hope’s Edge, so used that as a layer under the salad I made. I absolutely LOVE sweet onion and eat it raw. It is sweet and crunchy and, more importantly, is a great source of sulfur which is so important for human health and which is lacking in our commercially produced vegetables today. The herb is raw dill, which I can’t seem to get enough of these days. And we now have those small cucumbers in the local markets that are so tender.
I also had a package of defrosted lamb stew chunks that needed using. And a bag of beets with their greens from Hope’s Edge. While I sauteed the meat in beef tallow in my heavy Creuset cast iron/enamel pot, I peeled the beets with a peeler, and cleaned and chopped the beet greens, including the stalks on the leaves. The bottom parts of the stalk are like celery, and I threw those into the meat pan, alongside chopped garlic scapes, herbs, and salt. I took out some tiny new red potatoes, peeled some white carrots, chopped the green onions that came also from Hope’s Edge, and cut some sweet onion that went into the meat pot.
The pot went into the oven for 45 minutes—with garlic scapes, the beet green stalks, the onion, herbs, salt for 45 minutes.
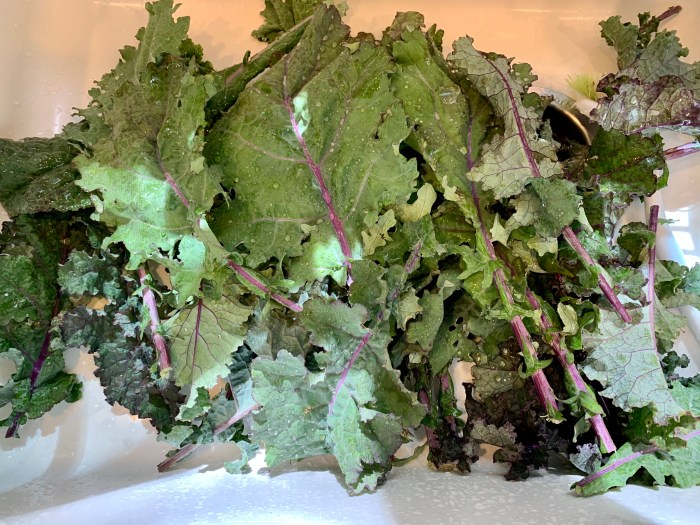
While I was at it, I prepped the BIG bunch of kale from Hope’s Edge. I love the lavender color of the stems, but I just tear off the leaves from the stem with my hands and put the stems in the compost.
I drop the leaves into a pot of boiling water until they wilt down. No more than 5 minutes of cooking as you don’t want to cook them to death. Drain. Refresh with cold water until you can pick up the mass with your hands and chop it. Half went into the freezer and half is waiting for me to heat it in butter in a pan—which I could just eat as a side veggie or put into an omelet with cheese on top. YOU could add some nutmeg to the butter.
I wanted some rice for some reason, so I measured out a cup, added salt and some butter, and let the pot sit on the top of the oven until I got ready to finish dinner. It never hurts to let rice soak a bit. It will cook faster.
The meat pot came out of the oven and was left to cool on top of the stove, uncovered.
Thirty or so minutes before I wanted dinner, I heated the oven (350), added a little more water and heated my meat pot on the stove, added my prepped veggies (NOT the beet greens), covered it and cooked it in the oven for 30 or so minutes. Cook until the potatoes are soft inside. Then I stirred in the beet greens, recovered the pot, and cooked for another 5-6 minutes.
Yummo!
The “bread” is a corn tortilla toasted in the oven with bits of raw butter and salt on top. The organic fruit is the last of the cantaloup I’ve been eating, fresh red cherries, and a sliced nectarine. And, an after dinner coffee with raw honey and raw milk and cream.
More yummo! And I have food for today so can play.
Long-time friend Roxanne Wells is a master gardener and a master quilter who mostly designs her own astonishingly wonderful quilts. Unlike my wild gardens here on Howe Hill, on property that is on a hill, Roxanne’s gardens are meticulously planned and tended. I have been in awe of her garden and her quilts for many years now.
We email pretty much daily, and we send pics back and forth—pics mainly of gardens and quilts. The emails cover a wide range of our thinking, ideas, worries, and joys. She is a special friend in my life.
I thought that it would be fun to see pics of how Roxanne’s gardens develop over the summer and to hear how she thinks and plans for how the garden looks as each grouping of plants comes into bloom. Roxanne chooses each plant carefully for the statement it makes in its own blooming season. She thinks about how the garden will look during the WHOLE summer season.
So, I asked her if she would put together a series of pictures that show her garden’s changes over this season so far. The text is also hers from this point.
My Gardens Throughout the Season
Given this large bed is the focus from most of the rooms in the back of the house, it’s the largest of my gardens. I’ve included photos over a span of the growing season to see how this garden changes – sometimes only in a matter of a week or two. There are no annuals in the gardens. The closest I come to annuals are the violas which self-seed from year-to-year.
June 13th. The larger bed with chives, violas, aquilegia (both pink and purple hybrids), and pinks in bloom.
SAMSUNG CAMERA PICTURES
Three weeks later, on July 4, the pinks and purples on their way out and reds appearing. The reds are from astilbe and asiatic lilies (two different asiatic hybrids in differing heights).
SAMSUNG CAMERA PICTURES
A closer look at the red asiatic lilies: Tall, dark red is the hybrid “Montenegro” and the shorter orange/red is “Matrix.”
SAMSUNG CAMERA PICTURES
Another two weeks—on July 16th—and this is the same bed seen from the far end looking back at the house. Now the pink and purple colors are fading and being replaced by darker and hotter colors that are just beginning to color up. At this time, from this angle, the darker astilbes hold your attention and move your eye along the border of the bed where I have the same hybrid planted in several places.
SAMSUNG CAMERA PICTURES
July 22nd, and only a week later, from the same far end of this large bed. Day-lilies carry the bulk of the colors now, as well as the astilbe and some fuchsia-colored phlox (just beginning to open).
Far end large bed 3rd wk July
More photos below show closer looks at “vignettes” within the larger bed.
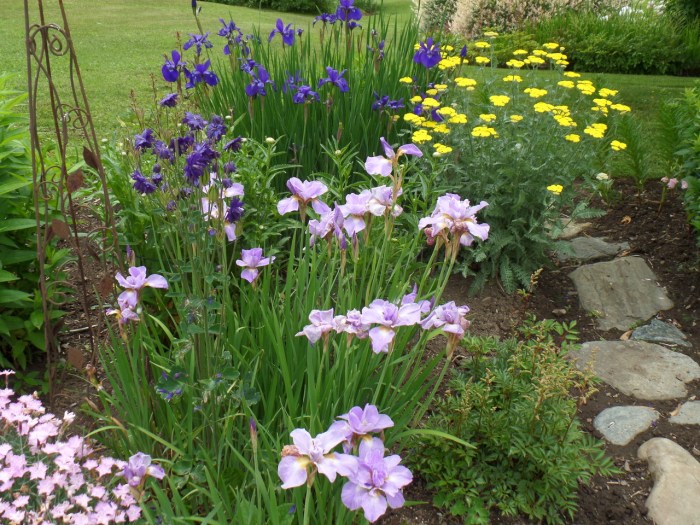
June 22, far end of above bed with Siberian iris (“Midnight Velvet” and “Ranman”), aquilegia (purple hybrid) and achillea “Moonshine.” Pinks are in the lower left.
SAMSUNG CAMERA PICTURES
On July 8th, in this same spot, the above blooms are replaced with pink astilbe and white daisies. The achillea’s yellow blooms remain for many weeks. I like this achillea hybrid (“Moonshine”) for its soft yellow, which compliments many other colors, and the length of its bloom time.
Daisies, Achillea Moonshine, Astilbe
July 4th. This is the center of this large bed. Once again I’ve used the achillea “Moonshine” to facilitate moving the eye from one area of the bed to another, but still maintaining the overall color scheme. However, here the pink color comes from a small, but prolific asiatic lily (“Lollypop”) and a dark pink astilbe—which mimics the darker pink on the edge of the asiatic lilies.
Birdbath, Lollypop asiatics, achillea Moonshine and astilbe
As you follow the center path and look thru this large bed vignette (above), there’s a wetter area where bog plants flourish.
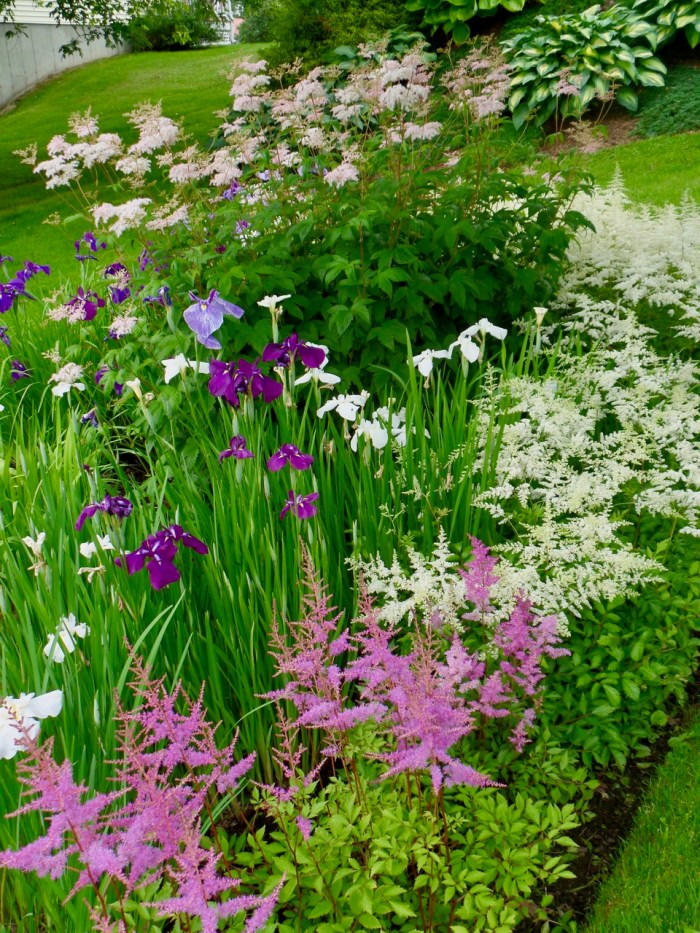
July 8th: The “bog bed”: astilbe, Japanese iris and filipendula.
Bog bed. Queen of the Prairie, astilbe,
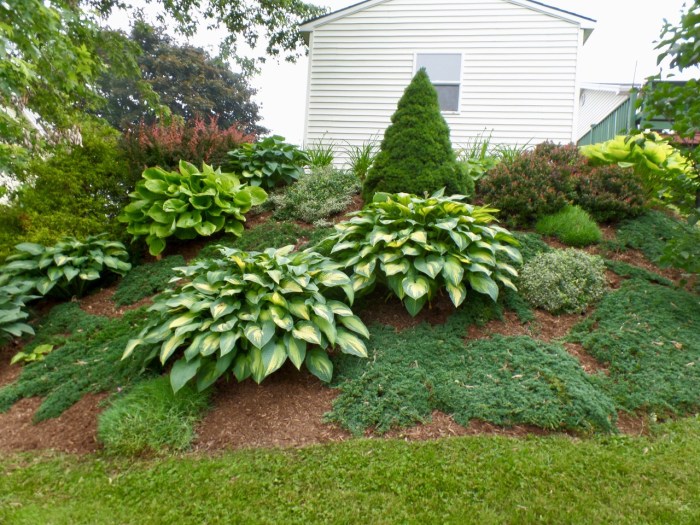
And behind this bed (just visible at the top right of the above photo) there’s a steep embankment along the back of the garage. This area is a challenge to garden. The area is steep, so needs plants that will hold the soil. And, it is dry, so needs plantings that will tolerate dryness as well. Here I’ve incorporated a mix of hosta (large leafed and with a varied color range to add interest to this otherwise non-blooming area) and a mix of evergreens. There are also barberry to add a touch of red.
back of garage hill
My yard has presented a challenge with its wide range of topographies, but also given me an opportunity to “garden with a bit of everything.”
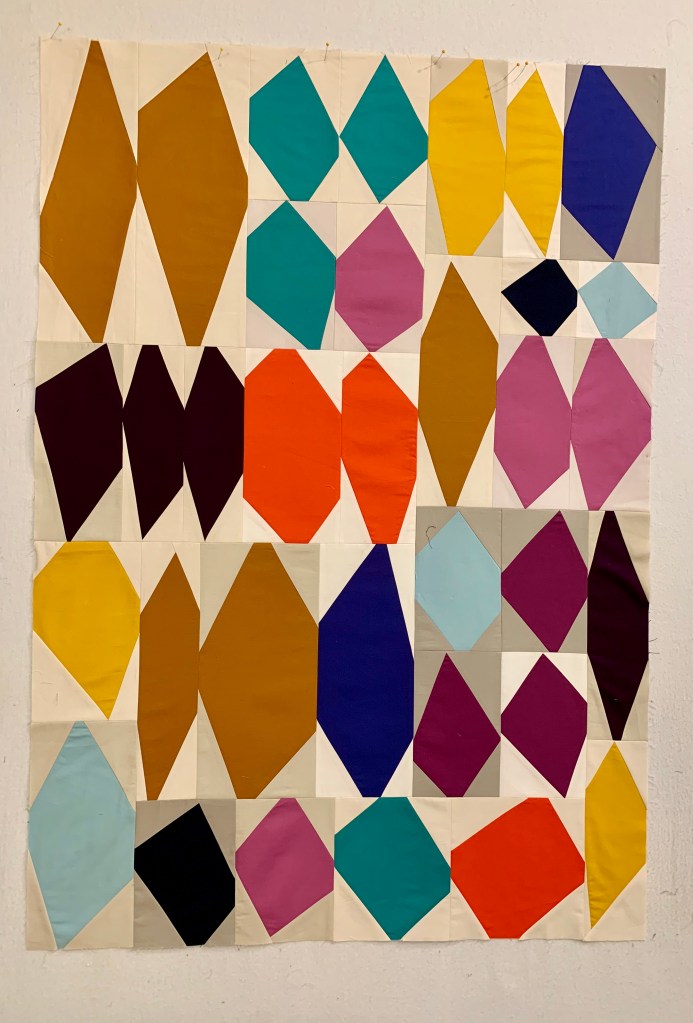
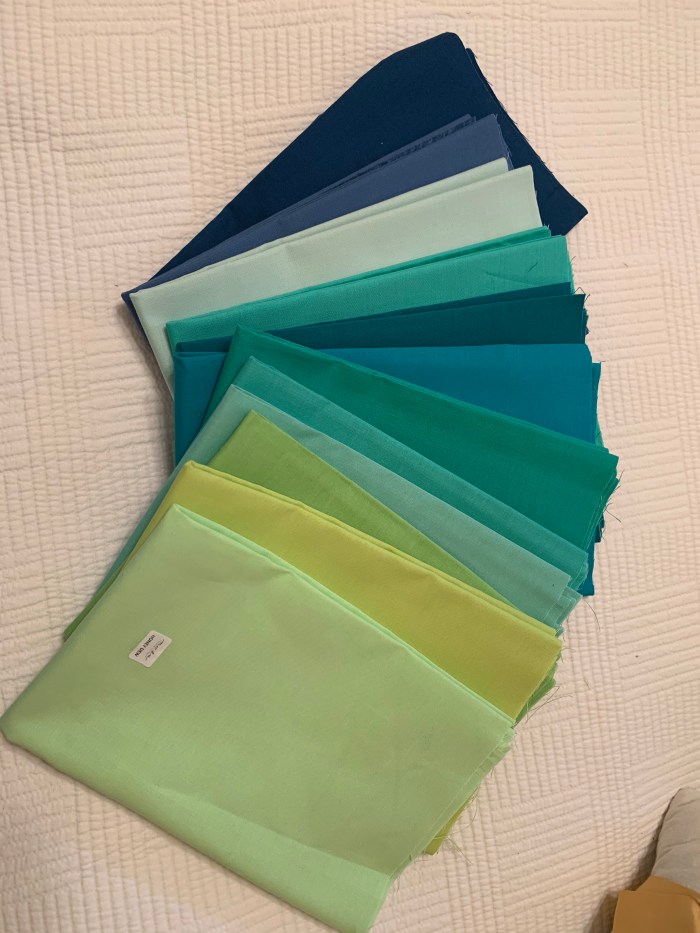
Here is the 5th project of 7 from this year’s online class The Color Collective sponsored by Amy Newbold’s Sewtopia. Tara Faughnan is the designer and curator of each month’s fabrics.
I wanted a wall hanging, so my version is 31 by 45 inches.
I LOVED this project. And I was so pleased that my blocks and sections went together without a hitch. There is math involved here. And a lot of thinking about balancing color. But the improve “rock” block is really fun to make.
I am not sure how I’ll quilt it, but likely the matchstick lines on my domestic machine. I liked how that looked on an earlier project, “Gumdrop.” I am not sure about thread color though. Possibly my “go to” light grey. Possibly a neutral cream? I will use a “skinny” 50-weight as I don’t want the lines to take over the quilt.
Here is the fabric palette for project 6, “Give and Take,” which I’ll start next. It would be impossible to make an ugly quilt with these gorgeous analogous colors.
Look what’s in my kitchen window today.
I picked them yesterday before last night’s rain.
The day-lilies continue to brighten the whole yard. The Pee Gee hydrangea bush/tree is loaded with blooms this year. The hostas are blooming with their tall lavender spikes. The little perky flower on the right in the little jar is tickseed. Bee Balm is the magenta on the right of the big arrangement. And, of course there is a lot more in there: Queen Anne’s Lace, a rose-colored yarrow, the dusty pink bloom of a creeping succulent that has a life of its own here, AND one hot orange cone flower that is making one part of the garden glow with color.
We have dense, dense fog this morning, but it was so cool and lovely last night. Great sleeping weather!
I’m enjoying the red geraniums in the oak barrels. They were a “simple” choice as in the past I planted an array of different flowers in these barrels.
It will be a “simple” choice to weed the rocks behind the barrels after the next good rain. They come out pretty easily. OK. I could wet them with the hose too. But it is hot and humid, which always saps my strength and energy. It’s a simple choice to just go with what the body says it needs too. Weeding gravel paths is an ongoing summer project around here.
On Sunday I grilled some boned chicken thighs on the grill, which only takes a little time as without bones, the meat is flat. I’ve left my little grill out away from the house rather than putting it away neatly after each use. It’s so easy to just run out, light it, and put some food on it. It heats up really quickly. AND there is no messy clean-up in the kitchen.
I love thighs and drumsticks. Each has so much more flavor than the overblown breasts which in my opinion are pretty tasteless—unless, of course they are a free-range chicken raised locally. Grilling the quick-marinated chicken gave the stir fry I was making a whole new level of “tasty” good.
I sliced up the cooked chicken and added it at the very last minute to a stir fry cooked in chicken fat. As usual, I used many types of vegetables—all fresh and in our local markets and also coming to me weekly from Hope’s Edge CSA. This one has cabbage, carrot, red pepper, celery, garlic scapes, some diced potato, herbs, salt, and some cut up pre-cooked broccoli rabe from another meal. Spring onions are added toward the last as I don’t like them cooked to mush. I started the stir fry with the diced potato in the fat as it would cook a bit slower than the other items. The chicken is added when I turn off the heat. I like stir fries that are not limp, so I turn the ingredients on a regular basis.
Quinoa cooks in 15 minutes. And I was hungry, so I went with quinoa rather than rice. Grains are a treat for me, so this meal was satisfying, for sure. And I have enough leftovers to feed me for a few more meals, which is nice on these hot, humid days when I also have an engaging sewing project. Cooking up a big stir fry is also a simple choice.
The “Bedrock” quilt top is almost done—from The Color Collective and designed by Tara Faughnan. There will be pictures this week for sure.
My solid row looks just like it should, so I didn’t take a picture of my own developing solid rainbow quilt. The deep rose color of this block/row is so luscious. And I love the big X block we made—with it’s secondary bloc that forms such a nice pattern between the big X’s.
This picture is the mock-up that Sugaridoo’s Irene gives us each month—with each new row added. I am enjoying the very graphic nature of this quilt. And, there are so many cool methods in this Quilt Along; so many terrific blocks. The blank rows are the remaining three left to do.
I am also making the quilt in my Cotton+Steel/Ruby Star Society fabrics—which I’d like to whittle down a bit. It’s been fun trying to come close to the rainbow colors of the solids Sugaridoo chose.
Somehow I didn’t get the line of the butterflies centered just right on the accent block. Even though I wasn’t happy with it, I sewed the strip together. The next morning I took it apart and redid the long butterfly piece. Now I’m happy. It was an easy fix when I wasn’t tired, and I learned how to handle this problem with the freezer paper method along the way.
I’m pretty sure the Cotton+Steel/Ruby Star Society fabrics are breeding in their bins. They don’t seem to be going down with use. Of course, I keep adding to them!!!
The green row above the big Delta row—Mowed Lawn—is an improv method that lends itself to all kinds of uses. I’ve loved the many blocks with tree trunks cut into them that one sees around and about today. One of them is Bright Birch Trees by Crazy Mom Quilts. Beth Guntner Jones posted a picture on the Sugaridoo FB page and others identified the Bright Birch Trees pattern.
Oh boy, I found myself making some stripped fabrics from the off-cuts on a table I keep near my sewing machine, cutting them into one-inch slices, and digging into my solid stash for some bright colors.
Now I can’t stop making them, so I have TWO leader/ender projects going on. My “trees” are on smaller blocks than I think Crazy Mom’s pattern uses. I cut at 8 1/2 inch and trimmed to 8 inches, which will finish at 7 1/2 inches. I tried this method once before but got frustrated. After the Sugaridoo improv row, Mowed Lawn, it was easy.
BUT, one hint: when you cut your solid block, number your slices from left to right on the RIGHT SIDE of your fabric. Otherwise, it’s just way too easy to get the pieces mixed up.
Now I want to vary the trunk widths a bit…
And I’ve started “Bedrock” from The Color Collective, designed by Tara Faughnan. Pics likely to follow in a few days.
They were big, overgrown, bent, and an accident waiting to happen.
We planted them when we first moved here in 2004. River Birches don’t have a long life span, so I knew that they were entering the time frame when they would cause trouble—especially in the winter.
Tom Jackson of Jackson Landscape Services, who has bailed me out so many, many times now, came to view the problem and agreed that the best course was just to cut them down. And, to add to the work order a regular birch tree out front that was overgrowing the front yard and upper deck.
Tom organized Timbercliff Tree Services to do the work that happened this week. Tibercliff does terrific work and has a terrific crew. They actually came about five years ago and trimmed these same river birches after they had been badly damaged in a winter ice storm—which gave them another five years of life here.
I will miss the beautiful bark and these graceful trees, but I’m also looking forward to having more sun in this part of the yard.
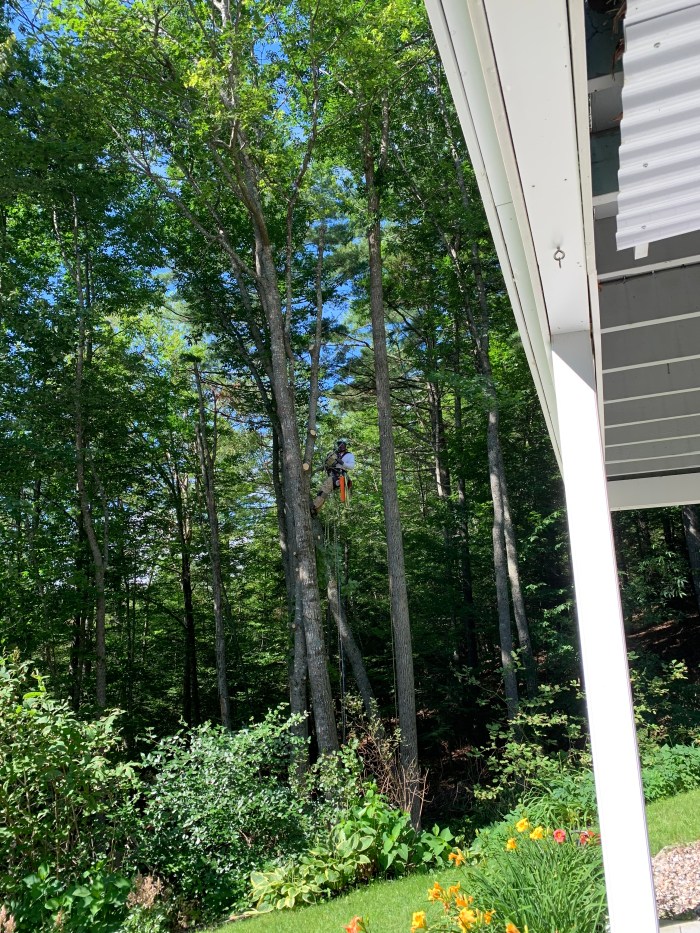
Timbercliff uses a bucket to get to the tops of the trees when they can.
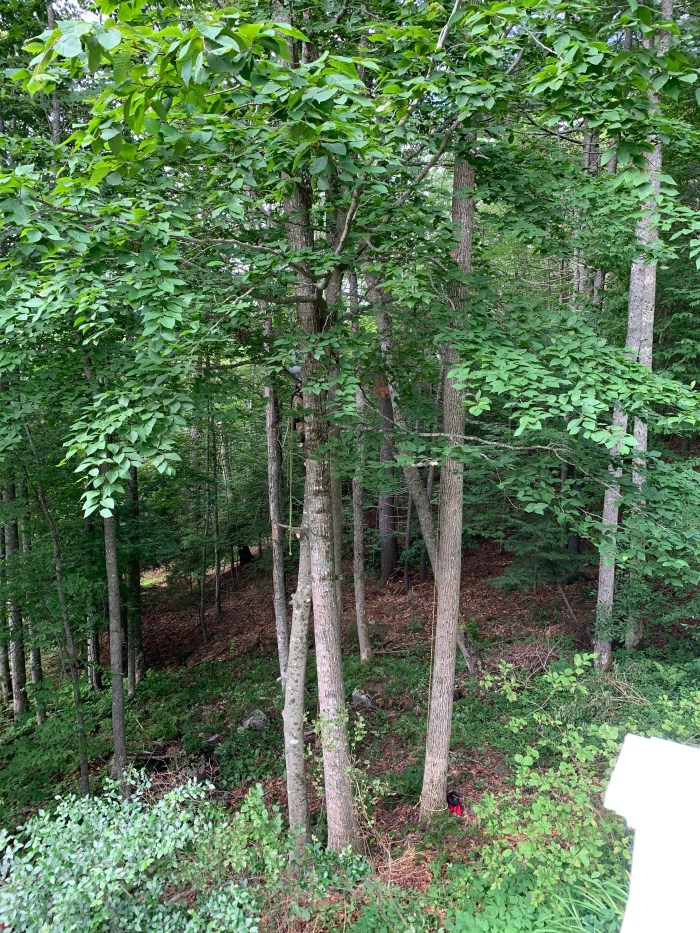
Wow. You can see the house again.
And this bed will now get a lot of sun. I love the way our woods are so dark and mysterious in the summer. They beg you to come explore.
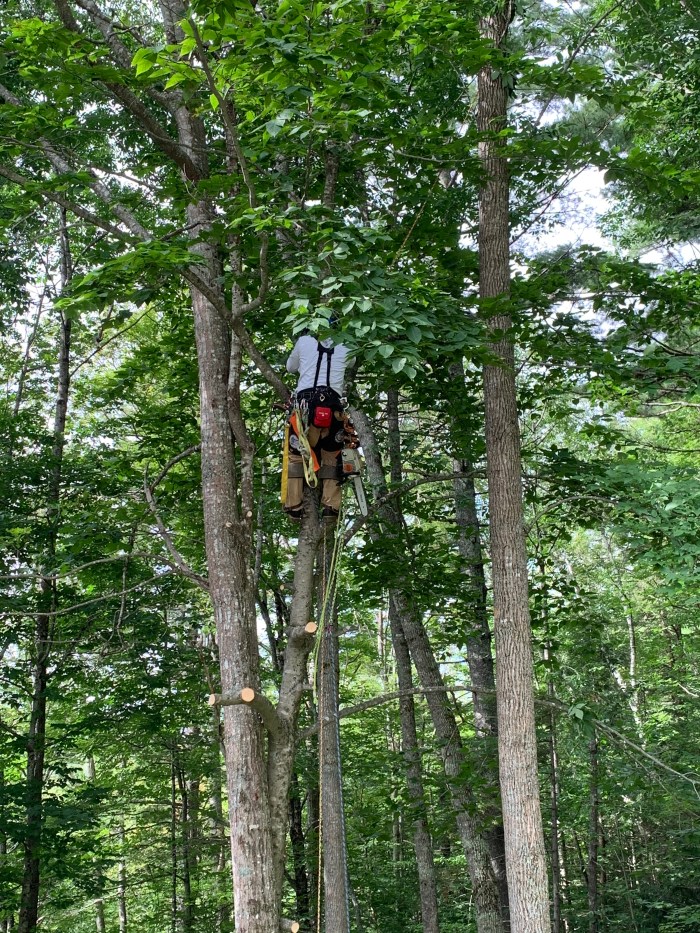
The birch tree out front was kind of wrapped around a big oak. The lower branches have been cut now, but you can see, on the left, the oak in front and the birch behind it. For this work, a brave man climbs the tree—which is on a VERY steep hill. The cut tree parts will just be laid at the base on the hill to help shore it up. We used to have a path to the meadow down this hill, but I gave up that work a long time ago.
I’ve never seen AC ask to go inside when there is lots of activity outside. But he’s almost 2 1/2 years old now, and he’s learned some wisdom. Clearly he thought all the men on the property and the heavy sound of the saws was dangerous.
Taking down the birch in the front is giving the front beds much more light. There is a new feeing of openness out there now.
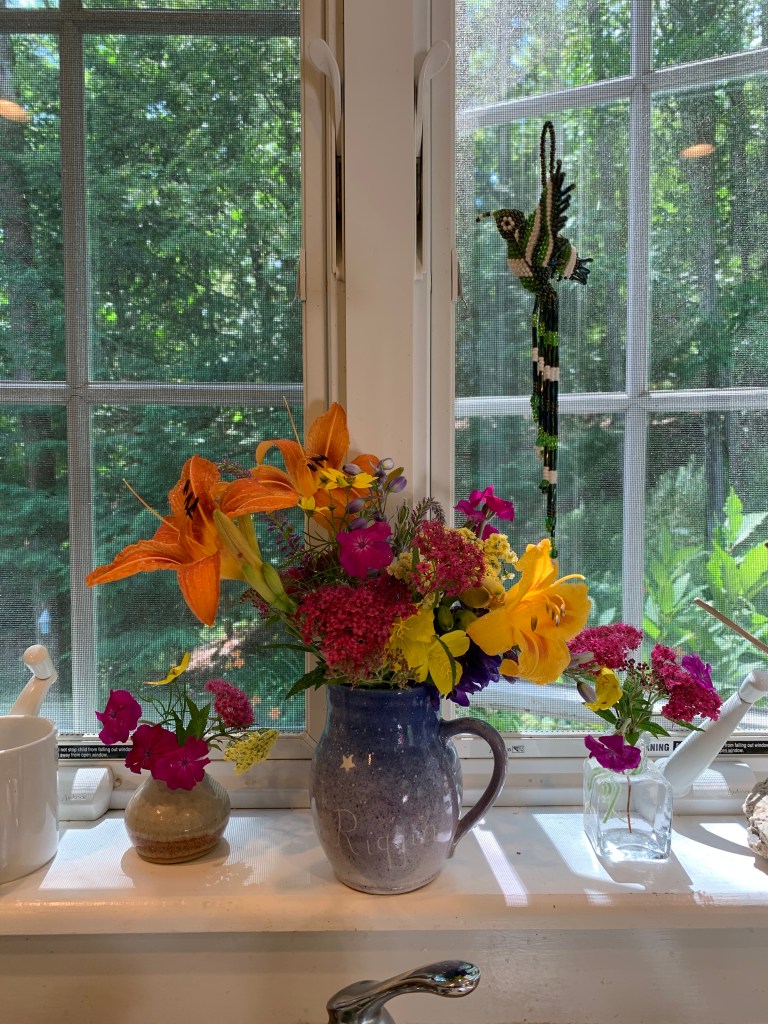
Last night and yesterday morning we got a good rain from the remnants of tropical storm Fay. Around noon, the skies cleared and the sun came out. Earlier, I had roasted some Hope’s Edge CSA beets in the oven and was making a salad with them, so I went out to the garden to get some fresh herbs: tarragon, mint, and lemon thyme came inside for the salad—along with these flowers as you can’t turn me loose in the garden with a pair of kitchen shears and downed flowers offering themselves up. It was painful to see the downed delphiniums.
Before I knew it, my kitchen window was so pretty.
The beaded humming bird was a gift from a grandchild a few years ago. And I can’t use vinegar in a salad, so I use the herbs to give my roasted beet salad some interest. The mint was especially nice in the beet salad, which turned out to be delicious. I used olive oil, salt, some Penzey’s Sunny Paris (to which I am addicted), diced roasted beets, chopped spring onions, chopped Vidalia sweet onions, some drops of Young Living Essential lemon oil, and the herbs. You could add vinegar—a fruity one would be nice. Or balsemic. And maybe a tiny, tiny bit of Dijon mustard?
I finished getting the “little circles” quilt top together later in the afternoon. It is so sweet. And now it is OFF the design wall as it is time to make this month’s Sugaridoo QAL row. Then on to The Color Collective project “Bedrock.”
I was intrigued with these double prong pins to be used to keep seams together and each “flap” in place so ordered some. They worked REALLY well. When I get close to a pin, I sew up to them in slow motion—sometimes sewing over the prongs REALLY slowly, sometimes removing them as I get to the first prong—depending on where my sewing machine needle is going to land. I got them from Connecting Threads I think. (The one pictured below is inserted a little too crooked; they need to be straighter.)